

Bereitstellen eines zustandslosen Containers in der Cloud

I will demonstrate how to deploy a simple container on cloud run.
Cloud Run is a fully managed platform that enables you to run your code directly on top of Google’s scalable infrastructure. Cloud Run is simple, automated, and designed to make you more productive.
- Create a simple hello world application using fastapi library (python)
- Containerize the application
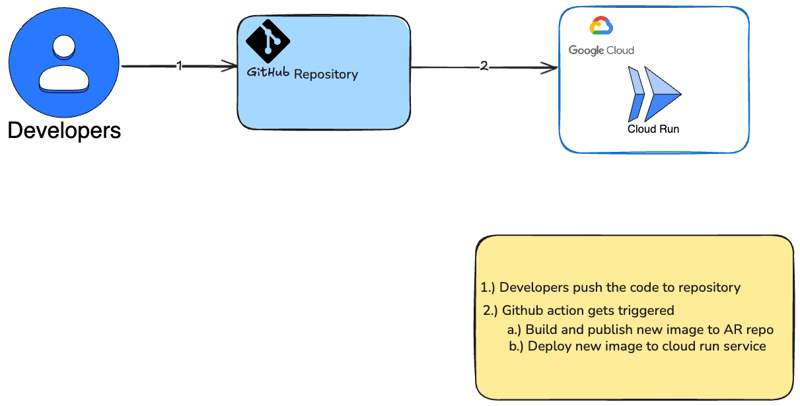
- Configure the workflow with GCP
- Deploy the container onto cloud run service via github workflow
I followed official fastapi doc to spin up a hello world app
Create a requirements.txt file
fastapi[standard]
pydantic>=2.7.0,<3.0.0
- Create an app directory and enter it
- Create an empty file init.py
- Create a main.py file with:
from typing import Union

from fastapi import FastAPI

app = FastAPI()


@app.get("/")
def read_root():
    return {"Hello": "World"}


@app.get("/items/{item_id}")
def read_item(item_id: int, q: Union[str, None] = None):
    return {"item_id": item_id, "q": q}
Create a Dockerfile
FROM python:3.9

WORKDIR /code

COPY ./requirements.txt /code/requirements.txt

RUN pip install --no-cache-dir --upgrade -r /code/requirements.txt

COPY ./app /code/app

CMD ["fastapi", "run", "app/main.py", "--port", "80"]
GitHub Action
In order for the GitHub actions process to pick up the YAML file, there’s specific location for it to live. Each repository using actions requires a directory structure called /.github/workflows
*Configure this workflow with GCP more info *
# This workflow build and push a Docker container to Google Artifact Registry
# and deploy it on Cloud Run when a commit is pushed to the $default-branch
# branch.
#
# To configure this workflow:
#
# 1. Enable the following Google Cloud APIs:
#
#    - Artifact Registry (artifactregistry.googleapis.com)
#    - Cloud Run (run.googleapis.com)
#    - IAM Credentials API (iamcredentials.googleapis.com)
#
#    You can learn more about enabling APIs at
#    https://support.google.com/googleapi/answer/6158841.
#
# 2. Create and configure a Workload Identity Provider for GitHub:
#    https://github.com/google-github-actions/auth#preferred-direct-workload-identity-federation.
#
#    Depending on how you authenticate, you will need to grant an IAM principal
#    permissions on Google Cloud:
#
#    - Artifact Registry Administrator (roles/artifactregistry.admin)
#    - Cloud Run Developer (roles/run.developer)
#
#    You can learn more about setting IAM permissions at
#    https://cloud.google.com/iam/docs/manage-access-other-resources
#
# 3. Change the values in the "env" block to match your values.
Create a file google-cloudrun-docker.yml
name: 'Build and Deploy to Cloud Run'

on:
  push:
    branches:
      - '$default-branch'

env:
  PROJECT_ID: 'my-project' # TODO: update to your Google Cloud project ID
  REGION: 'us-central1' # TODO: update to your region
  SERVICE: 'my-service' # TODO: update to your service name
  WORKLOAD_IDENTITY_PROVIDER: 'projects/123456789/locations/global/workloadIdentityPools/my-pool/providers/my-provider' # TODO: update to your workload identity provider

jobs:
  deploy:
    runs-on: 'ubuntu-latest'

    permissions:
      contents: 'read'
      id-token: 'write'

    steps:
      - name: 'Checkout'
        uses: 'actions/checkout@692973e3d937129bcbf40652eb9f2f61becf3332' # actions/checkout@v4

      # Configure Workload Identity Federation and generate an access token.
      #
      # See https://github.com/google-github-actions/auth for more options,
      # including authenticating via a JSON credentials file.
      - id: 'auth'
        name: 'Authenticate to Google Cloud'
        uses: 'google-github-actions/auth@f112390a2df9932162083945e46d439060d66ec2' # google-github-actions/auth@v2
        with:
          workload_identity_provider: '${{ env.WORKLOAD_IDENTITY_PROVIDER }}'

      # BEGIN - Docker auth and build
      #
      # If you already have a container image, you can omit these steps.
      - name: 'Docker Auth'
        uses: 'docker/login-action@9780b0c442fbb1117ed29e0efdff1e18412f7567' # docker/login-action@v3
        with:
          username: 'oauth2accesstoken'
          password: '${{ steps.auth.outputs.auth_token }}'
          registry: '${{ env.REGION }}-docker.pkg.dev'

      - name: 'Build and Push Container'
        run: |-
          DOCKER_TAG="$${{ env.REGION }}-docker.pkg.dev/${{ env.PROJECT_ID }}/${{ env.SERVICE }}:${{ github.sha }}"
          docker build --tag "${DOCKER_TAG}" .
          docker push "${DOCKER_TAG}"
      - name: 'Deploy to Cloud Run'

        # END - Docker auth and build

        uses: 'google-github-actions/deploy-cloudrun@33553064113a37d688aa6937bacbdc481580be17' # google-github-actions/deploy-cloudrun@v2
        with:
          service: '${{ env.SERVICE }}'
          region: '${{ env.REGION }}'
          # NOTE: If using a pre-built image, update the image name below:

          image: '${{ env.REGION }}-docker.pkg.dev/${{ env.PROJECT_ID }}/${{ env.SERVICE }}:${{ github.sha }}'
      # If required, use the Cloud Run URL output in later steps
      - name: 'Show output'
        run: |2-

          echo ${{ steps.deploy.outputs.url }}
Directory Structure
You should now have a directory structure like:
├── app
│   ├── __init__.py
│   └── main.py
├── Dockerfile
└── requirements.txt
└── requirements.txt
├── .github
│   ├── workflows
         ├── google-cloudrun-docker.yml
> 1. Create a new repo in gitHUb
> 2. Push your exisisting code to new repository on default branch
Das obige ist der detaillierte Inhalt vonBereitstellen eines zustandslosen Containers in der Cloud. Für weitere Informationen folgen Sie bitte anderen verwandten Artikeln auf der PHP chinesischen Website!

Heiße KI -Werkzeuge

Undresser.AI Undress
KI-gestützte App zum Erstellen realistischer Aktfotos

AI Clothes Remover
Online-KI-Tool zum Entfernen von Kleidung aus Fotos.

Undress AI Tool
Ausziehbilder kostenlos

Clothoff.io
KI-Kleiderentferner

Video Face Swap
Tauschen Sie Gesichter in jedem Video mühelos mit unserem völlig kostenlosen KI-Gesichtstausch-Tool aus!

Heißer Artikel
Heiße Werkzeuge

Notepad++7.3.1
Einfach zu bedienender und kostenloser Code-Editor

SublimeText3 chinesische Version
Chinesische Version, sehr einfach zu bedienen

Senden Sie Studio 13.0.1
Leistungsstarke integrierte PHP-Entwicklungsumgebung

Dreamweaver CS6
Visuelle Webentwicklungstools

SublimeText3 Mac-Version
Codebearbeitungssoftware auf Gottesniveau (SublimeText3)
Heiße Themen
 1673
1673
 14
1429
52
1333
25
1278
29
1257
24
14
1429
52
1333
25
1278
29
1257
24

 Python vs. C: Lernkurven und Benutzerfreundlichkeit
Apr 19, 2025 am 12:20 AM
Python vs. C: Lernkurven und Benutzerfreundlichkeit
Apr 19, 2025 am 12:20 AM
Python ist leichter zu lernen und zu verwenden, während C leistungsfähiger, aber komplexer ist. 1. Python -Syntax ist prägnant und für Anfänger geeignet. Durch die dynamische Tippen und die automatische Speicherverwaltung können Sie die Verwendung einfach zu verwenden, kann jedoch zur Laufzeitfehler führen. 2.C bietet Steuerung und erweiterte Funktionen auf niedrigem Niveau, geeignet für Hochleistungsanwendungen, hat jedoch einen hohen Lernschwellenwert und erfordert manuellem Speicher und Typensicherheitsmanagement.
 Python lernen: Ist 2 Stunden tägliches Studium ausreichend?
Apr 18, 2025 am 12:22 AM
Python lernen: Ist 2 Stunden tägliches Studium ausreichend?
Apr 18, 2025 am 12:22 AM
Ist es genug, um Python für zwei Stunden am Tag zu lernen? Es hängt von Ihren Zielen und Lernmethoden ab. 1) Entwickeln Sie einen klaren Lernplan, 2) Wählen Sie geeignete Lernressourcen und -methoden aus, 3) praktizieren und prüfen und konsolidieren Sie praktische Praxis und Überprüfung und konsolidieren Sie und Sie können die Grundkenntnisse und die erweiterten Funktionen von Python während dieser Zeit nach und nach beherrschen.
 Python vs. C: Erforschung von Leistung und Effizienz erforschen
Apr 18, 2025 am 12:20 AM
Python vs. C: Erforschung von Leistung und Effizienz erforschen
Apr 18, 2025 am 12:20 AM
Python ist in der Entwicklungseffizienz besser als C, aber C ist in der Ausführungsleistung höher. 1. Pythons prägnante Syntax und reiche Bibliotheken verbessern die Entwicklungseffizienz. 2. Die Kompilierungsmerkmale von Compilation und die Hardwarekontrolle verbessern die Ausführungsleistung. Bei einer Auswahl müssen Sie die Entwicklungsgeschwindigkeit und die Ausführungseffizienz basierend auf den Projektanforderungen abwägen.
 Python vs. C: Verständnis der wichtigsten Unterschiede
Apr 21, 2025 am 12:18 AM
Python vs. C: Verständnis der wichtigsten Unterschiede
Apr 21, 2025 am 12:18 AM
Python und C haben jeweils ihre eigenen Vorteile, und die Wahl sollte auf Projektanforderungen beruhen. 1) Python ist aufgrund seiner prägnanten Syntax und der dynamischen Typisierung für die schnelle Entwicklung und Datenverarbeitung geeignet. 2) C ist aufgrund seiner statischen Tipp- und manuellen Speicherverwaltung für hohe Leistung und Systemprogrammierung geeignet.
 Welches ist Teil der Python Standard Library: Listen oder Arrays?
Apr 27, 2025 am 12:03 AM
Welches ist Teil der Python Standard Library: Listen oder Arrays?
Apr 27, 2025 am 12:03 AM
PythonlistsarePartThestandardlibrary, whilearraysarenot.listarebuilt-in, vielseitig und UNDUSEDFORSPORINGECollections, während dieArrayRay-thearrayModulei und loses und loses und losesaluseduetolimitedFunctionality.
 Python: Automatisierung, Skript- und Aufgabenverwaltung
Apr 16, 2025 am 12:14 AM
Python: Automatisierung, Skript- und Aufgabenverwaltung
Apr 16, 2025 am 12:14 AM
Python zeichnet sich in Automatisierung, Skript und Aufgabenverwaltung aus. 1) Automatisierung: Die Sicherungssicherung wird durch Standardbibliotheken wie OS und Shutil realisiert. 2) Skriptschreiben: Verwenden Sie die PSUTIL -Bibliothek, um die Systemressourcen zu überwachen. 3) Aufgabenverwaltung: Verwenden Sie die Zeitplanbibliothek, um Aufgaben zu planen. Die Benutzerfreundlichkeit von Python und die Unterstützung der reichhaltigen Bibliothek machen es zum bevorzugten Werkzeug in diesen Bereichen.
 Python für wissenschaftliches Computer: Ein detailliertes Aussehen
Apr 19, 2025 am 12:15 AM
Python für wissenschaftliches Computer: Ein detailliertes Aussehen
Apr 19, 2025 am 12:15 AM
Zu den Anwendungen von Python im wissenschaftlichen Computer gehören Datenanalyse, maschinelles Lernen, numerische Simulation und Visualisierung. 1.Numpy bietet effiziente mehrdimensionale Arrays und mathematische Funktionen. 2. Scipy erweitert die Numpy -Funktionalität und bietet Optimierungs- und lineare Algebra -Tools. 3.. Pandas wird zur Datenverarbeitung und -analyse verwendet. 4.Matplotlib wird verwendet, um verschiedene Grafiken und visuelle Ergebnisse zu erzeugen.
 Python für die Webentwicklung: Schlüsselanwendungen
Apr 18, 2025 am 12:20 AM
Python für die Webentwicklung: Schlüsselanwendungen
Apr 18, 2025 am 12:20 AM
Zu den wichtigsten Anwendungen von Python in der Webentwicklung gehören die Verwendung von Django- und Flask -Frameworks, API -Entwicklung, Datenanalyse und Visualisierung, maschinelles Lernen und KI sowie Leistungsoptimierung. 1. Django und Flask Framework: Django eignet sich für die schnelle Entwicklung komplexer Anwendungen, und Flask eignet sich für kleine oder hochmobile Projekte. 2. API -Entwicklung: Verwenden Sie Flask oder Djangorestframework, um RESTFUFFUPI zu erstellen. 3. Datenanalyse und Visualisierung: Verwenden Sie Python, um Daten zu verarbeiten und über die Webschnittstelle anzuzeigen. 4. Maschinelles Lernen und KI: Python wird verwendet, um intelligente Webanwendungen zu erstellen. 5. Leistungsoptimierung: optimiert durch asynchrones Programmieren, Caching und Code
