„Erstellen Sie APIs in 5 Minuten mit FastAPI. Als modernes, leistungsstarkes Python-Framework erleichtert FastAPI die Erstellung leistungsstarker Webanwendungen.“
Installation
Installieren Sie FastAPI und uvicorn (ASGI-Server) mit pip:
pip install fastapi uvicorn
pip install fastapi
Lasst uns unsere API erstellen
Öffnen Sie den Editor und fügen Sie den folgenden Inhalt ein, speichern Sie die Datei als data.json (wir werden dieser Datei mit der POST-Methode Daten hinzufügen und Datensätze mit der GET-Methode abrufen
).data.json
[
   {
      "name": "John",
      "age": 25
   },
   {  "name": "Smith",
      "age": 27
   }
]
Erstellen Sie nun eine neue Python-Datei, nennen Sie sie app.py und fügen Sie den folgenden Code ein
# This section imports necessary modules and classes from the FastAPI library and Python's standard library. It imports FastAPI for creating the web application, HTTPException for raising HTTP exceptions, List for type hints, and json for working with JSON data.

from fastapi import FastAPI, HTTPException
from typing import List
import json

# This creates an instance of the FastAPI class, which will be the main application instance for handling HTTP requests.
app = FastAPI()

# This block reads the content of the "data.json" file using a context manager (with statement) and loads the JSON data into the initial_data variable.
with open("data.json", "r") as file:
    initial_data = json.load(file)

# This line initializes the data variable with the loaded JSON data, effectively creating a list of dictionaries containing user information.
data = initial_data

# This decorator (@app.get(...)) defines a GET endpoint at the "/users" URL. It uses the get_users function to handle the request. The response_model parameter specifies the expected response model, which is a list of dictionaries in this case.
@app.get("/users", response_model=List[dict])
async def get_users():
    return data

# This decorator (@app.post(...)) defines a POST endpoint at the "/users" URL. It uses the create_user function to handle the request. The response_model parameter specifies the expected response model, which is a single dictionary in this case.
# The create_user function attempts to append the received user dictionary to the data list. If successful, it constructs a response dictionary indicating the success. If an exception occurs during the attempt (e.g., due to invalid data), it constructs a response dictionary indicating an error.
@app.post("/users", response_model=dict)
async def create_user(user: dict):
    try:
        data.append(user)
        response_data = {"message": "User created successfully", "user": user}
    except:
        response_data = {"message": "Error creating user", "user": user}
    return response_data

# This function uses a context manager to open the "data.json" file in write mode and then uses json.dump to write the contents of the data list back to the file, formatting it with an indentation of 4 spaces.
def save_data():
    with open("data.json", "w") as file:
        json.dump(data, file, indent=4)

# This decorator (@app.on_event(...)) defines a function that will be executed when the FastAPI application is shutting down. In this case, it calls the save_data function to save the data back to the JSON file before the application exits.
@app.on_event("shutdown")
async def shutdown_event():
    save_data()

# This block checks if the script is being run directly (not imported as a module). If it is, it uses the uvicorn.run function to start the FastAPI application on host "0.0.0.0" and port 8000. This is how you launch the application using the Uvicorn ASGI server.
if __name__ == "__main__":
    import uvicorn
    uvicorn.run(app, host="0.0.0.0", port=8000)
Führen Sie app.py aus. Der Uvicorn-Server startet einen neuen Prozess zur Verarbeitung eingehender HTTP-Anfragen. Sobald der Server hochgefahren ist, öffnen Sie Postman, erstellen Sie eine neue GET-Anfrage mit der URL: http://0.0.0.0:8000/users und klicken Sie auf Senden


Sie sehen eine JSON-Antwort mit der Liste der Benutzer aus der Datei data.json.
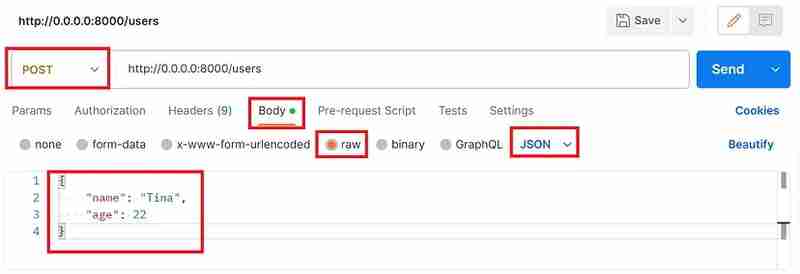
Fügen wir nun mit der POST-Methode einen Benutzer zu dieser Datei hinzu. Erstellen Sie eine neue Anfrage, wählen Sie die POST-Methode aus, klicken Sie auf den Text, wählen Sie Raw aus, wählen Sie JSON aus der Dropdown-Liste aus und fügen Sie den folgenden JSON als Nutzlast ein, um einen neuen Benutzer hinzuzufügen
{
    "name": "Tina",
    "age": 22
}

Sobald Sie auf „Senden“ klicken, erhalten Sie eine Antwort zurück, wenn der Benutzer erfolgreich hinzugefügt wurde, mit dem Statuscode 200 OK

Und das ist es, wir haben erfolgreich eine API mit der GET/POST-Methode erstellt, um Benutzer anzuzeigen und einer Datei hinzuzufügen. Gehen Sie zurück zur GET-Anfrage und klicken Sie auf „Senden“. Nun sollte die Benutzerin „Tina“ auch in der Antwort der API aufgeführt sein.
Eine erstaunliche Sache an FastAPI ist, dass es automatisch Swagger-Dokumentation für Ihre API-Endpunkte generiert, was es Entwicklern erleichtert, Ihre API zu verstehen und effektiv zu nutzen.
Wenn Sie einen Browser öffnen und http://localhost:8000/docs eingeben, wird ein Swagger-Dokument für die API angezeigt

Bitte beachten Sie, dass dies nur ein einfaches Beispiel für die Erstellung einer schnellen API mit Python ist. Sie müssen außerdem weitere Konfigurations- oder Codierungsarbeiten durchführen, insbesondere im Hinblick auf Fehlerbehandlung, Datenvalidierung und Sicherheit.
Das obige ist der detaillierte Inhalt vonErstellen Sie APIs in wenigen Minuten mit Python. Für weitere Informationen folgen Sie bitte anderen verwandten Artikeln auf der PHP chinesischen Website!
 So löschen Sie eine Datenbank
 Detaillierte Erläuterung der Quarzkonfigurationsdatei
 Was tun, wenn die CPU-Auslastung zu hoch ist?
 Bitcoin-Handelsplattform
 So überprüfen Sie die Mac-Adresse
 Methode zur Wiederherstellung der Oracle-Datenbank
 Die Rolle der mathematischen Funktion in der C-Sprache
 Verwendung von while


