

In diesem Artikel vergleichen wir die Schritte zum Hochladen einer Datei auf AWS S3 zwischen Documenso und dem AWS S3-Bild-Upload-Beispiel.
Wir beginnen mit dem einfachen Beispiel von Vercel.
Vercel bietet ein gutes Arbeitsbeispiel für das Hochladen einer Datei auf AWS S3.
Die README-Datei dieses Beispiels bietet zwei Optionen: Sie können entweder einen vorhandenen S3-Bucket verwenden oder einen neuen Bucket erstellen. Dies zu verstehen hilft
Sie konfigurieren Ihre Upload-Funktion richtig.
Es ist an der Zeit, dass wir uns den Quellcode ansehen. Wir suchen ein Eingabeelement mit type=file. In app/page.tsx finden Sie den folgenden Code:
return (
    <main>
      <h1>Upload a File to S3</h1>
      <form onSubmit={handleSubmit}>
        <input
         >


<h2>


  <strong>onChange</strong>
</h2>

<p>onChange updates state using setFile, but it does not do the uploading. upload happens when you submit this form.<br>
</p>

<pre class="brush:php;toolbar:false">onChange={(e) => {
  const files = e.target.files
  if (files) {
    setFile(files[0])
  }
}}
In der handleSubmit-Funktion passiert viel. Wir müssen die Liste der Operationen in dieser handleSubmit-Funktion analysieren. Ich habe die Kommentare in diesem Codeausschnitt geschrieben, um die Schritte zu erklären.
const handleSubmit = async (e: React.FormEvent<HTMLFormElement>) => {
    e.preventDefault()

    if (!file) {
      alert('Please select a file to upload.')
      return
    }

    setUploading(true)

    const response = await fetch(
      process.env.NEXT_PUBLIC_BASE_URL + '/api/upload',
      {
        method: 'POST',
        headers: {
          'Content-Type': 'application/json',
        },
        body: JSON.stringify({ filename: file.name, contentType: file.type }),
      }
    )

    if (response.ok) {
      const { url, fields } = await response.json()

      const formData = new FormData()
      Object.entries(fields).forEach(([key, value]) => {
        formData.append(key, value as string)
      })
      formData.append('file', file)

      const uploadResponse = await fetch(url, {
        method: 'POST',
        body: formData,
      })

      if (uploadResponse.ok) {
        alert('Upload successful!')
      } else {
        console.error('S3 Upload Error:', uploadResponse)
        alert('Upload failed.')
      }
    } else {
      alert('Failed to get pre-signed URL.')
    }

    setUploading(false)
  }
api/upload/route.ts hat den folgenden Code:
import { createPresignedPost } from '@aws-sdk/s3-presigned-post'
import { S3Client } from '@aws-sdk/client-s3'
import { v4 as uuidv4 } from 'uuid'

export async function POST(request: Request) {
  const { filename, contentType } = await request.json()

  try {
    const client = new S3Client({ region: process.env.AWS_REGION })
    const { url, fields } = await createPresignedPost(client, {
      Bucket: process.env.AWS_BUCKET_NAME,
      Key: uuidv4(),
      Conditions: [
        ['content-length-range', 0, 10485760], // up to 10 MB
        ['starts-with', '$Content-Type', contentType],
      ],
      Fields: {
        acl: 'public-read',
        'Content-Type': contentType,
      },
      Expires: 600, // Seconds before the presigned post expires. 3600 by default.
    })

    return Response.json({ url, fields })
  } catch (error) {
    return Response.json({ error: error.message })
  }
}
Die erste Anfrage im handleSubmit war an /api/upload und sendet Inhaltstyp und Dateinamen als Nutzlast. Es wird wie folgt analysiert:
const { filename, contentType } = await request.json()
Der nächste Schritt besteht darin, einen S3-Client zu erstellen und dann einen vorsignierten Beitrag zu erstellen, der URL und Feld zurückgibt. Sie würden diese URL verwenden, um Ihre Datei hochzuladen.
Mit diesem Wissen analysieren wir, wie der Upload in Documenso funktioniert, und ziehen einen Vergleich.
Beginnen wir mit dem Eingabeelement mit type=file. Der Code ist in Documentenso anders organisiert. Sie finden das Eingabeelement in einer Datei mit dem Namen document-dropzone.tsx.
<input {...getInputProps()} />

<p className="text-foreground mt-8 font-medium">{_(heading[type])}</p>
Hier wird getInputProps als useDropzone zurückgegeben. Documenso verwendet React-Dropzone.
import { useDropzone } from 'react-dropzone';
onDrop ruft props.onDrop auf, Sie finden einen Attributwert namens onFileDrop in upload-document.tsx.
<DocumentDropzone
  className="h-[min(400px,50vh)]"
  disabled={remaining.documents === 0 || !session?.user.emailVerified}
  disabledMessage={disabledMessage}
  onDrop={onFileDrop}
  onDropRejected={onFileDropRejected}
/>
Sehen wir uns an, was in der onFileDrop-Funktion passiert.
const onFileDrop = async (file: File) => {
    try {
      setIsLoading(true);

      const { type, data } = await putPdfFile(file);

      const { id: documentDataId } = await createDocumentData({
        type,
        data,
      });

      const { id } = await createDocument({
        title: file.name,
        documentDataId,
        teamId: team?.id,
      });

      void refreshLimits();

      toast({
        title: _(msg`Document uploaded`),
        description: _(msg`Your document has been uploaded successfully.`),
        duration: 5000,
      });

      analytics.capture('App: Document Uploaded', {
        userId: session?.user.id,
        documentId: id,
        timestamp: new Date().toISOString(),
      });

      router.push(`${formatDocumentsPath(team?.url)}/${id}/edit`);
    } catch (err) {
      const error = AppError.parseError(err);

      console.error(err);

      if (error.code === 'INVALID_DOCUMENT_FILE') {
        toast({
          title: _(msg`Invalid file`),
          description: _(msg`You cannot upload encrypted PDFs`),
          variant: 'destructive',
        });
      } else if (err instanceof TRPCClientError) {
        toast({
          title: _(msg`Error`),
          description: err.message,
          variant: 'destructive',
        });
      } else {
        toast({
          title: _(msg`Error`),
          description: _(msg`An error occurred while uploading your document.`),
          variant: 'destructive',
        });
      }
    } finally {
      setIsLoading(false);
    }
  };
Es passiert viel, aber für unsere Analyse betrachten wir nur die Funktion namens putFile.
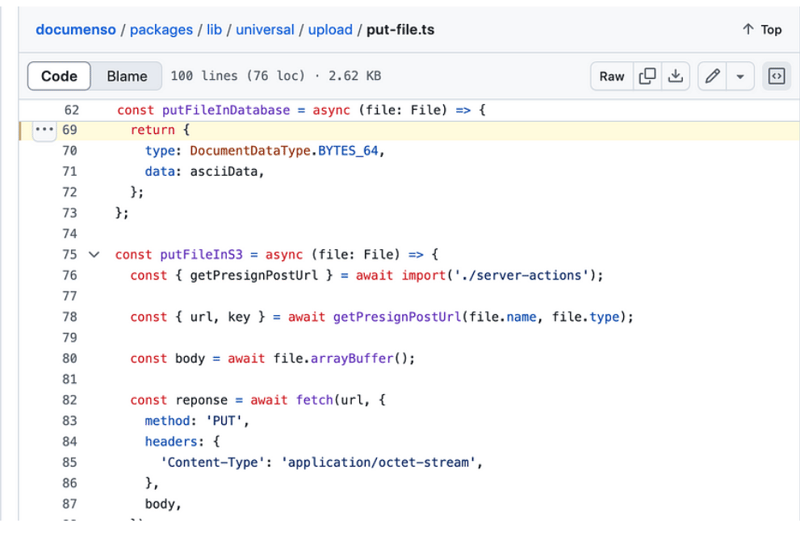
putPdfFile ist in upload/put-file.ts definiert
/**
 * Uploads a document file to the appropriate storage location and creates
 * a document data record.
 */
export const putPdfFile = async (file: File) => {
  const isEncryptedDocumentsAllowed = await getFlag('app_allow_encrypted_documents').catch(
    () => false,
  );

  const pdf = await PDFDocument.load(await file.arrayBuffer()).catch((e) => {
    console.error(`PDF upload parse error: ${e.message}`);

    throw new AppError('INVALID_DOCUMENT_FILE');
  });

  if (!isEncryptedDocumentsAllowed && pdf.isEncrypted) {
    throw new AppError('INVALID_DOCUMENT_FILE');
  }

  if (!file.name.endsWith('.pdf')) {
    file.name = `${file.name}.pdf`;
  }

  removeOptionalContentGroups(pdf);

  const bytes = await pdf.save();

  const { type, data } = await putFile(new File([bytes], file.name, { type: 'application/pdf' }));

  return await createDocumentData({ type, data });
};
Dies ruft die putFile-Funktion auf.
/**
 * Uploads a file to the appropriate storage location.
 */
export const putFile = async (file: File) => {
  const NEXT_PUBLIC_UPLOAD_TRANSPORT = env('NEXT_PUBLIC_UPLOAD_TRANSPORT');

  return await match(NEXT_PUBLIC_UPLOAD_TRANSPORT)
    .with('s3', async () => putFileInS3(file))
    .otherwise(async () => putFileInDatabase(file));
};
const putFileInS3 = async (file: File) => {
  const { getPresignPostUrl } = await import('./server-actions');

  const { url, key } = await getPresignPostUrl(file.name, file.type);

  const body = await file.arrayBuffer();

  const reponse = await fetch(url, {
    method: 'PUT',
    headers: {
      'Content-Type': 'application/octet-stream',
    },
    body,
  });

  if (!reponse.ok) {
    throw new Error(
      `Failed to upload file "${file.name}", failed with status code ${reponse.status}`,
    );
  }

  return {
    type: DocumentDataType.S3_PATH,
    data: key,
  };
};
export const getPresignPostUrl = async (fileName: string, contentType: string) => {
  const client = getS3Client();

  const { getSignedUrl } = await import('@aws-sdk/s3-request-presigner');

  let token: JWT | null = null;

  try {
    const baseUrl = APP_BASE_URL() ?? 'http://localhost:3000';

    token = await getToken({
      req: new NextRequest(baseUrl, {
        headers: headers(),
      }),
    });
  } catch (err) {
    // Non server-component environment
  }

  // Get the basename and extension for the file
  const { name, ext } = path.parse(fileName);

  let key = `${alphaid(12)}/${slugify(name)}${ext}`;

  if (token) {
    key = `${token.id}/${key}`;
  }

  const putObjectCommand = new PutObjectCommand({
    Bucket: process.env.NEXT_PRIVATE_UPLOAD_BUCKET,
    Key: key,
    ContentType: contentType,
  });

  const url = await getSignedUrl(client, putObjectCommand, {
    expiresIn: ONE_HOUR / ONE_SECOND,
  });

  return { key, url };
};
In Documenso wird keine POST-Anfrage angezeigt. Es verwendet eine Funktion namens getSignedUrl, um die URL abzurufen, wobei
Vercel-Beispiel stellt eine POST-Anfrage an die API/Upload-Route.
Das Eingabeelement kann im Vercel-Beispiel leicht gefunden werden, da dies nur ein Beispiel ist, Documenso jedoch gefunden wird
React-Dropzone verwenden und das Eingabeelement entsprechend dem Geschäftskontext positionieren.
Bei Thinkthroo studieren wir große Open-Source-Projekte und stellen Architekturführer zur Verfügung. Wir haben mit Rückenwind wiederverwendbare Komponenten entwickelt, die Sie in Ihrem Projekt verwenden können.
Wir bieten Next.js-, React- und Node-Entwicklungsdienste an.
Buchen Sie einen Termin mit uns, um Ihr Projekt zu besprechen.

https://github.com/documenso/documenso/blob/main/packages/lib/universal/upload/put-file.ts#L69
https://github.com/vercel/examples/blob/main/solutions/aws-s3-image-upload/README.md
https://github.com/vercel/examples/tree/main/solutions/aws-s3-image-upload
https://github.com/vercel/examples/blob/main/solutions/aws-s3-image-upload/app/page.tsx#L58C5-L76C12
https://github.com/vercel/examples/blob/main/solutions/aws-s3-image-upload/app/api/upload/route.ts
https://github.com/documenso/documenso/blob/main/packages/ui/primitives/document-dropzone.tsx#L157
https://react-dropzone.js.org/
https://github.com/documenso/documenso/blob/main/apps/web/src/app/(dashboard)/documents/upload-document.tsx#L61
https://github.com/documenso/documenso/blob/main/packages/lib/universal/upload/put-file.ts#L22
Das obige ist der detaillierte Inhalt vonVergleich der Spload-Funktion zwischen Documenso und aws-smage-upload-Beispiel. Für weitere Informationen folgen Sie bitte anderen verwandten Artikeln auf der PHP chinesischen Website!


![[Web-Frontend] Node.js-Schnellstart](https://img.php.cn/upload/course/000/000/067/662b5d34ba7c0227.png)


