

So drucken Sie Kontakte in Outlook

This article will guide you through the process of printing Outlook contacts, whether it's an entire address book or a specific record.
Microsoft Outlook offers great convenience in organizing contacts digitally, but sometimes you might need a paper copy. Printing your Outlook contacts can be helpful for various reasons, whether it's for a quick reference during your meeting or a backup for those just-in-case moments. Let's walk through the simple steps to transform your virtual network into a neatly organized tangible list.
Note. This guide shows how to print contacts in classic (old) Outlook.
How to print a list of contacts in Outlook
The Address book in Outlook is a "virtual folder" displaying information from your contact folders. However, the address book itself does not have a printing option. To get your contacts on paper, you need to go directly to the address source, and then use the print option available. Here are the detailed instructions:
- Access your Outlook contacts. In the Navigation pane on the left side of the Outlook window, click the People icon to open your Contacts view.
- Select the target folder. In the folder pane, select the folder containing the contacts you wish to print.
-
Choose the view. On the Home tab, in the Current View group, select the view that suits your needs. The view you choose will determine the available printing styles. For a card, booklet, or phone directory style, select the People, Business Card, or Card view. For a table or memo style, choose the List view.

-
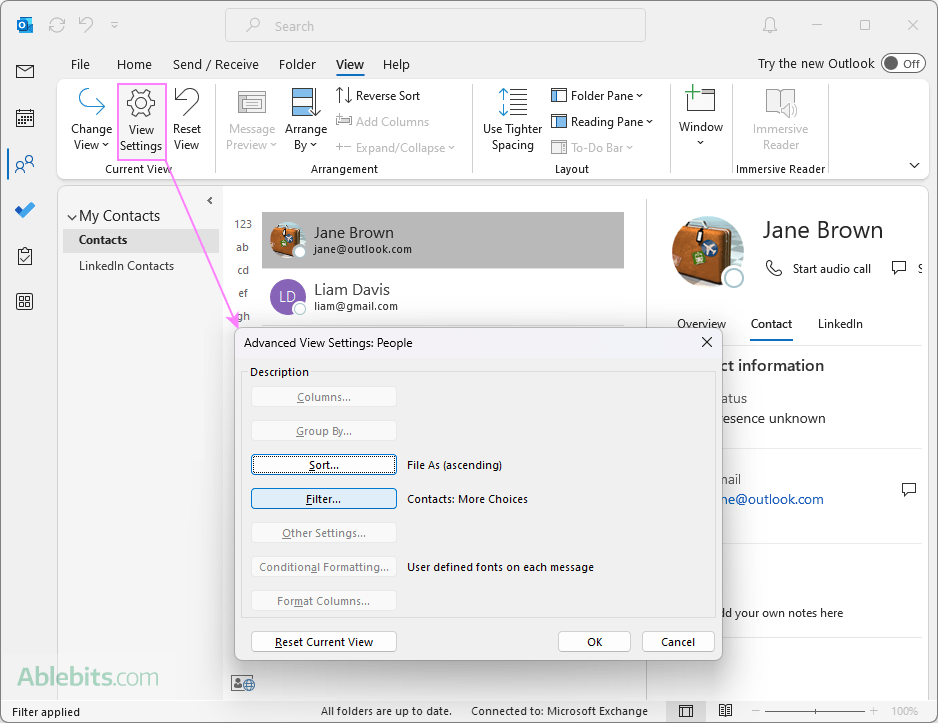
Filter the contacts. If you only want to print a subset of your contacts, you can apply a filter. For this, go to the View tab, click View Settings, and set your criteria, such as company or category. If you're aiming to print all contacts in a folder, you can skip this step.
- Access the print menu. Go to the File tab > Print or press Ctrl + P to open the Print menu.
-
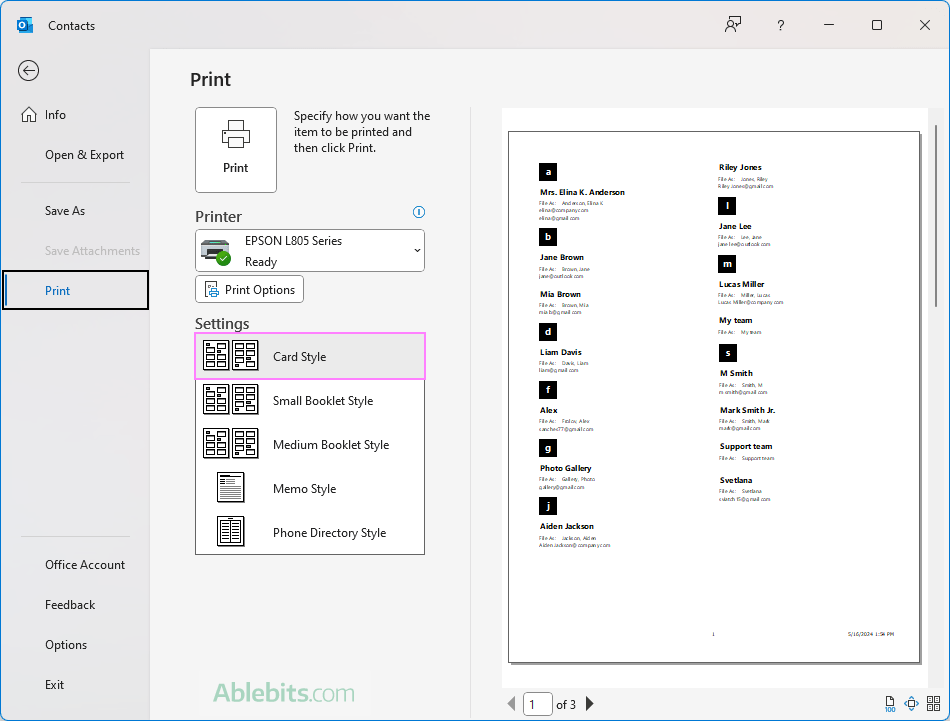
Choose the print style. Under Settings, choose the desired style. A preview of the printout will appear on the right. If you're happy with the format and want to print all pages, click Print. If not, proceed to the next step.
-
Customize the print settings. To fine-tune your settings, click the Print Options button. In the dialog box that appears, you can choose which pages to print, the number of copies, and other preferences. For further customization, click:
- Page Setup to choose fonts, formats, paper size, or to add a header and/or footer.
- Define Styles to modify a specific style or to create your custom style.
After adjusting the settings to your liking, click Preview to see how your changes will look on the final printout.
-
Print. Once you're completely satisfied with the preview, hit the Print button to initiate the printing process.


With these steps, you'll have a printed list of contacts from your Outlook address book, organized just the way you need them.
Note. These instructions are applicable to the classic desktop Outlook app for Windows. Unfortunately, in the new Outlook and Outlook on the web there is currently no option to print contacts.
How to print an individual Outlook contact
Printing a certain contact from Outlook is a simple task that can be done in just a few steps:
- In your Outlook contact folder, locate the specific contact you want to print.
- Double-click on the contact's name to open its card.
- With the contact card open, click File > Print or use the Ctrl + P shortcut.
- In the Print menu that appears, you can select the printer and tailor the settings to fit your needs. For a single contact, Outlook only provides the Memo style as the default print format. To customize the formatting, click the Print Options button.
- Preview the contact to make sure that all the necessary details are included and formatted to your preference.
- Finally, click the Print button to send the contact to the printer.


By following these steps you can quickly get a hard copy of the contact details whenever required for your meetings, networking events, or as a personal backup.
Print Outlook contacts to PDF
Printing Outlook contacts to a PDF file can be a convenient way to save and share your contact information. Here's a step-by-step guide to help you do just that:
- Select the contact folder you want to include in the PDF file. If you're looking to convert a specific contact to PDF, double-click on it to open its card.
- Click File > Print or use the Ctrl + P shortcut to get to the print menu.
- Choose Microsoft Print to PDF as your printer.
- Select your preferred style.
- To adjust additional settings like which pages to include or add a header/footer, click the Print Options button.
- Click the Print button.
- In the Save Print Output As dialog box, choose a location for your PDF and name it.
- Click Save, and your contacts will be immediately saved as a PDF in the folder you selected.


Saving to PDF lets you promptly get a digital copy of your Outlook contacts in a widely compatible format, which can be easily shared or archived.
Note. This process is applicable to the classic desktop Outlook app on Windows 10 and Windows 11. The new Outlook app and Outlook on the web currently do not offer an option to print contacts.
Outlook contacts print styles
When it comes to organizing and sharing contact information, Outlook offers a variety of styles to suit different needs and preferences. Each style offers a unique layout and presentation of your contact information. Here's an overview of the print styles available for Outlook contacts:
Card Style
This style closely resembles how contacts appear in Outlook's Card view. Each contact is displayed as a separate card, making it convenient for quick scanning through details. It's convenient for creating a physical address book with a visually appealing and compact layout.

Small Booklet Style
Ideal for creating a pocket-sized booklet, this style arranges your contacts in a compact format that's easy to carry around. It optimizes space by placing multiple entries on each page, so you can make useful reference booklets that can fit in a pocket or binder.

Medium Booklet Style
The Medium Booklet style is an excellent choice for those who prefer a balance between compactness and readability. It offers more space for each contact than the small booklet style, making it easier to read and perfect for a desk reference.

Phone Directory style
This style organizes your contacts in a format similar to a traditional phone book. It lists people alphabetically with their names and phone numbers. This style is useful for creating a phone directory of your Outlook contacts.

Memo style
The Memo style in Outlook is designed for those who need a detailed record of their contacts. It prints each contact on a separate page, providing an overview of the essential information. This style is perfect for creating personal profiles or for instances where detailed information is required for each contact.

Table style
The Table style is a practical choice for those who appreciate organization and clarity. It displays your contacts in a structured tabular format, much like a spreadsheet. Typically, it's the default print style when you apply the List view for contacts in Outlook.

As you see, different styles have different uses and serve specific purposes. Pick the one that best fits your needs to keep your contacts within reach, in the format that you prefer.
Wrapping up, printing Outlook contacts is a convenient way to stay organized and prepared for any scenario, be it a formal meeting or a casual get-together. So go ahead, give it a try, and enjoy the feeling of holding your digital world in your hands ?
Das obige ist der detaillierte Inhalt vonSo drucken Sie Kontakte in Outlook. Für weitere Informationen folgen Sie bitte anderen verwandten Artikeln auf der PHP chinesischen Website!

Heiße KI -Werkzeuge

Undresser.AI Undress
KI-gestützte App zum Erstellen realistischer Aktfotos

AI Clothes Remover
Online-KI-Tool zum Entfernen von Kleidung aus Fotos.

Undress AI Tool
Ausziehbilder kostenlos

Clothoff.io
KI-Kleiderentferner

Video Face Swap
Tauschen Sie Gesichter in jedem Video mühelos mit unserem völlig kostenlosen KI-Gesichtstausch-Tool aus!

Heißer Artikel
Heiße Werkzeuge

Notepad++7.3.1
Einfach zu bedienender und kostenloser Code-Editor

SublimeText3 chinesische Version
Chinesische Version, sehr einfach zu bedienen

Senden Sie Studio 13.0.1
Leistungsstarke integrierte PHP-Entwicklungsumgebung

Dreamweaver CS6
Visuelle Webentwicklungstools

SublimeText3 Mac-Version
Codebearbeitungssoftware auf Gottesniveau (SublimeText3)
Heiße Themen


 Excel -Formel, um die Top 3, 5, 10 Werte in der Spalte oder Zeile zu finden
Apr 01, 2025 am 05:09 AM
Excel -Formel, um die Top 3, 5, 10 Werte in der Spalte oder Zeile zu finden
Apr 01, 2025 am 05:09 AM
In diesem Tutorial wird gezeigt, wie die Top -N -Werte in einem Datensatz effizient lokalisiert werden und zugehörige Daten mithilfe von Excel -Formeln abgerufen werden können. Unabhängig davon, ob Sie die höchsten, niedrigsten oder diejenigen, die spezifische Kriterien erfüllen, benötigen dieser Leitfaden Lösungen. Findi
 So verwenden Sie Flash -Füllung in Excel mit Beispielen
Apr 05, 2025 am 09:15 AM
So verwenden Sie Flash -Füllung in Excel mit Beispielen
Apr 05, 2025 am 09:15 AM
Dieses Tutorial bietet einen umfassenden Leitfaden zur Flash -Füllfunktion von Excel, einem leistungsstarken Tool zur Automatisierung von Dateneingabeaufgaben. Es deckt verschiedene Aspekte ab, von seiner Definition und seinem Standort bis hin zu fortgeschrittener Verwendung und Fehlerbehebung. Excels Fla verstehen
 So fügen Sie Kalender zu Outlook hinzu: freigegebener, Internetkalender, iCal -Datei
Apr 03, 2025 am 09:06 AM
So fügen Sie Kalender zu Outlook hinzu: freigegebener, Internetkalender, iCal -Datei
Apr 03, 2025 am 09:06 AM
In diesem Artikel wird erläutert, wie Sie in der Outlook -Desktop -Anwendung freigegebene Kalender und die Nutzung gemeinsamer Kalender, einschließlich des Importierens von Icalendar -Dateien, zugreifen. Zuvor haben wir Ihren Outlook -Kalender geteilt. Lassen Sie uns nun untersuchen
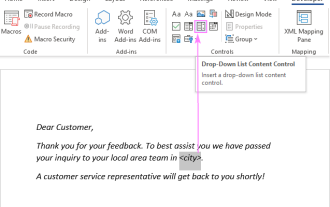 Fügen Sie der Outlook -E -Mail -Vorlage eine Dropdown -Liste hinzu
Apr 01, 2025 am 05:13 AM
Fügen Sie der Outlook -E -Mail -Vorlage eine Dropdown -Liste hinzu
Apr 01, 2025 am 05:13 AM
In diesem Tutorial wird angezeigt, wie Sie Ihren Outlook -E -Mail -Vorlagen Dropdown -Listen hinzufügen, einschließlich mehrerer Auswahl- und Datenbankpopulationen. Während Outlook Dropdowns nicht direkt unterstützt, bietet dieser Leitfaden kreative Problemumgehungen. E -Mail -Vorlagen SAV
 Medianformel in Excel - Praktische Beispiele
Apr 11, 2025 pm 12:08 PM
Medianformel in Excel - Praktische Beispiele
Apr 11, 2025 pm 12:08 PM
In diesem Tutorial wird erläutert, wie der Median der numerischen Daten in Excel mithilfe der Medianfunktion berechnet wird. Der Median, ein wesentliches Maß für die zentrale Tendenz, identifiziert den mittleren Wert in einem Datensatz und bietet eine robustere Darstellung der zentralen Tendene
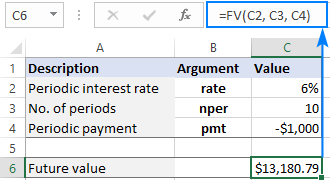 FV -Funktion in Excel, um den zukünftigen Wert zu berechnen
Apr 01, 2025 am 04:57 AM
FV -Funktion in Excel, um den zukünftigen Wert zu berechnen
Apr 01, 2025 am 04:57 AM
In diesem Tutorial wird erläutert, wie die FV-Funktion von Excel verwendet wird, um den zukünftigen Wert von Investitionen zu bestimmen und sowohl reguläre Zahlungen als auch Pauschalablagerungen zu umfassen. Effektive Finanzplanung hängt vom Verständnis des Investitionswachstums ab, und dieser Leitfaden prov
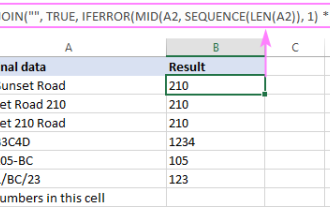 So entfernen / teilen Sie Text und Zahlen in Excel Cell
Apr 01, 2025 am 05:07 AM
So entfernen / teilen Sie Text und Zahlen in Excel Cell
Apr 01, 2025 am 05:07 AM
Dieses Tutorial zeigt verschiedene Methoden zur Trennung von Text und Zahlen in Excel-Zellen, wobei sowohl integrierte Funktionen als auch benutzerdefinierte VBA-Funktionen verwendet werden. Sie lernen, wie Sie Zahlen extrahieren, während Sie Text entfernen, Text isolieren, während Sie Zahlen wegwerfen
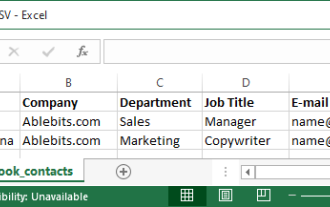 So importieren Sie Kontakte in Outlook (aus CSV- und PST -Datei)
Apr 02, 2025 am 09:09 AM
So importieren Sie Kontakte in Outlook (aus CSV- und PST -Datei)
Apr 02, 2025 am 09:09 AM
Dieses Tutorial zeigt zwei Methoden zum Importieren von Kontakten in Outlook: Verwenden von CSV- und PST -Dateien und deckt auch die Übertragung von Kontakten in Outlook online ab. Unabhängig davon
