 Web-Frontend
 js-Tutorial
 Erlernen Sie die Verwendung grundlegender Bootstarp-Steuerelemente (Tabelle, Formular, Schaltfläche) und Javascript-Kenntnisse
Erlernen Sie die Verwendung grundlegender Bootstarp-Steuerelemente (Tabelle, Formular, Schaltfläche) und Javascript-Kenntnisse
Bootstrap definiert für uns einfache und benutzerfreundliche Stile. Wir benötigen nur wenige Stilspezifikationen, um eine einfache und elegante Seitenanzeige zu vervollständigen.
In diesem Artikel werden hauptsächlich die folgenden grundlegenden Steuerelemente vorgestellt:
1. Tabelle
2. Formular
3. Schaltfläche
1. Tabelle verwendet weiterhin
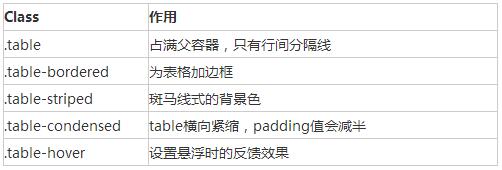
| Es gibt die folgenden Klassen zur Steuerung von Tabellenattributen. Standardmäßig belegt der Tabellenstil den übergeordneten Container
 <div class="container">
    <div class="row">
      <div class="col-md-8 col-md-offset-2">
        <table class="table table-bordered table-striped table-hover">
      <tr>
        <th>标题一</th>
        <th>标题二</th>
        <th>标题三</th>
      </tr>
      <tr>
        <td>1</td>
        <td>2</td>
        <td>3</td>
      </tr>
      <tr>
        <td>4</td>
        <td>5</td>
        <td>6</td>
      </tr>
    </table>
      </div>
    </div>
  </div>
Nach dem Login kopieren Umschließen Sie jede .table mit .table-responsive, um eine reaktionsfähige Tabelle zu erstellen, die auf Geräten mit kleinem Bildschirm (weniger als 768 Pixel) horizontal scrollt. Wenn der Bildschirm 768 Pixel breiter ist, verschwindet die horizontale Bildlaufleiste. 2. Form, es gibt mehrere Stildefinitionen
Labels und Steuerelemente sollten in Divs vom Typ „Formulargruppe“ eingeschlossen werden. Das Standardformular lautet wie folgt
 <div class="container">
    <form>
      <div class="form-group">
        <label for="exampleInputEmail1">Email address</label>
        <input type="email" class="form-control" id="exampleInputEmail1"
          placeholder="Enter email">
      </div>
      <div class="form-group">
        <label for="exampleInputPassword1">Password</label>
        <input type="password" class="form-control"
          id="exampleInputPassword1" placeholder="Password">
      </div>
      <div class="checkbox">
        <label> <input type="checkbox"> Check me out
        </label>
      </div>
      <button type="submit" class="btn btn-default">Submit</button>
    </form>
  </div>
Nach dem Login kopieren Inline-Formular, Geben Sie die Nur-SR-Kategorie für die Beschriftung an. Sie können die Beschriftung ausblenden, die Beschriftung darf jedoch nicht weggelassen werden.
  <div class="container">
    <form class="form-inline">
      <div class="form-group">
        <label for="exampleInputEmail1" class="sr-only">Email address</label>
        <input type="email" class="form-control" id="exampleInputEmail1"
          placeholder="Enter email">
      </div>
      <div class="form-group">
        <label for="exampleInputPassword1">Password</label>
        <input type="password" class="form-control"
          id="exampleInputPassword1" placeholder="Password">
      </div>
      <div class="checkbox">
        <label> <input type="checkbox"> Check me out
        </label>
      </div>
      <button type="submit" class="btn btn-default">Submit</button>
    </form>
  </div>
Nach dem Login kopieren Für die horizontale Form müssen Sie die Länge für das Etikett und die Etikettengruppe angeben und ein Rastersystemlayout übernehmen. Die Beschriftung wird nach rechts ausgerichtet und die Beschriftungsgruppe wird nach links ausgerichtet.
 <div class="container">
    <form class="form-horizontal">
      <div class="form-group">
          <label for="exampleInputEmail1" class="col-md-2 control-label">Email
            address</label>
        <div class="col-md-8">
          <input type="email" class="form-control" id="exampleInputEmail1"
            placeholder="Enter email">
        </div>
      </div>
      <div class="form-group" >
          <label for="exampleInputPassword1" class="col-md-2 control-label">Password</label>
        <div class="col-md-8">
          <input type="password" class="form-control"
            id="exampleInputPassword1" placeholder="Password">
        </div>
      </div>
      <div class="checkbox col-md-offset-2">
        <label> <input type="checkbox"> Check me out
        </label>
      </div>
      <button type="submit" class="btn btn-default col-md-offset-2">Submit</button>
    </form>
  </div>
Nach dem Login kopieren Formularvalidierung, bootstrap3 unterstützt die benutzerdefinierte Validierung von Formularen. Das Hinzufügen von „required“ gibt an, dass das Formular erforderlich ist. node.setCustomValidity kann die benutzerdefinierte Validierung des Formulars festlegen
<div class="container">
    <form class="form-horizontal">
      <div class="form-group">
        <label for="exampleInputEmail1" class="col-md-2 control-label">Email
          address</label>
        <div class="col-md-8">
          <input type="email" class="form-control" id="exampleInputEmail1"
            placeholder="Enter email" required>
        </div>
      </div>
      <div class="form-group">
        <label for="password1" class="col-md-2 control-label">Password</label>
        <div class="col-md-8">
          <input type="password" class="form-control"
            id="password1" placeholder="Password" required onchange="checkPassword()">
        </div>
      </div>
<div class="form-group">
        <label for="password2" class="col-md-2 control-label" onchange="checkPassword()"> Password2</label>
        <div class="col-md-8">
          <input type="password" class="form-control"
            id="password2" placeholder="Password2" required>
        </div>
      </div>
      <div class="checkbox col-md-offset-2">
        <label> <input type="checkbox"> Check me out
        </label>
      </div>
      <button type="submit" class="btn btn-default col-md-offset-2">Submit</button>
    </form>
  </div>

  <script>
    function checkPassword() {
      var pwd1 = $("#password1").val();
      var pwd2 = $("#password2").val();
      if (pwd1 != pwd2) {
        document.getElementById("password1").setCustomValidity("两次输入的密码不一致");
      } else {
        document.getElementById("password1").setCustomValidity("");
      }

    }
  </script>
Nach dem Login kopieren 3. Schaltflächenstil
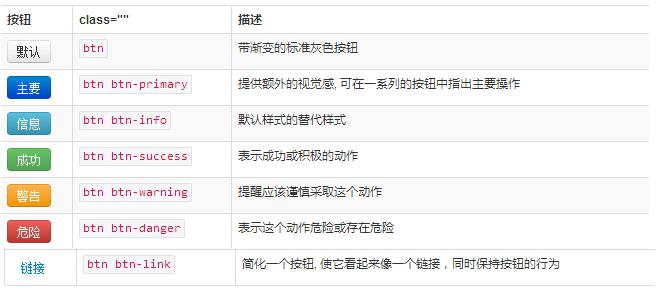
Verwenden Sie .btn-lg, .btn-sm, .btn-xs, um Schaltflächen unterschiedlicher Größe zu erhalten. Durch Hinzufügen von .btn-block zur Schaltfläche kann diese 100 % der Breite des übergeordneten Knotens und der Schaltfläche ausfüllen wird auch zum Blockebenenelement, ,
  <div class="container">
    <button type="button" class="btn btn-default btn-block">Default</button>
    <button type="button" class="btn btn-primary btn-block">Primary</button>
    <button type="button" class="btn btn-success">Success</button>
    <button type="button" class="btn btn-info">Info</button>
    <button type="button" class="btn btn-warning">Warning</button>
    <button type="button" class="btn btn-danger">Danger</button>
    <button type="button" class="btn btn-link">链接</button>
    <a class="btn btn-default" href="#" role="button">Link</a>
    <button class="btn btn-default" type="submit">Button</button>
    <input class="btn btn-default" type="button" value="Input">
    <input class="btn btn-default" type="submit" value="Submit">
  </div>
Nach dem Login kopieren Das Obige ist der gesamte Inhalt dieses Artikels. Ich hoffe, er wird für das Studium aller hilfreich sein. Erklärung dieser Website
Der Inhalt dieses Artikels wird freiwillig von Internetnutzern beigesteuert und das Urheberrecht liegt beim ursprünglichen Autor. Diese Website übernimmt keine entsprechende rechtliche Verantwortung. Wenn Sie Inhalte finden, bei denen der Verdacht eines Plagiats oder einer Rechtsverletzung besteht, wenden Sie sich bitte an admin@php.cn

Heiße KI -Werkzeuge
Undresser.AI UndressKI-gestützte App zum Erstellen realistischer Aktfotos 
AI Clothes RemoverOnline-KI-Tool zum Entfernen von Kleidung aus Fotos. 
Undress AI ToolAusziehbilder kostenlos 
Clothoff.ioKI-Kleiderentferner 
AI Hentai GeneratorErstellen Sie kostenlos Ai Hentai. 
Heißer Artikel
R.E.P.O. Energiekristalle erklärten und was sie tun (gelber Kristall)
2 Wochen vor
By 尊渡假赌尊渡假赌尊渡假赌
Wie lange dauert es, um Split Fiction zu schlagen?
1 Monate vor
By DDD
R.E.P.O. Dateispeicherspeicherort: Wo ist es und wie schützt sie?
1 Monate vor
By DDD
R.E.P.O. Beste grafische Einstellungen
2 Wochen vor
By 尊渡假赌尊渡假赌尊渡假赌
Assassin's Creed Shadows: Seashell Riddle -Lösung
1 Wochen vor
By DDD

Heiße Werkzeuge
Notepad++7.3.1Einfach zu bedienender und kostenloser Code-Editor 
SublimeText3 chinesische VersionChinesische Version, sehr einfach zu bedienen 
Senden Sie Studio 13.0.1Leistungsstarke integrierte PHP-Entwicklungsumgebung 
Dreamweaver CS6Visuelle Webentwicklungstools 
SublimeText3 Mac-VersionCodebearbeitungssoftware auf Gottesniveau (SublimeText3) 
Heiße Themen So legen Sie die Größe und Farbe der Schaltflächen in HTML fest
Mar 05, 2021 pm 05:16 PM
In HTML können Sie die Attribute „width“ und „height“ verwenden, um die Größe des Schaltflächenelements festzulegen, und das Attribut „background-color“, um die Farbe des Schaltflächenelements festzulegen. Die spezifische Syntax lautet „button{width: width value; height:“. Höhenwert; Hintergrundfarbe: Farbwert;}".  Binaryx wird wieder umbenannt, und die vier, die es der Gemeinschaft gibt, steigt im Begriff zu steigen?
Mar 04, 2025 pm 12:00 PM
Binaryx 'Token -Name Änderung: Von BNX auf vier und dann zu Form hat die tiefe Bedeutung hinter strategischen Anpassungen Binaryx kürzlich das Token -Symbol von vier bis $ $ Form geändert, das die Branche weit verbreitet hat. Dies ist nicht das erste Mal, dass Binaryx seinen Namen geändert hat, und sein Token -Symbol hat einen Übergang von BNX auf vier erlebt. In diesem Artikel werden die strategischen Absichten dieser Reihe von Namensänderungen eingehend untersucht. 1. Token Name Change-Prozess und strategische Überlegungen Binaryx starteten zunächst das $ BNX-Token auf der Basis der BNB-Kette im Jahr 2021, um das Gaming-Ökosystem von Play-to-Earn (P2E) zu unterstützen. Anfang 2024, um das Wirtschaftsmodell zu optimieren  So verwenden Sie die Vue3-Tabellenkomponente
May 12, 2023 pm 09:40 PM
Grundlegende Tabelle Bevor Sie die Tabellenkomponente entwickeln, überlegen Sie zunächst, welchen API-Stil Sie verwenden möchten. Da der Autor in der Produktionsarbeit Elemente verwendet, ähneln die Stile der vorherigen Komponenten denen von Element, aber dieses Mal habe ich nicht vor, den Elementstil zu verwenden . Ich habe vor, es zu ändern und direkt anzuzeigen: Wir erwarten, dass Benutzer es wie folgt verwenden: constdataList=[{id:1,name:'"JavaEE Enterprise Application Practice"',author:'dev1ce',price:'10.22 ',desc:&# 3  So deaktivieren Sie das Rendern von Schaltflächen in React
Jan 19, 2023 pm 01:58 PM
So deaktivieren Sie das Rendern von Schaltflächen in React: 1. Öffnen Sie die entsprechende js-Codedatei. 2. Suchen Sie nach „const flags = true; <Button invalid={flags}/>“ und ändern Sie den Wert „true“ in „false Button can“. deaktiviert sein.  Kann es in HTML5 mehrere Formulare geben?
Aug 01, 2022 pm 05:28 PM
In HTML5 kann es mehrere Formulare geben. Die Regeln erlauben die Verwendung mehrerer Formular-Tags auf derselben HTML-Seite. Um jedoch zu verhindern, dass das Backend sie beim Senden nicht erkennt, müssen Sie dem Formular unterschiedliche IDs oder Klassen hinzufügen. Die Syntax lautet „<from action= "url" id=" id value 1">Formularelement</from><from action="url" id="id value 2">Formularelement</from>.....".  Was ist das Tag, das das Formular in HTML5 definiert?
Jul 26, 2022 pm 04:26 PM
Der Tag, der ein Formular in HTML5 definiert, ist „<form>“. Mit dem Formular-Tag wird ein HTML-Formular (Formularfeld) für Benutzereingaben erstellt, um Benutzerinformationen zu sammeln und zu übertragen. Der gesamte Inhalt des Formulars wird mit der Syntax „<form action="Submit Address" method=" übermittelt. Submit-Methode „name="form name">form control</form>". Ein Formular kann ein oder mehrere Formularelemente enthalten, z. B. „input“, „select“ und „textarea“.  So verwenden Sie Button-Tags in HTML
Feb 24, 2021 pm 02:16 PM
In HTML wird das Button-Tag zum Definieren einer Schaltfläche verwendet, z. B. Text oder Bilder. Die Syntax lautet „<button type="button" onclick="js code">Button</button> ", Der Austauscheffekt kann durch die Kombination der Attribute von Button-Tags mit JS-Code erreicht werden.  So fügen Sie einer Tabelle in JQuery eine Zeile hinzu
May 29, 2023 pm 01:24 PM
So fügen Sie einer Tabelle mit jQuery eine Zeile hinzu: 1. Erstellen Sie eine HTML-Beispieldatei und referenzieren Sie die jQuery-Datei. 2. Verwenden Sie die Tags „table“, „tr“ und „td“, um eine Tabelle zu erstellen und binden Sie das Onclick-Klickereignis und führen Sie dann die Funktion „addhang()“ aus. 4. Definieren Sie eine Variable tr innerhalb der Funktion, um die Tabellenzeilen zu speichern, die hinzugefügt werden müssen Fügen Sie über die Methode „append()“ eine Zeile zur Tabelle hinzu. 
|


