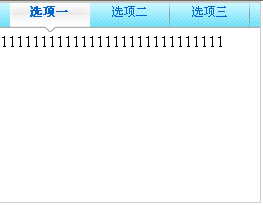
查了一下jq的官方插件编写文档(http://docs.jquery.com/Plugins/Authoring)以及文档中推荐的Mike Alsup写的一篇A Plugin Development Pattern。英语不是很好,但还是努力看下来(既学习到知识又能练习英语,何乐不为),照猫画虎的写了一个处女作——tabBox。
顾名思义,这个插件就是方便的产生具有tab选项卡功能“盒子”的。看图一下就明白

这样功能在网页上是非常肠炎宁个的,不论前台后台。
在这,我首先提供了3个参数用于自定义插件,
$.fn.tabBox.defaults = {
width : 260,
height : 200,
basePath : "tabBox/"
};
width和height定义“盒子”的宽度和高度,basePath用于定义使用插件的页面对插件文件夹的相对路径。这个选项的出现时不得已而为之,因为选项卡的样式中用到了图片,而必须要有一个基准路径才能正确找到图片的路径。这也是参照了一个叫jqtransform(
http://www.dfc-e.com/metiers/multimedia/opensource/jqtransform/)的插件的做法,他也有个参数用于指定图片文件夹所在的位置。当然还有一种做法,就是想WebUI(
http://www.jqueryui.com/)一样,样式写到css文件里,这样图片的引用就是先对与css文件的路径了,而这两个都是插件的组成部分,相对路劲是不变的。所以不用提供这个路径了。只是由于这个插件用到的样式比较少,所以没有采用这个方法。
插件的原理很简单,核心的函数就是一个render(),用于渲染出tab的样式:
$.fn.tabBox.render = function() {
$(".tabBox").css({
width : $.fn.tabBox.defaults.width+"px",
height : $.fn.tabBox.defaults.height+"px",
position : "relative",
border : "1px #ccc solid",
background : "url("+$.fn.tabBox.defaults.basePath+"tabHead.gif) top left repeat-x"
});
$(".tabBox h2").each(function(i){
$(this).css({
width : "80px",
height : "30px",
position : "absolute",
"border-top" : "none",
cursor : "pointer",
left : 10+(i*80),
background : "url("+$.fn.tabBox.defaults.basePath+"tabNormal.gif) top right no-repeat",
"text-align" : "center",
"font-size" : "12px",
"font-weight" : "normal",
color : "#06c",
"line-height" : "22px"
});
});
$(".tabBox div").each(function(){
$(this).css({
width : $.fn.tabBox.defaults.width+"px",
height : ($.fn.tabBox.defaults.height-30)+"px",
display : "none",
position : "absolute",
top : "30px"
});
});
$(".tabBox h2.curTab").css({
background : "url("+$.fn.tabBox.defaults.basePath+"tabCurTab.gif) top center no-repeat",
"font-weight" : "bolder"
});
$(".tabBox h2.curTab + div").css({
display : "block"
});
};
可以看到这个函数全都是设置样式的代码,(也让我体验了一下用jq设置css的快感,依然记得e.style.backgroud的时代~),这个函数保证了显示当前被激活的标签和对应的信息。另外,通过捕捉tab选项卡的click事件来改变当前的激活标签,再渲染一次就可以了。
$(".tabBox h2").click(function(){
$(".tabBox h2").removeClass("curTab");
$(this).addClass("curTab");
$.fn.tabBox.render();
});
写完之后的一点思考:
1、对插件自定义选项的做法看不太懂
// build main options before element iteration
var opts = $.extend({}, $.fn.tabBox.defaults, options);
// iterate and reformat each matched element
return this.each(function() {
$this = $(this);
// build element specific options
var o = $.meta ? $.extend({}, opts, $this.data()) : opts;
这差不多是从Mike Alsup的文章中照搬过来的。照他的说法,好像是可以自定义整个插件的选项,还可以定义某一个特定元素的选项,可我试了一下,似乎不可以~。难道是我没看懂他说的?
2、目前tab是捕捉click事件的,我想加强一下,可以自定义是捕捉click还是mouseover,是的,可以写两个事件处理函数。但怎么样来通过配置决定调用哪个处理程序呢?
打包下载


 Was sind die JQuery-Plug-Ins?
 So bedienen Sie JSON mit JQuery
 So löschen Sie Elemente in JQuery
 Verwendung der jQuery-Methode hover()
 jquery implementiert die Paging-Methode
 Was ist ein verstecktes Element in jquery?
 Was wird in jquery hervorgehoben?
 Methode zur Reparatur von Datenbankzweifeln
 So lösen Sie das Problem, dass der Win10-Ordner nicht gelöscht werden kann


