基于mootools的圆角边框扩展代码_Mootools
JQuery下面有个扩展是用纯JS生成的圆角,不过和DIV+CSS拼出来是一样的道理,圆角看上去都比较粗糙。
用背景图片要好看得多,问题是不能拉伸,最简单做法就是用四个角小图片加边框拼出来。不过这样多出N多图片,一堆乱七八糟的代码,相当不爽。
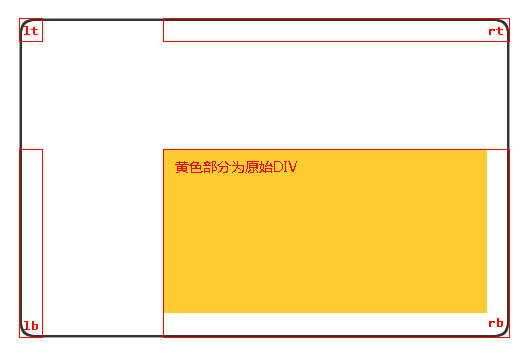
有一个很有技巧的方法,用一张大图片+CSS来做,原理如下。 
用一张大的背景图片做圆角,用CSS分别取四个角和边再拼成一个DIV。这样不仅可以解决圆角,还可以生成其它特殊的边框(比如阴影)。
但是每次使用都要加CSS也很不爽,于是用mootools写了一个Element类的扩展。
setBorder
Element.implement({
setBorder: function(pic, len) {
///
/// 设定容器边框(图片).
/// 已测div
///
/// 图片地址
/// 边框宽度
///
var content = this.clone();
var width = this.getSize().x + len * 2;
var height = this.getSize().y + len * 2;
this.empty().setStyles({ 'width': width, 'height': height });
var lt = new Element('div', {
'styles': {
'width': len,
'height': len,
'float': 'left',
'background': 'url(' + pic + ') no-repeat left top'
}
});
var rt = new Element('div', {
'styles': {
'width': width - len,
'height': len,
'float': 'left',
'background': 'url(' + pic + ') no-repeat right top'
}
});
var lb = new Element('div', {
'styles': {
'width': len,
'height': height - len,
'float': 'left',
'background': 'url(' + pic + ') no-repeat left bottom'
}
});
var rb = new Element('div', {
'styles': {
'width': width - len,
'height': height - len,
'float': 'left',
'background': 'url(' + pic + ') no-repeat right bottom'
}
});
content.inject(rb, 'top');
lt.inject(this, 'top');
rt.injectBottom(this);
lb.injectBottom(this);
rb.injectBottom(this);
return this;
}
});
这样在页面上直接调用setBorder方法传个背景图片,边框宽度进去就行了。
HTML代码

显显示效果
mootools边框demo http://demo.jb51.net/js/mootools_yj/demo.htm
打包下载
[Ctrl+A 全选 注:如需引入外部Js需刷新才能执行]
以前用Jquery也写过一个,居然找不着了,不过原理是一样的。

Heiße KI -Werkzeuge

Undresser.AI Undress
KI-gestützte App zum Erstellen realistischer Aktfotos

AI Clothes Remover
Online-KI-Tool zum Entfernen von Kleidung aus Fotos.

Undress AI Tool
Ausziehbilder kostenlos

Clothoff.io
KI-Kleiderentferner

AI Hentai Generator
Erstellen Sie kostenlos Ai Hentai.

Heißer Artikel

Heiße Werkzeuge

Notepad++7.3.1
Einfach zu bedienender und kostenloser Code-Editor

SublimeText3 chinesische Version
Chinesische Version, sehr einfach zu bedienen

Senden Sie Studio 13.0.1
Leistungsstarke integrierte PHP-Entwicklungsumgebung

Dreamweaver CS6
Visuelle Webentwicklungstools

SublimeText3 Mac-Version
Codebearbeitungssoftware auf Gottesniveau (SublimeText3)

Heiße Themen
 1386
1386
 52
52
 Was soll ich tun, wenn ich auf den Codendruck auf Kleidungsstücke für Front-End-Thermalpapier-Quittungen stoße?
Apr 04, 2025 pm 02:42 PM
Häufig gestellte Fragen und Lösungen für das Ticket-Ticket-Ticket-Ticket in Front-End im Front-End-Entwicklungsdruck ist der Ticketdruck eine häufige Voraussetzung. Viele Entwickler implementieren jedoch ...
 Wer bekommt mehr Python oder JavaScript bezahlt?
Apr 04, 2025 am 12:09 AM
Es gibt kein absolutes Gehalt für Python- und JavaScript -Entwickler, je nach Fähigkeiten und Branchenbedürfnissen. 1. Python kann mehr in Datenwissenschaft und maschinellem Lernen bezahlt werden. 2. JavaScript hat eine große Nachfrage in der Entwicklung von Front-End- und Full-Stack-Entwicklung, und sein Gehalt ist auch beträchtlich. 3. Einflussfaktoren umfassen Erfahrung, geografische Standort, Unternehmensgröße und spezifische Fähigkeiten.
 Wie fusioniere ich Arrayelemente mit derselben ID mit JavaScript in ein Objekt?
Apr 04, 2025 pm 05:09 PM
Wie fusioniere ich Array -Elemente mit derselben ID in ein Objekt in JavaScript? Bei der Verarbeitung von Daten begegnen wir häufig die Notwendigkeit, dieselbe ID zu haben ...
 Entmystifizieren JavaScript: Was es tut und warum es wichtig ist
Apr 09, 2025 am 12:07 AM
JavaScript ist der Eckpfeiler der modernen Webentwicklung. Zu den Hauptfunktionen gehören eine ereignisorientierte Programmierung, die Erzeugung der dynamischen Inhalte und die asynchrone Programmierung. 1) Ereignisgesteuerte Programmierung ermöglicht es Webseiten, sich dynamisch entsprechend den Benutzeroperationen zu ändern. 2) Die dynamische Inhaltsgenerierung ermöglicht die Anpassung der Seiteninhalte gemäß den Bedingungen. 3) Asynchrone Programmierung stellt sicher, dass die Benutzeroberfläche nicht blockiert ist. JavaScript wird häufig in der Webinteraktion, der einseitigen Anwendung und der serverseitigen Entwicklung verwendet, wodurch die Flexibilität der Benutzererfahrung und die plattformübergreifende Entwicklung erheblich verbessert wird.
 Der Unterschied in der Konsole.log -Ausgabeergebnis: Warum unterscheiden sich die beiden Anrufe?
Apr 04, 2025 pm 05:12 PM
Eingehende Diskussion der Ursachen des Unterschieds in der Konsole.log-Ausgabe. In diesem Artikel wird die Unterschiede in den Ausgabeergebnissen der Konsolenfunktion in einem Code analysiert und die Gründe dafür erläutert. � ...
 Wie kann man Parallax -Scrolling- und Element -Animationseffekte wie die offizielle Website von Shiseido erzielen?
oder:
Wie können wir den Animationseffekt erzielen, der von der Seite mit der Seite mit der offiziellen Website von Shiseido begleitet wird?
Apr 04, 2025 pm 05:36 PM
Diskussion über die Realisierung von Parallaxe -Scrolling- und Elementanimationseffekten in diesem Artikel wird untersuchen, wie die offizielle Website der Shiseeido -Website (https://www.shiseeido.co.jp/sb/wonderland/) ähnlich ist ...
 TypeScript für Anfänger, Teil 2: Grundlegende Datentypen
Mar 19, 2025 am 09:10 AM
Sobald Sie das Typscript-Tutorial für Einstiegsklasse gemeistert haben, sollten Sie in der Lage sein, Ihren eigenen Code in eine IDE zu schreiben, die TypeScript unterstützt und in JavaScript zusammenfasst. Dieses Tutorial wird in verschiedenen Datentypen in TypeScript eingetaucht. JavaScript hat sieben Datentypen: NULL, UNDEFINED, BOOLEAN, NUMMER, STRING, SYMBOL (durch ES6 eingeführt) und Objekt. TypeScript definiert mehr Typen auf dieser Grundlage, und dieses Tutorial wird alle ausführlich behandelt. Null -Datentyp Wie JavaScript, null in TypeScript
 Kann PowerPoint JavaScript ausführen?
Apr 01, 2025 pm 05:17 PM
JavaScript kann in PowerPoint ausgeführt werden und durch Aufrufen externer JavaScript -Dateien oder der Einbettung von HTML -Dateien über VBA implementiert werden. 1. Um VBA zu verwenden, um JavaScript -Dateien aufzurufen, müssen Sie Makros aktivieren und VBA -Programmierkenntnisse haben. 2. Einbetten Sie HTML -Dateien ein, die JavaScript enthalten, die einfach und einfach zu bedienen sind, aber Sicherheitsbeschränkungen unterliegen. Zu den Vorteilen zählen erweiterte Funktionen und Flexibilität, während Nachteile Sicherheit, Kompatibilität und Komplexität beinhalten. In der Praxis sollte die Aufmerksamkeit auf Sicherheit, Kompatibilität, Leistung und Benutzererfahrung geschenkt werden.


