纯CSS实现tooltip提示框,CSS箭头及形状之续篇给整个tooltip提示框加个边框
本片介绍仅用CSS做出tooltip那样的提示框及箭头等形状!
首先介绍一下CSS:after选择器
定义和用法:(参考w3school:after选择器)
:after选择器在被选元素的内容后面插入内容,使用content属性来指定要插入的内容
例:
p:after
{
content:"台词:-";
background-color:yellow;
color:red;
font-weight:bold;
}面来介绍用:after选择器来制作CSS箭头等提示框:(这里将一步一步简单的设计,每一步添加的内容就是与前一步多出来的style代码内容,注意区别!)
首先,我们的HTML代码:
<body>
<div class="demo">
</div>
</body>
让我们来设置该盒子的样式:
<style>
.demo{
background-color: lightgreen;
height: 100px;
position: relative;
width: 100px;
}</style>截图:
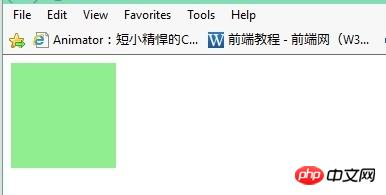
这里需注意我们设置position属性为relative,是为了允许我们设置我们的“箭头”(还没有出现)绝对定位并且保持它和我们的盒子有联系!
接着我们继续插入“箭头”(还没有出现)基本样式:
<style>
.demo{
background-color: lightgreen;
height: 100px;
position: relative;
width: 100px;
}
.demo:after{
content:'';
position:absolute;
height:20px;
width:20px;
background:yellow;
}</style>截图:
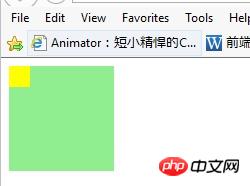
你将会注意到一些事,一、我们仅仅插入了一个黄色的方块,那个就是我们将要设计成箭头的方块;二、我们设置绝对定位absolute以至于我们可以将它移动到我们想要的位置上!
继续,这儿给黄色方块(即“箭头”前身)设置边框,这儿的边框就是箭头的实体,并且去掉黄色方块的内容(通过设置。demo:after中的样式“height:0;width:0”去掉黄色方块,这里我们省略了黄色方块的height、width):
<style>
.demo{
background-color: lightgreen;
height: 100px;
position: relative;
width: 100px;
}
.demo:after{
content:'';
position:absolute;
//height:20px;
//width:20px;
background:yellow;
border:10px solid gray;
}</style>截图:
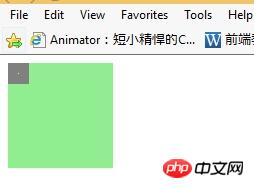
现在再将灰色边框方块设计成箭头形式:
<style>
.demo{
background-color: lightgreen;
height: 100px;
position: relative;
width: 100px;
}
.demo:after{
content:'';
position:absolute;
//height:20px;
//width:20px;
//background:yellow;
//border:10px solid gray;
border:10px solid transparent;
border-top-color:gray }
</style>截图:
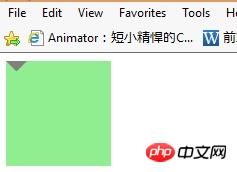
OK!我们可以看到箭头成形!
下面来设置它的位置为我们想要的(此例箭头移动至下端):
<style>
.demo{
background-color: lightgreen;
height: 100px;
position: relative;
width: 100px;
}
.demo:after{
content:'';
position:absolute;
//height:20px;
//width:20px;
//background:yellow;
//border:10px solid gray;
border:10px solid transparent;
border-top-color:gray;
top:100%;
left:10px;
}</style>截图:
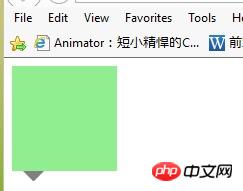
到这里基本上完事了
下面整体样式设计下(其实就更改了盒子的背景色与箭头颜色相同):
<style>
.demo{
background-color: gray;
height: 100px;
position: relative;
width: 100px;
}
.demo:after{
content:'';
position:absolute;
//height:20px;
//width:20px;
//background:yellow;
//border:10px solid gray;
border:10px solid transparent;
border-top-color:gray;
top:100%;
left:10px;
}</style>截图:
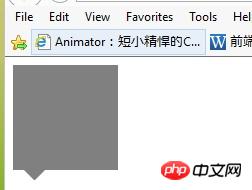
具体需要什么样的样式可以自行设置了!例如将箭头移动到其他三边可以设置border-T\R\B\L-color:gray;和TRBL(TRBL是指top\right\bottom\left)即可!
当然要修改箭头在盒子边框上的位置时,还需注意:边框border的大小不包含在自身盒子尺寸内!所以设计时需要注意margin的影响,比如箭头在下边框中居中,我们考虑上面的同时还需添加:“ margin-left:-10px; ”才可居中!
结论来自yy浮萍人生的评论(简洁形象~~哈哈~~):
此例设计原理:设置伪类选择器盒子的宽度和高度为0,那边border形成的区域是[X]这个样子的,其他三边透明了,所以呢就显示了个三角形!
本文来源:https://www.cnblogs.com/xuyongsky1234/p/4152853.html

Heiße KI -Werkzeuge

Undresser.AI Undress
KI-gestützte App zum Erstellen realistischer Aktfotos

AI Clothes Remover
Online-KI-Tool zum Entfernen von Kleidung aus Fotos.

Undress AI Tool
Ausziehbilder kostenlos

Clothoff.io
KI-Kleiderentferner

Video Face Swap
Tauschen Sie Gesichter in jedem Video mühelos mit unserem völlig kostenlosen KI-Gesichtstausch-Tool aus!

Heißer Artikel

Heiße Werkzeuge

Notepad++7.3.1
Einfach zu bedienender und kostenloser Code-Editor

SublimeText3 chinesische Version
Chinesische Version, sehr einfach zu bedienen

Senden Sie Studio 13.0.1
Leistungsstarke integrierte PHP-Entwicklungsumgebung

Dreamweaver CS6
Visuelle Webentwicklungstools

SublimeText3 Mac-Version
Codebearbeitungssoftware auf Gottesniveau (SublimeText3)

Heiße Themen
 Ist HTML für Anfänger leicht zu lernen?
Apr 07, 2025 am 12:11 AM
HTML ist für Anfänger geeignet, da es einfach und leicht zu lernen ist und schnell Ergebnisse sehen kann. 1) Die Lernkurve von HTML ist glatt und leicht zu beginnen. 2) Beherrschen Sie einfach die grundlegenden Tags, um Webseiten zu erstellen. 3) hohe Flexibilität und kann in Kombination mit CSS und JavaScript verwendet werden. 4) Reiche Lernressourcen und moderne Tools unterstützen den Lernprozess.
 Die Rollen von HTML, CSS und JavaScript: Kernverantwortung
Apr 08, 2025 pm 07:05 PM
HTML definiert die Webstruktur, CSS ist für Stil und Layout verantwortlich, und JavaScript ergibt eine dynamische Interaktion. Die drei erfüllen ihre Aufgaben in der Webentwicklung und erstellen gemeinsam eine farbenfrohe Website.
 Was ist ein Beispiel für ein Start -Tag in HTML?
Apr 06, 2025 am 12:04 AM
AnexampleofaTartingTaginHtmlis, die, die starttagsaresesinginhtmlastheyinitiateElements, definetheirtypes, andarecrucialForstructuringwebpages und -konstruktionsthedoms.
 HTML, CSS und JavaScript verstehen: Ein Anfängerhandbuch
Apr 12, 2025 am 12:02 AM
WebdevelopmentRelieSonHtml, CSS und JavaScript: 1) HtmlStructuresContent, 2) CSSstylesit und 3) JavaScriptaddssinteraktivität, Bildung von TheBasisofModerernwebexperiences.
 Wie kann man adaptives Layout der Y-Achse-Position in Webanmerkungen implementieren?
Apr 04, 2025 pm 11:30 PM
Der ad-axis-Position adaptive Algorithmus für Webanmerkungen In diesem Artikel wird untersucht, wie Annotationsfunktionen ähnlich wie Word-Dokumente implementiert werden, insbesondere wie man mit dem Intervall zwischen Anmerkungen umgeht ...
 Gitee Pages statische Website -Bereitstellung fehlgeschlagen: Wie können Sie einzelne Dateien 404 Fehler beheben und beheben?
Apr 04, 2025 pm 11:54 PM
GitePages statische Website -Bereitstellung fehlgeschlagen: 404 Fehlerbehebung und Auflösung bei der Verwendung von Gitee ...
 HTML, CSS und JavaScript: Wesentliche Tools für Webentwickler
Apr 09, 2025 am 12:12 AM
HTML, CSS und JavaScript sind die drei Säulen der Webentwicklung. 1. HTML definiert die Webseitenstruktur und verwendet Tags wie z.
 Wie verwendet ich CSS3 und JavaScript, um den Effekt der Streuung und Vergrößerung der umgebenden Bilder nach dem Klicken zu erreichen?
Apr 05, 2025 am 06:15 AM
Um den Effekt der Streuung und Vergrößerung der umgebenden Bilder nach dem Klicken auf das Bild zu erreichen, müssen viele Webdesigns einen interaktiven Effekt erzielen: Klicken Sie auf ein bestimmtes Bild, um die Umgebung zu machen ...


