

【Android】第5章(2)按钮和文本框

分类:C#、Android、VS2015; 创建日期:2016-02-07 一、简介 1、Button 常规按钮。 2、TextView 文本视图,其功能和WPF的TextBlock控件类似,【工具箱】中提供的3个组件实际上是同一个TextView控件用不同的属性来区分的,这3个不同的属性在【工具箱】中对应
分类:C#、Android、VS2015;
创建日期:2016-02-07
一、简介
1、Button
常规按钮。
2、TextView
文本视图,其功能和WPF的TextBlock控件类似,【工具箱】中提供的3个组件实际上是同一个TextView控件用不同的属性来区分的,这3个不同的属性在【工具箱】中对应的名称如下:
- Text(Large):大字体的TextView
- Text(Medium):中等字体的TextView
- Text(small):小字体的TextView
3、EditText
文本框,其功能和WinForm的TextBox类似,区别仅是WinForm的TextBox在【工具箱】中只有一个,然后通过属性设置是普通文本还是密码输入;而Android的EditText实际上也是通过属性来区分是普通文本还是密码输入,但在工具箱中分别以组件的形式提供了,这2个不同的属性在【工具箱】中对应的名称如下:
- PlainText:常规的EditText
- PassWord:密码输入的EditText
二、示例1—Demo1EditText
本示例演示如何功能:
- 在文本框中输入信息时立即在另一个文本框中显示所键入的字符。
- Toast基本用法。
- 常规文本框和密码输入文本框的基本用法。
1、运行截图

2、主要设计步骤
(1)添加demo01_EditTextaxml文件
<span style="color: #0000ff;"></span><span style="color: #ff00ff;">xml version="1.0" encoding="utf-8"</span><span style="color: #0000ff;">?></span>
<span style="color: #0000ff;"><span style="color: #800000;">LinearLayout </span><span style="color: #ff0000;">xmlns:android</span><span style="color: #0000ff;">="http://schemas.android.com/apk/res/android"</span><span style="color: #ff0000;">
    android:orientation</span><span style="color: #0000ff;">="vertical"</span><span style="color: #ff0000;">
    android:layout_width</span><span style="color: #0000ff;">="match_parent"</span><span style="color: #ff0000;">
    android:layout_height</span><span style="color: #0000ff;">="match_parent"</span><span style="color: #0000ff;">></span>
  <span style="color: #0000ff;"><span style="color: #800000;">TextView
      </span><span style="color: #ff0000;">android:text</span><span style="color: #0000ff;">="文本框基本用法"</span><span style="color: #ff0000;">
      android:layout_width</span><span style="color: #0000ff;">="match_parent"</span><span style="color: #ff0000;">
      android:layout_height</span><span style="color: #0000ff;">="wrap_content"</span><span style="color: #ff0000;">
      android:id</span><span style="color: #0000ff;">="@+id/textView1"</span> <span style="color: #0000ff;">/></span>
  <span style="color: #0000ff;"><span style="color: #800000;">EditText
      </span><span style="color: #ff0000;">android:layout_width</span><span style="color: #0000ff;">="match_parent"</span><span style="color: #ff0000;">
      android:layout_height</span><span style="color: #0000ff;">="wrap_content"</span><span style="color: #ff0000;">
      android:id</span><span style="color: #0000ff;">="@+id/editText1"</span> <span style="color: #0000ff;">/></span>
  <span style="color: #0000ff;"><span style="color: #800000;">EditText
      </span><span style="color: #ff0000;">android:inputType</span><span style="color: #0000ff;">="textPassword"</span><span style="color: #ff0000;">
      android:layout_width</span><span style="color: #0000ff;">="match_parent"</span><span style="color: #ff0000;">
      android:layout_height</span><span style="color: #0000ff;">="wrap_content"</span><span style="color: #ff0000;">
      android:id</span><span style="color: #0000ff;">="@+id/editText2"</span> <span style="color: #0000ff;">/></span>
  <span style="color: #0000ff;"><span style="color: #800000;">TextView
      </span><span style="color: #ff0000;">android:text</span><span style="color: #0000ff;">=""</span><span style="color: #ff0000;">
      android:layout_width</span><span style="color: #0000ff;">="match_parent"</span><span style="color: #ff0000;">
      android:layout_height</span><span style="color: #0000ff;">="wrap_content"</span><span style="color: #ff0000;">
      android:id</span><span style="color: #0000ff;">="@+id/txtResult"</span><span style="color: #ff0000;">
      android:gravity</span><span style="color: #0000ff;">="center_horizontal"</span><span style="color: #ff0000;">
      android:layout_marginTop</span><span style="color: #0000ff;">="20dp"</span> <span style="color: #0000ff;">/></span>
<span style="color: #0000ff;"></span><span style="color: #800000;">LinearLayout</span><span style="color: #0000ff;">></span></span></span></span></span></span>(2)添加Demo01EditText.cs文件
先在项目根目录下添加一个SrcActivity文件夹,然后在该文件夹下添加.cs文件,这些文件选择的模板都是【Activity】。
<span style="color: #0000ff;">using</span><span style="color: #000000;"> Android.App;
</span><span style="color: #0000ff;">using</span><span style="color: #000000;"> Android.OS;
</span><span style="color: #0000ff;">using</span><span style="color: #000000;"> Android.Widget;
</span><span style="color: #0000ff;">using</span><span style="color: #000000;"> Android.Graphics;
</span><span style="color: #0000ff;">namespace</span><span style="color: #000000;"> ch05demos.SrcActivity
{
    [Activity(Label </span>= <span style="color: #800000;">"</span><span style="color: #800000;">TextBoxDemo</span><span style="color: #800000;">"</span><span style="color: #000000;">)]
    </span><span style="color: #0000ff;">public</span> <span style="color: #0000ff;">class</span><span style="color: #000000;"> Demo01EditText : Activity
    {
        </span><span style="color: #0000ff;">PRotected</span> <span style="color: #0000ff;">override</span> <span style="color: #0000ff;">void</span><span style="color: #000000;"> OnCreate(Bundle savedInstanceState)
        {
            </span><span style="color: #0000ff;">base</span><span style="color: #000000;">.OnCreate(savedInstanceState);
            SetContentView(Resource.Layout.demo01_EditText);

            </span><span style="color: #0000ff;">var</span> txtResult = FindViewById<textview><span style="color: #000000;">(Resource.Id.txtResult);
            txtResult.SetTextColor(Color.Red);
            txtResult.Enabled </span>= <span style="color: #0000ff;">false</span><span style="color: #000000;">;

            </span><span style="color: #0000ff;">var</span> txt1 = FindViewById<edittext><span style="color: #000000;">(Resource.Id.editText1);
            txt1.TextChanged </span>+= (s, e) =><span style="color: #000000;">
            {
                txtResult.Text </span>= <span style="color: #800000;">"</span><span style="color: #800000;">输入的内容为:</span><span style="color: #800000;">"</span> +<span style="color: #000000;"> txt1.Text;
            };

            </span><span style="color: #0000ff;">var</span> txt2 = FindViewById<edittext><span style="color: #000000;">(Resource.Id.editText2);
            txt2.TextChanged </span>+= (s, e) =><span style="color: #000000;">
            {
                txtResult.Text </span>= <span style="color: #800000;">"</span><span style="color: #800000;">输入的内容为:</span><span style="color: #800000;">"</span> +<span style="color: #000000;"> txt2.Text;
            };
        }
    }
}</span></edittext></edittext></textview>运行即得到截图所示的结果。
如果希望在文本输入过程中立即判断键入的是哪个字符,可利用下面的事件来实现(用模拟器测试时,仅在硬件键盘开启时才有效):
EditText edittext = FindViewById<edittext><span style="color: #000000;">(Resource.Id.edittext);
edittext.KeyPress </span>+= (s, e) =><span style="color: #000000;">
{
    e.Handled </span>= <span style="color: #0000ff;">false</span><span style="color: #000000;">;
    </span><span style="color: #0000ff;">if</span> (e.Event.Action == KeyEventActions.Down && e.KeyCode ==<span style="color: #000000;"> Keycode.Enter) {
        Toast.MakeText (</span><span style="color: #0000ff;">this</span><span style="color: #000000;">, edittext.Text, ToastLength.Short).Show ();
        e.Handled </span>= <span style="color: #0000ff;">true</span><span style="color: #000000;">;
    }
};</span></edittext>
三、示例2--Demo02Login
在一个应用中,登录是最最基本的界面,该例子演示如何利用Button、TextView、EditText基本控件开发一个简单的登录窗口。
运行截图:

主要设计步骤:
(1)在layout文件夹下添加demo02_Login.axml文件。在该文件的【设计】视图中,从【工具箱】中拖放以下控件:
Text(Medium):生成中等的TextView
PlainText:生成明文输入的EditText
Password:生成密码输入的EditText
Button:生成Button
(2)在【属性】窗口中设置各控件对应的属性。最后生成的代码如下:
<span style="color: #0000ff;"></span><span style="color: #ff00ff;">xml version="1.0" encoding="utf-8"</span><span style="color: #0000ff;">?></span>
<span style="color: #0000ff;"><span style="color: #800000;">LinearLayout </span><span style="color: #ff0000;">xmlns:android</span><span style="color: #0000ff;">="http://schemas.android.com/apk/res/android"</span><span style="color: #ff0000;">
    android:orientation</span><span style="color: #0000ff;">="vertical"</span><span style="color: #ff0000;">
    android:layout_width</span><span style="color: #0000ff;">="match_parent"</span><span style="color: #ff0000;">
    android:layout_height</span><span style="color: #0000ff;">="match_parent"</span><span style="color: #0000ff;">></span>
  <span style="color: #0000ff;"><span style="color: #800000;">TextView
      </span><span style="color: #ff0000;">android:text</span><span style="color: #0000ff;">="用户名"</span><span style="color: #ff0000;">
      android:textAppearance</span><span style="color: #0000ff;">="?android:attr/textAppearanceMedium"</span><span style="color: #ff0000;">
      android:layout_width</span><span style="color: #0000ff;">="match_parent"</span><span style="color: #ff0000;">
      android:layout_height</span><span style="color: #0000ff;">="wrap_content"</span><span style="color: #ff0000;">
      android:id</span><span style="color: #0000ff;">="@+id/textView1"</span> <span style="color: #0000ff;">/></span>
  <span style="color: #0000ff;"><span style="color: #800000;">EditText
      </span><span style="color: #ff0000;">android:layout_width</span><span style="color: #0000ff;">="match_parent"</span><span style="color: #ff0000;">
      android:layout_height</span><span style="color: #0000ff;">="wrap_content"</span><span style="color: #ff0000;">
      android:id</span><span style="color: #0000ff;">="@+id/editTextUserName"</span> <span style="color: #0000ff;">/></span>
  <span style="color: #0000ff;"><span style="color: #800000;">TextView
      </span><span style="color: #ff0000;">android:text</span><span style="color: #0000ff;">="密码"</span><span style="color: #ff0000;">
      android:textAppearance</span><span style="color: #0000ff;">="?android:attr/textAppearanceMedium"</span><span style="color: #ff0000;">
      android:layout_width</span><span style="color: #0000ff;">="match_parent"</span><span style="color: #ff0000;">
      android:layout_height</span><span style="color: #0000ff;">="wrap_content"</span><span style="color: #ff0000;">
      android:id</span><span style="color: #0000ff;">="@+id/textView2"</span> <span style="color: #0000ff;">/></span>
  <span style="color: #0000ff;"><span style="color: #800000;">EditText
      </span><span style="color: #ff0000;">android:inputType</span><span style="color: #0000ff;">="textPassword"</span><span style="color: #ff0000;">
      android:layout_width</span><span style="color: #0000ff;">="match_parent"</span><span style="color: #ff0000;">
      android:layout_height</span><span style="color: #0000ff;">="wrap_content"</span><span style="color: #ff0000;">
      android:id</span><span style="color: #0000ff;">="@+id/editTextPwd"</span> <span style="color: #0000ff;">/></span>
  <span style="color: #0000ff;"><span style="color: #800000;">Button
      </span><span style="color: #ff0000;">android:text</span><span style="color: #0000ff;">="登录"</span><span style="color: #ff0000;">
      android:layout_width</span><span style="color: #0000ff;">="100dp"</span><span style="color: #ff0000;">
      android:layout_height</span><span style="color: #0000ff;">="wrap_content"</span><span style="color: #ff0000;">
      android:id</span><span style="color: #0000ff;">="@+id/buttonLogin"</span><span style="color: #ff0000;">
      android:layout_gravity</span><span style="color: #0000ff;">="center_horizontal"</span> <span style="color: #0000ff;">/></span>
<span style="color: #0000ff;"></span><span style="color: #800000;">LinearLayout</span><span style="color: #0000ff;">></span></span></span></span></span></span></span>(3)保存所有打开的文件,以便能在.cs中键入代码时能看到智能提示。说明:如果在.cs文件中仍然看不到ID的智能提示,单击【解决方案资源管理器】上方的【刷新】按钮即可。
(4)在SrcActivity文件夹下添加Demo02Login.cs文件,将代码改为下面的内容:
<span style="color: #0000ff;">using</span><span style="color: #000000;"> System;
</span><span style="color: #0000ff;">using</span><span style="color: #000000;"> Android.App;
</span><span style="color: #0000ff;">using</span><span style="color: #000000;"> Android.OS;
</span><span style="color: #0000ff;">using</span><span style="color: #000000;"> Android.Widget;
</span><span style="color: #0000ff;">namespace</span><span style="color: #000000;"> ch05demos.SrcActivity
{
    [Activity(Label </span>= <span style="color: #800000;">"</span><span style="color: #800000;">LoginDemo</span><span style="color: #800000;">"</span><span style="color: #000000;">)]
    </span><span style="color: #0000ff;">public</span> <span style="color: #0000ff;">class</span><span style="color: #000000;"> Demo02Login : Activity
    {
        </span><span style="color: #0000ff;">protected</span> <span style="color: #0000ff;">override</span> <span style="color: #0000ff;">void</span><span style="color: #000000;"> OnCreate(Bundle savedInstanceState)
        {
            </span><span style="color: #0000ff;">base</span><span style="color: #000000;">.OnCreate(savedInstanceState);
            SetContentView(Resource.Layout.demo02_Login);
            Button btn </span>= FindViewById<button><span style="color: #000000;">(Resource.Id.buttonLogin);
            btn.Click </span>+= Btn_Click;  <span style="color: #008000;">//</span><span style="color: #008000;">技巧:按+=后,连续按两次<tab>键</tab></span>
<span style="color: #000000;">        }

        </span><span style="color: #0000ff;">private</span> <span style="color: #0000ff;">void</span> Btn_Click(<span style="color: #0000ff;">object</span><span style="color: #000000;"> sender, EventArgs e)
        {
            </span><span style="color: #0000ff;">var</span> userName = FindViewById<edittext><span style="color: #000000;">(Resource.Id.editTextUserName);
            </span><span style="color: #0000ff;">var</span> pwd = FindViewById<edittext><span style="color: #000000;">(Resource.Id.editTextPwd);
            Toast.MakeText(</span><span style="color: #0000ff;">this</span><span style="color: #000000;">,
                </span><span style="color: #0000ff;">string</span>.Format(<span style="color: #800000;">"</span><span style="color: #800000;">用户名:{0}, 密码:{1}</span><span style="color: #800000;">"</span><span style="color: #000000;">, userName.Text, pwd.Text),
                </span><span style="color: #008000;">//</span><span style="color: #008000;">技巧:按空格</span>
<span style="color: #000000;">                ToastLength.Long).Show();
        }
    }
}</span></edittext></edittext></button>运行,即得到截图所示的效果。

Heiße KI -Werkzeuge

Undresser.AI Undress
KI-gestützte App zum Erstellen realistischer Aktfotos

AI Clothes Remover
Online-KI-Tool zum Entfernen von Kleidung aus Fotos.

Undress AI Tool
Ausziehbilder kostenlos

Clothoff.io
KI-Kleiderentferner

AI Hentai Generator
Erstellen Sie kostenlos Ai Hentai.

Heißer Artikel
Heiße Werkzeuge

Notepad++7.3.1
Einfach zu bedienender und kostenloser Code-Editor

SublimeText3 chinesische Version
Chinesische Version, sehr einfach zu bedienen

Senden Sie Studio 13.0.1
Leistungsstarke integrierte PHP-Entwicklungsumgebung

Dreamweaver CS6
Visuelle Webentwicklungstools

SublimeText3 Mac-Version
Codebearbeitungssoftware auf Gottesniveau (SublimeText3)
Heiße Themen
 1380
1380
 52
52

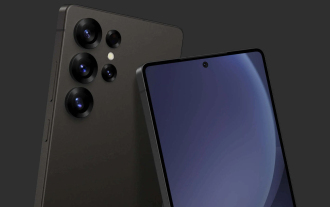
 Neuer Bericht liefert eine vernichtende Einschätzung der angeblichen Kamera-Upgrades für das Samsung Galaxy S25, Galaxy S25 Plus und Galaxy S25 Ultra
Sep 12, 2024 pm 12:23 PM
Neuer Bericht liefert eine vernichtende Einschätzung der angeblichen Kamera-Upgrades für das Samsung Galaxy S25, Galaxy S25 Plus und Galaxy S25 Ultra
Sep 12, 2024 pm 12:23 PM
In den letzten Tagen hat Ice Universe immer wieder Details zum Galaxy S25 Ultra enthüllt, von dem allgemein angenommen wird, dass es das nächste Flaggschiff-Smartphone von Samsung ist. Der Leaker behauptete unter anderem, Samsung plane nur ein Kamera-Upgrade
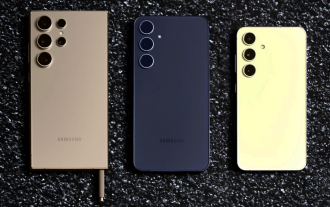
 Beim Samsung Galaxy S25 Ultra sind erste Renderbilder durchgesickert und Gerüchte über Designänderungen wurden enthüllt
Sep 11, 2024 am 06:37 AM
Beim Samsung Galaxy S25 Ultra sind erste Renderbilder durchgesickert und Gerüchte über Designänderungen wurden enthüllt
Sep 11, 2024 am 06:37 AM
OnLeaks hat sich nun mit Android Headlines zusammengetan, um einen ersten Blick auf das Galaxy S25 Ultra zu werfen, nur wenige Tage nach dem gescheiterten Versuch, mehr als 4.000 US-Dollar von seinen X-Followern (ehemals Twitter) zu generieren. Für den Kontext sind die unten eingebetteten Renderbilder h
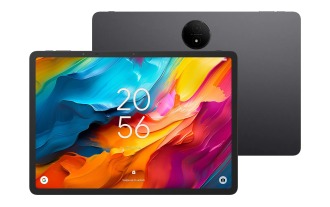 IFA 2024 | Das NXTPAPER 14 von TCL wird in der Leistung nicht mit dem Galaxy Tab S10 Ultra mithalten können, in der Größe aber fast
Sep 07, 2024 am 06:35 AM
IFA 2024 | Das NXTPAPER 14 von TCL wird in der Leistung nicht mit dem Galaxy Tab S10 Ultra mithalten können, in der Größe aber fast
Sep 07, 2024 am 06:35 AM
Neben der Ankündigung zweier neuer Smartphones hat TCL auch ein neues Android-Tablet namens NXTPAPER 14 angekündigt, dessen riesige Bildschirmgröße eines seiner Verkaufsargumente ist. Das NXTPAPER 14 verfügt über Version 3.0 der matten LCD-Panels der Signaturmarke von TCL
 Das Vivo Y300 Pro bietet einen 6.500-mAh-Akku in einem schlanken 7,69-mm-Gehäuse
Sep 07, 2024 am 06:39 AM
Das Vivo Y300 Pro bietet einen 6.500-mAh-Akku in einem schlanken 7,69-mm-Gehäuse
Sep 07, 2024 am 06:39 AM
Das Vivo Y300 Pro wurde gerade vollständig vorgestellt und ist eines der schlanksten Mittelklasse-Android-Telefone mit einem großen Akku. Genauer gesagt ist das Smartphone nur 7,69 mm dick, verfügt aber über einen 6.500 mAh starken Akku. Dies ist die gleiche Kapazität wie bei der kürzlich eingeführten Version
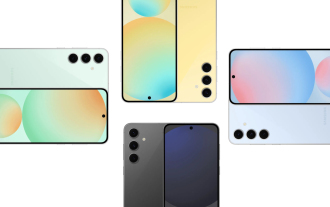 Das Samsung Galaxy S24 FE soll in vier Farben und zwei Speicheroptionen für weniger als erwartet auf den Markt kommen
Sep 12, 2024 pm 09:21 PM
Das Samsung Galaxy S24 FE soll in vier Farben und zwei Speicheroptionen für weniger als erwartet auf den Markt kommen
Sep 12, 2024 pm 09:21 PM
Samsung hat noch keine Hinweise darauf gegeben, wann es seine Smartphone-Serie Fan Edition (FE) aktualisieren wird. Derzeit ist das Galaxy S23 FE nach wie vor die jüngste Ausgabe des Unternehmens und wurde Anfang Oktober 2023 vorgestellt
 Neuer Bericht liefert eine vernichtende Einschätzung der angeblichen Kamera-Upgrades für das Samsung Galaxy S25, Galaxy S25 Plus und Galaxy S25 Ultra
Sep 12, 2024 pm 12:22 PM
Neuer Bericht liefert eine vernichtende Einschätzung der angeblichen Kamera-Upgrades für das Samsung Galaxy S25, Galaxy S25 Plus und Galaxy S25 Ultra
Sep 12, 2024 pm 12:22 PM
In den letzten Tagen hat Ice Universe immer wieder Details zum Galaxy S25 Ultra enthüllt, von dem allgemein angenommen wird, dass es das nächste Flaggschiff-Smartphone von Samsung ist. Der Leaker behauptete unter anderem, Samsung plane nur ein Kamera-Upgrade
 Xiaomi Redmi Note 14 Pro Plus erscheint als erstes Qualcomm Snapdragon 7s Gen 3 Smartphone mit Light Hunter 800 Kamera
Sep 27, 2024 am 06:23 AM
Xiaomi Redmi Note 14 Pro Plus erscheint als erstes Qualcomm Snapdragon 7s Gen 3 Smartphone mit Light Hunter 800 Kamera
Sep 27, 2024 am 06:23 AM
Das Redmi Note 14 Pro Plus ist nun offiziell als direkter Nachfolger des letztjährigen Redmi Note 13 Pro Plus (aktuell 375 $ bei Amazon) erhältlich. Wie erwartet steht das Redmi Note 14 Pro Plus neben dem Redmi Note 14 und dem Redmi Note 14 Pro an der Spitze der Redmi Note 14-Serie. Li
 iQOO Z9 Turbo Plus: Die Reservierungen für das möglicherweise aufgepeppte Serien-Flaggschiff beginnen
Sep 10, 2024 am 06:45 AM
iQOO Z9 Turbo Plus: Die Reservierungen für das möglicherweise aufgepeppte Serien-Flaggschiff beginnen
Sep 10, 2024 am 06:45 AM
Die Schwestermarke von OnePlus, iQOO, hat einen Produktzyklus von 2023 bis 2024, der möglicherweise fast abgeschlossen ist. Dennoch hat die Marke erklärt, dass sie mit ihrer Z9-Serie noch nicht fertig sei. Seine letzte und möglicherweise hochwertigste Turbo+-Variante wurde gerade wie vorhergesagt angekündigt. T
