
Div CSS ist eine derzeit beliebte Webseiten-Layout-Technologie
Div wird verwendet, um die Daten zu speichern, die angezeigt werden müssen (Text, Diagramme ...), und CSS wird verwendet, um anzugeben, wie sie angezeigt werden sollen, um gegenseitige Effekte zwischen Daten und Anzeige zu erzielen
Wir können Div-CSS einfach so verstehen:
div ist ein Container, der zum Speichern von Inhalten (Text, Bilder, Elemente) verwendet wird.
css wird verwendet, um anzugeben, wie der im Div platzierte Inhalt angezeigt wird, einschließlich der Position und des Erscheinungsbilds des Inhalts
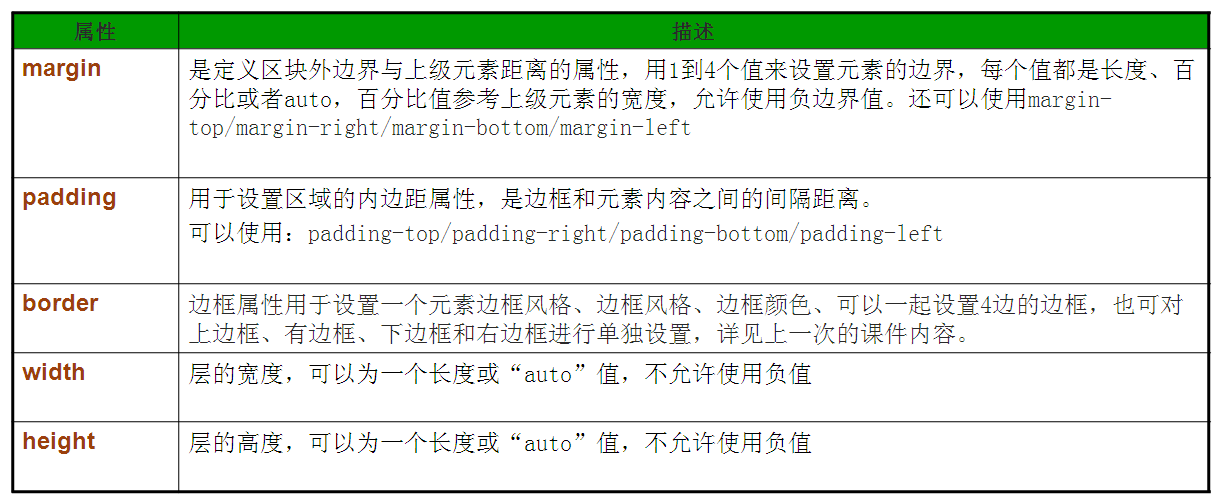
(1) Verwandte Attribute des Boxmodells
Schauen wir uns das Bild an, um die Rolle jedes Attributs zu verstehen:

Die oben genannten Attribute sind in vier Richtungen unterteilt: oben, rechts, unten und links
>Frage: Wie berechnet man die Breite und Höhe von Seitenelementen?
Antwort: Die tatsächliche Belegungsgröße des Elements = Elementgröße, Randbreite der Auffüllung Beispiel: Die tatsächliche Belegungshöhe des Elements = obere und untere Höhenattribut, obere und untere Randbreite der Auffüllung
Wir verstehen es anhand eines klassischen 3D-Strukturdiagramms des Boxmodells, wie in der Abbildung dargestellt:

Von oben nach unten betrachtet ist die hierarchische Beziehung wie folgt:
Ebene 1: der Rand der Box, Ebene 2: Inhalt, innen Inhalt des Elements Margin (padding)
Ebene 3: Hintergrundbild (background-image)
Ebene 4: Hintergrundfarbe (background-color)
Ebene 5: Rand der Box (margin)
Aus dieser hierarchischen Beziehung ist ersichtlich, dass bei gleichzeitiger Festlegung von Hintergrundbild und Hintergrundfarbe das Hintergrundbild
über der Hintergrundfarbe
angezeigt wird
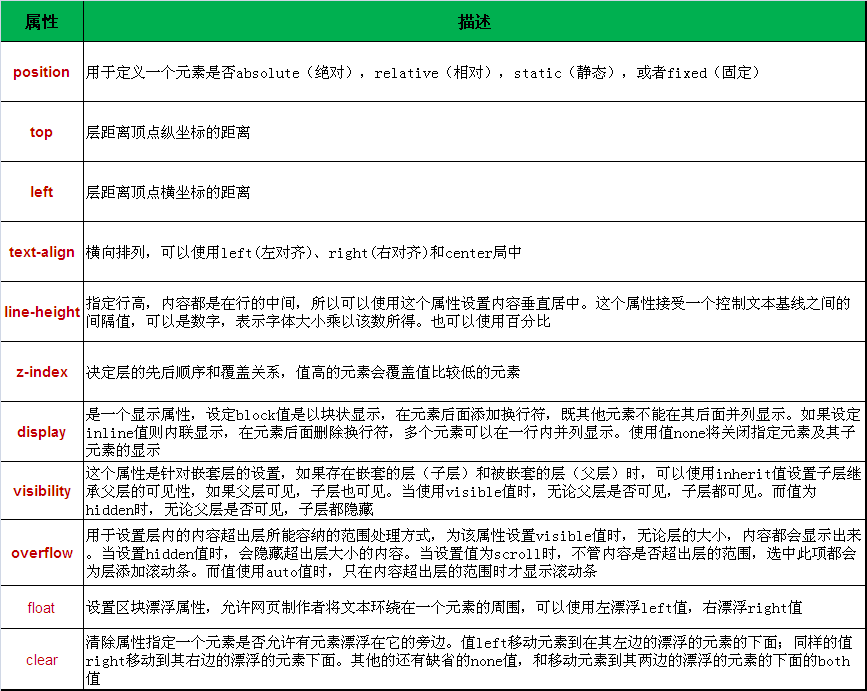
4. Deklarieren Sie die CSS-Attribute des Boxmodells
 Zum Beispiel:
水平居中包含两种情况:
块级元素的水平居中:margin:0px auto;
文字内容的水平居中:text-align: center;
垂直居中:
常见的单行文字的垂直居中可设置文字所在行的height与
行高样式属性一致,比如:
div{
width: 400px;
height: 400px;
line-height: 400px;/*行高与div高度一致*/
}
<span style="color: #008080;"> 1</span> <span style="color: #000000;">#box {                              /* 声明ID选择器,名称为box           */
</span><span style="color: #008080;"> 2</span> <span style="color: #000000;">    position:absolute;              /* 设置层的定位为绝对定位            */
</span><span style="color: #008080;"> 3</span> <span style="color: #000000;">    top:30px;                       /* 层距离顶点纵向坐标的距离为30个像素  */
</span><span style="color: #008080;"> 4</span> <span style="color: #000000;">    left:100px;                     /* 层距离左点横向坐标的距离为100个像素 */
</span><span style="color: #008080;"> 5</span> <span style="color: #000000;">    width:300px;                    /* 设置层的宽度为300个像素           */
</span><span style="color: #008080;"> 6</span> <span style="color: #000000;">    height:150px;                   /* 设置层的高度为150个像素           */
</span><span style="color: #008080;"> 7</span> <span style="color: #000000;">    overflow:auto;                  /* 当内容超出层的范围时显示滚动条     */
</span><span style="color: #008080;"> 8</span> <span style="color: #000000;">    z-index:1;                      /* 设置层的先后顺序为覆盖关系        */
</span><span style="color: #008080;"> 9</span> <span style="color: #000000;">    visibility:visible;            /* 无论父层是否可见,子层都可见       */
</span><span style="color: #008080;">10</span> }
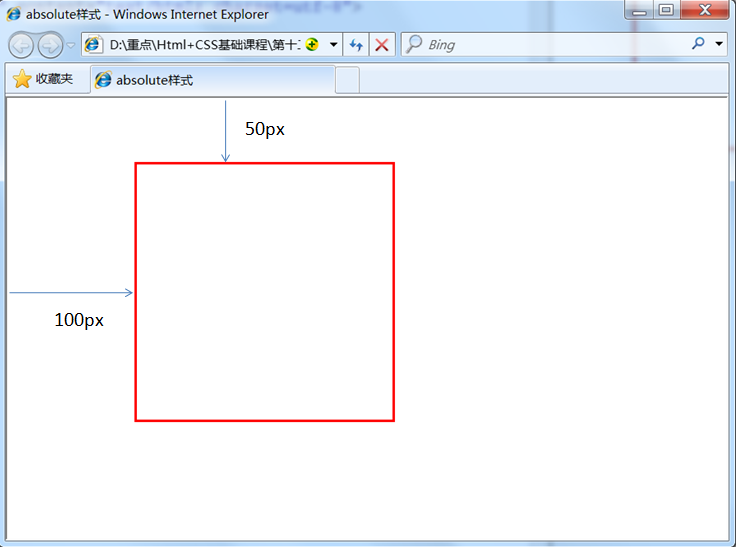
如果想为元素设置层模型中的绝对定位,需要设置position:absolute(表示绝对定位),这条语句的作用将元素从文档流中拖出来,然后使用left、right、top、bottom属性相对于其最接近的一个具有定位属性的父包含块进行绝对定位。如果不存在这样的包含块,则相对于body元素,即相对于浏览器窗口。
如下面代码可以实现div元素相对于浏览器窗口向右移动100px,向下移动50px。
<span style="color: #008080;">1</span> <span style="color: #000000;">div{
</span><span style="color: #008080;">2</span> <span style="color: #000000;">    width:200px;
</span><span style="color: #008080;">3</span> <span style="color: #000000;">    height:200px;
</span><span style="color: #008080;">4</span> <span style="color: #000000;">    border:2px red solid;
</span><span style="color: #008080;">5</span> <span style="color: #000000;">    position:absolute;
</span><span style="color: #008080;">6</span> <span style="color: #000000;">    left:100px;
</span><span style="color: #008080;">7</span> <span style="color: #000000;">    top:50px;
</span><span style="color: #008080;">8</span> <span style="color: #000000;">}
</span><span style="color: #008080;">9</span> <span style="color: #0000ff;"><</span><span style="color: #800000;">div </span><span style="color: #ff0000;">id</span><span style="color: #0000ff;">="div1"</span><span style="color: #0000ff;">></</span><span style="color: #800000;">div</span><span style="color: #0000ff;">></span>
效果如下:
如果想为元素设置层模型中的相对定位,需要设置position:relative(表示相对定位),它通过left、right、top、bottom属性确定元素在正常文档流中的偏移位置。相对定位完成的过程是首先按static(float)方式生成一个元素(并且元素像层一样浮动了起来),然后相对于以前的位置移动,移动的方向和幅度由left、right、top、bottom属性确定,偏移前的位置保留不动。
如下代码实现相对于以前位置向下移动50px,向右移动100px;
#div1{
    width:200px;
    height:200px;
    border:2px red solid;
    position:relative;
    left:100px;
    top:50px;
}

<div id="div1"></div>
效果图:
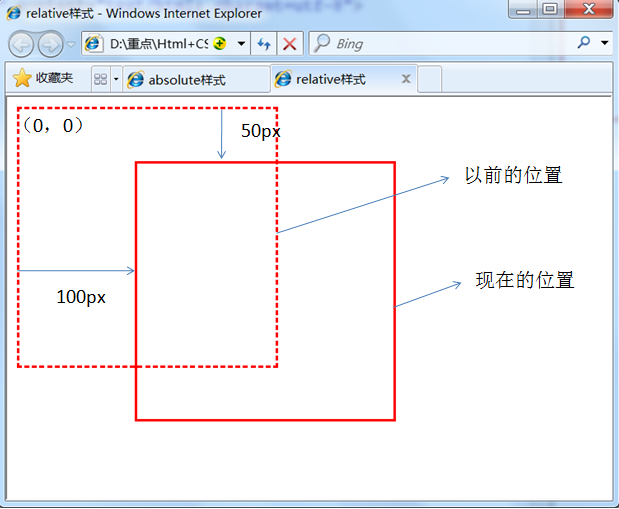
什么叫做“偏移前的位置保留不动”呢?
大家可以做一个实验,在右侧代码编辑器的19行div标签的后面加入一个span标签,在标并在span标签中写入一些文字。如下代码:
<body>
    <div id="div1"></div><span>偏移前的位置还保留不动,覆盖不了前面的div没有偏移前的位置</span>
</body>效果图:
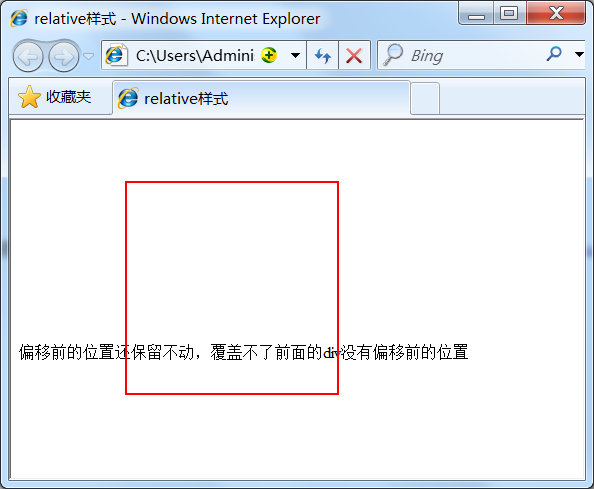
从效果图中可以明显的看出,虽然div元素相对于以前的位置产生了偏移,但是div元素以前的位置还是保留着,所以后面的span元素是显示在了div元素以前位置的后面。
fixed:表示固定定位,与absolute定位类型类似,但它的相对移动的坐标是视图(屏幕内的网页窗口)本身。由于视图本身是固定的,它不会随浏览器窗口的滚动条滚动而变化,除非你在屏幕中移动浏览器窗口的屏幕位置,或改变浏览器窗口的显示大小,因此固定定位的元素会始终位于浏览器窗口内视图的某个位置,不会受文档流动影响,这与background-attachment:fixed;属性功能相同。以下代码可以实现相对于浏览器视图向右移动100px,向下移动50px。并且拖动滚动条时位置固定不变。
<span style="color: #008080;"> 1</span> <span style="color: #000000;">#div1{
</span><span style="color: #008080;"> 2</span> <span style="color: #000000;">    width:200px;
</span><span style="color: #008080;"> 3</span> <span style="color: #000000;">    height:200px;
</span><span style="color: #008080;"> 4</span> <span style="color: #000000;">    border:2px red solid;
</span><span style="color: #008080;"> 5</span> <span style="color: #000000;">    position:fixed;
</span><span style="color: #008080;"> 6</span> <span style="color: #000000;">    left:100px;
</span><span style="color: #008080;"> 7</span> <span style="color: #000000;">    top:50px;
</span><span style="color: #008080;"> 8</span> <span style="color: #000000;">}
</span><span style="color: #008080;"> 9</span> <span style="color: #0000ff;"><</span><span style="color: #800000;">p</span><span style="color: #0000ff;">></span>文本文本文本文本文本文本文本文本文本文本文本文本文本文本文本文本文本文本文本文本文本文本文本文本文本文本文本文本文本文本文本文本文本文本。<span style="color: #0000ff;"></</span><span style="color: #800000;">p</span><span style="color: #0000ff;">></span>
<span style="color: #008080;">10</span> <span style="color: #000000;">....
</span><span style="color: #008080;">11</span>
理解浮动属性首先要搞清楚,什么是文档流?
文档流:浏览器根据元素在html文档中出现的顺序,
从左向右,从上到下依次排列
浮动属性是CSS中的定位属性,用法如下:
float: 浮动方向(left、right、none);
left为左浮动、right为右浮动、none是默认值表示不浮动
,设置元素的浮动,该元素将脱离文档流,向左或向右移动
直到它的外边距碰到父元素的边框或另一个浮动元素的边
框为止
浮动示例,没有使用浮动的3个DIV:
HTML结构代码:

样式中加入 float:left;
执行效果如图:

你再修改为 float: right试试右浮动是什么效果
16、让商品分类DIV、内容DIV和右侧DIV并排放置
HTML结构代码:
<span style="color: #008080;">1</span> <span style="color: #0000ff;"><</span><span style="color: #800000;">div </span><span style="color: #ff0000;">id</span><span style="color: #0000ff;">="container"</span><span style="color: #0000ff;">></span>
<span style="color: #008080;">2</span>     <span style="color: #0000ff;"><</span><span style="color: #800000;">div </span><span style="color: #ff0000;">id</span><span style="color: #0000ff;">="header"</span><span style="color: #0000ff;">></span>顶部(header)<span style="color: #0000ff;"></</span><span style="color: #800000;">div</span><span style="color: #0000ff;">></span>
<span style="color: #008080;">3</span>     <span style="color: #0000ff;"><</span><span style="color: #800000;">div </span><span style="color: #ff0000;">id</span><span style="color: #0000ff;">="main"</span><span style="color: #0000ff;">></span>
<span style="color: #008080;">4</span>         <span style="color: #0000ff;"><</span><span style="color: #800000;">div </span><span style="color: #ff0000;">class</span><span style="color: #0000ff;">="cat"</span><span style="color: #0000ff;">></span>商品分类(cat)<span style="color: #0000ff;"></</span><span style="color: #800000;">div</span><span style="color: #0000ff;">></span>
<span style="color: #008080;">5</span>         <span style="color: #0000ff;"><</span><span style="color: #800000;">div </span><span style="color: #ff0000;">class</span><span style="color: #0000ff;">="content"</span><span style="color: #0000ff;">></span>内容(content)<span style="color: #0000ff;"></</span><span style="color: #800000;">div</span><span style="color: #0000ff;">></span>
<span style="color: #008080;">6</span>         <span style="color: #0000ff;"><</span><span style="color: #800000;">div </span><span style="color: #ff0000;">class</span><span style="color: #0000ff;">="sidebar"</span><span style="color: #0000ff;">></span>右侧(sidebar)<span style="color: #0000ff;"></</span><span style="color: #800000;">div</span><span style="color: #0000ff;">></span>
<span style="color: #008080;">7</span>     <span style="color: #0000ff;"></</span><span style="color: #800000;">div</span><span style="color: #0000ff;">></span>
<span style="color: #008080;">8</span>     <span style="color: #0000ff;"><</span><span style="color: #800000;">div </span><span style="color: #ff0000;">id</span><span style="color: #0000ff;">="footer"</span><span style="color: #0000ff;">></span>底部(footer)<span style="color: #0000ff;"></</span><span style="color: #800000;">div</span><span style="color: #0000ff;">></span>
<span style="color: #008080;">9</span> <span style="color: #0000ff;"></</span><span style="color: #800000;">div</span><span style="color: #0000ff;">></span>
CSS样式代码(在第13节CSS代码基础上加入):
<span style="color: #008080;"> 1</span> <span style="color: #000000;">.cat, .sidebar {
</span><span style="color: #008080;"> 2</span> <span style="color: #000000;">        float:left;
</span><span style="color: #008080;"> 3</span> <span style="color: #000000;">        width:20%;
</span><span style="color: #008080;"> 4</span> <span style="color: #000000;">        height:100%;
</span><span style="color: #008080;"> 5</span> <span style="color: #000000;">    }
</span><span style="color: #008080;"> 6</span> <span style="color: #000000;"> .content {
</span><span style="color: #008080;"> 7</span> <span style="color: #000000;">        float:left;
</span><span style="color: #008080;"> 8</span> <span style="color: #000000;">        width:60%;
</span><span style="color: #008080;"> 9</span> <span style="color: #000000;">        height:100%;
</span><span style="color: #008080;">10</span>     }
17、clear清除
clear只对块级元素有效,表示如果前一个元素存在左浮动或右浮动,则换行
clear属性的取值:rigth、left、both、none
 Der Unterschied zwischen Pascal-Sprache und C-Sprache
 Was tun, wenn Linux beim Ausführen einer Datei „Keine solche Datei oder kein solches Verzeichnis' anzeigt?
 So rufen Sie das BIOS auf einem HP-Computer auf
 Welche Funktion hat der Frequenzteiler?
 So verwenden Sie die Monatsfunktion
 Offizielle Binance-Website
 Der Unterschied zwischen Indexof und Includes
 So verwenden Sie Busybox


