Absolut tiefes Verständnis von CSS
1. Absolut und Float haben die gleichen Eigenschaften, Wrapping und Destruktivität
1. Absolut und Float sind ähnlich (siehe Demo unten, wenn sich das Bild in der oberen linken Ecke befindet, dann verwenden Sie Float und Absolut). wird das Gleiche sein)
  1 <!doctype html>  2 <html>  3 <head>  4 <meta charset="utf-8">  5 <meta name="viewport" content="width=device-width">  6 <title>absolute和float高尔基</title>  7 <style>  8 body {  9     background-color: #B0DEF5; 10     font-size: 14px; font-family: arial; 11     color: #444; 12 } 13 a { 14     color: #0078b6; 15     text-decoration: none; 16 } 17 a:hover { 18     text-decoration: underline; 19 } 20 em { 21     font-style: normal; 22     color: #aeaeae; 23     margin: 0 5px; 24 } 25 svg { 26     position: absolute; 27 } 28 .container { 29     width: 560px; height: -webkit-calc(100vh - 16px); height: calc(100vh - 16px); 30     margin-left: auto; margin-right: auto; 31     background-color: #fff; 32 } 33 .list { 34     padding: 20px; 35     position: relative; 36 } 37 .space { 38     padding-left: 60px; 39     line-height: 22px; 40 } 41 .space img { 42     vertical-align: text-bottom; 43 } 44 .info { 45     font-size: 12px; 46     overflow: hidden; 47     color: #808080; 48 } 49 .from { 50     float: left; 51 } 52 .from a { 53     color: #9abbc8; 54 } 55 p { 56     margin: 6px 0; 57 } 58 .operate { 59     float: right; 60 } 61 .operate img { 62     vertical-align: text-bottom; 63     margin-right: 3px; 64 } 65 .test { 66     position: relative; 67     font-size: 18px; font-family: 'microsoft yahei'; 68 } 69 .test p { 70    width: 200px; 71    margin-left: auto; margin-right: auto; 72    padding: 5px; 73    background-color: #f0f0f0;     74 } 75 .test input { 76     width: 20px; height: 20px; 77     vertical-align: -4px; 78 } 79 </style> 80 </head> 81  82 <body> 83 <p class="container"> 84     <svg xmlns="http://www.w3.org/2000/svg" width="520" height="360"> 85         <path d="M45 80C45 280,45 320,165 300" stroke-width="1" stroke="#444" fill="none"></path> 86     </svg> 87     <p class="list"> 88         <a href="#" id="avatar" class="avatar" style="float: left;"><img src="http://img.mukewang.com/54447ac70001f5cc00500050.jpg"></a> 89         <p class="space"> 90             <a href="//weibo.com/mukewang" target="_blank" title="慕课网">慕课网</a> 91             <img src="http://img.mukewang.com/54447b1a0001750000160013.png"> 92             <a href="http://huati.weibo.com/k/%E6%85%95%E8%AF%BE%E7%BD%91%E6%B4%BB%E5%8A%A8?from=501">#慕课网活动#</a>【全民晒课ing,火速赢取IT图书】无论你是慕课网的“资深粉丝”,还是刚加入的新同学,在慕课网活动帖:<a href="http://www.imooc.com/wenda/detail/30394">http://www.php.cn/</a> 写下你在慕课网所学习的任意一门课程,并附上课程的学习心得,就有机会赢得精品IT好书。<img src="http://img.mukewang.com/54447cc700010dbf00220022.gif">这事很急哒,仅有2天呦。在<a href="http://huati.weibo.com/k/%E7%A8%8B%E5%BA%8F%E5%91%98%E8%8A%82?from=501">#程序员节#</a>送给自己一份礼物吧!<img src="http://img.mukewang.com/54447af90001ab1c00010001.gif"> 93             <p><img src="http://img.mukewang.com/54447aea0001f43301200084.jpg"></p> 94             <p class="info">     95                    <span class="from"> 96                     <a href="#">9月13日 10:27</a>  97                     <em>来自</em><a href="#">微博 weibo.com</a>                       98                 </span> 99                 <span class="operate">100                     <a href="javascript:" title="赞"><img src="http://img.mukewang.com/54447c350001055b00120013.png">(4)</a><em>|</em>101                     <a href="javascript:">转发(5)</a><em>|</em>102                     <a href="javascript:">收藏</a><em>|</em>103                     <a href="javascript:">评论(2)</a>104                 </span>105             </p>106         </p>107     </p>108     <p class="test">109         <p><input type="radio" name="layout" id="float" checked><label for="float">float: left;</label></p>110         <p><input type="radio" name="layout" id="absolute"><label for="absolute">position: absolute;</label></p>111     </p>112 </p>113 <script>114 var eleAvatar = document.getElementById("avatar"),115     eleFloat = document.getElementById("float"),116     eleAbsolute = document.getElementById("absolute");117 118 // SVG路径以及相关动画119 var elePath = document.querySelector("path"), timerPath = null;
120 var funPathMove = function(end) {121 clearTimeout(timerPath);122 var d = elePath.getAttribute("d"), arrD = d.split(" ");123 // 动画起始值124 var start = arrD.slice(-1) * 1;125 if (start == end) return;126 // 速率127 var rate = 5, current = start;128 console.log(arrD);129 var step = function() {130 if (Math.abs(end - current) < 1) {131 current = end;132 } else {133 current += (end - current) / 5;134 timerPath = setTimeout(step, 30);135 }136 // 替换最后一个值137 arrD.splice(-1, 1, current);138 // 曲线走起139 elePath.setAttribute("d", arrD.join(" "));140 };141 step();142 };143 144 if (eleAvatar && eleFloat && eleAbsolute) {145 var attrFloat = eleAvatar.style.cssFloat != undefined? "cssFloat": "styleFloat";146 eleFloat.onclick = function() {147 eleAvatar.style.position = "";148 eleAvatar.style[attrFloat] = "left";149 elePath && funPathMove(300);150 };151 eleAbsolute.onclick = function() {152 eleAvatar.style[attrFloat] = "";153 eleAvatar.style.position = "absolute";154 elePath && funPathMove(340);155 };156 }157 </script>158 </body>159 </html>Code anzeigen
2. Destruktiv 1 <!doctype html> 2 <html> 3 <head> 4 <meta charset="utf-8"> 5 <meta name="viewport" content="width=device-width"> 6 <title>absolute的破坏性</title> 7 <style> 8 .box { 9 padding: 10px;10 background-color: #f0f0f0; 11 }12 input {13 position: absolute; top: 234px; 14 width: 160px; height: 32px;15 font-size: 100%;16 }17 </style>18 </head>19 20 <body>21 <p class="box"><img id="image" src="http://img.mukewang.com/54447b06000171a002560191.jpg" width="256" height="191"></p>22 <input id="button" type="button" value="图片absolute化">23 <script>24 var eleImg = document.getElementById("image"), eleBtn = document.getElementById("button");25 if (eleImg != null && eleBtn != null) {26 eleBtn.onclick = function() {27 if (this.absolute) {28 eleImg.style.position = "";29 this.value = "图片absolute化";30 this.absolute = false;31 } else {32 eleImg.style.position = "absolute";33 this.value = "图片去absolute";34 this.absolute = true;35 }36 };37 }38 </script>39 </body>40 </html>Code anzeigen
3. Packbarkeit 1 <!doctype html> 2 <html> 3 <head> 4 <meta charset="utf-8"> 5 <meta name="viewport" content="width=device-width"> 6 <title>absolute的包裹性</title> 7 <style> 8 .box { 9 padding: 10px;10 background-color: #f0f0f0; 11 }12 input {13 position: absolute; top: 234px; 14 width: 160px; height: 32px;15 font-size: 100%;16 }17 </style>18 </head>19 20 <body>21 <p id="box" class="box"><img src="http://img.mukewang.com/54447b06000171a002560191.jpg" width="256" height="191"></p>22 <input id="button" type="button" value="容器absolute化">23 <script>24 var eleBox = document.getElementById("box"), eleBtn = document.getElementById("button");25 if (eleBox != null && eleBtn != null) {26 eleBtn.onclick = function() {27 if (this.absolute) {28 eleBox.style.position = "";29 this.value = "容器absolute化";30 this.absolute = false;31 } else {32 eleBox.style.position = "absolute";33 this.value = "容器去absolute";34 this.absolute = true;35 }36 };37 }38 </script>39 </body>40 </html>Code anzeigen
2. Die Unabhängigkeit des Absoluten Bei Verwendung des Absoluten muss es nicht zusammen mit dem Relativen verwendet werden Je unabhängiger es ist, desto leistungsfähiger ist es. 3. Absolute Eigenschaften 1 🎜>
2. Standort folgen
1 <!doctype html> 2 <html> 3 <head> 4 <meta charset="utf-8"> 5 <title>折翼天使表现特性一:去浮动</title> 6 <style> 7 input[type=button] { 8 height: 32px; 9 font-size: 100%; 10 }11 </style>12 </head>13 14 <body>15 <img src="http://img.mukewang.com/54447b06000171a002560191.jpg">16 <img src="http://img.mukewang.com/54447f4a0001eb7d01910256.jpg">17 <img src="http://img.mukewang.com/54447f550001ccb002560191.jpg">18 <p><input type="button" id="float" value="点击第2张图片应用float:left"></p>19 <p><input type="button" id="button" value="点击第2张图片应用position:absolute"></p>20 <script>21 var flbtn = document.getElementById("float"),22 button = document.getElementById("button"),23 image2 = document.getElementsByTagName("img")[1];24 if (flbtn && button && image2) {25 var value_init = button.value;26 button.onclick = function() {27 if (this.value == value_init) {28 image2.style.position = "absolute";29 this.value = "撤销";30 } else {31 image2.style.position = "";32 this.value = value_init;33 }34 };35 36 flbtn.onclick = function() {37 image2.style["cssFloat" in this.style? "cssFloat": "styleFloat"] = "left";38 };39 }40 </script>41 </body>42 </html>Code anzeigen
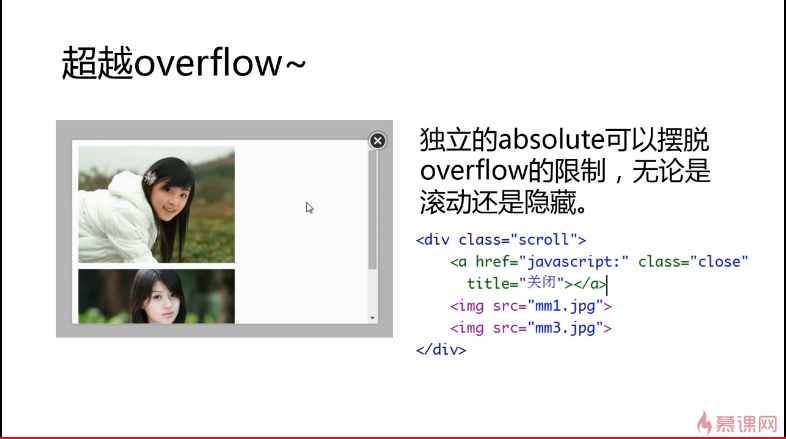
3. Jenseits des Überlaufs
 1 <!doctype html> 2 <html> 3 <head> 4 <meta charset="utf-8"> 5 <title>折翼天使表现特性二:位置跟随</title> 6 <style> 7 input[type=button] { 8     height: 32px; 9     font-size: 100%;10 }11 p { margin-left: 260px; }12 img + p { margin-top: 60px; }13 </style>14 </head>15 16 <body>17 <img src="http://img.mukewang.com/54447b06000171a002560191.jpg">18 <p><img src="http://img.mukewang.com/54447f4a0001eb7d01910256.jpg"></p>19 <img src="http://img.mukewang.com/54447f550001ccb002560191.jpg">20 <p><input type="button" id="block" value="点击第2张图片应用display:block"></p>21 <p><input type="button" id="button" value="点击第2张图片应用position:absolute变天使"></p>22 <script>23 var block = document.getElementById("block"),24     button = document.getElementById("button"),25     image2 = document.getElementsByTagName("img")[1];26 if (block && button && image2) {27     var value_init_button = button.value;28     button.onclick = function() {29         if (this.value == value_init_button) {30             image2.style.position = "absolute";31             this.value = "撤销";32         } else {33             image2.style.position = "";34             this.value = value_init_button;35         }36     };37     38     var value_init_block = block.value;39     block.onclick = function() {40         if (this.value == value_init_block) {41             image2.style.display = "block";42             this.value = "撤销";43         } else {44             image2.style.display = "";45             this.value = value_init_block;46         }
47 };48 }49 </script>50 </body>51 </html>Code anzeigen
Beim Verschieben der Bildlaufleiste bewegt sich die Schaltfläche „Schließen“ nicht, da „Absolut“ eingestellt ist. 4. Tatsächliche Verwendung von Absolut
1 <!doctype html> 2 <html> 3 <head> 4 <meta charset="utf-8"> 5 <title>超越overflow</title> 6 <style> 7 body { 8 background-color: #bbb; 9 }10 .scroll {11 width: 500px; height: 300px;12 margin: 200px auto 0;13 margin-top: -webkit-calc(50vh - 150px);14 margin-top: calc(50vh - 150px);15 border: 1px solid #ccc;16 border-radius: 3px;17 box-shadow: 0 0 3px rgba(0,0,0,.35);18 background-color: #fff;19 overflow: auto;20 }21 .close {22 position: absolute;23 width: 34px; height: 34px; 24 margin: -17px 0 0 483px;25 background: url(http://www.php.cn/) no-repeat;26 }27 .close:hover {28 background-position: 0 -41px; 29 }30 img {31 display: block;32 margin: 10px;33 }34 </style>35 </head>36 37 <body>38 <p class="scroll">39 <a href="javascript:" class="close" title="关闭"></a>40 <img src="http://img.mukewang.com/54447b06000171a002560191.jpg">41 <img src="http://img.mukewang.com/54447f550001ccb002560191.jpg">42 </p>43 </body>44 </html>Hot, Empfehlungen und VIP werden alle mit absoluten und relativen implementiert
Code anzeigen
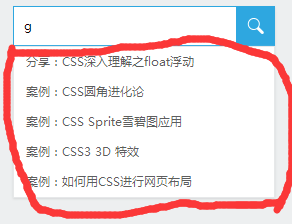
2. Dropdown-Box-Positionierung
1 <!doctype html> 2 <html> 3 <head> 4 <meta charset="utf-8"> 5 <title>图标定位二三事</title> 6 <style> 7 body { font: 14px/1.4 "Microsoft YaHei"; background-color: #EDEFF0; } 8 body, h3, h5 { margin: 0; } 9 img { border: 0 none; vertical-align: bottom; }10 .l { float: left; }.r { float: right; }11 .constr { width: 1200px; margin-left: auto; margin-right: auto; }12 .header { background-color: #2A2C2E; }13 .nav { height: 60px; }14 .nav-list { float: left; font-size: 14px; font-weight: 400; }15 .nav-a { display: inline-block; line-height: 20px; padding: 20px 35px; color: #B5BDC0; text-decoration: none; }16 .nav-a:hover { color: #fff; }17 18 .course { padding-top: 10px; }19 .course-list { float: left; width: 280px; height: 240px; margin: 5px 10px 15px; border-radius: 0 0 1px 1px; background-color: #F7FAF9; background-color: rgba(255,255,255,1); box-shadow: 0 1px 2px #c5c5c5; text-decoration: none; }20 .course-list-img { background-color: #6396F1; }21 .course-list-h { line-height: 50px; font-size: 14px; font-weight: 400; color: #363d40; text-align: center; }22 .course-list-tips { margin: 0 14px; font-size: 12px; color: #b4bbbf; overflow: hidden; }23 24 .icon-hot { position: absolute; width: 28px; height: 11px; margin: -6px 0 0 2px; background: url(http://www.php.cn/); }25 .icon-recom { position: absolute; line-height: 20px; padding: 0 5px; background-color: #f60; color: #fff; font-size: 12px; }26 .icon-vip { position: absolute; width: 36px; height: 36px; margin-left: -36px; background: url(http://www.php.cn/); text-indent: -9em; overflow: hidden; }27 </style>28 </head>29 30 <body>31 <p class="header">32 <p class="constr">33 <p class="nav">34 <h3 class="nav-list">35 <a href="http://www.imooc.com/course/list" class="nav-a">课程</a>36 </h3>37 <h3 class="nav-list">38 <a href="http://www.imooc.com/wenda" class="nav-a">问答</a>39 </h3>40 <h3 class="nav-list">41 <a href="http://www.imooc.com/seek/index" class="nav-a">42 求课<i class="icon-hot"></i>43 </a>44 </h3>45 </p>46 </p>47 </p>48 49 <p class="main">50 <p class="constr">51 <p class="course">52 <a href="http://www.imooc.com/view/121" class="course-list">53 <p class="course-list-img">54 <span class="icon-recom">推荐</span>55 <img width="280" height="160" alt="分享:CSS深入理解之float浮动" src="http://img.mukewang.com/53d74f960001ae9d06000338-300-170.jpg"><!--56 --><i class="icon-vip">vip</i>57 </p>58 <h5 class="course-list-h">分享:CSS深入理解之float浮动</h5>59 <p class="course-list-tips">60 <span class="l">已完结</span>61 <span class="r">3514人学习</span>62 </p>63 </a>64 </p>65 </p>66 </p>67 </body>68 </html>verwendet eine abhängigkeitsfreie absolute Positionierung. Das heißt, es wird nur das Absolute verwendet und das Relative wird nicht verwendet
Code anzeigen
3. Zentrierung und Kantenpositionierung
1 <!doctype html> 2 <html> 3 <head> 4 <meta charset="utf-8"> 5 <title>下拉框定位二三事</title> 6 <style> 7 body { margin: 0; font: 14px/1.4 "Microsoft YaHei"; background-color: #EDEFF0; } 8 .constr { width: 1200px; max-width: 80%; margin-left: auto; margin-right: auto; padding-bottom: 300px; overflow: hidden; } 9 .course-sidebar { width: 262px; float: left; }10 .course-sidebar > p { border: 1px solid #e6e8e9; box-shadow: 0px 1px 2px #d5d7d8; background-color: #fff; }11 .course-sidebar-type { height: 380px; }12 .course-sidebar-search { margin-top: 20px; overflow: hidden; }13 .course-search-input { width: 200px; line-height: 18px; padding: 10px; margin: 0; border: 0 none; font-size: 12px; font-family: inherit; float: left; }14 .course-sidebar-search.focus { border-color: #2ea7e0; }15 .course-search-input:focus { outline: 0 none; }16 .course-search-input::-ms-clear { display: none; }17 .course-search-btn { width: 38px; height: 38px; float: right; background: url(http://www.php.cn/); text-indent: -9em; overflow: hidden; }18 .focus .course-search-btn { background-position: 0 -38px; }19 20 .course-sidebar-result { display: none; position: absolute; width: 260px; margin: 39px 0 0 -1px; padding-left: 0; list-style-type: none; border: 1px solid #e6e8e9; background-color: #fff; box-shadow: 0px 1px 2px #d5d7d8; font-size: 12px; }21 .course-sidebar-result > li { line-height: 30px; padding-left: 12px; }22 .course-sidebar-result > li:hover { background-color: #f9f9f9; }23 .course-sidebar-result a { display: block; color: #5e5e5e; text-decoration: none; }24 .course-sidebar-result a:hover { color: #000; }25 </style>26 </head>27 28 <body>29 <p class="constr">30 <p class="course-sidebar">31 <p class="course-sidebar-type"></p>32 <p class="course-sidebar-search">33 <ul id="result" class="course-sidebar-result">34 <li><a href="http://www.imooc.com/view/121">分享:CSS深入理解之float浮动</a></li>35 <li><a href="http://www.imooc.com/view/118">案例:CSS圆角进化论</a></li>36 <li><a href="http://www.imooc.com/view/93">案例:CSS Sprite雪碧图应用</a></li>37 <li><a href="http://www.imooc.com/view/77">案例:CSS3 3D 特效</a></li>38 <li><a href="http://www.imooc.com/view/57">案例:如何用CSS进行网页布局</a></li>39 </ul>40 <input class="course-search-input" placeholder="课程搜索">41 <a href="javascript:" class="course-search-btn">搜索</a>42 </p>43 </p>44 </p>45 <script>46 (function() {47 var input = document.getElementsByTagName("input")[0],48 result = document.getElementById("result");49 50 if (input && result) {51 input.onfocus = function() {52 this.parentNode.className = "course-sidebar-search focus";53 if (this.value != "") {54 // show datalist55 result.style.display = "block";56 }57 };58 input.onblur = function() {59 if (this.value == "") {60 this.parentNode.className = "course-sidebar-search";61 }62 // hide datalist63 result.style.display = "none";64 };65 66 // IE7 that wrap a p for avoid bad effect from float67 if (!document.querySelector) {68 var p = document.createElement("p");69 input.parentNode.insertBefore(p, input);70 p.appendChild(result);71 }72 // events of datalist73 if ("oninput" in input) {74 input.addEventListener("input", function() {75 if (this.value.trim() != "") {76 result.style.display = "block";77 } else {78 result.style.display = "none";79 }80 });81 } else {82 // IE6-IE883 input.onpropertychange = function(event) {84 event = event || window.event;85 if (event.propertyName == "value" && /focus/.test(this.parentNode.className)) {86 if (this.value != "") {87 result.style.display = "block";88 } else {89 result.style.display = "none";90 }91 }92 }93 }94 }95 96 })();97 </script>98 </body>99 </html>Um eine Bildzentrierung zu erreichen und als Idee für die Kantenpositionierung können Sie unbegrenzte Absolutheit verwenden, die die Nachführbarkeit von nutzt
im Code, das ist sehr wichtig

4. Dateibildausrichtung und -positionierung
1 <!doctype html> 2 <html> 3 <head> 4 <meta charset="utf-8"> 5 <title>居中、边缘定位二三事</title> 6 <style> 7 body { margin: 0; font: 14px/1.4 "Microsoft YaHei"; background-color: #EDEFF0; } 8 .constr { width: 1200px; max-width: 80%; margin-left: auto; margin-right: auto; } 9 .course-content { float: right; position: relative; width: 920px; min-height: 1200px; background: #fff; }10 .course-list-x { padding: 20px 10px; overflow: hidden; }11 .course-list { float: left; width: 280px; height: 240px; margin: 5px 10px 15px; border-radius: 0 0 1px 1px; background-color: #F7FAF9; background-color: rgba(255,255,255,1); box-shadow: 0 1px 2px #c5c5c5; text-decoration: none; }12 13 .goto_top_diaocha, .goto_top_app, .goto_top_feed { display: block; width: 48px; height: 48px; margin-top: 10px; background: url(http://www.php.cn/) no-repeat; }14 .goto_top_diaocha { background-position: -48px 0; }15 .goto_top_diaocha:hover { background-position: -48px -50px; }16 .goto_top_app { background-position: -96px 0; }17 .goto_top_app:hover { background-position: -96px -50px; }18 .goto_top_feed { background-position: -144px 0; }19 .goto_top_feed:hover { background-position: -144px -50px; }20 21 .course-loading-x { height: 0; margin-top: 20px; text-align: center; letter-spacing: -.25em; overflow: hidden; }22 .course-loading { position: absolute; margin-left: -26px; }23 24 .course-fixed-x { height: 0; text-align: right; overflow: hidden; }25 .course-fixed { display: inline; position: fixed; margin-left: 20px; bottom: 100px; }26 </style>27 </head>28 29 <body>30 <p class="constr">31 <p class="course-content">32 <p class="course-list-x">33 <p class="course-list"></p>34 <p class="course-list"></p>35 <p class="course-list"></p>36 <p class="course-list"></p>37 <p class="course-list"></p>38 <p class="course-list"></p>39 </p>40 <p class="course-loading-x">41 <img src="http://img.mukewang.com/5453077400015bba00010001.gif" class="course-loading" alt="加载中...">42 </p>43 <p class="course-fixed-x">44 <p class="course-fixed">45 <a href="http://www.imooc.com/activity/diaocha" class="goto_top_diaocha"></a>46 <a href="http://www.imooc.com/mobile/app" class="goto_top_app"></a>47 <a href="http://www.imooc.com/user/feedback" class="goto_top_feed"></a>48 </p>49 </p>50 </p>51 </p>52 </body>53 </html>Tatsächlich Im Projekt sind an einigen Stellen Sterne vorhanden, an anderen nicht. Wenn Sie Probleme mit dem Text haben möchten, können Sie diese verwenden absolut
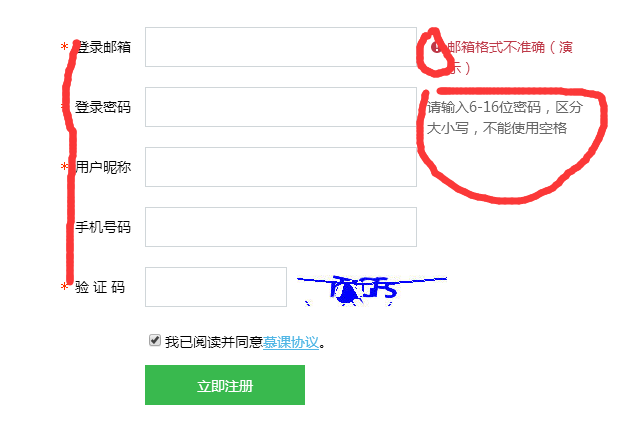
Für das Symbol vor dem Postfach und den Text, der über das Feld hinausgeht, können Sie absolute Absolut verwenden. Es bietet eine neue Idee für das Seitenlayout

4. Absolut ist vom Dokumentenfluss getrennt
Die Animation sollte absolut verwendet werden so weit wie möglich, da Absolute vom Dokumentenfluss getrennt ist, sodass die Animation keine Auswirkungen auf andere Elemente hat
1 <!doctype html> 2 <html> 3 <head> 4 <meta charset="utf-8"> 5 <title>文本图标对齐与定位二三事</title> 6 <style> 7 body { margin: 0; font: 14px/1.4 "Microsoft YaHei"; background-color: #EDEFF0; } 8 a { color: #50B6E5; } 9 .constr { width: 1200px; margin-left: auto; margin-right: auto; }10 .regist-head { height: 60px; line-height: 60px; padding-left: 30px; background-color: #be3948; color: #fff; font-size: 18px; }11 .regist-body { min-height: 400px; padding: 100px 0; background-color: #fff; }12 .regist-main { width: 600px; margin-left: auto; margin-right: auto; }13 .regist-group { margin-top: 20px; overflow: hidden; }14 .regist-label { width: 70px; padding-top: 10px; float: left; }15 .regist-cell { display: table-cell; *display: inline-block; }16 .regist-input { height: 18px; line-height: 18px; width: 260px; padding: 10px 5px; margin: 0 10px 0 0; border: 1px solid #d0d6d9; vertical-align: top; }17 .regist-code-input { width: 130px; }18 .regist-btn { display: inline-block; width: 160px; line-height: 40px; background-color: #39b94e; color: #fff; text-align: center; text-decoration: none; }19 .regist-btn:hover { background-color: #33a646; }20 .icon-warn { display: inline-block; width: 20px; height: 21px; background: url(http://www.php.cn/) no-repeat center; }21 22 .regist-star { position: absolute; margin-left: -1em; font-family: simsun; color: #f30; }23 .regist-remark { position: absolute; line-height: 21px; padding-top: 9px; color: #666; }24 .regist-warn { padding-left: 20px; color: #be3948; }25 .regist-warn > .icon-warn { position: absolute; margin-left: -20px; }26 </style>27 </head>28 29 <body>30 <p class="constr">31 <p class="regist-head">注册</p>32 <p class="regist-body">33 <p class="regist-main">34 <p class="regist-group">35 <label class="regist-label"><span class="regist-star">*</span>登录邮箱</label>36 <p class="regist-cell">37 <input type="email" class="regist-input"><span class="regist-remark regist-warn">38 <i class="icon-warn"></i>邮箱格式不准确(演示)39 </span>40 </p>41 </p>42 <p class="regist-group">43 <label class="regist-label"><span class="regist-star">*</span>登录密码</label>44 <p class="regist-cell">45 <input type="password" class="regist-input"><span class="regist-remark">46 请输入6-16位密码,区分大小写,不能使用空格47 </span>48 </p>49 </p>50 <p class="regist-group">51 <label class="regist-label"><span class="regist-star">*</span>用户昵称</label>52 <p class="regist-cell">53 <input type="password" class="regist-input">54 </p>55 </p>56 <p class="regist-group">57 <label class="regist-label">手机号码</label>58 <p class="regist-cell">59 <input type="tel" class="regist-input">60 </p>61 </p>62 <p class="regist-group">63 <label class="regist-label"><span class="regist-star">*</span>验 证 码</label>64 <p class="regist-cell">65 <input class="regist-input regist-code-input"><img src="http://img.mukewang.com/545308540001678401500040.jpg">66 </p>67 </p>68 <p class="regist-group">69 <label class="regist-label"> </label>70 <p class="regist-cell">71 <input type="checkbox" checked><label>我已阅读并同意<a href="##">慕课协议</a>。</label>72 <p>73 <a href="javascript:" class="regist-btn">立即注册</a>74 </p>75 </p>76 </p>77 </p>78 </p>79 </p>80 </body>81 </html>Für ein tieferes Verständnis von CSS-Absolut-Artikeln achten Sie bitte auf PHP Chinesische Website!

Heiße KI -Werkzeuge

Undresser.AI Undress
KI-gestützte App zum Erstellen realistischer Aktfotos

AI Clothes Remover
Online-KI-Tool zum Entfernen von Kleidung aus Fotos.

Undress AI Tool
Ausziehbilder kostenlos

Clothoff.io
KI-Kleiderentferner

AI Hentai Generator
Erstellen Sie kostenlos Ai Hentai.

Heißer Artikel

Heiße Werkzeuge

Notepad++7.3.1
Einfach zu bedienender und kostenloser Code-Editor

SublimeText3 chinesische Version
Chinesische Version, sehr einfach zu bedienen

Senden Sie Studio 13.0.1
Leistungsstarke integrierte PHP-Entwicklungsumgebung

Dreamweaver CS6
Visuelle Webentwicklungstools

SublimeText3 Mac-Version
Codebearbeitungssoftware auf Gottesniveau (SublimeText3)

Heiße Themen
 1380
1380
 52
52
 Die Rollen von HTML, CSS und JavaScript: Kernverantwortung
Apr 08, 2025 pm 07:05 PM
HTML definiert die Webstruktur, CSS ist für Stil und Layout verantwortlich, und JavaScript ergibt eine dynamische Interaktion. Die drei erfüllen ihre Aufgaben in der Webentwicklung und erstellen gemeinsam eine farbenfrohe Website.
 So verwenden Sie Bootstrap in Vue
Apr 07, 2025 pm 11:33 PM
Die Verwendung von Bootstrap in Vue.js ist in fünf Schritte unterteilt: Startstrap installieren. Bootstrap in main.js. Verwenden Sie die Bootstrap -Komponente direkt in der Vorlage. Optional: benutzerdefinierter Stil. Optional: Verwenden Sie Plug-Ins.
 So schreiben Sie geteilte Zeilen auf Bootstrap
Apr 07, 2025 pm 03:12 PM
Es gibt zwei Möglichkeiten, eine Bootstrap -Split -Zeile zu erstellen: Verwenden des Tags, das eine horizontale Split -Linie erstellt. Verwenden Sie die CSS -Border -Eigenschaft, um benutzerdefinierte Style Split -Linien zu erstellen.
 So ändern Sie Bootstrap
Apr 07, 2025 pm 03:18 PM
Um die Größe der Elemente in Bootstrap anzupassen, können Sie die Dimensionsklasse verwenden, einschließlich: Einstellbreite:.
 So fügen Sie Bilder auf Bootstrap ein
Apr 07, 2025 pm 03:30 PM
Es gibt verschiedene Möglichkeiten, Bilder in Bootstrap einzufügen: Bilder direkt mit dem HTML -IMG -Tag einfügen. Mit der Bootstrap -Bildkomponente können Sie reaktionsschnelle Bilder und weitere Stile bereitstellen. Legen Sie die Bildgröße fest und verwenden Sie die IMG-Fluid-Klasse, um das Bild anpassungsfähig zu machen. Stellen Sie den Rand mit der img-beliebten Klasse ein. Stellen Sie die abgerundeten Ecken ein und verwenden Sie die IMG-Rund-Klasse. Setzen Sie den Schatten, verwenden Sie die Schattenklasse. Größen Sie die Größe und positionieren Sie das Bild im CSS -Stil. Verwenden Sie mit dem Hintergrundbild die CSS-Eigenschaft im Hintergrund.
 So richten Sie das Framework für Bootstrap ein
Apr 07, 2025 pm 03:27 PM
Um das Bootstrap -Framework einzurichten, müssen Sie die folgenden Schritte befolgen: 1. Verweisen Sie die Bootstrap -Datei über CDN; 2. Laden Sie die Datei auf Ihrem eigenen Server herunter und hosten Sie sie. 3.. Fügen Sie die Bootstrap -Datei in HTML hinzu; 4. Kompilieren Sie Sass/weniger bei Bedarf; 5. Importieren Sie eine benutzerdefinierte Datei (optional). Sobald die Einrichtung abgeschlossen ist, können Sie die Grid -Systeme, -Komponenten und -stile von Bootstrap verwenden, um reaktionsschnelle Websites und Anwendungen zu erstellen.
 So sehen Sie das Datum der Bootstrap
Apr 07, 2025 pm 03:03 PM
ANTWORT: Sie können die Datumsauswahlkomponente von Bootstrap verwenden, um Daten auf der Seite anzuzeigen. Schritte: Stellen Sie das Bootstrap -Framework ein. Erstellen Sie ein Eingangsfeld für Datumsauswahl in HTML. Bootstrap fügt dem Selektor automatisch Stile hinzu. Verwenden Sie JavaScript, um das ausgewählte Datum zu erhalten.
 So verwenden Sie die Bootstrap -Taste
Apr 07, 2025 pm 03:09 PM
Wie benutze ich die Bootstrap -Taste? Führen Sie Bootstrap -CSS ein, um Schaltflächenelemente zu erstellen, und fügen Sie die Schaltfläche "Bootstrap" hinzu, um Schaltflächentext hinzuzufügen


