
 Web-Frontend
js-Tutorial
Bootstrap-Karussell plus CSS3-Animation ist so cool! _Javascript-Kenntnisse
Web-Frontend
js-Tutorial
Bootstrap-Karussell plus CSS3-Animation ist so cool! _Javascript-Kenntnisse
Bootstrap-Karussell plus CSS3-Animation ist so cool! _Javascript-Kenntnisse

Wenn Ihr Projekt ein leichtes Karussell erfordert, sind oft nicht viele Funktionen erforderlich. Gleichzeitig, wenn Ihr Projekt Bootstrap verwendet (eines der beliebtesten Open-Source-Frontend-Frameworks). Sie können sich auf die offiziellen Bootstrap-Komponenten beziehen.
Einführung in Animate.css
Um die von mir geschriebenen Animationseffekte lobenswert zu machen, habe ich eine sehr bekannte Open-Source-CSS3-Animationsbibliothek verwendet, die anschaulich animate.css heißt. Geschrieben von Dan Eden.
Das ist Code, der es mir ermöglicht, mich auf die anstehende Aufgabe zu konzentrieren, anstatt CSS3-Animationen zu interpretieren.
Die Verwendung von Animate.css erfordert 2 Schritte:
Fügen Sie animate.min.css in das HTML-Dokument ein.
Fügen Sie die animierte Klasse „yourchosenanimation“ zu den Elementen hinzu, die Sie auf der Webseite animieren möchten.
Als Nächstes verwenden Sie den Klassennamen für die Animation, die Sie auf der Animate.css-Website gesehen haben, anstelle Ihrer gewählten Animation.
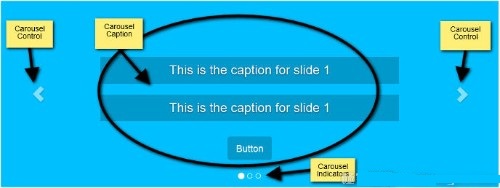
Einführung der Bootstrap-Karussellkomponente
Die Bootstrap-Karussellkomponente besteht aus drei Hauptteilen.
- Das Karussell gibt die Anzahl der Seiten an, auf denen die Diashow angezeigt wird, gibt Benutzern einen visuellen Hinweis und bietet eine wischbare Navigation.
- Karussellelemente, eine Klasse namens .carousel-inner, sind innerhalb des äußeren Rahmens enthalten. Stellt jeden einzelnen Schieberegler dar. In jedes Bild können Bilder eingefügt werden. Sie können auch einen Titel hinzufügen. Sie können dem HTML-Element auch den Klassennamen „carousel-caption“ hinzufügen. Bootstrap wird seine eigenen Stile haben. Durch diese Elemente können wir Animationen hinzufügen.
- Schließlich gibt es noch den Karussell-Steuerpfeil, der es dem Benutzer ermöglicht, vorwärts und rückwärts zu gleiten.
Wenn Sie mehr Details über die Bootstrap-Karussellkomponente erfahren möchten, können Sie sich den Artikel von Syed Fazle Rahman zum Erstellen eines JS-Karusselleffekts mit Bootstrap3 ansehen.
Um die Demo einfach anzuzeigen, werde ich vorerst keine Bilder hinzufügen. Der Fokus liegt zunächst auf dem Karussellrahmen als Animation.
HTML-Struktur erstellen
Das Folgende müssen Sie in Ihrem Projekt zitieren:
- jQuery
- CSS und JavaScript von Bootstrap
- Animate.css
- Ein Stylesheet und ein JS-Dokument.
Um den Entwicklungsprozess zu beschleunigen, werden die Vorlage und die erforderlichen Dateien von der offiziellen Bootstrap-Website zitiert.
Das Folgende ist der Bootstrap-Karussellcode:
1 2 3 4 5 6 7 8 9 10 11 12 13 14 15 16 17 18 19 20 21 22 23 24 25 26 27 28 29 30 31 32 33 34 35 36 37 38 39 40 41 42 43 44 45 46 47 48 49 50 51 52 53 54 55 56 57 58 59 60 61 62 63 64 65 66 67 68 |
|
Wenn der obige Code korrekt ist, wird beim Öffnen im Browser ein ausführbares Karussell angezeigt. Alles oben enthält keine einzige Zeile Javascript-Code. Wenn Sie keine Bilder hinzufügen, fügen Sie einfach einen Mindesthöhenwert zum Klassenblock .carousel.item im CSS-Dokument hinzu, um zu verhindern, dass das Karussell zusammenbricht.
Fügen Sie den Elementen im Karusselltitel ein Animationsattribut „data-animation“ hinzu und verwenden Sie dabei diese spezielle Animationsbibliothek als Wert.
Wenn Sie andere Animationen aus der Animate.css-Bibliothek erleben möchten, ersetzen Sie den Wert des data-animation-Attributs durch den Namen der Animationsklasse Ihrer Wahl.
Wir verwenden den Attributwert data-animation im Javascript-Code.
Während in manchen Fällen ein einfaches automatisches Karussell zu finden ist, haben wir in diesem Fall mehr Kontrolle.
Im ersten Schritt in diese Richtung löschen Sie den data-ride="carousel"-Wert aus dem Element und initialisieren den data-ride-Attributwert, ohne Code zu schreiben. Wir beabsichtigen jedoch, JS-Code zur Steuerung des Karussells zu verwenden, sodass dieses Data-Ride-Attribut nicht erforderlich ist.
CSS-Stile zum Karussell hinzufügen
Nutzen Sie nun Ihre Kreativität, um den Karusselltitel nach Ihren Wünschen zu gestalten. Die Stilregeln, die ich schreiben werde, sind Demos, die reibungslos funktionieren.
Genauer gesagt fügen wir die Kontrolle über die Eigenschaften der Animationsverzögerung hinzu. Definieren Sie, wann jede Animation startet (beachten Sie, dass das Browser-Präfix zur einfachen Demonstration weggelassen wird)
1 2 3 4 5 6 7 8 9 10 11 |
|
Das obige Code-Snippet stellt sicher, dass die Elementanimation ordnungsgemäß startet und auch andere Effekte ausgeführt werden können. Sie können beispielsweise die ersten beiden Titel auswählen, die gleichzeitig angezeigt werden sollen, und dann auf die Schaltfläche klicken, selbst entscheiden, Spaß haben.
JQuery-Code schreiben:
Lassen Sie uns dieses Karussell initialisieren und den folgenden Code zu Ihrer benutzerdefinierten Javascript-Datei hinzufügen:
1 2 3 |
|
Wir haben das Karussell dynamisch eingerichtet. Als nächstes lösen wir diese Animation.
Um den Titel der ersten Folie zu animieren, muss das Skript ausgeführt werden, nachdem die Seite im Browser geladen wurde. Die nachfolgende Folie wird animiert und unser Code wird für das Ereignis „slide.bs.carousel“ ausgeführt. Das bedeutet, dass derselbe Code zweimal ausgeführt wird: einmal zum Laden der Seite und einmal für das Ereignis slide.bs.carousel.
Da wir dem Grundsatz der Nichtduplizierung folgen möchten, planen wir, unseren Code in Funktionen zu kapseln und bei Bedarf auf diese zu verweisen.
Code:
1 2 3 4 5 6 7 8 9 10 11 12 13 14 15 16 17 18 19 20 21 22 23 24 25 26 27 28 29 30 31 |
|
上边的代码 我们来分析一下。
1、来看doAnimations()函数
这个doAnimations() 函数执行的任务如下。
它开始通过缓存变量中含有的animationend事件名称的字符串。这个事件告诉我们,你可能已经猜到,当每个动画结束。我们需要这个点的信息,因为每一次的动画结束后,我们将animate.css类移除。如果我们不做移除,轮播的标题将只有一次动画,也就是,只是在第一次轮播显示特定的幻灯片。
1 |
|
接来下,我们的函数循环遍历每一个我们想要有动画的元素,并获取data-animation的属性值。想上边所说的,这个值包含我们想要添加给元素的Animate.css类,以便有动画效果。
1 2 3 4 5 |
|
最后,这个doAnimations() 函数动态添加animate.css类的每个要执行动画的元素上,当动画结束的时候,还附加了一个事件监听。动画结束后我们移除从Animate.css添加的类。这样确保下一个轮播灯片回到当前的区域。(你试着删除这段代码,看看会发生什么)
1 2 3 |
|
2、第一个标题的动画
当页面在浏览器中加载时,我们在第一个幻灯片中动画的内容:
1 2 3 |
|
在这个代码中,我们找到第一张灯片,我们希望通过使用data-animation从动画的标题获取动画属性的值。然后我们把变量 $firstAnimatingElems 当做参数传给doAnimations()函数,然后执行函数。
3、轮播的停止功能
当第一张灯片内容执行完动画以后,我们停止这个轮播功能。
1 |
|
这是Bootstrap轮播组件防止不停旋转的特征。不停的旋转,可能会让访客生厌。
在这种情况下,我建议确保轮播不直接循环到下一个灯片直到所有的动画运行完毕。可以通过设置在初始化代码中的“间隔”选项来控制这个:
1 2 3 |
|
在我看来,一个无限循环轮播标题跳跃每一次的滑动进入视线不理想。
4、轮播幻灯片标题的动画
为每张幻灯片的动画轮播标题变得可见需要以下描述的步骤。
首先,我们在slide.bs.carousel上添加一个事件监听器。
当幻灯片实例方法被调用时,该事件立即触发。
1 2 3 |
|
接下来,我们选择当前的灯片,找到我们希望增加动画的元素。下边的代码用了slide.bs.carousel事件的.relatedTarget属性来绑定动画。
1 |
|
最后,我们调用doAnimations()函数,把$animatingElems当做参数传进去。
1 |
|
正如你们许多人可能知道,轮播有一些需要开发者考虑的问题。
在这篇文章中,展示了如何添加一些额外的精力,用几行jQuery和animate.css库用在基本的Bootstrap轮播组件。然而,其他类似的css库,或者css3动画,我们会做的一样好,希望这篇文章可以给大家带来更多的启发,打开大家的学习思路。

Heiße KI -Werkzeuge

Undresser.AI Undress
KI-gestützte App zum Erstellen realistischer Aktfotos

AI Clothes Remover
Online-KI-Tool zum Entfernen von Kleidung aus Fotos.

Undress AI Tool
Ausziehbilder kostenlos

Clothoff.io
KI-Kleiderentferner

Video Face Swap
Tauschen Sie Gesichter in jedem Video mühelos mit unserem völlig kostenlosen KI-Gesichtstausch-Tool aus!
Heißer Artikel
Heiße Werkzeuge

Notepad++7.3.1
Einfach zu bedienender und kostenloser Code-Editor

SublimeText3 chinesische Version
Chinesische Version, sehr einfach zu bedienen

Senden Sie Studio 13.0.1
Leistungsstarke integrierte PHP-Entwicklungsumgebung

Dreamweaver CS6
Visuelle Webentwicklungstools

SublimeText3 Mac-Version
Codebearbeitungssoftware auf Gottesniveau (SublimeText3)
Heiße Themen


 So erhalten Sie die Bootstrap -Suchleiste
Apr 07, 2025 pm 03:33 PM
So erhalten Sie die Bootstrap -Suchleiste
Apr 07, 2025 pm 03:33 PM
So verwenden Sie Bootstrap, um den Wert der Suchleiste zu erhalten: Bestimmt die ID oder den Namen der Suchleiste. Verwenden Sie JavaScript, um DOM -Elemente zu erhalten. Holen Sie sich den Wert des Elements. Führen Sie die erforderlichen Maßnahmen aus.
 So verwenden Sie Bootstrap in Vue
Apr 07, 2025 pm 11:33 PM
So verwenden Sie Bootstrap in Vue
Apr 07, 2025 pm 11:33 PM
Die Verwendung von Bootstrap in Vue.js ist in fünf Schritte unterteilt: Startstrap installieren. Bootstrap in main.js. Verwenden Sie die Bootstrap -Komponente direkt in der Vorlage. Optional: benutzerdefinierter Stil. Optional: Verwenden Sie Plug-Ins.
 Wie man vertikale Zentrierung von Bootstrap macht
Apr 07, 2025 pm 03:21 PM
Wie man vertikale Zentrierung von Bootstrap macht
Apr 07, 2025 pm 03:21 PM
Verwenden Sie Bootstrap, um die vertikale Zentrierung zu implementieren: FlexBox-Methode: Verwenden Sie den D-Flex, den Justify-Content-Center und die Ausrichtungsklassen aus Align-Item-Center, um Elemente in den Flexbox-Behälter zu platzieren. Methode für Ausstellungs-Iitem-Center-Klassen: Bei Browsern, die Flexbox nicht unterstützen, verwenden Sie die Klasse aus Align-items-Center-Klasse, vorausgesetzt, das übergeordnete Element hat eine definierte Höhe.
 So schreiben Sie geteilte Zeilen auf Bootstrap
Apr 07, 2025 pm 03:12 PM
So schreiben Sie geteilte Zeilen auf Bootstrap
Apr 07, 2025 pm 03:12 PM
Es gibt zwei Möglichkeiten, eine Bootstrap -Split -Zeile zu erstellen: Verwenden des Tags, das eine horizontale Split -Linie erstellt. Verwenden Sie die CSS -Border -Eigenschaft, um benutzerdefinierte Style Split -Linien zu erstellen.
 So richten Sie das Framework für Bootstrap ein
Apr 07, 2025 pm 03:27 PM
So richten Sie das Framework für Bootstrap ein
Apr 07, 2025 pm 03:27 PM
Um das Bootstrap -Framework einzurichten, müssen Sie die folgenden Schritte befolgen: 1. Verweisen Sie die Bootstrap -Datei über CDN; 2. Laden Sie die Datei auf Ihrem eigenen Server herunter und hosten Sie sie. 3.. Fügen Sie die Bootstrap -Datei in HTML hinzu; 4. Kompilieren Sie Sass/weniger bei Bedarf; 5. Importieren Sie eine benutzerdefinierte Datei (optional). Sobald die Einrichtung abgeschlossen ist, können Sie die Grid -Systeme, -Komponenten und -stile von Bootstrap verwenden, um reaktionsschnelle Websites und Anwendungen zu erstellen.
 So fügen Sie Bilder auf Bootstrap ein
Apr 07, 2025 pm 03:30 PM
So fügen Sie Bilder auf Bootstrap ein
Apr 07, 2025 pm 03:30 PM
Es gibt verschiedene Möglichkeiten, Bilder in Bootstrap einzufügen: Bilder direkt mit dem HTML -IMG -Tag einfügen. Mit der Bootstrap -Bildkomponente können Sie reaktionsschnelle Bilder und weitere Stile bereitstellen. Legen Sie die Bildgröße fest und verwenden Sie die IMG-Fluid-Klasse, um das Bild anpassungsfähig zu machen. Stellen Sie den Rand mit der img-beliebten Klasse ein. Stellen Sie die abgerundeten Ecken ein und verwenden Sie die IMG-Rund-Klasse. Setzen Sie den Schatten, verwenden Sie die Schattenklasse. Größen Sie die Größe und positionieren Sie das Bild im CSS -Stil. Verwenden Sie mit dem Hintergrundbild die CSS-Eigenschaft im Hintergrund.
 So verwenden Sie die Bootstrap -Taste
Apr 07, 2025 pm 03:09 PM
So verwenden Sie die Bootstrap -Taste
Apr 07, 2025 pm 03:09 PM
Wie benutze ich die Bootstrap -Taste? Führen Sie Bootstrap -CSS ein, um Schaltflächenelemente zu erstellen, und fügen Sie die Schaltfläche "Bootstrap" hinzu, um Schaltflächentext hinzuzufügen
 So ändern Sie Bootstrap
Apr 07, 2025 pm 03:18 PM
So ändern Sie Bootstrap
Apr 07, 2025 pm 03:18 PM
Um die Größe der Elemente in Bootstrap anzupassen, können Sie die Dimensionsklasse verwenden, einschließlich: Einstellbreite:.
