

HTML5 Canvas: Schwenken, Zoomen, Drehen von Bild- und Textcodedetails

HTML5 Canvas bietet APIs für die grafische Übersetzung, Drehung und Skalierung.
Übersetzung (übersetzen)
Übersetzungskoordinaten translator(x, y) bedeutet (0,0) Die Koordinaten werden in (x, y) übersetzt und die ursprünglichen (0,0)-Koordinaten werden zu (-x, -y)
Das Diagramm sieht wie folgt aus:
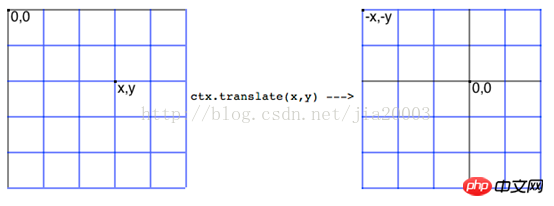
Der Koordinatenpunkt jedes ursprünglichen Koordinatenpunkts p(ox, oy) nach der Übersetzung ist p(ox-x, oy-y) und sein Mittelpunkt (x, y) ist die Übersetzung
Punktkoordinaten translator(x, y).
Code-Demo:
// translate is move the startpoint to centera and back to top left corner
function renderText(width, height, context) {
context.translate(width/ 2, height / 2);// 中心点坐标为(0, 0)
context.font="18px Arial";
context.fillStyle="blue";
context.fillText("Please Press <Esc> to Exit Game",5,50);
context.translate(-width/2,-height/2); // 平移恢复(0,0)坐标为左上角
context.fillText("I'm Back to Top",5,50);
}
Skalieren
Skalieren(a, b) bedeutet, das Objekt entlang der XY-Achse auf die Größe a*x bzw. b*y zu skalieren. Der Effekt ist wie im Bild dargestellt:

// translation the rectangle.
function drawPath(context) {
    context.translate(200,200);
    context.scale(2,2);// Scale twice size of original shape
    context.strokeStyle= "green";
    context.beginPath();
    context.moveTo(0,40);
    context.lineTo(80,40);
    context.lineTo(40,80);
    context.closePath();
    context.stroke();
}Drehen(drehen)
Drehwinkel drehen(Math.PI/8)

Die Koordinate p(x, y) vor der Drehung und die entsprechende Koordinate P(rx, ry) nach der Drehung sind
Rx = x * cos(-angle)- y * sin(-angle);
Ry = y * cos(-angle) + x * sin(-angle);
Rotation90 Grad kann vereinfacht werden zu:
Rx = y;
Ry = -x;
Die Standarddrehrichtung in Canvas ist im Uhrzeigersinn. Der Democode lautet wie folgt:
// new point.x = x * cos(-angle) -y * sin(-angle),
// new point.y = y * cos(-angle) +x * sin(-angle)
function renderRotateText(context) {
    context.font="24px Arial";
    context.fillStyle="red";
    context.fillText("i'm here!!!",5,50);

    // rotate -90 degreee
    // context.rotate(-Math.PI/2);
    // context.fillStyle="blue";
    // context.fillText("i'm here!!!", -400,30);

    // rotate 90 degreee
    context.rotate(Math.PI/2);
    context.fillStyle="blue";
    context.fillText("i'm here!!!",350,-420);

    console.log(Math.sin(Math.PI/2));

    // rotae 90 degree and draw 10 lines
    context.fillStyle="green";
    for(var i=0; i<4;
 i++) {
        var x = (i+1)*20;
        var y = (i+1)*60;
        var newX = y;
        var newY =-x;
        context.fillRect(newX,newY, 200, 6);
    }
}Der übliche Ansatz besteht darin, Rotation und Übersetzung zusammen zu verwenden, erste Änderung die Koordinaten (0,0)In die Mittelposition verschieben
übersetzen (Breite/2, Höhe/2)Dann verwenden Sie rotate(Math.PI/2)Vollständige Drehung
Das Codebeispiel lautet wie folgt:
function saveAndRestoreContext(context) {
    context.save();
    context.translate(200,200);
    context.rotate(Math.PI/2);
    context.fillStyle="black";
    context.fillText("2D Context Rotate And Translate", 10, 10);
    context.restore();
    context.fillText("2D Context Rotate And Translate", 10, 10);
}Alle JavaScript-Codes:
var tempContext = null; // global variable 2d context
window.onload = function() {
var canvas = document.getElementById("target");
canvas.width = 450;
canvas.height = 450;
if (!canvas.getContext) {
console.log("Canvas not supported. Please install a HTML5 compatible browser.");
return;
}
// get 2D context of canvas and draw image
tempContext = canvas.getContext("2d");
// renderText(canvas.width, canvas.height, tempContext);
saveAndRestoreContext(tempContext);
// drawPath(tempContext);
}
// translate is move the start point to centera and back to top left corner
function renderText(width, height, context) {
context.translate(width / 2, height / 2);
context.font="18px Arial";
context.fillStyle="blue";
context.fillText("Please Press <Esc> to Exit Game",5,50);
context.translate(-width / 2, -height / 2);
context.fillText("I'm Back to Top",5,50);
}
// translation the rectangle.
function drawPath(context) {
context.translate(200, 200);
context.scale(2,2); // Scale twice size of original shape
context.strokeStyle = "green";
context.beginPath();
context.moveTo(0, 40);
context.lineTo(80, 40);
context.lineTo(40, 80);
context.closePath();
context.stroke();
}
// new point.x = x * cos(-angle) - y * sin(-angle),
// new point.y = y * cos(-angle) + x * sin(-angle)
function renderRotateText(context) {
context.font="24px Arial";
context.fillStyle="red";
context.fillText("i'm here!!!",5,50);
// rotate -90 degreee
// context.rotate(-Math.PI/2);
// context.fillStyle="blue";
// context.fillText("i'm here!!!", -400,30);
// rotate 90 degreee
context.rotate(Math.PI/2);
context.fillStyle="blue";
context.fillText("i'm here!!!", 350,-420);
console.log(Math.sin(Math.PI/2));
// rotae 90 degree and draw 10 lines
context.fillStyle="green";
for(var i=0; i<4; i++) {
var x = (i+1)*20;
var y = (i+1)*60;
var newX = y;
var newY = -x;
context.fillRect(newX, newY, 200, 6);
}
}
function saveAndRestoreContext(context) {
context.save();
context.translate(200,200);
context.rotate(Math.PI/2);
context.fillStyle="black";
context.fillText("2D Context Rotate And Translate", 10, 10);
context.restore();
context.fillText("2D Context Rotate And Translate", 10, 10);
}Das Obige ist der Inhalt des HTML5-Canvas-Schwenkens, Zoomens und Drehens von Grafikcodedetails. Weitere verwandte Inhalte finden Sie auf der chinesischen PHP-Website (www.php.cn)!

Heiße KI -Werkzeuge

Undresser.AI Undress
KI-gestützte App zum Erstellen realistischer Aktfotos

AI Clothes Remover
Online-KI-Tool zum Entfernen von Kleidung aus Fotos.

Undress AI Tool
Ausziehbilder kostenlos

Clothoff.io
KI-Kleiderentferner

AI Hentai Generator
Erstellen Sie kostenlos Ai Hentai.

Heißer Artikel
Heiße Werkzeuge

Notepad++7.3.1
Einfach zu bedienender und kostenloser Code-Editor

SublimeText3 chinesische Version
Chinesische Version, sehr einfach zu bedienen

Senden Sie Studio 13.0.1
Leistungsstarke integrierte PHP-Entwicklungsumgebung

Dreamweaver CS6
Visuelle Webentwicklungstools

SublimeText3 Mac-Version
Codebearbeitungssoftware auf Gottesniveau (SublimeText3)
Heiße Themen
 1378
1378
 52
52

 Tabellenrahmen in HTML
Sep 04, 2024 pm 04:49 PM
Tabellenrahmen in HTML
Sep 04, 2024 pm 04:49 PM
Anleitung zum Tabellenrahmen in HTML. Hier besprechen wir verschiedene Möglichkeiten zum Definieren von Tabellenrändern anhand von Beispielen für den Tabellenrand in HTML.
 HTML-Rand links
Sep 04, 2024 pm 04:48 PM
HTML-Rand links
Sep 04, 2024 pm 04:48 PM
Anleitung zum HTML-Rand links. Hier besprechen wir einen kurzen Überblick über HTML margin-left und seine Beispiele sowie seine Code-Implementierung.
 Verschachtelte Tabelle in HTML
Sep 04, 2024 pm 04:49 PM
Verschachtelte Tabelle in HTML
Sep 04, 2024 pm 04:49 PM
Dies ist eine Anleitung für verschachtelte Tabellen in HTML. Hier diskutieren wir anhand der entsprechenden Beispiele, wie man eine Tabelle innerhalb der Tabelle erstellt.
 HTML-Tabellenlayout
Sep 04, 2024 pm 04:54 PM
HTML-Tabellenlayout
Sep 04, 2024 pm 04:54 PM
Leitfaden zum HTML-Tabellenlayout. Hier besprechen wir die Werte des HTML-Tabellenlayouts zusammen mit den Beispielen und Ausgaben im Detail.
 HTML-Eingabeplatzhalter
Sep 04, 2024 pm 04:54 PM
HTML-Eingabeplatzhalter
Sep 04, 2024 pm 04:54 PM
Leitfaden für HTML-Eingabeplatzhalter. Hier besprechen wir die Beispiele für HTML-Eingabeplatzhalter zusammen mit den Codes und Ausgaben.
 HTML-geordnete Liste
Sep 04, 2024 pm 04:43 PM
HTML-geordnete Liste
Sep 04, 2024 pm 04:43 PM
Leitfaden zur HTML-geordneten Liste. Hier besprechen wir auch die Einführung von HTML-geordneten Listen und Typen sowie deren Beispiele
 Text in HTML verschieben
Sep 04, 2024 pm 04:45 PM
Text in HTML verschieben
Sep 04, 2024 pm 04:45 PM
Anleitung zum Verschieben von Text in HTML. Hier besprechen wir eine Einführung, wie Marquee-Tags funktionieren, mit Syntax und Beispielen für die Implementierung.
 HTML-Onclick-Button
Sep 04, 2024 pm 04:49 PM
HTML-Onclick-Button
Sep 04, 2024 pm 04:49 PM
Anleitung zum HTML-OnClick-Button. Hier diskutieren wir deren Einführung, Funktionsweise, Beispiele und Onclick-Events in verschiedenen Veranstaltungen.
