

Detaillierte Codeerklärung des erweiterten HTML5-Canvas-Codes (Bild)

beginPath() – einen neuen Pfad beginnen; > closePath() – Versuchen Sie, den vorhandenen Pfad zu schließen, indem Sie eine Linie zeichnen, die den Endpunkt der letzten Linie mit den Anfangskoordinaten verbindet
fill() – Mit sub beschriebener Form füllen; durch den Pfad;
isPointInPath(x,y) – gibt true zurück, wenn der angegebene Punkt innerhalb der durch den aktuellen Pfad beschriebenen Form liegt; > lineTo(x,y) – einen Unterpfad zu den angegebenen Koordinaten zeichnen;
moveTo(x,y) – zu den angegebenen Koordinaten bewegen, ohne einen Unterpfad zu zeichnen ;
rect(x,y,w,h) – – Zeichnen Sie ein Rechteck mit der oberen linken Ecke bei (x,y), der Breite w und der Höhe h;
Strich() – Zeichnen Sie einen Umriss für die durch den Unterpfad beschriebene Form >
lineCap – Legen Sie den Stil des Linienendes fest, wenn Sie eine Linie oder geschlossene Form zeichnen;
<style type="text/css">
        canvas{
            border:thin solid black;
            margin: 4px;
        }
        body > *{
            float: left;
        }
</style><canvas id="canvas1" width="500" height="140">
您的浏览器不支持<code>canvas</code>!
</canvas> <script>
//由直线创建路径
var ctx=document.getElementById("canvas1").getContext("2d");
ctx.fillStyle="#136455";
ctx.strokeStyle="blue";
ctx.lineWidth=4;
ctx.beginPath();
ctx.moveTo(10,10);
ctx.lineTo(110,10);
ctx.lineTo(110,120);
ctx.closePath();
ctx.fill();
ctx.beginPath();
ctx.moveTo(150,10);
ctx.lineTo(200,10);
ctx.lineTo(200,120);
ctx.lineTo(190,120);
ctx.fill();
ctx.stroke();
ctx.beginPath();
ctx.moveTo(250,10);
ctx.lineTo(250,120);
ctx.stroke();
</script>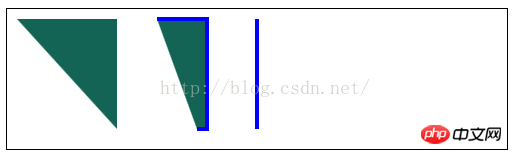 2) Bogen zeichnen:
end
Winkel,Richtung) – – Zeichnen Sie einen Bogen nach (x,y), der Radius ist rad, der Startwinkel ist 🎜>startAngle, der Endwinkel ist endAngle. Der optionale Parameter
direction gibt die Richtung des Bogens an <canvas id="canvas2" width="500" height="140">
您的浏览器不支持<code>canvas</code>!
</canvas> <script>
//设置lineCap属性
var ctx2=document.getElementById("canvas2").getContext("2d");
ctx2.strokeStyle="red";
ctx2.lineWidth=2;
ctx2.beginPath();
ctx2.moveTo(0,50);
ctx2.lineTo(200,50);
ctx2.stroke();
ctx2.strokeStyle="black";
ctx2.lineWidth=40;
var xpos=50;
var styles=["butt","round","square"];
for(var i=0;i<styles.length;i++){
ctx2.beginPath();
ctx2.lineCap=styles[i];
ctx2.moveTo(xpos,50);
ctx2.lineTo(xpos,150);
ctx2.stroke();
xpos+=50;
}
</script>;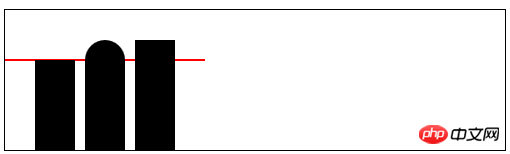
    <canvas id="canvas3" width="500" height="140">
        您的浏览器不支持<code>canvas</code>!
</canvas> <script>
//用Rect方法绘制矩形
var ctx3=document.getElementById("canvas3").getContext("2d");
ctx3.fillStyle="yellow";
ctx3.strokeStyle="black";
ctx3.lineWidth=4;
ctx3.beginPath();
ctx3.moveTo(110,10);
ctx3.lineTo(110,100);
ctx3.lineTo(10,10);
ctx3.closePath();
ctx3.rect(110,10,100,90);
ctx3.rect(110,100,130,30);
ctx3.fill();
ctx3.stroke();
</script>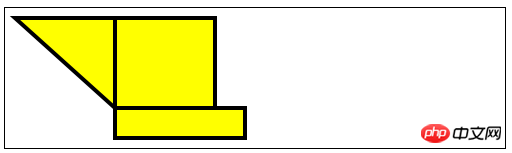
3) Bézierkurve zeichnen
bezierCurveTo(cx1,cy1,cx2,cy2,x,y) – – Zeichnen Sie eine Bezier-Kurve zum Punkt (x,y), die Kontrollpunkte sind (cx1,cy1) und
( cx2 ,cy2); <canvas id="canvas4" width="500" height="140">
您的浏览器不支持<code>canvas</code>!
</canvas> <script>
//使用arcTo方法
var ctx4=document.getElementById("canvas4").getContext("2d");
var point1=[100,10];
var point2=[200,10];
var point3=[200,110];
ctx4.fillStyle="yellow";
ctx4.strokeStyle="black";
ctx4.lineWidth=4;
ctx4.beginPath();
ctx4.moveTo(point1[0],point1[1]);
ctx4.arcTo(point2[0],point2[1],point3[0],point3[1],100);
ctx4.stroke();
drawPoint(point1[0],point1[1]);
drawPoint(point2[0],point2[1]);
drawPoint(point3[0],point3[1]);
ctx4.beginPath();
ctx4.moveTo(point1[0],point1[1]);
ctx4.lineTo(point2[0],point2[1]);
ctx4.lineTo(point3[0],point3[1]);
ctx4.stroke();
function drawPoint(x,y){
ctx4.lineWidth=1;
ctx4.strokeStyle="red";
ctx4.strokeRect(x-2,y-2,4,4);
}
</script>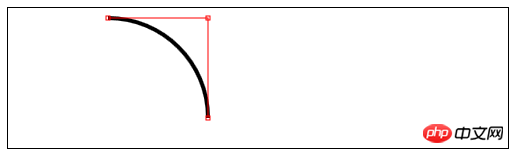
quadraticCurveTo(cx,xy,x,y) – – Zeichnen Sie eine quadratische Bezier-Kurve zum Punkt (x,y), Kontrollpunkt ist (cx, cy);
    <canvas id="canvas5" width="500" height="140">
        您的浏览器不支持<code>canvas</code>!
</canvas> <script>
//响应鼠标移动绘制圆弧
var canvasElem = document.getElementById("canvas5");
var ctx5 = canvasElem.getContext("2d");
var point1 = [100, 10];
var point2 = [200, 10];
var point3 = [200, 110];
draw();
canvasElem.onmousemove = function (e) {
if (e.ctrlKey) {
point1 = [e.clientX, e.clientY];
} else if(e.shiftKey) {
point2 = [e.clientX, e.clientY];
} else {
point3 = [e.clientX, e.clientY];
}
ctx5.clearRect(0, 0, 540, 140);
draw();
}
function draw() {
ctx5.fillStyle = "yellow";
ctx5.strokeStyle = "black";
ctx5.lineWidth = 4;
ctx5.beginPath();
ctx5.moveTo(point1[0], point1[1]);
ctx5.arcTo(point2[0], point2[1], point3[0], point3[1], 50);
ctx5.stroke();
drawPoint(point1[0], point1[1]);
drawPoint(point2[0], point2[1]);
drawPoint(point3[0], point3[1]);
ctx5.beginPath();
ctx5.moveTo(point1[0], point1[1]);
ctx5.lineTo(point2[0], point2[1]);
ctx5.lineTo(point3[0], point3[1]);
ctx5.stroke();
}
function drawPoint(x, y) {
ctx5.lineWidth = 1;
ctx5.strokeStyle = "red";
ctx5.strokeRect(x -2, y-2, 4, 4);
}
</script>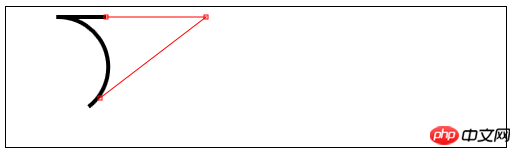 4) Einen Ausschnittsbereich erstellen
    <canvas id="canvas6" width="500" height="140">
        您的浏览器不支持<code>canvas</code>!
</canvas> <script>
//使用arc方法
var ctx6=document.getElementById("canvas6").getContext("2d");
ctx6.fillStyle="yellow";
ctx6.lineWidth=3;
ctx6.beginPath();
ctx6.arc(70,70,60,0,Math.PI,true);
ctx6.stroke();
ctx6.beginPath();
ctx6.arc(200,70,60,Math.PI/2,Math.PI/4,false);
ctx6.fill();
ctx6.stroke();
ctx6.beginPath();
var val=0;
for(var i=0;i<4;i++){
ctx6.arc(350,70,60,val,val+Math.PI/4,false);
val+=Math.PI/2;
}
ctx6.closePath();
ctx6.fill();
ctx6.stroke();
</script>() – Einen neuen Ausschnittsbereich erstellen ; 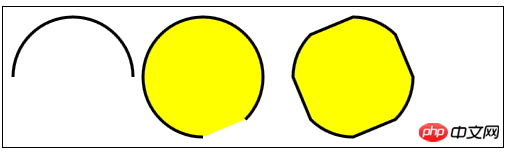
5) Text zeichnen:
fillText(
strokeText(
font——设置绘制文本时使用的字体;
textAlign——设置文本的对齐方式:start、end、left、right、center;
textBaseline——设置文本的基线:top、hanging、middle、alphabetic、ideographic、bottom;
6)使用特效和转换:
6.1)使用阴影:
shadowBlur——设置阴影的模糊程度;
shadowColor——设置阴影的颜色;
shadowOffsetX——设置阴影的水平偏移量;
shadowOffsetY——设置阴影的垂直偏移量;
   <canvas id="canvas8" width="500" height="140">
        您的浏览器不支持<code>canvas</code>!
</canvas> <script>
//给图形和文本应用阴影
var ctx8=document.getElementById("canvas8").getContext("2d");
ctx8.fillStyle="lightgrey";
ctx8.strokeStyle="black";
ctx8.lineWidth=3;
ctx8.shadowOffsetX=5;
ctx8.shadowOffsetY=5;
ctx8.shadowBlur=5;
ctx8.shadowColor="grey";
ctx8.beginPath();
ctx8.arc(420,70,50,0,Math.PI,true);
ctx8.stroke();
ctx8.beginPath();
ctx8.arc(420,80,40,0,Math.PI,false);
ctx8.fill();
ctx8.font="100px sans-serif";
ctx8.fillText("hello",50,100);
ctx8.strokeText("hello",50,100);
</script>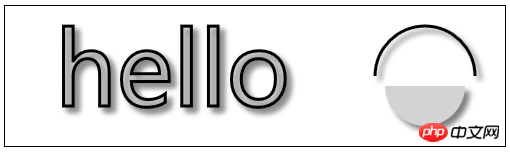
6.2)使用透明度:
globalAlpha——给文本和图形设置透明度(从0到1);
    <canvas id="canvas9" width="300" height="120">
        您的浏览器不支持<code>canvas</code>!
</canvas> <script>
//使用globalAlpha属性,设置透明度
var ctx9=document.getElementById("canvas9").getContext("2d");
ctx9.fillStyle="lightgrey";
ctx9.strokeStyle="black";
ctx9.lineWidth=3;
ctx9.font="100px sans-serif";
ctx9.fillText("hello",10,100);
ctx9.strokeText("hello",10,100);
ctx9.fillStyle="red";
ctx9.globalAlpha=0.5;
ctx9.fillRect(10,10,240,100);
</script>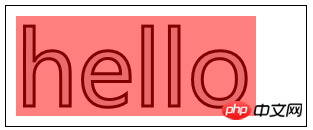
6.3)使用合成:
globalCompositeOperation——与透明度属性结合使用,来控制图形和文本在画布上绘制的方式;
globalCompositeOperation允许的值:
=copy——将来源绘制于目标之上,忽略一切透明度设置;
=source-atop——在两个图像都不透明处显示来源图像,
目标图像不透明但来源图像透明处显示目标图像,其它位置显示为透明;
=source-in——来源图像和目标图像都不透明处显示来源图像。其它位置显示为透明;
=source-out——来源图像不透明但目标图像透明处显示来源图像。其它位置显示为透明;
=source-over——来源图像不透明处显示来源图像。其它位置显示目标图像;
=destination-atop——与source-atop相同,但用目标图像替代来源图像,反之亦然;
=destination-in——与source-in相同,但用目标图像替代来源图像,反之亦然;
=destination-over——与source-over相同,但用目标图像替代来源图像,反之亦然;
=destination-out——与source-out相同,但用目标图像替代来源图像,反之亦然;
=lighter——显示来源图像与目标图像的总和,颜色值限制最高255(100%);
=xor——对来源图像和目标图像执行异或运算;
    <canvas id="canvas10" width="300" height="120">
        您的浏览器不支持<code>canvas</code>!
    </canvas>
    <label>Comosition Value:</label>
    <select id="list">
        <option>copy</option>
        <option>destination-atop</option>
        <option>destination-in</option>
        <option>destination-over</option>
        <option>destination-out</option>
        <option>lighter</option>
        <option>source-atop</option>
        <option>source-in</option>
        <option>source-out</option>
        <option>source-over</option>
        <option>xor</option>
</select> <script>
//使用globalCompositeOperation属性
var ctx10=document.getElementById("canvas10").getContext("2d");
ctx10.fillStyle="lightgrey";
ctx10.strokeStyle="black";
ctx10.lineWidth=3;
var compVal="copy";
document.getElementById("list").onchange=function(e){
compVal= e.target.value;
draw();
}
draw();
function draw(){
ctx10.clearRect(0,0,300,120);
ctx10.globalAlpha=1.0;
ctx10.font="100px sans-serif";
ctx10.fillText("hello",10,100);
ctx10.strokeText("hello",10,100);
ctx10.globalCompositeOperation=compVal;
ctx10.fillStyle="red";
ctx10.globalAlpha=0.5;
ctx10.fillRect(100,10,150,100);
}
</script>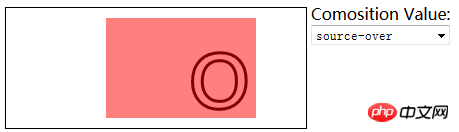
6.4)使用变换:
scale(
rotate(
translate(
transform(a,b,c,d,e,f)——合并现有的变换和a-f值所指定的矩阵;
setTansform(a,b,c,d,e,f)——用a-f值所指定的矩阵替换现有的变换;
    <canvas id="canvas11" width="400" height="200">
        您的浏览器不支持<code>canvas</code>!
</canvas> <script>
//使用变换
var ctx11=document.getElementById("canvas11").getContext("2d");
ctx11.fillStyle="lightgrey";
ctx11.strokeStyle="black";
ctx11.lineWidth=3;
ctx11.clearRect(0,0,300,120);
ctx11.globalAlpha=1.0;
ctx11.font="100px sans-serif";
ctx11.fillText("hello",10,100);
ctx11.strokeText("hello",10,100);
ctx11.scale(1.3,1.3);
ctx11.translate(100,-50);
ctx11.rotate(0.5);
ctx11.fillStyle="red";
ctx11.globalAlpha=0.5;
ctx11.fillRect(100,10,150,100);
ctx11.strokeRect(0,0,300,200);
</script>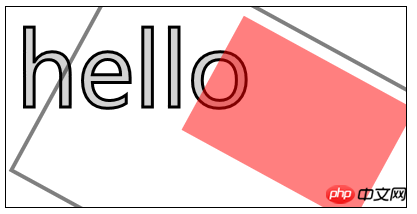
Das obige ist der detaillierte Inhalt vonDetaillierte Codeerklärung des erweiterten HTML5-Canvas-Codes (Bild). Für weitere Informationen folgen Sie bitte anderen verwandten Artikeln auf der PHP chinesischen Website!

Heiße KI -Werkzeuge

Undresser.AI Undress
KI-gestützte App zum Erstellen realistischer Aktfotos

AI Clothes Remover
Online-KI-Tool zum Entfernen von Kleidung aus Fotos.

Undress AI Tool
Ausziehbilder kostenlos

Clothoff.io
KI-Kleiderentferner

Video Face Swap
Tauschen Sie Gesichter in jedem Video mühelos mit unserem völlig kostenlosen KI-Gesichtstausch-Tool aus!

Heißer Artikel
Heiße Werkzeuge

Notepad++7.3.1
Einfach zu bedienender und kostenloser Code-Editor

SublimeText3 chinesische Version
Chinesische Version, sehr einfach zu bedienen

Senden Sie Studio 13.0.1
Leistungsstarke integrierte PHP-Entwicklungsumgebung

Dreamweaver CS6
Visuelle Webentwicklungstools

SublimeText3 Mac-Version
Codebearbeitungssoftware auf Gottesniveau (SublimeText3)
Heiße Themen
 1393
1393
 52
52

 Tabellenrahmen in HTML
Sep 04, 2024 pm 04:49 PM
Tabellenrahmen in HTML
Sep 04, 2024 pm 04:49 PM
Anleitung zum Tabellenrahmen in HTML. Hier besprechen wir verschiedene Möglichkeiten zum Definieren von Tabellenrändern anhand von Beispielen für den Tabellenrand in HTML.
 Verschachtelte Tabelle in HTML
Sep 04, 2024 pm 04:49 PM
Verschachtelte Tabelle in HTML
Sep 04, 2024 pm 04:49 PM
Dies ist eine Anleitung für verschachtelte Tabellen in HTML. Hier diskutieren wir anhand der entsprechenden Beispiele, wie man eine Tabelle innerhalb der Tabelle erstellt.
 HTML-Rand links
Sep 04, 2024 pm 04:48 PM
HTML-Rand links
Sep 04, 2024 pm 04:48 PM
Anleitung zum HTML-Rand links. Hier besprechen wir einen kurzen Überblick über HTML margin-left und seine Beispiele sowie seine Code-Implementierung.
 HTML-Tabellenlayout
Sep 04, 2024 pm 04:54 PM
HTML-Tabellenlayout
Sep 04, 2024 pm 04:54 PM
Leitfaden zum HTML-Tabellenlayout. Hier besprechen wir die Werte des HTML-Tabellenlayouts zusammen mit den Beispielen und Ausgaben im Detail.
 HTML-Eingabeplatzhalter
Sep 04, 2024 pm 04:54 PM
HTML-Eingabeplatzhalter
Sep 04, 2024 pm 04:54 PM
Leitfaden für HTML-Eingabeplatzhalter. Hier besprechen wir die Beispiele für HTML-Eingabeplatzhalter zusammen mit den Codes und Ausgaben.
 Text in HTML verschieben
Sep 04, 2024 pm 04:45 PM
Text in HTML verschieben
Sep 04, 2024 pm 04:45 PM
Anleitung zum Verschieben von Text in HTML. Hier besprechen wir eine Einführung, wie Marquee-Tags funktionieren, mit Syntax und Beispielen für die Implementierung.
 HTML-geordnete Liste
Sep 04, 2024 pm 04:43 PM
HTML-geordnete Liste
Sep 04, 2024 pm 04:43 PM
Leitfaden zur HTML-geordneten Liste. Hier besprechen wir auch die Einführung von HTML-geordneten Listen und Typen sowie deren Beispiele
 HTML-Onclick-Button
Sep 04, 2024 pm 04:49 PM
HTML-Onclick-Button
Sep 04, 2024 pm 04:49 PM
Anleitung zum HTML-OnClick-Button. Hier diskutieren wir deren Einführung, Funktionsweise, Beispiele und Onclick-Events in verschiedenen Veranstaltungen.
