

In diesem Abschnitt geht es hauptsächlich um Beispiele für verschiedene Verwendungsmöglichkeiten von Leinwand Zunächst werde ich ein Problem lösen, das ich beim Anwenden von Leinwandzeichnungen hatte.
Der folgende Code zeichnet ein 100*100-Rechteck auf Leinwand:
<!doctype html>
<html>
<head>
<meta charset="utf-8">
<title>canvas基础练习</title>
<style>
    .myCanvas{
    border:1px solid #f00;
     width:200px;
      height:200px;
       }
       </style>
       <script>
    window.onload = function(){
        var canvas = document.getElementById("myCanvas1");
        var context = canvas.getContext("2d");
        //设置矩形填充颜色为红色
        context.fillStyle = "red";
        //从(10,10)位置绘制100*100的正方形
        context.fillRect(10,10,100,100);
    };
    </script>
    </head>
    <body>
    <canvas class="myCanvas" id="myCanvas1">
            你的浏览器不支持canvas。    </canvas>
            </body>
</html>Die laufenden Ergebnisse sind wie folgt: 
Hä? Seltsam, was wir gezeichnet haben, ist offensichtlich ein Quadrat. Warum ist daraus ein Rechteck geworden? Überprüfen Sie den Code, es gibt kein Problem!
Versuchen wir mal, den Code zu ändern! Entfernen Sie die Breiten- und Höhenattribute im Stil :
<!doctype html>
<html>
<head>
<meta charset="utf-8">
<title>canvas基础练习</title>
<style>
    .myCanvas{
        border:1px solid #f00;
    }
</style>

<script>
    window.onload = function(){
        var canvas = document.getElementById("myCanvas1");
        var context = canvas.getContext("2d");

        //设置矩形填充颜色为红色
        context.fillStyle = "red";
        //从10,10位置绘制100*100的正方形
        context.fillRect(10,10,100,100);
    };
</script>
</head>

<body>
    <canvas class="myCanvas" id="myCanvas1">
            你的浏览器不支持canvas。
    </canvas>
</body>

</html> und sehen Sie sich die laufenden Ergebnisse an: 
Das ist normal!
Vergleichen Sie die Unterschiede zwischen den beiden Codes. Der zweite Code entfernt lediglich die Breiten- und Höhenattribute aus dem -Stil, und die anderen sind genau gleich.
Später, nachdem ich die Daten konsultiert hatte, stellte ich fest, dass die Standardgröße der Leinwand 300 Pixel * 150 Pixel beträgt, was einem Bild entspricht. Die von CSS festgelegten Breiten- und Höhenattribute entsprechen dem Strecken dieses Bildes.
Auf diese Weise ist es für uns nicht schwer herauszufinden: Das erste Bild ist tatsächlich das Ergebnis der Streckung des zweiten Bildes von 300px*150px auf 200px*200px.
Wie stellt man also die Größe der Leinwand richtig ein, ohne dass es zu einer Bildverformung kommt?
Es gibt zwei Methoden:
//第一种:在html标签中静态设置
<canvas width="200" height="200" id="myCanvas">

//第二种:使用Js代码动态设置
var canvas = document.getElementById("myCanvas1");
var canvas.width = 200;
var canvas.height = 200;<!doctype html>
<html>
<head>
<meta charset="utf-8">
<title>canvas基础练习</title>
<style>
.myCanvas{
border:1px solid #f00;
}
</style>
<script>
var canvasWidth;
var canvasHeight;
//获取canvas的宽和高存放于全局变量备用,并返回canvas的context对象
function getContextById(elementId){
var canvas = document.getElementById(elementId);
canvasWidth = canvas.width;
canvasHeight = canvas.height;
var context = canvas.getContext("2d");
return context;
}
function drawPath(){
var context = getContextById("myCanvas");
//清除画布
context.clearRect(0,0,canvasWidth,canvasHeight);
context.beginPath();
/*绘制弧线,使用arc(x,y,radius,startAngle,endAngle,counterclockwise)方法
以(x,y)为圆心绘制一条弧线,弧线半径为radius,起始和结束角度(用弧度表示)分别为startAngle
和endAngle。最后一个参数表示是否按逆时针方向计算,值为false表示顺时针方向计算。
*/
context.arc(130,130,90,0,2*Math.PI,false);
/*arcTo(x1,y1,x2,y2,radius):从上一点开始绘制一条弧线,到(x2,y2)为止,并且以给
定的半径radius穿过(x1,y1)
*/
context.arcTo(310,220,400,130,80)
/*bezierCurveTo(c1x,c1y,c2x,c2y,x,y):从上一点开始绘制一条曲线,到(x,y)为
止,并且以(c1x,c1y)和(c2x,c2y)为控制的。
*/
context.bezierCurveTo(320,210,400,250,310,300);
/*lineTo(x,y):从上一点开始绘制一条直线,到(x,y)为止*/
context.lineTo(0,300);
context.moveTo(130,220);
context.lineTo(100,300);
/*quadraticCurveTo(cx,cy,x,y):从上一点开始绘制一条二次曲线,到(x,y)为止,并且
以(cx,cy)作为控制点
*/
context.quadraticCurveTo(40,380,130,400);
context.lineTo(450,400);
/*rect(x,y,width,height):从点(x,y)开始绘制一个矩形路径*/
context.rect(80,80,100,100)
context.strokeStyle="rgba(0,0,255,0.5)";
//最后必须调用stroke()方法,这样才能把图像绘制到画布上。
context.stroke();
}
</script>
</head>
<body>
<canvas width="500" height="500" class="myCanvas" id="myCanvas">
你的浏览器不支持canvas。
</canvas>
<div>
<button onClick="drawPath()">绘制</button>
</div>
</body>
</html>Laufeffekt: 
<!doctype html>
<html>
<head>
<meta charset="utf-8">
<title>canvas基础练习</title>
<style>
    .myCanvas{
        border:1px solid #f00;
    }
</style>

<script>
    var canvasWidth = 300;
    var canvasHeight = 300;
    //获取canvas的宽和高存放于全局变量备用,并返回canvas的context对象
    function getContextById(elementId){
        var canvas = document.getElementById(elementId);
        canvasWidth = canvas.width;
        canvasHeight = canvas.height;
        var context = canvas.getContext("2d");
        return context;
    }

    function drawText(){
        var context = getContextById("myCanvas");
        //清除画布
        context.clearRect(0,0,canvasWidth,canvasHeight);

        //开始路径
        context.beginPath();
        //绘制外圆
        context.arc(100,100,99,0,2*Math.PI,false);
        //绘制内圆
        //context.moveTo(194,100);//将绘图游标移动到(x,y),不画线
        context.arc(100,100,94,0,2*Math.PI,false);
        //绘制分针
        context.moveTo(100,100);
        context.lineTo(100,15);
        //绘制时针
        context.moveTo(100,100);
        context.lineTo(35,100);
        context.strokeStyle="rgba(0,0,255,0.5)";
        //最后必须调用stroke()方法,这样才能把图像绘制到画布上。
        context.stroke();

        //绘制文本
        context.font="bold 14px Arial";
        context.textAlign="center";
        context.textBaseline="middle";//文本的基线
        context.fillText("3",200-15,100);
        context.fillText("6",100,200-15);
        context.fillText("9",15,100);
        context.fillText("12",100,15);
        context.strokeStyle="rgba(0,0,255,0.5)";
        //最后必须调用stroke()方法,这样才能把图像绘制到画布上。
        context.stroke();
    }

</script>
</head>

<body>
    <canvas width="200" height="200" class="myCanvas" id="myCanvas">
            你的浏览器不支持canvas。
    </canvas>
    <div>
        <button onClick="drawText()">绘制</button>
    </div>
</body>

</html>Der Laufeffekt ist wie folgt: 
<!doctype html>
<html>
<head>
<meta charset="utf-8">
<title>canvas基础练习</title>
<style>
    .myCanvas{
        border:1px solid #f00;
    }
</style>

<script>
    var canvasWidth = 300;
    var canvasHeight = 300;
    //获取canvas的宽和高存放于全局变量备用,并返回canvas的context对象
    function getContextById(elementId){
        var canvas = document.getElementById(elementId);
        canvasWidth = canvas.width;
        canvasHeight = canvas.height;
        var context = canvas.getContext("2d");
        return context;
    }

    function drawText(){
        var context = getContextById("myCanvas");
        //清除画布
        context.clearRect(0,0,canvasWidth,canvasHeight);

        //开始路径
        context.beginPath();
        //绘制外圆
        context.arc(100,100,99,0,2*Math.PI,false);
        //绘制内圆
        //context.moveTo(194,100);//将绘图游标移动到(x,y),不画线
        context.arc(100,100,94,0,2*Math.PI,false);

        //绘制文本
        context.font="bold 14px Arial";
        context.textAlign="center";
        context.textBaseline="middle";//文本的基线
        context.fillText("3",200-15,100);
        context.fillText("6",100,200-15);
        context.fillText("9",15,100);
        context.fillText("12",100,15);
        context.strokeStyle="rgba(0,0,255,0.5)";
        //最后必须调用stroke()方法,这样才能把图像绘制到画布上。
        context.stroke();

        //变换原点,将圆心变换为画布坐标原点
        /*translate(x,y):将坐标原点移动到(x,y)。执行这个变换后,坐标(0,0)会变成之
        前由(x,y)表示的点
        */
        context.translate(100,100);

        //旋转1个弧度
        context.rotate(1);

        //绘制分针
        context.moveTo(0,0);
        context.lineTo(0,-85);
        //绘制时针
        context.moveTo(0,0);
        context.lineTo(-65,0);
        context.strokeStyle="rgba(0,0,255,0.5)";

        //最后必须调用stroke()方法,这样才能把图像绘制到画布上。
        context.stroke();

        //将原点恢复到原画布原点
        context.translate(-100,-100);
    }

</script>
</head>

<body>
    <canvas width="200" height="200" class="myCanvas" id="myCanvas">
            你的浏览器不支持canvas。
    </canvas>
    <div>
        <button onClick="drawText()">绘制</button>
    </div>
</body>

</html>Der Laufeffekt: 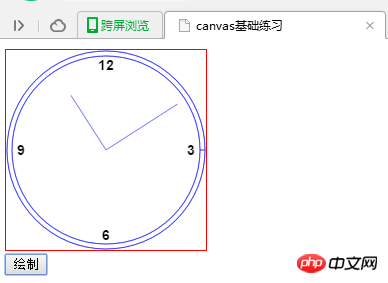
<!DOCTYPE html>
<html>
<head>
    <meta http-equiv="Content-Type" content="text/html; charset=utf-8" />
    <title>canvas绘图</title>
</head>

<body>
    <canvas id="myCanvas" width="400" height="400" style="border:#0F0 solid 1px">A Drawing of something</canvas>
    <script>
        var drawing=document.getElementById("myCanvas");
        //确定浏览器支持<canvas>元素
        if(drawing.getContext){
            //取得绘图上下文对象的引用,“2d”是取得2D上下文对象
            var context=drawing.getContext("2d");
            //设置阴影
            context.shadowColor="rgba(0,0,0,0.5)"//设置阴影颜色
            context.shadowOffsetX=15;//设置形状或路径x轴方向的阴影偏移量,默认值为0;
            context.shadowOffsetY=15;//设置形状或路径y轴方向的阴影偏移量,默认值为0;
            context.shadowBlur=10;//设置模糊的像素数,默认值为0,即不模糊。
            //绘制红色填充矩形
            context.fillStyle="red";
            context.fillRect(10,10,100,100);
            //绘制半透明的蓝色矩形
            context.fillStyle="rgba(0,0,255,1)";
            context.fillRect(60,60,100,100);
        }
    </script>
</body>
</html>
Das obige ist der detaillierte Inhalt vonAusführliche Erklärung des HTML5-Canvas (3). Für weitere Informationen folgen Sie bitte anderen verwandten Artikeln auf der PHP chinesischen Website!
 Was sind die Produktionsmethoden der HTML5-Animationsproduktion?
 Der Unterschied zwischen HTML und HTML5
 echarts adaptive Größeneinstellungen
 Befehl zum Neustart der Netzwerkkarte unter Linux
 So öffnen Sie eine XML-Datei
 So ändern Sie die Registrierung
 bootmgr fehlt und kann nicht booten
 DSP-Anwendungsbereiche


![[Web-Frontend] Node.js-Schnellstart](https://img.php.cn/upload/course/000/000/067/662b5d34ba7c0227.png)


