LNMPEinführung
LAMP(Linux Apache MySQL PHP)---FrühererWebService.
LNMP(Linux Nginx MySQL PHP)---Trendiger und neuer Der webn-Dienst erfreut sich einer steigenden Nutzungsrate (sehr beliebt in China).
Nginx (Engine X) wird von Russen entwickelt und ist Open Source www Service-Software, die gesamte Software ist 780K (sehr klein), es ist ein statisches (HTML, js, css, jpg usw.) www Software, kleine statische Dateien mit hoher Parallelität, die nur sehr wenige Ressourcen beanspruchen.
NginxVerwenden Sie die Plattform (Linux-Unix-Windows sind in Ordnung) und ApacheDas Gleiche.
Nginx Funktionen:
a.www webDienst---http 80
b.Lastausgleich (Reverse ProxyProxy)
c.web Cache
Vorteile von
nginx:
1. Einfache Konfiguration und Flexibilität.
2.Hohe Parallelität (statische kleine Dateien), statisch 1-2W.
3. Beansprucht nur wenige Ressourcen, 2W entwickelt gleichzeitig 10 Thread-Dienste und verbraucht Hunderte Megabyte Speicher .
4.Es gibt viele Arten von Funktionen (Web-Cache-ProxyProxy), und jede Funktion ist nicht sehr stark.
5. unterstützt das epoll-Modell, wodurch nginx eine hohe Parallelität unterstützt. Es gibt einen Unterschied zwischen
6.nginx mit dynamischen Diensten und Apache.
7.Verwenden Sie nginx, um die Geschwindigkeit von IP zu begrenzen. Die Anzahl der Verbindungen kann begrenzt werden.
Implementierungsprinzip: nginx (Apache)- -》php--》MySQL
nginx Anwendungsszenarien:
1. statischer Dienst (Bilder, Videos), der andere lighthttpd (die Community ist nicht aktiv). Parallelität: 1-3W, html, js, css, .flv
2.Dynamischer Dienst: nginx+fastcgi-Modus läuft php, jsp. Parallelität: 500-1500, ähnlich wie Apache+php, lighttpd+fcgi php
3.Reverse-Proxy, Lastausgleich. Für Bestellungen unter PV2000W können Sie nginx als Agent verwenden. haproxy, F5, a10
4. Cache Service, SQUID, VARNI.
nginx und andere Web Serververgleich:
1) Apache
Stabil und leistungsstark
b. Der Prefork-Modus eliminiert den Aufwand für die Prozesserstellung und bietet eine hohe Leistung.
c.Bei der Verarbeitung dynamischer Geschäftsdaten liegt der Engpass nicht im Apache selbstd. Bei hoher Parallelität werden relativ mehr Systemressourcen verbraucht
e.
Basierend auf dem traditionellenselect-Modell2) nginx
a.
Basierend auf dem asynchronenIO-Modell (epoll, kqueue), hat eine starke Leistung und kann Zehntausende Parallelität unterstützen Sehr gute Unterstützung für kleine Dateien, hohe Leistung (beschränkt auf kleine statische Dateien)
c. Schöner Code, Erweiterungsbibliothek muss für das Hauptprogramm kompiliert werden
Relativ geringer Ressourcenverbrauch
3) Lighttpd
(Baidu Tieba, Douban)a.
Basierend auf dem asynchronenIOModell ist die Leistung ähnlich wie bei nginxb.
Die Erweiterung ist derSO-Modus, der besser ist als nginxSeien Sie flexibelc.
Die weltweite Nutzung ist gering, Die Sicherheit ist nicht so gut wieApacheundnginxGutd.
DateiURL Adressverschlüsselung kann über das Plug-in erreicht werden (mod secdownload)
So wählen Sie ausWeb Server (empfohlen) in Unternehmensproduktionsszenarien:
Statisches Geschäft: Für hohe Parallelität verwenden Sienginx oder lighttpd
Dynamisches Geschäft: Verwenden Sienginx und Apache Beide
haben beides dynamische und statische Dienste:nginx und Apache beide Ja, wählen Sie
Externes Geschäftnginx, Internes GeschäftApache
Installation, Konfigurationnginx1.
Installationsvorbereitung:[root@localhost ~]# yum install pcre* -y [root@localhost ~]# yum install openssl* -y
2.
Kompilieren:./configure --prefix=/application/nginx1. 12.0
--user=nginx
--group=nginx
--with-http_stub_status_module
--with-http_ssl_module
3.
Startprüfung:[root@localhost application]# /application/nginx/sbin/nginx -t
nginx: Die Syntax der Konfigurationsdatei /application/nginx1.12.0/conf/nginx.conf ist in Ordnung
nginx: Der Test der Konfigurationsdatei /application/nginx1.12.0/conf/nginx.conf ist erfolgreich
[root@localhost application]# /application/nginx/sbin/nginx
[root@localhost application]# netstat -lntup|grep nginx (Auch 80 Der Port kann auch überprüft werden)

Das Erscheinungsbild dieser Schnittstelle zeigt an Erfolg
[root@localhost application]# vim /application/nginx/html/index.html Homepage-Inhalt ändern
4.ÜberNginx-Module
1)Nginx-Kernmodule (erforderlich), einschließlich Hauptveranstaltungen
2)Standard-HTTP-Module (obwohl es nicht erforderlich ist, wird es standardmäßig installiert und es wird nicht empfohlen, es zu ändern), einschließlich Core Acess FastCGI Gzip (Komprimierungsmodul, Leistungsoptimierung) LOG (Protokollmodul) Proxy Rewrite ( URL Umschreibemodul) Upstream (Lastausgleichsmodul) usw.
Tipp: Unter Standardbedingungen werden beide Modulsätze installiert. Das Ändern der Konfigurationsdatei umfasst hauptsächlich das Ändern der Modulparameter basierend auf den Funktionen der Modulgruppe 2. Die Parameter des Moduls können auf der offiziellen Website eingesehen werden.
5.nginx Konfiguration
[root@localhost conf]# egrep -v "#|^$" nginx conf .default >nginx.conf (Entfernen Sie den Kommentar # Zeile)
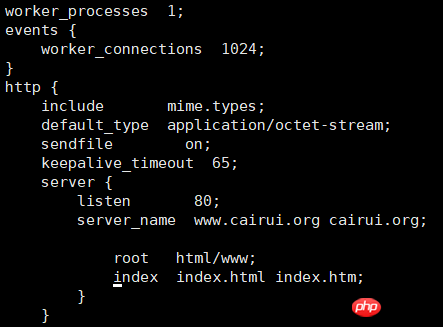
[root@localhost conf]# vim nginx.conf (cairui.org ist ein Alias)

[root@localhost conf ]# mkdir /application/nginx/html/www
[root@localhost conf]# touch /application/nginx/html/www/index.html
[root@localhost conf] # vim /application/nginx/html/www/index.html
[root@localhost conf]# /application/nginx/sbin/nginx -t
nginx: die Konfigurationsdatei /application / nginx1.12.0/conf/nginx.conf-Syntax ist in Ordnung
nginx: Konfigurationsdatei /application/nginx1.12.0/conf/nginx.conf-Test ist erfolgreich
[root@localhost conf] # /application/nginx/sbin/nginx -s reload
Ändern Sie die Datei WindowsLocalHosts, um sicherzustellen, dass sie vorhanden ist winIn der Eingabeaufforderung können Sie pingvom virtuellen Host übergeben und dann zur Webseite gehen, um
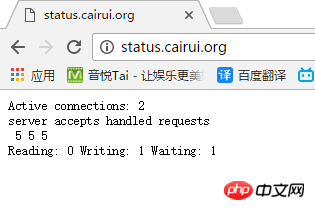
Status Server hinzufügen Tag:
[root@localhost conf]# vim /application/nginx/conf /nginx.conf 
## STatus
Server {
Listen 80;
Servername Status.Cairui.org;
Standort / { stub_status on; access_log off;}}
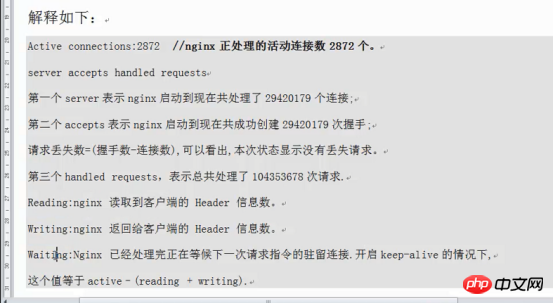
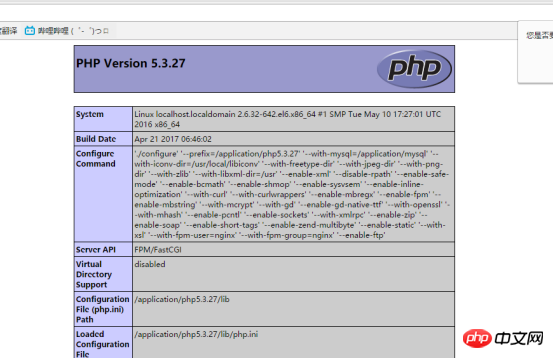
beiWinLokaleHosts-Datei muss auch , Böswillige Domänennamenbindung auflösen: [root@localhost conf]# vim /application/nginx/conf/nginx.conf(muss zuerst auf dem Server platziert werden) Server { listen 80; Standort / { deny all; } } Protokollierungsfunktion aktivieren: [root@localhost conf]# cat /application/nginx/conf/nginx.conf.default (Suchen Sie das Protokollformat) #log_format main '$remote_addr - $remote_user [$time_local] "$request" ' # $body_bytes_sent "$ http_referer" ' # '"$http_user_agent" "$http_x_forwarded_for"'; #access_log logs/access.log main; Kopieren Sie nach nginx.conf und entfernen Sie den Kommentar Das Fehlerprotokollformat wird oben platziert Software zur Analyse des nginx-Protokolls: syslog, rsyslog, Awstats, scribe, kafka Mysql MysqlInstallationsmethode: 5.1---Kompilieren und installieren Konfigurieren, Make, Make Install 5.5--- Compile Install cmake, make, make install (kann direkt mit dem Binärpaket installiert werden , entpacken Sie es einfach) 1.Installieren Sie MySQL [root@localhost conf]# useradd mysql -s /sbin/ nologin -M [root@localhost tools]# tar xf mysql-5.5.32-linux2.6-x86_64.tar.gz [root@localhost tools]# mv mysql-5.5 .32-linux2.6-x86_64 /application/mysql5.5.32 [root@localhost tools]# ln -s /application/mysql5.5.32/ /application/mysql [root@ localhost tools]# chown -R mysql.mysql /application/mysql/data/ [root@localhost mysql]# ./scripts/mysql_install_db --user=mysql --basedir=/application/mysql/ - -datadir=/application/mysql/data/(libaio muss vor der Kompilierung installiert werden) [root@localhost mysql]# cp support -files/mysql.server /etc/init.d/mysqld [root@localhost mysql]# vim /etc/init.d/mysqld [root@localhost mysql]# cp support-files/my-small.cnf /etc/my.cnf (Die Konfigurationsdatei jeder Version ist unterschiedlich) cp: Überschreibt es "/etc/my.cnf"? y [root@localhost mysql]# vim /etc/profile [root@localhost mysql]# service mysqld start MySQL wird gestartet. ERFOLGREICH! [root@localhost mysql]# MySQL Datenbankoptimierung: MySQL> Datenbanken anzeigen Datenbanktest löschen; MySQL> 🎜> Passwort ändern ( eingeben). mysqlÄndern)mysql> set passwort für root@localhost = passwort('123'); phpunter LNMP: 》libphp5.so 》fcgi php-fpm port9000(Baidu) Installierenphp bevor Sie sicherstellen, dass MySQL, Nginx normal laufen[root@localhost mysql]# netstat -lntup|egrep "nginx|mysql" Software, die installiert werden muss Installierenlibiconv (./configure --prefix=/usr/local/libiconv) Installieren Sie libmcrypt (Nicht erforderlich, zur Installation empfohlen) Es handelt sich um eine verschlüsselte Bibliothek Installierenmhash Installmcrypt Installierenphp , , Konfiguration [root@localhost etc]# /application/php/sbin/php-fpm Beim Booten starten cat >>/etc/rc.local< #nginx+php-fpm von cairui im Jahr 2017 /etc/init.d/mysqld start /application/php/sbin/php-fpm /application/nginx/sbin/nginx EOF [root@134 extra]# cat /application/nginx/conf/extra/bbs.conf server { listen 80; server_name bbs.caimengzhi.org; root root html/bbs; index index .html index.htmi index.php; location ~ .*.(php|php5)?$ #Kein Verzeichnis innerhalb von {} angegeben Wenn ja, lesen Sie dieses Mal einfach die php-Datei direkt unter html/bbs Software (WikiDownloadHDwiki) (Hinweis www) 


Das obige ist der detaillierte Inhalt vonLinux + Nginx + MySQL + PHP-Symbol, detaillierte Bedienschritte!. Für weitere Informationen folgen Sie bitte anderen verwandten Artikeln auf der PHP chinesischen Website!
 So öffnen Sie eine PHP-Datei
 So entfernen Sie die ersten paar Elemente eines Arrays in PHP
 Was tun, wenn die PHP-Deserialisierung fehlschlägt?
 So verbinden Sie PHP mit der MSSQL-Datenbank
 So verbinden Sie PHP mit der MSSQL-Datenbank
 So laden Sie HTML hoch
 So lösen Sie verstümmelte Zeichen in PHP
 So öffnen Sie PHP-Dateien auf einem Mobiltelefon


