Dieser Artikel stellt hauptsächlich die relevanten Informationen für den Einstieg in Spring Boot (Web+Freemarker) vor.
1 Konfigurieren Sie die Maven-Datei pom.xml
<?xml version="1.0" encoding="UTF-8"?>
<project xmlns="http://maven.apache.org/POM/4.0.0"
     xmlns:xsi="http://www.w3.org/2001/XMLSchema-instance"
     xsi:schemaLocation="http://maven.apache.org/POM/4.0.0 http://maven.apache.org/xsd/maven-4.0.0.xsd">
  <modelVersion>4.0.0</modelVersion>
  <groupId>com.hdwang</groupId>
  <artifactId>spring-boot-test</artifactId>
  <version>1.0-SNAPSHOT</version>
  <name>spring-boot-test</name>
  <description>project for test Spring Boot</description>
  <properties>
    <project.build.sourceEncoding>UTF-8</project.build.sourceEncoding>
    <java.version>1.8</java.version>
  </properties>
  <!-- Inherit defaults from Spring Boot -->
  <parent>
    <groupId>org.springframework.boot</groupId>
    <artifactId>spring-boot-starter-parent</artifactId>
    <version>1.5.4.RELEASE</version>
    <relativePath/>
  </parent>
  <dependencies>
    <!-- Add typical dependencies for a web application -->
    <dependency>
      <groupId>org.springframework.boot</groupId>
      <artifactId>spring-boot-starter-web</artifactId>
    </dependency>
    <dependency>
      <groupId>org.springframework.boot</groupId>
      <artifactId>spring-boot-starter-freemarker</artifactId>
    </dependency>
    <!-- auto redeploy -->
    <dependency>
      <groupId>org.springframework.boot</groupId>
      <artifactId>spring-boot-devtools</artifactId>
      <optional>true</optional>
    </dependency>
  <!-- Package as an executable jar -->
  <build>
    <plugins>
      <plugin>
        <groupId>org.springframework.boot</groupId>
        <artifactId>spring-boot-maven-plugin</artifactId>
      </plugin>
    </plugins>
  </build>
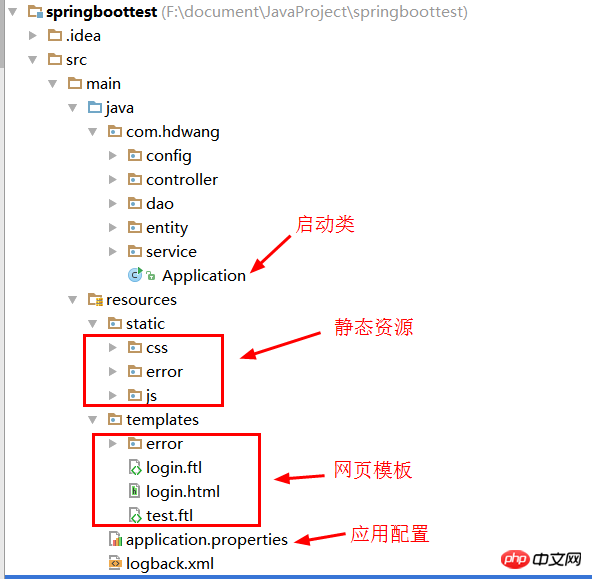
</project>2. Dateistruktur (statisch/templates/application.properties/logback.xml) Namen sind vereinbart, nur bestimmte Mehrere Namen, Weitere Informationen finden Sie in der offiziellen Spring Boot-Dokumentation. Der folgende Name ist eine der Konfigurationsmethoden)

3. Erstellen Sie eine Startup-Klasse (platziert auf der obersten Ebene, sub -Layer (Ordner der unteren Ebene) kann gescannt und injiziert werden)
@SpringBootApplication
public class Application {
  /**
   * main function
   * @param args params
   */
  public static void main(String[] args){
    SpringApplication.run(Application.class,args);
  }
}4. Erstellen Sie einen Controller (im unteren Verzeichnis der Anwendungsklasse)
@Controller
@RequestMapping("/common")
public class Common {
  @Value("${msg:Welcome!}")
  private String msg;
  /**
   * get a page
   * @return a page with name called return value
   */
  @RequestMapping("login")
  public String getLoginPage(ModelMap map){
    map.put("welcomeMsg",this.msg);
    return "login";
  }
}5 eine Webseitenvorlage login.ftl (Freemarker muss das Suffix ftl verwenden, und ich habe mich schon lange davon täuschen lassen! js/css usw. werden in den entsprechenden Ordnern abgelegt. Beachten Sie, dass /static nicht im Zugriff enthalten ist Pfad. Davon habe ich mich auch schon lange täuschen lassen!)
<!DOCTYPE html>
<html>
<head>
  <meta charset="UTF-8" />
  <title>login</title>
  <link href="/css/home.css" rel="external nofollow" rel="stylesheet" type="text/css" />
  <script type="text/javascript" src="/js/jquery-2.0.3.min.js"></script>
  <script type="text/javascript" src="/js/home.js"></script>
</head>
<body>
<h1>login page</h1>
<h2>${welcomeMsg}</h2>
<form>
  <p>
   <label>用户名:<input type="text" id="username"/></label>
  </p>
  <p>
   <label>密码:<input type="password"/></label>
  </p>
  <p>
    <input type="submit" value="提交"/>
    <input type="reset" value="重置" />
  </p>
</form>
</body>
</html>6. Übernehmen Sie die Konfigurationsdatei schreiben Sie
und erstellen Sie eine neue application.properties-Datei und fügen Sie den folgenden Inhalt hinzu
msg=Ladies and gentleman,Welcome!
7. Starten Sie den Browser
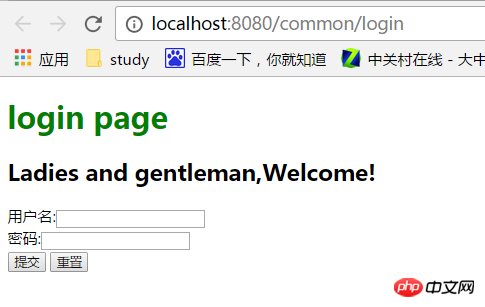
und führen Sie ihn aus. Besuchen Sie: http://localhost:8080/common/login

8. Bereitstellung
mvn-Paket Paket
java -jar xxx.jar Führen Sie einfach dieses Paket aus
Das obige ist der detaillierte Inhalt vonDetaillierte Erläuterung der Spring Boot-Einführung in JAVA (Web + Freemarker). Für weitere Informationen folgen Sie bitte anderen verwandten Artikeln auf der PHP chinesischen Website!
 So laden Sie die heutigen Schlagzeilenvideos herunter und speichern sie
 Der Unterschied zwischen Windows-Ruhezustand und Ruhezustand
 So lösen Sie eine Java-Ausnahme beim Lesen großer Dateien
 Was ist Löwenzahn?
 Was sind die Vorteile des Java-Factory-Musters?
 Was bedeutet Linux?
 Einführung in SSL-Erkennungstools
 Welche Datensicherungssoftware gibt es?
 So entsperren Sie Android-Berechtigungsbeschränkungen


