 Datenbank
 MySQL-Tutorial
 Detaillierte grafische Erläuterung der Kodierungseinstellungen für die MySQL-Installation
Detaillierte grafische Erläuterung der Kodierungseinstellungen für die MySQL-Installation
1. Installation von MySQL
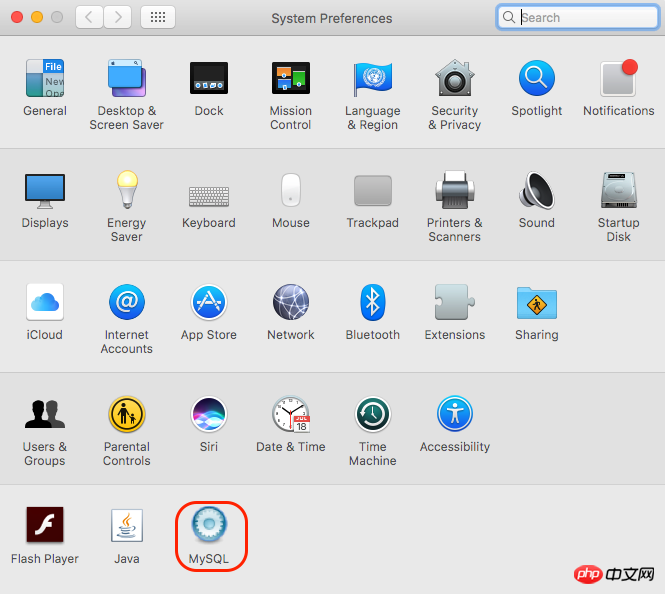
Laden Sie Mac OS herunter. Befolgen Sie die Anweisungen zur Installation. Nachdem die Installation abgeschlossen ist, können Sie den MySQL-Server in der Systemsteuerung starten und herunterfahren,

Installieren Sie gleichzeitig den Client: MySQL Workbench.app,

Starten Sie den MySQL-Server, öffnen Sie MySQL Workbench, geben Sie das Anfangskennwort ein , und werden dann aufgefordert, das anfängliche Passwort zu ändern.
2. Legen Sie den Anmeldepfad unter Terminal fest:
Erstellen Sie eine neue Datei in /Users/**/: .bash_profile
Geben Sie die Datei ein:
export PATH=${PATH}:/usr/local/mysql/binEinfach speichern. Unter Terminal können Sie sich mit „mysql -u root -p“ anmelden.
3. Datenbankkodierungsproblem
Melden Sie sich beim MySQL-Client an (mysql -u root -p), um die Datenbankkodierung anzuzeigen. Der Befehl lautet wie folgt:
mysql> SHOW VARIABLES LIKE 'char%';
Gefunden
character_set_database | latin1
character_set_server | latin1
Sie müssen die Kodierung festlegen, aber die Installationsdatei enthält keine my.cnf-Datei. Viele Lösungen im Internet sind nutzlos und Sie können nur Ihre eigene my.cnf-Datei erstellen. cnf-Datei.
Schließen Sie den MySQL-Server, erstellen Sie mit MacVim my.cnf, geben Sie den Inhalt ein als:
# Example MySQL config file for medium systems.
#
# This is for a system with little memory (32M - 64M) where MySQL plays
# an important part, or systems up to 128M where MySQL is used together with
# other programs (such as a web server)
#
# MySQL programs look for option files in a set of
# locations which depend on the deployment platform.
# You can copy this option file to one of those
# locations. For information about these locations, see:
# http://dev.mysql.com/doc/mysql/en/option-files.html #
# In this file, you can use all long options that a program supports.
# If you want to know which options a program supports, run the program
# with the "--help" option.
# The following options will be passed to all MySQL clients
[client] default-character-set=utf8
#password = your_password
port = 3306
socket = /tmp/mysql.sock
# Here follows entries for some specific programs
# The MySQL server
[mysqld]
character-set-server=utf8
init_connect='SET NAMES utf8
port = 3306
socket = /tmp/mysql.sock
skip-external-locking
key_buffer_size = 16M
max_allowed_packet = 1M
table_open_cache = 64
sort_buffer_size = 512K
net_buffer_length = 8K
read_buffer_size = 256K
read_rnd_buffer_size = 512K
myisam_sort_buffer_size = 8M
character-set-server=utf8
init_connect='SET NAMES utf8' # Don't listen on a TCP/IP port at all. This can be a security enhancement, # if all processes that need to connect to mysqld run on the same host.
# All interaction with mysqld must be made via Unix sockets or named pipes.
# Note that using this option without enabling named pipes on Windows
# (via the "enable-named-pipe" option) will render mysqld useless! #
#skip-networking
# Replication Master Server (default)
# binary logging is required for replication
log-bin=mysql-bin
# binary logging format - mixed recommended
binlog_format=mixed
# required unique id between 1 and 2^32 - 1
# defaults to 1 if master-host is not set
# but will not function as a master if omitted
server-id = 1
# Replication Slave (comment out master section to use this)
#
# To configure this host as a replication slave, you can choose between
# two methods :
#
# 1) Use the CHANGE MASTER TO command (fully described in our manual) -
# the syntax is:
#
# CHANGE MASTER TO MASTER_HOST=<host>, MASTER_PORT=<port>,
# MASTER_USER=<user>, MASTER_PASSWORD=<password> ;
#
# where you replace <host>, <user>, <password> by quoted strings and
# <port> by the master's port number (3306 by default). #
# Example:
#
# CHANGE MASTER TO MASTER_HOST='125.564.12.1', MASTER_PORT=3306,
# MASTER_USER='joe', MASTER_PASSWORD='secret';
#
# OR
#
# 2) Set the variables below. However, in case you choose this method, then
# start replication for the first time (even unsuccessfully, for example
# if you mistyped the password in master-password and the slave fails to
# connect), the slave will create a master.info file, and any later
# change in this file to the variables' values below will be ignored and # overridden by the content of the master.info file, unless you shutdown
# the slave server, delete master.info and restart the slaver server.
# For that reason, you may want to leave the lines below untouched
# (commented) and instead use CHANGE MASTER TO (see above)
#
# required unique id between 2 and 2^32 - 1
# (and different from the master)
# defaults to 2 if master-host is set
# but will not function as a slave if omitted
#server-id = 2
#
# The replication master for this slave - required
#master-host = <hostname>
#
# The username the slave will use for authentication when connecting
# to the master - required
#master-user = <username>
#
# The password the slave will authenticate with when connecting to
# the master - required
#master-password = <password>
#
# The port the master is listening on.
# optional - defaults to 3306
#master-port = <port>
#
# binary logging - not required for slaves, but recommended
#log-bin=mysql-bin
# Uncomment the following if you are using InnoDB tables
#innodb_data_home_dir = /usr/local/mysql/data
#innodb_data_file_path = ibdata1:10M:autoextend
#innodb_log_group_home_dir = /usr/local/mysql/data
# You can set .._buffer_pool_size up to 50 - 80 %
# of RAM but beware of setting memory usage too high
#innodb_buffer_pool_size = 16M
#innodb_additional_mem_pool_size = 2M
# Set .._log_file_size to 25 % of buffer pool size
#innodb_log_file_size = 5M
#innodb_log_buffer_size = 8M
#innodb_flush_log_at_trx_commit = 1
#innodb_lock_wait_timeout = 50
[mysqldump]
quick
max_allowed_packet = 16M
[mysql]
no-auto-rehash
# Remove the next comment character if you are not familiar with SQL
#safe-updates
default-character-set=utf8
[myisamchk]
key_buffer_size = 20M
sort_buffer_size = 20M
read_buffer = 2M
write_buffer = 2M
[mysqlhotcopy]
interactive-timeoutSpeichern Sie die Datei und speichern Sie sie im Verzeichnis /etc/, starten Sie den MySQL-Server neu. Die Änderung ist erfolgreich.
Wenn Sie immer noch keine chinesischen Zeichen einfügen können, erstellen Sie bitte die Datenbank und die Tabelle neu.
Das obige ist der detaillierte Inhalt vonDetaillierte grafische Erläuterung der Kodierungseinstellungen für die MySQL-Installation. Für weitere Informationen folgen Sie bitte anderen verwandten Artikeln auf der PHP chinesischen Website!

Heiße KI -Werkzeuge

Undresser.AI Undress
KI-gestützte App zum Erstellen realistischer Aktfotos

AI Clothes Remover
Online-KI-Tool zum Entfernen von Kleidung aus Fotos.

Undress AI Tool
Ausziehbilder kostenlos

Clothoff.io
KI-Kleiderentferner

AI Hentai Generator
Erstellen Sie kostenlos Ai Hentai.

Heißer Artikel

Heiße Werkzeuge

Notepad++7.3.1
Einfach zu bedienender und kostenloser Code-Editor

SublimeText3 chinesische Version
Chinesische Version, sehr einfach zu bedienen

Senden Sie Studio 13.0.1
Leistungsstarke integrierte PHP-Entwicklungsumgebung

Dreamweaver CS6
Visuelle Webentwicklungstools

SublimeText3 Mac-Version
Codebearbeitungssoftware auf Gottesniveau (SublimeText3)

Heiße Themen
 1377
1377
 52
52
 MySQL: Die einfache Datenverwaltung für Anfänger
Apr 09, 2025 am 12:07 AM
MySQL ist für Anfänger geeignet, da es einfach zu installieren, leistungsfähig und einfach zu verwalten ist. 1. Einfache Installation und Konfiguration, geeignet für eine Vielzahl von Betriebssystemen. 2. Unterstützung grundlegender Vorgänge wie Erstellen von Datenbanken und Tabellen, Einfügen, Abfragen, Aktualisieren und Löschen von Daten. 3. Bereitstellung fortgeschrittener Funktionen wie Join Operations und Unterabfragen. 4. Die Leistung kann durch Indexierung, Abfrageoptimierung und Tabellenpartitionierung verbessert werden. 5. Backup-, Wiederherstellungs- und Sicherheitsmaßnahmen unterstützen, um die Datensicherheit und -konsistenz zu gewährleisten.
 Kann ich das Datenbankkennwort in Navicat abrufen?
Apr 08, 2025 pm 09:51 PM
Navicat selbst speichert das Datenbankkennwort nicht und kann das verschlüsselte Passwort nur abrufen. Lösung: 1. Überprüfen Sie den Passwort -Manager. 2. Überprüfen Sie Navicats "Messnot Password" -Funktion; 3.. Setzen Sie das Datenbankkennwort zurück; 4. Kontaktieren Sie den Datenbankadministrator.
 So erstellen Sie Navicat Premium
Apr 09, 2025 am 07:09 AM
Erstellen Sie eine Datenbank mit Navicat Premium: Stellen Sie eine Verbindung zum Datenbankserver her und geben Sie die Verbindungsparameter ein. Klicken Sie mit der rechten Maustaste auf den Server und wählen Sie Datenbank erstellen. Geben Sie den Namen der neuen Datenbank und den angegebenen Zeichensatz und die angegebene Kollektion ein. Stellen Sie eine Verbindung zur neuen Datenbank her und erstellen Sie die Tabelle im Objektbrowser. Klicken Sie mit der rechten Maustaste auf die Tabelle und wählen Sie Daten einfügen, um die Daten einzufügen.
 Wie kann ich das Datenbankkennwort in Navicat für Mariadb anzeigen?
Apr 08, 2025 pm 09:18 PM
Navicat für MariADB kann das Datenbankkennwort nicht direkt anzeigen, da das Passwort in verschlüsselter Form gespeichert ist. Um die Datenbanksicherheit zu gewährleisten, gibt es drei Möglichkeiten, Ihr Passwort zurückzusetzen: Setzen Sie Ihr Passwort über Navicat zurück und legen Sie ein komplexes Kennwort fest. Zeigen Sie die Konfigurationsdatei an (nicht empfohlen, ein hohes Risiko). Verwenden Sie Systembefehlsleitungs -Tools (nicht empfohlen, Sie müssen die Befehlszeilen -Tools beherrschen).
 MySQL: Einfache Konzepte für einfaches Lernen
Apr 10, 2025 am 09:29 AM
MySQL ist ein Open Source Relational Database Management System. 1) Datenbank und Tabellen erstellen: Verwenden Sie die Befehle erstellte und creatEtable. 2) Grundlegende Vorgänge: Einfügen, aktualisieren, löschen und auswählen. 3) Fortgeschrittene Operationen: Join-, Unterabfrage- und Transaktionsverarbeitung. 4) Debugging -Fähigkeiten: Syntax, Datentyp und Berechtigungen überprüfen. 5) Optimierungsvorschläge: Verwenden Sie Indizes, vermeiden Sie ausgewählt* und verwenden Sie Transaktionen.
 So führen Sie SQL in Navicat aus
Apr 08, 2025 pm 11:42 PM
Schritte zur Durchführung von SQL in Navicat: Verbindung zur Datenbank herstellen. Erstellen Sie ein SQL -Editorfenster. Schreiben Sie SQL -Abfragen oder Skripte. Klicken Sie auf die Schaltfläche Ausführen, um eine Abfrage oder ein Skript auszuführen. Zeigen Sie die Ergebnisse an (wenn die Abfrage ausgeführt wird).
 Navicat kann keine Verbindung zu MySQL/Mariadb/PostgreSQL und anderen Datenbanken herstellen
Apr 08, 2025 pm 11:00 PM
Häufige Gründe, warum Navicat keine Verbindung zur Datenbank und ihren Lösungen herstellen kann: 1. Überprüfen Sie den laufenden Status des Servers. 2. Überprüfen Sie die Verbindungsinformationen; 3. Passen Sie die Firewall -Einstellungen ein; 4. Konfigurieren Sie den Remote -Zugriff; 5. Fehlerbehebung mit Netzwerkproblemen; 6. Berechtigungen überprüfen; 7. Sicherheitskompatibilität sicherstellen; 8. Fehlerbehebung bei anderen Möglichkeiten.
 So erstellen Sie eine neue Verbindung zu MySQL in Navicat
Apr 09, 2025 am 07:21 AM
Sie können eine neue MySQL -Verbindung in Navicat erstellen, indem Sie den Schritten folgen: Öffnen Sie die Anwendung und wählen Sie eine neue Verbindung (Strg N). Wählen Sie "MySQL" als Verbindungstyp. Geben Sie die Hostname/IP -Adresse, den Port, den Benutzernamen und das Passwort ein. (Optional) Konfigurieren Sie erweiterte Optionen. Speichern Sie die Verbindung und geben Sie den Verbindungsnamen ein.


