 Backend-Entwicklung
 PHP-Tutorial
 Verwenden Sie PHP, um eine Verbindung zur Datenbank herzustellen und die Message-Board-Funktion zu implementieren
Verwenden Sie PHP, um eine Verbindung zur Datenbank herzustellen und die Message-Board-Funktion zu implementieren
Der folgende Editor zeigt Ihnen ein Beispiel für die Verwendung von PHP zum Herstellen einer Verbindung zu einer Datenbank, um die Message-Board-Funktion zu implementieren (empfohlen). Der Herausgeber findet es ziemlich gut, deshalb werde ich es jetzt mit Ihnen teilen und es allen als Referenz geben. Folgen wir dem Editor, um einen Blick darauf zu werfen
PHP implementiert die Message-Board-Funktion:
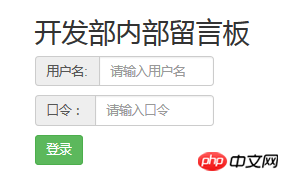
1 Die erste ist die Anmeldeseite:
<!DOCTYPE html>
<html>
 <head>
  <meta charset="UTF-8">
  <title>留言板登录</title>
  <script src="bootstrap/js/jquery-1.11.2.min.js"></script>
  <script src="bootstrap/js/bootstrap.min.js"></script>
  <link href="bootstrap/css/bootstrap.min.css" rel="external nofollow" rel="external nofollow" rel="external nofollow" rel="stylesheet" type="text/css"/>
 </head>
 <style>
  .header{
   margin-left: 550px;
   margin-top: 150px;
   height: 300px;
   max-width: 300px;
  }
  .xiugai{
   max-width: 200px;
  }
  .login{
   margin-top: 10px;
  }
 </style>
 <body>
  <form action="messloginchuli.php" method="post">
  <p class="header">
   <h2>开发部内部留言板</h2>
   <p class="input-group xiugai">
    <span class="input-group-addon" >用户名:</span>
    <input type="text" class="form-control" name="uid" placeholder="请输入用户名">
   </p>
   <p class="input-group xiugai" >
    <span class="input-group-addon">口令:</span>
    <input type="text" class="form-control" name="pwd" placeholder="请输入口令">
   </p>
   <button type="submit" class="btn btn-success login">登录</button>
  </p>
 </form>
 </body>
</html>2 Nachdem die Anmeldeseite fertiggestellt ist, müssen Sie die Anmeldeverarbeitungsseite aufrufen, bei der es sich um messageloginchuli.php handelt oben eingereicht >
<?php
session_start(); // 登录之后要把所包含登录的页面连接起来,开启session
$uid = $_POST["uid"];
$pwd = $_POST["pwd"];
require_once "./DBDA.class.php";
$db = new DBDA();
$sql = "select password from yuangong where username='{$uid}'";
$arr = $db->query($sql,0);
//var_dump($arr[0][0]);
if($arr[0][0]=$pwd && !empty($pwd)){
$_SESSION["uid"]=$uid;
header("location:message.php");
}
?>
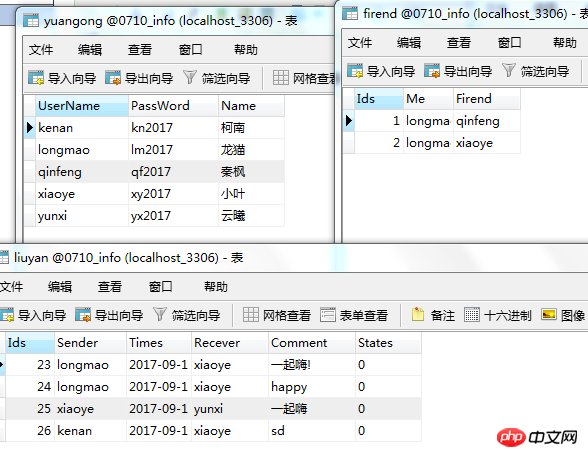
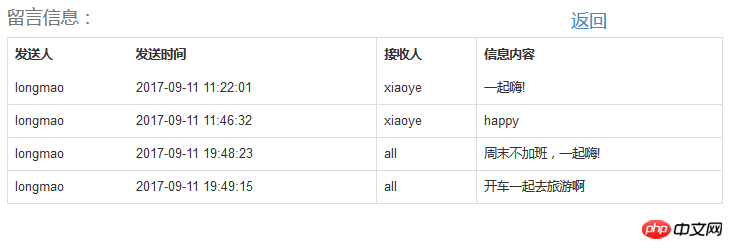
3 . Anmeldung abgeschlossen. Der letzte Schritt besteht darin, die Hauptseite aufzurufen, auf der der von Ihnen erhaltene Konversationsinhalt angezeigt wird. Im Folgenden finden Sie die entworfene Datenbanktabelle und den Code der Hauptseite:

<!DOCTYPE html>
<html>
<head>
<meta charset="UTF-8">
<title></title>
<script src="bootstrap/js/jquery-1.11.2.min.js"></script>
<script src="bootstrap/js/bootstrap.min.js"></script>
<link href="bootstrap/css/bootstrap.min.css" rel="external nofollow" rel="external nofollow" rel="external nofollow" rel="stylesheet" type="text/css"/>
</head>
<style>
.mess{
max-width: 800px;
margin-left: 250px;
margin-top: 150px;
}
</style>
<body>
<?php
session_start();
$uid = $_SESSION["uid"];
if(empty($_SESSION["uid"])){
header("location:messlogin.php");
exit;
}
?>
<p >
<a href="publish_info.php" rel="external nofollow" >发布信息</a>
<a href="tuichuchuli.php" rel="external nofollow" >退出系统</a>
</p>
<table class="table table-bordered mess" >
<caption >
留言信息:
</caption>
<thead>
<tr>
<th>发送人</th>
<th>发送时间</th>
<th>接收人</th>
<th>信息内容</th>
</tr>
</thead>
<tbody>
<?php
require_once "./DBDA.class.php";
$db = new DBDA();
$sql = "select * from liuyan where recever='{$uid}' or recever='all'";
$arr = $db->query($sql,0);
foreach($arr as $v){
echo "<tr>
<td>{$v[1]}</td>
<td>{$v[2]}</td>
<td>{$v[3]}</td>
<td>{$v[4]}</td>
</tr>";
}
?>
</tbody>
</table>
</body>
</html> <?php
session_start();
$uid = $_SESSION["uid"];
unset($uid);
header("location:messlogin.php");
?>

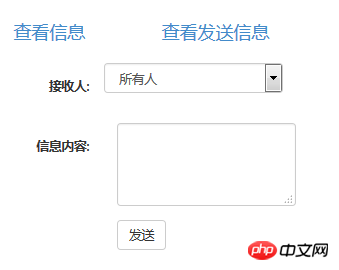
4. Schließlich gibt es noch die Seite zur Informationsfreigabe, an die Sie Informationen senden können irgendjemand Der Code lautet wie folgt:
<!DOCTYPE html>
<html>
<head>
<meta charset="UTF-8">
<title>发布信息界面</title>
<script src="bootstrap/js/jquery-1.11.2.min.js"></script>
<script src="bootstrap/js/bootstrap.min.js"></script>
<link href="bootstrap/css/bootstrap.min.css" rel="external nofollow" rel="external nofollow" rel="external nofollow" rel="stylesheet" type="text/css"/>
</head>
<style>
.mess{
max-width: 200px;
margin-top: 10px;
}
.mess1{
margin-top: 10px;
}
.opt{
max-width: 200px;
margin-left: 80px;
}
.txt{
max-width: 200px;
}
</style>
<body>
<?php
session_start();
$uid = $_SESSION["uid"];
if (empty($_SESSION["uid"])) {
header("location:messlogin.php");
exit ;
}
?>
<p >
<p >
<a href="message.php" rel="external nofollow" >查看信息</a>
<a href="seemess.php" rel="external nofollow" >查看发送信息</a>
</p>
<form class="form-horizontal" role="form" action="infochuli.php" method="post">
<p class="form-group">
<label for="firstname" class="col-sm-2 control-label mess1">接收人:</label>
<p class="form-group ">
<select class="form-control opt" name="recever">
<option value="all">所有人</option>
<?php
require_once "./DBDA.class.php";
$db = new DBDA();
//这里可以给特定的朋友发送信息的sql语句
//$sql = "select firend.firend,yuangong.name from firend,yuangong where firend.firend
//= yuangong.username and firend.me = '{$uid}'";
$sname = "select * from yuangong where username not in ('{$uid}')";
$arr = $db->query($sname,0);
//var_dump($arr[0][2]);
foreach($arr as $v){
echo "<option value='{$v[0]}'>{$v[2]}</option>";
}
?>
</select>
</p>
</p>
<p class="form-group">
<label for="lastname" class="col-sm-2 control-label mess1">信息内容:</label>
<p class="col-sm-10">
<textarea class="form-control txt" rows="3" name="content"></textarea>
</p>
</p>
<p class="form-group">
<p class="col-sm-offset-2 col-sm-10">
<button type="submit" class="btn btn-default">
发送
</button>
</p>
</p>
</form>
</p>
</body>
</html>
5. Nach dem Veröffentlichen der Nachricht müssen Sie die Verarbeitungsseite aufrufen, also „Infochuli.php senden“, und schließlich zur Sendeinformationsschnittstelle zurückkehren
Das obige ist der detaillierte Inhalt vonVerwenden Sie PHP, um eine Verbindung zur Datenbank herzustellen und die Message-Board-Funktion zu implementieren. Für weitere Informationen folgen Sie bitte anderen verwandten Artikeln auf der PHP chinesischen Website!

Heiße KI -Werkzeuge

Undresser.AI Undress
KI-gestützte App zum Erstellen realistischer Aktfotos

AI Clothes Remover
Online-KI-Tool zum Entfernen von Kleidung aus Fotos.

Undress AI Tool
Ausziehbilder kostenlos

Clothoff.io
KI-Kleiderentferner

Video Face Swap
Tauschen Sie Gesichter in jedem Video mühelos mit unserem völlig kostenlosen KI-Gesichtstausch-Tool aus!

Heißer Artikel

Heiße Werkzeuge

Notepad++7.3.1
Einfach zu bedienender und kostenloser Code-Editor

SublimeText3 chinesische Version
Chinesische Version, sehr einfach zu bedienen

Senden Sie Studio 13.0.1
Leistungsstarke integrierte PHP-Entwicklungsumgebung

Dreamweaver CS6
Visuelle Webentwicklungstools

SublimeText3 Mac-Version
Codebearbeitungssoftware auf Gottesniveau (SublimeText3)

Heiße Themen
 PHP 8.4 Installations- und Upgrade-Anleitung für Ubuntu und Debian
Dec 24, 2024 pm 04:42 PM
PHP 8.4 bringt mehrere neue Funktionen, Sicherheitsverbesserungen und Leistungsverbesserungen mit einer beträchtlichen Menge an veralteten und entfernten Funktionen. In dieser Anleitung wird erklärt, wie Sie PHP 8.4 installieren oder auf PHP 8.4 auf Ubuntu, Debian oder deren Derivaten aktualisieren. Obwohl es möglich ist, PHP aus dem Quellcode zu kompilieren, ist die Installation aus einem APT-Repository wie unten erläutert oft schneller und sicherer, da diese Repositorys in Zukunft die neuesten Fehlerbehebungen und Sicherheitsupdates bereitstellen.
 So richten Sie Visual Studio-Code (VS-Code) für die PHP-Entwicklung ein
Dec 20, 2024 am 11:31 AM
Visual Studio Code, auch bekannt als VS Code, ist ein kostenloser Quellcode-Editor – oder eine integrierte Entwicklungsumgebung (IDE) –, die für alle gängigen Betriebssysteme verfügbar ist. Mit einer großen Sammlung von Erweiterungen für viele Programmiersprachen kann VS Code c
 Erklären Sie JSON Web Tokens (JWT) und ihren Anwendungsfall in PHP -APIs.
Apr 05, 2025 am 12:04 AM
JWT ist ein offener Standard, der auf JSON basiert und zur sicheren Übertragung von Informationen zwischen Parteien verwendet wird, hauptsächlich für die Identitätsauthentifizierung und den Informationsaustausch. 1. JWT besteht aus drei Teilen: Header, Nutzlast und Signatur. 2. Das Arbeitsprinzip von JWT enthält drei Schritte: Generierung von JWT, Überprüfung von JWT und Parsingnayload. 3. Bei Verwendung von JWT zur Authentifizierung in PHP kann JWT generiert und überprüft werden, und die Funktionen und Berechtigungsinformationen der Benutzer können in die erweiterte Verwendung aufgenommen werden. 4. Häufige Fehler sind Signaturüberprüfungsfehler, Token -Ablauf und übergroße Nutzlast. Zu Debugging -Fähigkeiten gehört die Verwendung von Debugging -Tools und Protokollierung. 5. Leistungsoptimierung und Best Practices umfassen die Verwendung geeigneter Signaturalgorithmen, das Einstellen von Gültigkeitsperioden angemessen.
 Wie analysiert und verarbeitet man HTML/XML in PHP?
Feb 07, 2025 am 11:57 AM
Dieses Tutorial zeigt, wie XML -Dokumente mit PHP effizient verarbeitet werden. XML (Extensible Markup-Sprache) ist eine vielseitige textbasierte Markup-Sprache, die sowohl für die Lesbarkeit des Menschen als auch für die Analyse von Maschinen entwickelt wurde. Es wird üblicherweise für die Datenspeicherung ein verwendet und wird häufig verwendet
 PHP -Programm zum Zählen von Vokalen in einer Zeichenfolge
Feb 07, 2025 pm 12:12 PM
Eine Zeichenfolge ist eine Folge von Zeichen, einschließlich Buchstaben, Zahlen und Symbolen. In diesem Tutorial wird lernen, wie Sie die Anzahl der Vokale in einer bestimmten Zeichenfolge in PHP unter Verwendung verschiedener Methoden berechnen. Die Vokale auf Englisch sind a, e, i, o, u und sie können Großbuchstaben oder Kleinbuchstaben sein. Was ist ein Vokal? Vokale sind alphabetische Zeichen, die eine spezifische Aussprache darstellen. Es gibt fünf Vokale in Englisch, einschließlich Großbuchstaben und Kleinbuchstaben: a, e, ich, o, u Beispiel 1 Eingabe: String = "TutorialPoint" Ausgabe: 6 erklären Die Vokale in der String "TutorialPoint" sind u, o, i, a, o, ich. Insgesamt gibt es 6 Yuan
 Erklären Sie die späte statische Bindung in PHP (statisch: :).
Apr 03, 2025 am 12:04 AM
Statische Bindung (statisch: :) implementiert die späte statische Bindung (LSB) in PHP, sodass das Aufrufen von Klassen in statischen Kontexten anstatt Klassen zu definieren. 1) Der Analyseprozess wird zur Laufzeit durchgeführt.
 Was sind PHP Magic -Methoden (__construct, __Destruct, __call, __get, __set usw.) und geben Sie Anwendungsfälle an?
Apr 03, 2025 am 12:03 AM
Was sind die magischen Methoden von PHP? Zu den magischen Methoden von PHP gehören: 1. \ _ \ _ Konstrukt, verwendet, um Objekte zu initialisieren; 2. \ _ \ _ Destruct, verwendet zur Reinigung von Ressourcen; 3. \ _ \ _ Call, behandeln Sie nicht existierende Methodenaufrufe; 4. \ _ \ _ GET, Implementieren Sie den dynamischen Attributzugriff; 5. \ _ \ _ Setzen Sie dynamische Attributeinstellungen. Diese Methoden werden in bestimmten Situationen automatisch aufgerufen, wodurch die Code -Flexibilität und -Effizienz verbessert werden.
 MySQL: Einfache Konzepte für einfaches Lernen
Apr 10, 2025 am 09:29 AM
MySQL ist ein Open Source Relational Database Management System. 1) Datenbank und Tabellen erstellen: Verwenden Sie die Befehle erstellte und creatEtable. 2) Grundlegende Vorgänge: Einfügen, aktualisieren, löschen und auswählen. 3) Fortgeschrittene Operationen: Join-, Unterabfrage- und Transaktionsverarbeitung. 4) Debugging -Fähigkeiten: Syntax, Datentyp und Berechtigungen überprüfen. 5) Optimierungsvorschläge: Verwenden Sie Indizes, vermeiden Sie ausgewählt* und verwenden Sie Transaktionen.


