 Backend-Entwicklung
 Python-Tutorial
 Beispielerklärung zum automatischen Erhalten einer öffentlichen IP in Python
Beispielerklärung zum automatischen Erhalten einer öffentlichen IP in Python
Der folgende Editor zeigt Ihnen ein Beispiel dafür, wie Sie in Python automatisch eine öffentliche IP erhalten. Der Herausgeber findet es ziemlich gut, deshalb werde ich es jetzt mit Ihnen teilen und es allen als Referenz geben. Schauen Sie doch einmal mit dem Editor vorbei
0.1 SQL Grundlegende Installation von
Ubuntu, Debian-Serie:
Redhat, Centos-Serie Installation:
root@raspberrypi:~/python-script# apt-get install mysql-server
Melden Sie sich bei der Datenbank an
[root@localhost ~]# yum install mysql-server
Die Syntax zum Erstellen einer Datenbank lautet wie folgt
pi@raspberrypi:~ $ mysql -uroot -p -hlocalhost
Enter password:
Welcome to the MariaDB monitor. Commands end with ; or \g.
Your MariaDB connection id is 36
Server version: 10.0.30-MariaDB-0+deb8u2 (Raspbian)

Copyright (c) 2000, 2016, Oracle, MariaDB Corporation Ab and others.

Type 'help;' or '\h' for help. Type '\c' to clear the current input statement.

MariaDB [(none)]>
Die Syntax zum Erstellen einer Datentabelle lautet wie folgt
MariaDB [(none)]> help create database
Name: 'CREATE DATABASE'
Description:
Syntax:
CREATE {DATABASE | SCHEMA} [IF NOT EXISTS] db_name
 [create_specification] ...

create_specification:
 [DEFAULT] CHARACTER SET [=] charset_name
 | [DEFAULT] COLLATE [=] collation_name

CREATE DATABASE creates a database with the given name. To use this
statement, you need the CREATE privilege for the database. CREATE
SCHEMA is a synonym for CREATE DATABASE.

URL: https://mariadb.com/kb/en/create-database/


MariaDB [(none)]>
MariaDB [(none)]> help create table
Name: 'CREATE TABLE'
Description:
Syntax:
CREATE [TEMPORARY] TABLE [IF NOT EXISTS] tbl_name
 (create_definition,...)
 [table_options]
 [partition_options]

Or:

CREATE [TEMPORARY] TABLE [IF NOT EXISTS] tbl_name
 [(create_definition,...)]
 [table_options]
 [partition_options]
 select_statement
MariaDB [(none)]> CREATE DATABASE `ServiceLogs`
MariaDB [(none)]> CREATE TABLE `python_ip_logs` (
 `serial_number` bigint(20) NOT NULL AUTO_INCREMENT,
 `time` datetime DEFAULT NULL,
 `old_data` varchar(50) DEFAULT NULL,
 `new_data` varchar(50) DEFAULT NULL,
 PRIMARY KEY (`serial_number`)
) ENGINE=InnoDB AUTO_INCREMENT=3 DEFAULT CHARSET=latin1
 MariaDB [ServiceLogs]> select * from python_ip_logs;
 Empty set (0.00 sec)
Download-Pfad: https://pypi. python.org/pypi/MySQL-pythonInstallation:
Mysql verbinden安装: 解压 unzip MySQL-python-1.2.5.zip 进入解压后目录 cd MySQL-python-1.2.5/ 安装依赖 apt-get install libmysqlclient-dev 安装 python setup.py install 如果为0则安装OK echo $?
root@raspberrypi:~/python-script# cat p_mysql_3.py
#!/usr/bin/env python

import MySQLdb

try :
  conn = MySQLdb.connect("主机","用户名","密码","ServiceLogs")
  print ("Connect Mysql successful")
except:
  print ("Connect MySQL Fail")
root@raspberrypi:~/python-script#
1. Anforderungen
root@raspberrypi:~/python-script# cat p_mysql1.py
#!/usr/bin/env python

import MySQLdb

db = MySQLdb.connect("localhost","root","root","ServiceLogs")

cursor = db.cursor()

sql = "insert INTO python_ip_logs VALUES (DEFAULT,'2017-09-29 22:46:00','123','456')"

cursor.execute(sql)
db.commit()

db.close()
root@raspberrypi:~/python-script#1.1 Anforderungen
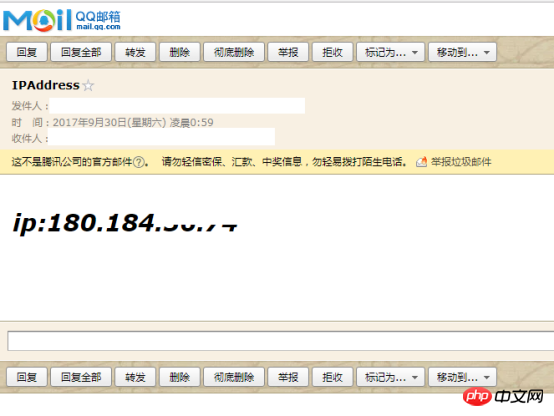
Da das Breitband bei jedem Neustart eine neue IP erhält, gibt es in diesem Zustand viele Unannehmlichkeiten beim Herstellen einer SSH-Verbindung. Glücklicherweise gab es zuvor Peanut Shell-Software Sie können Ihre IP-Adresse über den Domänennamen finden und darauf zugreifen, aber seit kurzem erfordert Peanut Shell auch echte Namen. Sie kann nur nach Authentifizierung verwendet werden, daher habe ich ein Python-Skript geschrieben, um die öffentliche IP zu erhalten.Erfolgseffekt: Wenn sich die IP ändert, kann eine Benachrichtigung per E-Mail gesendet und Daten in die Datenbank geschrieben werden
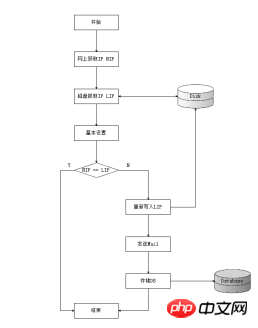
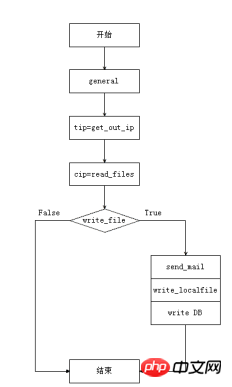
1.2Allgemeine Idee
1.3
Flussdiagramm
Andere Codes sind nichts zu zeichnen

Code schreiben
2.1.1 Python-Code schreiben
getnetworkip.py
savedb .pyroot@raspberrypi:~/python-script# cat getnetworkip.py
#!/usr/bin/env python
# coding:UTF-8
import requests
import send_mail
import savedb
def get_out_ip() :
url = r'http://www.trackip.net/'
r = requests.get(url)
txt = r.text
ip = txt[txt.find('title')+6:txt.find('/title')-1]
return (ip)
def main() :
try:
savedb.general_files()
tip = get_out_ip()
cip = savedb.read_files()
if savedb.write_files(cip,tip) :
send_mail.SamMail(get_out_ip())
except :
return False
if __name__=="__main__" :
main()
root@raspberrypi:~/python-script#root@raspberrypi:~/python-script# cat savedb.py
#!/usr/bin/env python
import MySQLdb
import os
import time
dirname = "logs"
filename = "logs/.ip_tmp"
def general_files(Default_String="Null") :
var1 = Default_String
if not os.path.exists(dirname) :
os.makedirs(dirname)
if not os.path.exists(filename) :
f = open(filename,'w')
f.write(var1)
f.close()
def read_files() :
f = open(filename,'r')
txt = f.readline()
return (txt)
def write_files(txt,new_ip) :
if not txt == new_ip :
NowTime = time.strftime("%Y-%m-%d %H:%M:%S", time.localtime())
old_ip = read_files()
os.remove(filename)
general_files(new_ip)
write_db(NowTime,old_ip,new_ip)
return True
else:
return False
def write_db(NowTime,Old_ip,New_ip) :
db = MySQLdb.connect("主机","用户名","密码","库名")
cursor = db.cursor()
sql = """
INSERT INTO python_ip_logs
VALUES
(DEFAULT,"%s","%s","%s")
""" %(NowTime,Old_ip,New_ip)
try:
cursor.execute(sql)
db.commit()
except:
db.rollback()
db.close()
root@raspberrypi:~/python-script#root@raspberrypi:~/python-script# cat send_mail.py
#!/usr/bin/env python
import smtplib
import email.mime.text
def SamMail(HtmlString) :
HOST = "smtp.163.com"
SUBJECT = "主题"
TO = "对方的邮箱地址"
FROM = "来自于哪里"
Remask = "The IP address has been changed"
msg = email.mime.text.MIMEText("""
<html>
<head>
<meta charset="utf-8" />
</head>
<body>
<em><h1>ip:%s</h1></em>
</body>
</html>
""" %(HtmlString),"html","utf-8")
msg['Subject'] = SUBJECT
msg['From'] = FROM
msg['TO'] = TO
try:
server = smtplib.SMTP()
server.connect(HOST,'25')
server.starttls()
server.login("用户名","密码")
server.sendmail(FROM,TO,msg.as_string())
server.quit()
except:
print ("Send mail Error")
root@raspberrypi:~/python-script#
print ("%s" %(line),end='')Verwenden Sie SELECT, um die Tabelle anzuzeigen. Die Wirkung ist wie folgt:
 Fügen Sie das Skript in crontab ein und lassen Sie es geplante Aufgaben ausführen
Das obige ist der detaillierte Inhalt vonBeispielerklärung zum automatischen Erhalten einer öffentlichen IP in Python. Für weitere Informationen folgen Sie bitte anderen verwandten Artikeln auf der PHP chinesischen Website!

Heiße KI -Werkzeuge

Undresser.AI Undress
KI-gestützte App zum Erstellen realistischer Aktfotos

AI Clothes Remover
Online-KI-Tool zum Entfernen von Kleidung aus Fotos.

Undress AI Tool
Ausziehbilder kostenlos

Clothoff.io
KI-Kleiderentferner

Video Face Swap
Tauschen Sie Gesichter in jedem Video mühelos mit unserem völlig kostenlosen KI-Gesichtstausch-Tool aus!

Heißer Artikel

Heiße Werkzeuge

Notepad++7.3.1
Einfach zu bedienender und kostenloser Code-Editor

SublimeText3 chinesische Version
Chinesische Version, sehr einfach zu bedienen

Senden Sie Studio 13.0.1
Leistungsstarke integrierte PHP-Entwicklungsumgebung

Dreamweaver CS6
Visuelle Webentwicklungstools

SublimeText3 Mac-Version
Codebearbeitungssoftware auf Gottesniveau (SublimeText3)

Heiße Themen
 PHP und Python: Verschiedene Paradigmen erklärt
Apr 18, 2025 am 12:26 AM
PHP ist hauptsächlich prozedurale Programmierung, unterstützt aber auch die objektorientierte Programmierung (OOP). Python unterstützt eine Vielzahl von Paradigmen, einschließlich OOP, funktionaler und prozeduraler Programmierung. PHP ist für die Webentwicklung geeignet, und Python eignet sich für eine Vielzahl von Anwendungen wie Datenanalyse und maschinelles Lernen.
 Wählen Sie zwischen PHP und Python: Ein Leitfaden
Apr 18, 2025 am 12:24 AM
PHP eignet sich für Webentwicklung und schnelles Prototyping, und Python eignet sich für Datenwissenschaft und maschinelles Lernen. 1.PHP wird für die dynamische Webentwicklung verwendet, mit einfacher Syntax und für schnelle Entwicklung geeignet. 2. Python hat eine kurze Syntax, ist für mehrere Felder geeignet und ein starkes Bibliotheksökosystem.
 Python vs. JavaScript: Die Lernkurve und Benutzerfreundlichkeit
Apr 16, 2025 am 12:12 AM
Python eignet sich besser für Anfänger mit einer reibungslosen Lernkurve und einer kurzen Syntax. JavaScript ist für die Front-End-Entwicklung mit einer steilen Lernkurve und einer flexiblen Syntax geeignet. 1. Python-Syntax ist intuitiv und für die Entwicklung von Datenwissenschaften und Back-End-Entwicklung geeignet. 2. JavaScript ist flexibel und in Front-End- und serverseitiger Programmierung weit verbreitet.
 Kann Visual Studio -Code in Python verwendet werden
Apr 15, 2025 pm 08:18 PM
VS -Code kann zum Schreiben von Python verwendet werden und bietet viele Funktionen, die es zu einem idealen Werkzeug für die Entwicklung von Python -Anwendungen machen. Sie ermöglichen es Benutzern: Installation von Python -Erweiterungen, um Funktionen wie Code -Abschluss, Syntax -Hervorhebung und Debugging zu erhalten. Verwenden Sie den Debugger, um Code Schritt für Schritt zu verfolgen, Fehler zu finden und zu beheben. Integrieren Sie Git für die Versionskontrolle. Verwenden Sie Tools für die Codeformatierung, um die Codekonsistenz aufrechtzuerhalten. Verwenden Sie das Lining -Tool, um potenzielle Probleme im Voraus zu erkennen.
 PHP und Python: Ein tiefes Eintauchen in ihre Geschichte
Apr 18, 2025 am 12:25 AM
PHP entstand 1994 und wurde von Rasmuslerdorf entwickelt. Es wurde ursprünglich verwendet, um Website-Besucher zu verfolgen und sich nach und nach zu einer serverseitigen Skriptsprache entwickelt und in der Webentwicklung häufig verwendet. Python wurde Ende der 1980er Jahre von Guidovan Rossum entwickelt und erstmals 1991 veröffentlicht. Es betont die Lesbarkeit und Einfachheit der Code und ist für wissenschaftliche Computer, Datenanalysen und andere Bereiche geeignet.
 So führen Sie Programme in der terminalen VSCODE aus
Apr 15, 2025 pm 06:42 PM
Im VS -Code können Sie das Programm im Terminal in den folgenden Schritten ausführen: Erstellen Sie den Code und öffnen Sie das integrierte Terminal, um sicherzustellen, dass das Codeverzeichnis mit dem Terminal Working -Verzeichnis übereinstimmt. Wählen Sie den Befehl aus, den Befehl ausführen, gemäß der Programmiersprache (z. B. Pythons Python your_file_name.py), um zu überprüfen, ob er erfolgreich ausgeführt wird, und Fehler auflösen. Verwenden Sie den Debugger, um die Debugging -Effizienz zu verbessern.
 Kann gegen Code in Windows 8 ausgeführt werden
Apr 15, 2025 pm 07:24 PM
VS -Code kann unter Windows 8 ausgeführt werden, aber die Erfahrung ist möglicherweise nicht großartig. Stellen Sie zunächst sicher, dass das System auf den neuesten Patch aktualisiert wurde, und laden Sie dann das VS -Code -Installationspaket herunter, das der Systemarchitektur entspricht und sie wie aufgefordert installiert. Beachten Sie nach der Installation, dass einige Erweiterungen möglicherweise mit Windows 8 nicht kompatibel sind und nach alternativen Erweiterungen suchen oder neuere Windows -Systeme in einer virtuellen Maschine verwenden müssen. Installieren Sie die erforderlichen Erweiterungen, um zu überprüfen, ob sie ordnungsgemäß funktionieren. Obwohl VS -Code unter Windows 8 möglich ist, wird empfohlen, auf ein neueres Windows -System zu upgraden, um eine bessere Entwicklungserfahrung und Sicherheit zu erzielen.
 Ist die VSCODE -Erweiterung bösartig?
Apr 15, 2025 pm 07:57 PM
VS -Code -Erweiterungen stellen böswillige Risiken dar, wie das Verstecken von böswilligem Code, das Ausbeutetieren von Schwachstellen und das Masturbieren als legitime Erweiterungen. Zu den Methoden zur Identifizierung böswilliger Erweiterungen gehören: Überprüfung von Verlegern, Lesen von Kommentaren, Überprüfung von Code und Installation mit Vorsicht. Zu den Sicherheitsmaßnahmen gehören auch: Sicherheitsbewusstsein, gute Gewohnheiten, regelmäßige Updates und Antivirensoftware.


