 Web-Frontend
 js-Tutorial
 Angular wird mit zTree kombiniert, um die gemeinsame Nutzung von Knotendateninstanzen asynchron zu laden
Angular wird mit zTree kombiniert, um die gemeinsame Nutzung von Knotendateninstanzen asynchron zu laden
本文主要和大家分享了Angular结合zTree异步加载节点数据的难点以及方法,有这方面需求的朋友参考下吧,希望能帮助到大家。
1 前提准备
1.1 新建一个angular4项目

1.2 去zTree官网下载zTree
zTree官网:点击前往
三少使用的版本:点击前往

2 编程步骤

从打印出zTree对象可以看出,zTree对象利用init方法来实现zTree结构;init方法接收三个参数
参数1:一个ul标签的DOM节点对象
参数2:基本配置对象
参数3:标题信息数组
2.1 在index.html中引入相关js、css

<!doctype html>
<html lang="en">
<head>
 <meta charset="utf-8">
 <title>TestZtree</title>
 <base href="/" rel="external nofollow" >

 <meta name="viewport" content="width=device-width, initial-scale=1">
 <link rel="icon" type="image/x-icon" href="favicon.ico" rel="external nofollow" >

 <link rel="stylesheet" type="text/css" href="./assets/zTree/css/zTreeStyle/zTreeStyle.css" rel="external nofollow" >
 <link rel="stylesheet" type="text/css" href="./assets/zTree/css/demo.css" rel="external nofollow" >
 <script src="./assets/zTree/js/jquery-1.4.4.min.js"></script>
 <script src="./assets/zTree/js/jquery.ztree.core.js"></script>
</head>
<body>
 <app-root></app-root>
</body>
</html>
View Code
2.2 在TS文件中声明jquery对象
declare var $ : any;
2.3 在TS文件中编写代码
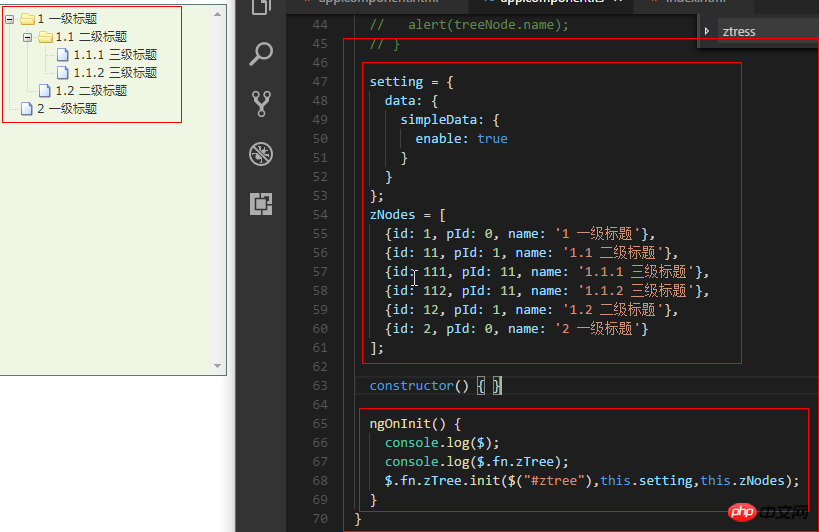
import { Component, OnInit } from '@angular/core';
declare var $ : any;
@Component({
 selector: 'app-root',
 templateUrl: './app.component.html',
 styleUrls: ['./app.component.scss']
})
export class AppComponent implements OnInit {

 // setting = {
 // view: {
 // showLine: true,
 // showIcon: true,
 // fontCss: this.getFont
 // },
 // data: {
 // simpleData: {
 // enable: true,
 // idKey: 'id',
 // pIdKey: 'pId'
 // }
 // },
 // callback: {
 // onClick: this.onCzTreeOnClick
 // }
 // };
 // zNodes = [
 // {id: 1, pId: 0, name: '1 一级标题', open: true, iconOpen:"assets/zTree/css/zTreeStyle/img/diy/1_open.png", iconClose:"assets/zTree/css/zTreeStyle/img/diy/1_close.png"},
 // {id: 11, pId: 1, name: '1.1 二级标题', open: true, font:{'background-color':'skyblue', 'color':'white'}},
 // {id: 111, pId: 11, name: '1.1.1 三级标题 -> 博客园', url: 'http://www.cnblogs.com/NeverCtrl-C/'},
 // {id: 112, pId: 11, name: '1.1.2 三级标题 -> 单击', click: "alert('你单击了')"},
 // {id: 12, pId: 1, name: '1.2 二级标题'},
 // {id: 2, pId: 0, name: '2 一级标题'}
 // ]
 // getFont(treeId, node) {
 // return node.font ? node.font : {};
 // }
 // onCzTreeOnClick(event, treeId, treeNode, clickFlag) {
 // alert(treeNode.name);
 // }
 setting = {
 data: {
 simpleData: {
 enable: true
 }
 }
 };
 zNodes = [
 {id: 1, pId: 0, name: '1 一级标题'},
 {id: 11, pId: 1, name: '1.1 二级标题'},
 {id: 111, pId: 11, name: '1.1.1 三级标题'},
 {id: 112, pId: 11, name: '1.1.2 三级标题'},
 {id: 12, pId: 1, name: '1.2 二级标题'},
 {id: 2, pId: 0, name: '2 一级标题'}
 ];
 constructor() { }
 ngOnInit() {
 console.log($);
 console.log($.fn.zTree);
 $.fn.zTree.init($("#ztree"),this.setting,this.zNodes);
 }
}View Code
2.4 在组件HTML中编写代码
<ul class="ztree"><ul></ul>
2.5 效果展示
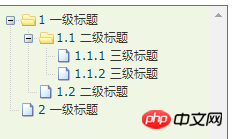
3 zTree基本功能
3.1 不显示连接线
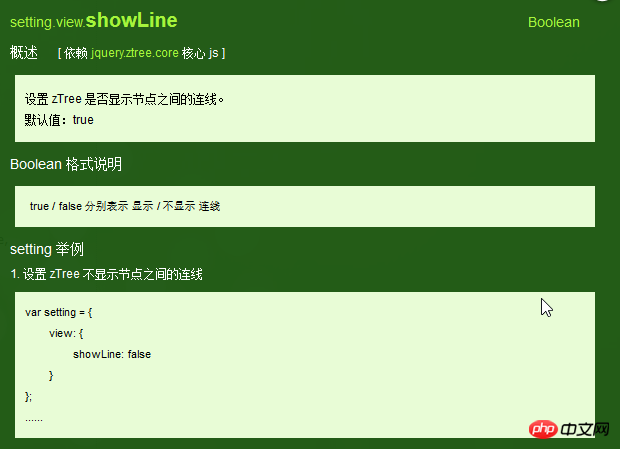
3.1.1 官方文档
不显示标题之间的连接线
3.1.2 编程步骤
在基本配置对象中指定showLine属性的值为false即可
 setting = {
 data: {
 simpleData: {
 enable: true
 }
 },
 view: {
 showLine: false
 }
};3.2 不显示节点图标
3.2.1 官方文档
去掉节点前面的图标

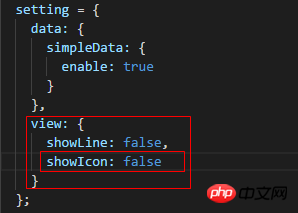
3.2.2 编程步骤
将基本配置对象的showIcon属性设为false即可
setting = {
 data: {
 simpleData: {
 enable: true
 }
 },
 view: {
 showLine: false,
 showIcon: false
 }
};View Code
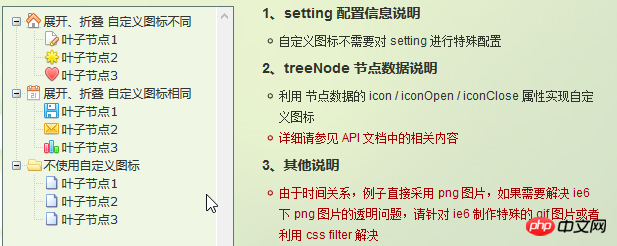
3.3 自定义节点图标
3.3.1 官方文档
更改节点的图标
3.3.2 编程步骤
为treeNode节点数据设置icon/iconOpen/iconClose属性即可

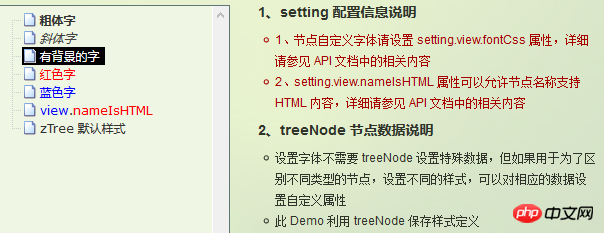
3.4 自定义字体
3.4.1 官方文档
更改节点字体的样式
3.4.2 编程步骤
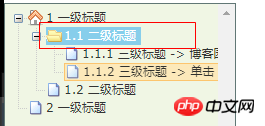
为treeNode节点数据设置font属性即可,font属性的值是一个对象,该对象的内容和style的数据一样

3.4.3 效果展示
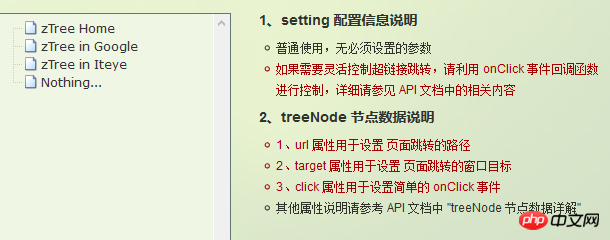
3.5 超链接
3.5.1 官方文档
点击节点标题就会自动跳转到对应的url
注意01:click属性只能进行最简单的 click 事件操作。相当于 的内容。 如果操作较复杂,请使用 onClick 事件回调函数。
3.5.2 编程步骤
为treeNode节点数据设置url、click属性即可
技巧01:设置click属性时,属性值必须是一些简单的onClick事件
技巧02:设置target属性时,属性值有 _blank 和 _self
_blank -> 用一个新窗口打开
_self -> 在原来的窗口打开

 zNodes = [
 {id: 1, pId: 0, name: '1 一级标题', open: true, iconOpen:"assets/zTree/css/zTreeStyle/img/diy/1_open.png", iconClose:"assets/zTree/css/zTreeStyle/img/diy/1_close.png"},
 {id: 11, pId: 1, name: '1.1 二级标题', open: true, font:{'background-color':'skyblue', 'color':'white'}},
 {id: 111, pId: 11, name: '1.1.1 三级标题 -> 博客园1', url: 'http://www.cnblogs.com/NeverCtrl-C/', target: '_blank'},
 {id: 113, pId: 11, name: '1.1.1 三级标题 -> 博客园2', url: 'http://www.cnblogs.com/NeverCtrl-C/', target: '_self'},
 {id: 112, pId: 11, name: '1.1.2 三级标题 -> 单击', click: "alert('你单击了')"},
 {id: 12, pId: 1, name: '1.2 二级标题'},
 {id: 2, pId: 0, name: '2 一级标题'}
]View Code
3.6 单击控制
3.6.1 官方文档
点击节点标题时触发相应的方法
技巧01:在angular中可以利用这个用法来实现路由跳转
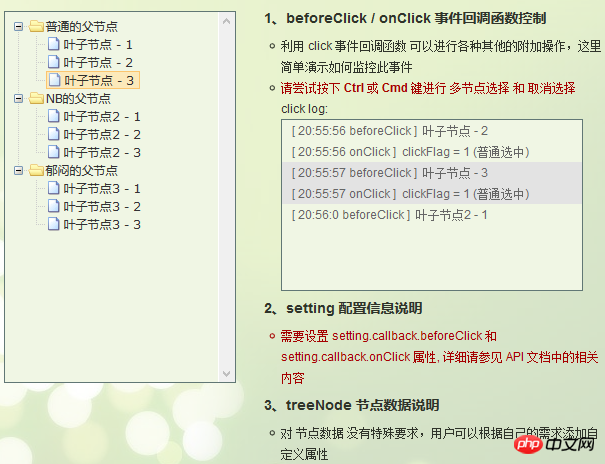
3.6.2 编程步骤
设置基本配置对象的onClick属性
技巧01:onClick属性值是一个方法的引用,我们需要自己编写这个方法

 setting = {
 view: {
 showLine: true,
 showIcon: true,
 fontCss: this.getFont
 },
 data: {
 simpleData: {
 enable: true,
 idKey: 'id',
 pIdKey: 'pId'
 }
 },
 callback: {
 onClick: this.onCzTreeOnClick
 }
};View Code
编写onClick触发方法

 onCzTreeOnClick(event, treeId, treeNode, clickFlag) {
 alert(treeNode.name);
}View Code
3.6.3 代码汇总
import { Component, OnInit } from '@angular/core';
declare var $ : any;
@Component({
 selector: 'app-root',
 templateUrl: './app.component.html',
 styleUrls: ['./app.component.scss']
})
export class AppComponent implements OnInit {
 setting = {
 view: {
 showLine: true,
 showIcon: true,
 fontCss: this.getFont
 },
 data: {
 simpleData: {
 enable: true,
 idKey: 'id',
 pIdKey: 'pId'
 }
 },
 callback: {
 onClick: this.onCzTreeOnClick
 },
 // async: {
 // enable: true,
 // url:"http://localhost:3000/data",
 // type: "get",
 // // autoParam:["id", "name=n", "level=lv"],
 // // otherParam:{"otherParam":"zTreeAsyncTest"},
 // dataFilter: this.filter
 // }
 };
 zNodes = [
 {id: 1, pId: 0, name: '1 一级标题', open: true, iconOpen:"assets/zTree/css/zTreeStyle/img/diy/1_open.png", iconClose:"assets/zTree/css/zTreeStyle/img/diy/1_close.png"},
 {id: 11, pId: 1, name: '1.1 二级标题', open: true, font:{'background-color':'skyblue', 'color':'white'}},
 {id: 111, pId: 11, name: '1.1.1 三级标题 -> 博客园1', url: 'http://www.cnblogs.com/NeverCtrl-C/', target: '_blank'},
 {id: 113, pId: 11, name: '1.1.1 三级标题 -> 博客园2', url: 'http://www.cnblogs.com/NeverCtrl-C/', target: '_self'},
 {id: 112, pId: 11, name: '1.1.2 三级标题 -> 单击', click: "alert('你单击了')"},
 {id: 12, pId: 1, name: '1.2 二级标题'},
 {id: 2, pId: 0, name: '2 一级标题'}
 ]
 getFont(treeId, node) {
 return node.font ? node.font : {};
 }
 // filter(treeId, parentNode,responseData) {
 // console.log(responseData);
 // if (responseData) {
 // for(var i =0; i < responseData.length; i++) {
 // responseData[i].name += "动态节点数据" + responseData[i].id;
 // }
 // }
 // return responseData;
 // }
 onCzTreeOnClick(event, treeId, treeNode, clickFlag) {
 alert(treeNode.name);
 }
 constructor() { }
 ngOnInit() {
 console.log('打印输出jquery对象');
 console.log($);
 console.log('但因输出zTree对象');
 console.log($.fn.zTree);
 $.fn.zTree.init($("#ztree"),this.setting,this.zNodes);
 // $.fn.zTree.init($("#ztree"),this.setting);
 }
}View Code
3.7 异步加载节点数据
3.7.1 官方文档
节点的数据是从后台进行获取的
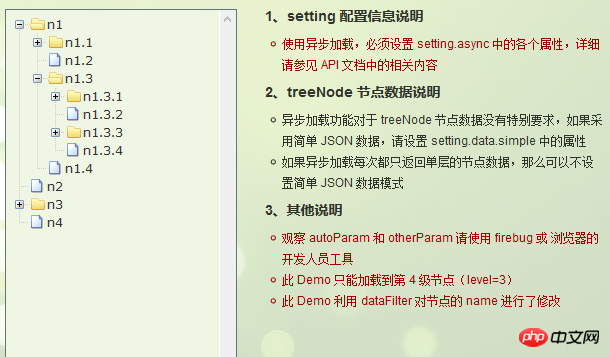
3.7.2 编程步骤
技巧01:异步加载节点数据时init方法不用传递第三个参数

> 准备一个后台用于返回JSON格式的数据
技巧01:返回的JSON数据是一个列表,格式为
[
 {
 "id": 1,
 "pId": 0,
 "name": "1 one"
 },
 {
 "id": 2,
 "pId": 0,
 "name": "2 two"
 }
]技巧02:三少偷懒,是利用json-server模拟的后台数据,哈哈;json-server
> 设置基本配置对象的async属性

 setting = {
 view: {
 showLine: true,
 showIcon: true,
 fontCss: this.getFont
 },
 data: {
 simpleData: {
 enable: true,
 idKey: 'id',
 pIdKey: 'pId'
 }
 },
 callback: {
 onClick: this.onCzTreeOnClick
 },
 async: {
 enable: true,
 url:"http://localhost:3000/data",
 type: "get",
 // autoParam:["id", "name=n", "level=lv"],
 // otherParam:{"otherParam":"zTreeAsyncTest"},
 dataFilter: this.filter
 }
};View Code
> 编写响应数据处理方法

 filter(treeId, parentNode,responseData) {
 console.log(responseData);
 if (responseData) {
 for(var i =0; i < responseData.length; i++) {
 responseData[i].name += "动态节点数据" + responseData[i].id;
 }
 }
 return responseData;
}View Code
3.7.3 代码总汇
{
 "data":
 [
 {
 "id": 1,
 "pId": 0,
 "name": "1 one"
 },
 {
 "id": 11,
 "pId": 1,
 "name": "1.1 oneToOne"
 },
 {
 "id": 12,
 "pId": 1,
 "name": "1.2 oneToTwo"
 },
 {
 "id": 2,
 "pId": 0,
 "name": "2 two"
 }
 ]
}模拟后台响应数据
<ul class="ztree"><ul></ul>
HTML
import { Component, OnInit } from '@angular/core';
declare var $ : any;

@Component({
 selector: 'app-root',
 templateUrl: './app.component.html',
 styleUrls: ['./app.component.scss']
})
export class AppComponent implements OnInit {

 setting = {
 view: {
 showLine: true,
 showIcon: true,
 fontCss: this.getFont
 },
 data: {
 simpleData: {
 enable: true,
 idKey: 'id',
 pIdKey: 'pId'
 }
 },
 callback: {
 onClick: this.onCzTreeOnClick
 },
 async: {
 enable: true,
 url:"http://localhost:3000/data",
 type: "get",
 // autoParam:["id", "name=n", "level=lv"],
 // otherParam:{"otherParam":"zTreeAsyncTest"},
 dataFilter: this.filter
 }
 };

 // zNodes = [
 // {id: 1, pId: 0, name: '1 一级标题', open: true, iconOpen:"assets/zTree/css/zTreeStyle/img/diy/1_open.png", iconClose:"assets/zTree/css/zTreeStyle/img/diy/1_close.png"},
 // {id: 11, pId: 1, name: '1.1 二级标题', open: true, font:{'background-color':'skyblue', 'color':'white'}},
 // {id: 111, pId: 11, name: '1.1.1 三级标题 -> 博客园1', url: 'http://www.cnblogs.com/NeverCtrl-C/', target: '_blank'},
 // {id: 113, pId: 11, name: '1.1.1 三级标题 -> 博客园2', url: 'http://www.cnblogs.com/NeverCtrl-C/', target: '_self'},
 // {id: 112, pId: 11, name: '1.1.2 三级标题 -> 单击', click: "alert('你单击了')"},
 // {id: 12, pId: 1, name: '1.2 二级标题'},
 // {id: 2, pId: 0, name: '2 一级标题'}
 // ]

 getFont(treeId, node) {
 return node.font ? node.font : {};
 }

 filter(treeId, parentNode,responseData) {
 console.log(responseData);
 if (responseData) {
 for(var i =0; i < responseData.length; i++) {
 responseData[i].name += "动态节点数据" + responseData[i].id;
 }
 }
 return responseData;
 }

 onCzTreeOnClick(event, treeId, treeNode, clickFlag) {
 alert(treeNode.name);
 }

 constructor() { }

 ngOnInit() {
 console.log('打印输出jquery对象');
 console.log($);
 console.log('但因输出zTree对象');
 console.log($.fn.zTree);
 // $.fn.zTree.init($("#ztree"),this.setting,this.zNodes);
 $.fn.zTree.init($("#ztree"),this.setting);
 }
}TS
3.7.4 效果展示

相关推荐:
Das obige ist der detaillierte Inhalt vonAngular wird mit zTree kombiniert, um die gemeinsame Nutzung von Knotendateninstanzen asynchron zu laden. Für weitere Informationen folgen Sie bitte anderen verwandten Artikeln auf der PHP chinesischen Website!

Heiße KI -Werkzeuge

Undresser.AI Undress
KI-gestützte App zum Erstellen realistischer Aktfotos

AI Clothes Remover
Online-KI-Tool zum Entfernen von Kleidung aus Fotos.

Undress AI Tool
Ausziehbilder kostenlos

Clothoff.io
KI-Kleiderentferner

AI Hentai Generator
Erstellen Sie kostenlos Ai Hentai.

Heißer Artikel

Heiße Werkzeuge

Notepad++7.3.1
Einfach zu bedienender und kostenloser Code-Editor

SublimeText3 chinesische Version
Chinesische Version, sehr einfach zu bedienen

Senden Sie Studio 13.0.1
Leistungsstarke integrierte PHP-Entwicklungsumgebung

Dreamweaver CS6
Visuelle Webentwicklungstools

SublimeText3 Mac-Version
Codebearbeitungssoftware auf Gottesniveau (SublimeText3)

Heiße Themen
 1371
1371
 52
52
![Fehler beim Laden des Plugins in Illustrator [Behoben]](https://img.php.cn/upload/article/000/465/014/170831522770626.jpg?x-oss-process=image/resize,m_fill,h_207,w_330) Fehler beim Laden des Plugins in Illustrator [Behoben]
Feb 19, 2024 pm 12:00 PM
Fehler beim Laden des Plugins in Illustrator [Behoben]
Feb 19, 2024 pm 12:00 PM
Erscheint beim Starten von Adobe Illustrator eine Meldung über einen Fehler beim Laden des Plug-Ins? Bei einigen Illustrator-Benutzern ist dieser Fehler beim Öffnen der Anwendung aufgetreten. Der Meldung folgt eine Liste problematischer Plugins. Diese Fehlermeldung weist darauf hin, dass ein Problem mit dem installierten Plug-In vorliegt, es kann jedoch auch andere Gründe haben, beispielsweise eine beschädigte Visual C++-DLL-Datei oder eine beschädigte Einstellungsdatei. Wenn dieser Fehler auftritt, werden wir Sie in diesem Artikel bei der Behebung des Problems unterstützen. Lesen Sie daher weiter unten weiter. Fehler beim Laden des Plug-Ins in Illustrator Wenn Sie beim Versuch, Adobe Illustrator zu starten, die Fehlermeldung „Fehler beim Laden des Plug-Ins“ erhalten, können Sie Folgendes verwenden: Als Administrator
 So installieren Sie Angular unter Ubuntu 24.04
Mar 23, 2024 pm 12:20 PM
Angular.js ist eine frei zugängliche JavaScript-Plattform zum Erstellen dynamischer Anwendungen. Es ermöglicht Ihnen, verschiedene Aspekte Ihrer Anwendung schnell und klar auszudrücken, indem Sie die Syntax von HTML als Vorlagensprache erweitern. Angular.js bietet eine Reihe von Tools, die Sie beim Schreiben, Aktualisieren und Testen Ihres Codes unterstützen. Darüber hinaus bietet es viele Funktionen wie Routing und Formularverwaltung. In dieser Anleitung wird erläutert, wie Angular auf Ubuntu24 installiert wird. Zuerst müssen Sie Node.js installieren. Node.js ist eine JavaScript-Ausführungsumgebung, die auf der ChromeV8-Engine basiert und es Ihnen ermöglicht, JavaScript-Code auf der Serverseite auszuführen. In Ub sein
 Detaillierte Erläuterung des Angular Learning State Managers NgRx
May 25, 2022 am 11:01 AM
Dieser Artikel vermittelt Ihnen ein detailliertes Verständnis des Angular-Statusmanagers NgRx und stellt Ihnen die Verwendung von NgRx vor. Ich hoffe, er wird Ihnen hilfreich sein!
 Stremio-Untertitel funktionieren nicht; Fehler beim Laden der Untertitel
Feb 24, 2024 am 09:50 AM
Untertitel funktionieren bei Stremio auf Ihrem Windows-PC nicht? Einige Stremio-Benutzer berichteten, dass in den Videos keine Untertitel angezeigt wurden. Viele Benutzer berichteten, dass ihnen die Fehlermeldung „Fehler beim Laden der Untertitel“ angezeigt wurde. Hier ist die vollständige Fehlermeldung, die bei diesem Fehler angezeigt wird: Beim Laden der Untertitel ist ein Fehler aufgetreten. Untertitel konnten nicht geladen werden: Dies könnte ein Problem mit dem von Ihnen verwendeten Plugin oder Ihrem Netzwerk sein. Wie in der Fehlermeldung angegeben, könnte es Ihre Internetverbindung sein, die den Fehler verursacht. Überprüfen Sie daher bitte Ihre Netzwerkverbindung und stellen Sie sicher, dass Ihr Internet ordnungsgemäß funktioniert. Abgesehen davon könnte es auch andere Gründe für diesen Fehler geben, darunter ein widersprüchliches Untertitel-Add-on, nicht unterstützte Untertitel für bestimmte Videoinhalte und eine veraltete Stremio-App. wie
 Eine kurze Analyse der Verwendung des Monaco-Editors in Angular
Oct 17, 2022 pm 08:04 PM
Wie verwende ich den Monaco-Editor in Angular? Der folgende Artikel dokumentiert die Verwendung des Monaco-Editors in Angular, der kürzlich in einem Unternehmen verwendet wurde. Ich hoffe, dass er für alle hilfreich sein wird!
 Ein Artikel über serverseitiges Rendering (SSR) in Angular
Dec 27, 2022 pm 07:24 PM
Kennen Sie Angular Universal? Es kann dazu beitragen, dass die Website eine bessere SEO-Unterstützung bietet!
 Wie man PHP und Angular für die Frontend-Entwicklung verwendet
May 11, 2023 pm 04:04 PM
Mit der rasanten Entwicklung des Internets wird auch die Front-End-Entwicklungstechnologie ständig verbessert und iteriert. PHP und Angular sind zwei Technologien, die in der Frontend-Entwicklung weit verbreitet sind. PHP ist eine serverseitige Skriptsprache, die Aufgaben wie die Verarbeitung von Formularen, die Generierung dynamischer Seiten und die Verwaltung von Zugriffsberechtigungen übernehmen kann. Angular ist ein JavaScript-Framework, mit dem Single-Page-Anwendungen entwickelt und komponentenbasierte Webanwendungen erstellt werden können. In diesem Artikel erfahren Sie, wie Sie PHP und Angular für die Frontend-Entwicklung verwenden und wie Sie diese kombinieren
 Outlook friert beim Einfügen eines Hyperlinks ein
Feb 19, 2024 pm 03:00 PM
Wenn beim Einfügen von Hyperlinks in Outlook Probleme beim Einfrieren auftreten, kann dies an instabilen Netzwerkverbindungen, alten Outlook-Versionen, Störungen durch Antivirensoftware oder Add-In-Konflikten liegen. Diese Faktoren können dazu führen, dass Outlook Hyperlink-Vorgänge nicht ordnungsgemäß verarbeitet. Beheben, dass Outlook beim Einfügen von Hyperlinks einfriert. Verwenden Sie die folgenden Korrekturen, um das Einfrieren von Outlook beim Einfügen von Hyperlinks zu beheben: Überprüfen Sie installierte Add-Ins. Aktualisieren Sie Outlook. Deaktivieren Sie vorübergehend Ihre Antivirensoftware und versuchen Sie dann, ein neues Benutzerprofil zu erstellen. Office-Apps reparieren. Programm deinstallieren und neu installieren. Los geht's. 1] Überprüfen Sie die installierten Add-Ins. Möglicherweise verursacht ein in Outlook installiertes Add-In das Problem.


