
Dieses Mal werde ich kurz über das Layout von CSS-Webseiten sprechen. Was sind die Vorsichtsmaßnahmen für das Layout von CSS-Webseiten? Hier sind praktische Fälle.
1. Zwei Implementierungsmethoden für festes linkes und adaptives Layout auf der rechten Seite
Die Darstellungen sind wie folgt:
Große Bildschirmanzeige:
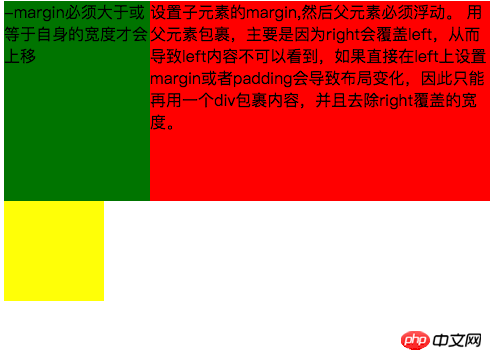
<style type="text/css">
	.left{
		float: left;
		width: 100%;
		height: 200px;
		background-color: red;
	}
	.left-content{
		margin-left: 30%;
	}
	.right{
		float: left;
		width: 30%;
		margin-left: -100%;
		height: 200px;
		background-color: green;
	}
	.layout0{
		clear: both;
		width: 100px;
		height: 100px;
		background-color: yellow;
	}
</style>
<body>
	<p id="body">
		<p class="left">
			<p class="left-content">
				设置子元素的margin,然后父元素必须浮动。
				用父元素包裹,主要是因为right会覆盖left,从而导致left内容不可以看到,如果直接在left上设置margin或者padding会导致布局变化,因此只能再用一个p包裹内容,并且去除right覆盖的宽度。
			</p>
		</p>
		<p class="right">-margin必须大于或等于自身的宽度才会上移</p>
		<p class="layout0"></p>
	</p>
</body>Floating-Layout, um ein festes linkes und ein adaptives Layout auf der rechten Seite zu erreichen
Der Hauptcode lautet wie folgt:<style type="text/css">
.left{
float: left;
width: 200px;
height: 200px;
background-color: yellow;
}
.right{
padding-left: 200px;
height: 200px;
background-color: red;
}
@media (min-width: 650px) and (max-width: 1000px){
.left{
width: 150px;
}
.right{
margin-left: 150px;
}
}
@media (max-width: 640px){
.left{
width: 100px;
}
.right{
margin-left: 100px;
}
}
</style>
<body>
<p id="main">
<p class="left">左边固定宽度,右边自适应</p>
<p class="right"></p>
</p>
</body>1. Die linke Seite muss vom Dokumentenfluss getrennt werden, während die rechte Seite nur normal angezeigt werden muss.
2.left deckt nur die rechte Seite ab. Wenn Sie also möchten, dass der rechte Inhalt vollständig angezeigt wird, müssen Sie right padding-left oder margin-left angeben.
Große Bildschirmanzeige: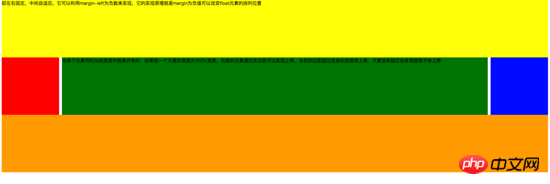
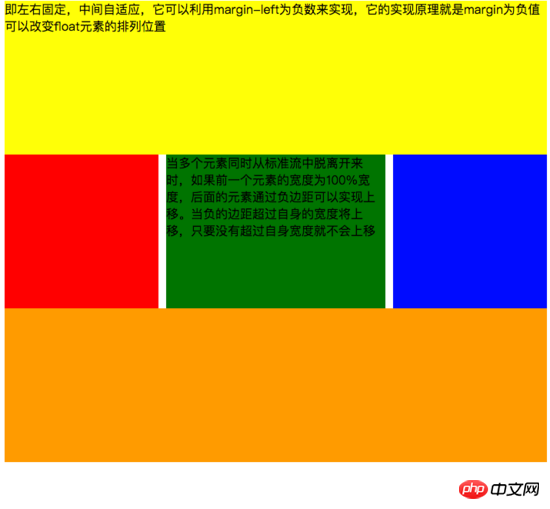
<style type="text/css">
	#head{
		height: 200px;
		background-color: yellow;
	}
	#body{
		width: 100%;
		float: left;
	}
	.main{
		background-color: green;
		min-height: 200px;
		margin: 0 210px;
	}
	.left{
		float: left;
		background-color: red;
		width: 200px;
		height: 200px;
		margin-left: -100%;
	}
	.right{
		float: right;
		background-color: blue;
		width: 200px;
		height: 200px;
		margin-left: -200px;
	}
	#footer{
		clear: both;
		height: 200px;
		background-color: orange;
	}
</style>
<body>
	<p id="head">即左右固定,中间自适应,它可以利用margin-left为负数来实现,它的实现原理就是margin为负值可以改变float元素的排列位置</p>
	<p id="body">
		<p class="main">当多个元素同时从标准流中脱离开来时,如果前一个元素的宽度为100%宽度,后面的元素通过负边距可以实现上移。当负的边距超过自身的宽度将上移,只要没有超过自身宽度就不会上移</p>
	</p>
	<p class="left"></p>
	<p class="right"></p>
	<p id="footer"></p>
</body><style type="text/css">
#head{
height: 200px;
background-color: yellow;
}
#body{
overflow: hidden;
}
.left{
float: left;
background-color: red;
width: 200px;
height: 200px;
}
.right{
float: right;
background-color: blue;
width: 200px;
height: 200px;
}
.main{
background-color: green;
height: 200px;
margin: 0 210px;
}
#footer{
clear: both;
height: 200px;
background-color: orange;
}
</style>
<body>
<p id="head">左右固定宽度并且向两边浮动,中间的p设置两边的margin</p>
<p id="body">
<p class="left"></p>
<p class="right"></p>
<p class="main">该方案有一个缺陷,在小屏幕情况下回导致right被挤下去,main没有了</p>
</p>
<p id="footer"></p>
</body><!DOCTYPE html>
<html>
<meta charset="utf-8">
<head>
<title>使用flex 实现“双飞翼布局”</title>
</head>
<style type="text/css">
#main{
display: flex;
display: -webkit-flex;//谷歌浏览器加前缀
flex-flow: row nowrap;
justify-content: flex-start;
align-items: center;
}
.left{
flex: 0 0 auto;
width:100px;
height: 200px;
background-color: red;
word-wrap: break-word;
overflow: hidden;
}
.main{
flex: 1 1 auto;
height: 200px;
background-color: green;
}
.right{
flex: 0 0 auto;
width: 100px;
height: 200px;
background-color: yellow;
}
</style>
<body>
<p id="main">
<p class="left">flex 语法我参照了阮一峰关于flex语法介绍 http://www.ruanyifeng.com/blog/2015/07/flex-grammar.html</p>
<p class="main"></p>
<p class="right"></p>
</p>
</body>
</html>3, Positionierungslayout
Ich werde hier nicht näher auf einige grundlegende CSS-Positionierungskenntnisse eingehen (ps: wenn Sie nicht wissen wie , bitte besuchen Sie die offizielle Website von w3c, um es mir anzusehen. Ich werde hauptsächlich erklären, was mir bei der Arbeit begegnet. Damit andere nicht in die gleiche Falle tappen wie ich. Erstens: Wenn Sie mehrere feste Elemente verwenden, achten Sie darauf, auf welcher Positionierung Sie basieren müssen, denn wenn das übergeordnete Element über ein Transformationsattribut verfügt, kann dies dazu führen, dass das feste Element des untergeordneten Elements basierend auf dem übergeordneten Element positioniert wird Behälter anstelle der Körperpositionierung. Der Effekt ist wie folgt: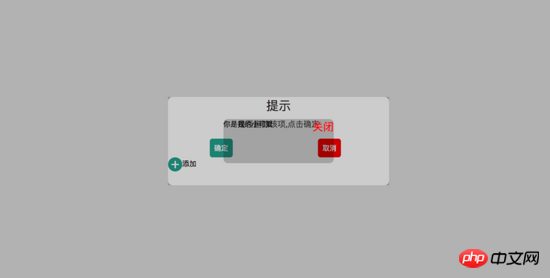
<!DOCTYPE html>
<html>
<head>
    <title>关于position的定位的坑</title>
</head>
<style type="text/css">
    body{
        margin: 0;
        padding: 0;
    }
    i{
        font-style: normal;
        cursor: pointer;
    }
    #delete-button{
        position: absolute;
        left: 45%;
        top: 45%;
        text-align: center;
        vertical-align: middle;
        height: 50px;
        margin: auto;
        cursor: pointer;
    }
    #delete-button > i{
        display: inline-block;
        width: 32px;
        height: 32px;
        border-radius: 16px;
        background-color: orange;
        color: red;
        font-size: 32px;
        vertical-align: middle;
        line-height: 28px;
    }
    /*第一个模态框的样式*/
    #layout{
        display: none;
        width: 100%;
        height: 100%;
    }
    /*使用flex布局水平竖直居中*/
    /*#layout-box{
        position: fixed;
        width: 100%;
        height: 100%;
        left: 0;
        top: 0;
        display: flex;
        display: -webkit-flex;
        flex-flow: column nowrap;
        justify-content: center;
        align-items: center;
        background-color: rgba(0,0,0,0.3);
    }*/
    /*使用postion 和 transform 水平垂直居中*/
    #layout-box{
        position: fixed;
        width: 100%;
        height: 100%;
        background-color: rgba(0,0,0,0.3);
    }
    .modal-dialog{
        position: absolute;
        left: 50%;
        top: 50%;
        width: 500px;
        height: 200px;
        border-radius: 10px;
        transform: translate(-50%, -50%);
        -webkit-transform: translate(-50%, -50%);
        -moz-transform: translate(-50%, -50%);
        -o-transform: translate(-50%, -50%);
        background-color: #fff;
    }
    .dialog-title{
        text-align: center;
        color: #333;
        font-size: 28px;
        margin-bottom: 10px;
    }
    .dialog-content{
        text-align: center;
        color: #666;
        font-size: 18px;
    }
    .dialog-button{
        margin-top: 20px;
        width: 100%;
        color: #333;
    }
    .dialog-button >.button-box{
        display: inline-block;
        width: 48%;
        text-align: center;
    }
    .button-box span{
        display: inline-block;
        padding: 10px;
        color: #fff;
        border-radius: 6px;
        cursor: pointer;
    }
    #confirm{
        background-color: #27ad9a;
    }
    #cancel{
        background-color: red;
    }
    /*添加按钮的样式*/
    #add-button > i{
        display: inline-block;
        width: 32px;
        height: 32px;
        border-radius: 16px;
        background-color: #27ad9a;
        color: #fff;
        font-size: 32px;
        vertical-align: middle;
        line-height: 28px;
        text-align: center;
    }
    #add-button{
        display: inline-block;
        cursor: pointer;
    }
    /*第二个模态框的样式*/
    .layout2{
        display: none;
        position: fixed;
        width: 100%;
        height: 100%;
        left: 0;
        top: 0;
        background-color: rgba(0,0,0,0.2);
    }
    .modal-dialog2{
        position: fixed;
        left: 50%;
        top: 50%;
        width: 50%;
        height: 50%;
        border-radius: 10px;
        transform: translate(-50%, -50%);
        -webkit-transform: translate(-50%, -50%);
        -moz-transform: translate(-50%, -50%);
        -o-transform: translate(-50%, -50%);
        background-color: rgba(0,0,0,0.2);
    }
    .modal-dialog2 > span{
        display: block;
    }
    .modal-text{
        float: left;
    }
    #close{
        color: red;
        font-size: 24px;
        float: right;
        cursor: pointer;
    }
</style>
<body>
    <p id="delete-button"><i>-</i>删除</p>
    <p id="layout">
        <p id="layout-box">
            <p class="modal-dialog">
                <p class="dialog-title">提示</p>
                <p class="dialog-content">是否删除该项,点击确定</p>
                <p class="dialog-button">
                    <p class="button-box">
                        <span id="confirm">确定</span>
                    </p>
                    <p class="button-box">
                        <span id="cancel">取消</span>
                    </p>
                </p>
                <p id="add-button"><i>+</i>添加</p>
                <p class="layout2">
                    <p class="modal-dialog2">
                        <span class="modal-text">你是我的小可爱</span>
                        <span id="close">关闭</span>
                    </p>
                </p>
            </p>
        </p>
    </p>
</body>
<script type="text/javascript">
    document.getElementById("delete-button").onclick= function(){
        var layout = document.getElementById("layout")
        layout.style.display = "block"
    }
    document.getElementById("confirm").onclick=function(){
        var layout = document.getElementById("layout")
        layout.style.display = "none"
    }
    document.getElementById("cancel").onclick=function(){
        var layout = document.getElementById("layout")
        layout.style.display = "none"
    }
    document.getElementById("add-button").onclick=function(){
        var layout = document.getElementsByClassName("layout2")
        layout[0].style.display = "block"
    }
    document.getElementById("close").onclick=function(){
        var layout = document.getElementsByClassName("layout2")
        layout[0].style.display = "none"
    }
</script>
</html>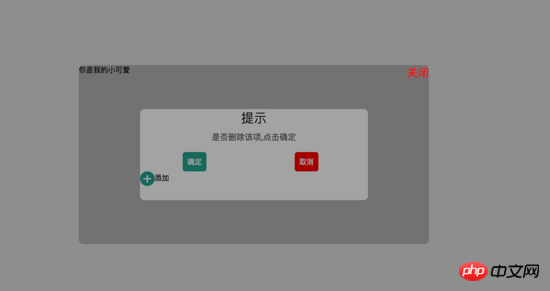
<!DOCTYPE html>
<html>
<head>
    <title>关于position的定位的坑</title>
</head>
<style type="text/css">
    body{
        margin: 0;
        padding: 0;
    }
    i{
        font-style: normal;
        cursor: pointer;
    }
    #delete-button{
        position: absolute;
        left: 45%;
        top: 45%;
        text-align: center;
        vertical-align: middle;
        height: 50px;
        margin: auto;
        cursor: pointer;
    }
    #delete-button > i{
        display: inline-block;
        width: 32px;
        height: 32px;
        border-radius: 16px;
        background-color: orange;
        color: red;
        font-size: 32px;
        vertical-align: middle;
        line-height: 28px;
    }
    /*第一个模态框的样式*/
    #layout{
        display: none;
        width: 100%;
        height: 100%;
    }
    /*使用flex布局水平竖直居中*/
    #layout-box{
        position: fixed;
        width: 100%;
        height: 100%;
        left: 0;
        top: 0;
        display: flex;
        display: -webkit-flex;
        flex-flow: column nowrap;
        justify-content: center;
        align-items: center;
        background-color: rgba(0,0,0,0.3);
    }
    /*使用postion 和 transform 水平垂直居中*/
    .modal-dialog{
        width: 500px;
        height: 200px;
        border-radius: 10px;
        background-color: #fff;
    }
    .dialog-title{
        text-align: center;
        color: #333;
        font-size: 28px;
        margin-bottom: 10px;
    }
    .dialog-content{
        text-align: center;
        color: #666;
        font-size: 18px;
    }
    .dialog-button{
        margin-top: 20px;
        width: 100%;
        color: #333;
    }
    .dialog-button >.button-box{
        display: inline-block;
        width: 48%;
        text-align: center;
    }
    .button-box span{
        display: inline-block;
        padding: 10px;
        color: #fff;
        border-radius: 6px;
        cursor: pointer;
    }
    #confirm{
        background-color: #27ad9a;
    }
    #cancel{
        background-color: red;
    }
    /*添加按钮的样式*/
    #add-button > i{
        display: inline-block;
        width: 32px;
        height: 32px;
        border-radius: 16px;
        background-color: #27ad9a;
        color: #fff;
        font-size: 32px;
        vertical-align: middle;
        line-height: 28px;
        text-align: center;
    }
    #add-button{
        display: inline-block;
        cursor: pointer;
    }
    /*第二个模态框的样式*/
    .layout2{
        display: none;
        position: fixed;
        width: 100%;
        height: 100%;
        left: 0;
        top: 0;
        background-color: rgba(0,0,0,0.2);
    }
    .modal-dialog2{
        position: fixed;
        left: 50%;
        top: 50%;
        width: 50%;
        height: 50%;
        border-radius: 10px;
        transform: translate(-50%, -50%);
        -webkit-transform: translate(-50%, -50%);
        -moz-transform: translate(-50%, -50%);
        -o-transform: translate(-50%, -50%);
        background-color: rgba(0,0,0,0.2);
    }
    .modal-dialog2 > span{
        display: block;
    }
    .modal-text{
        float: left;
    }
    #close{
        color: red;
        font-size: 24px;
        float: right;
        cursor: pointer;
    }
</style>
<body>
    <p id="delete-button"><i>-</i>删除</p>
    <p id="layout">
        <p id="layout-box">
            <p class="modal-dialog">
                <p class="dialog-title">提示</p>
                <p class="dialog-content">是否删除该项,点击确定</p>
                <p class="dialog-button">
                    <p class="button-box">
                        <span id="confirm">确定</span>
                    </p>
                    <p class="button-box">
                        <span id="cancel">取消</span>
                    </p>
                </p>
                <p id="add-button"><i>+</i>添加</p>
                <p class="layout2">
                    <p class="modal-dialog2">
                        <span class="modal-text">你是我的小可爱</span>
                        <span id="close">关闭</span>
                    </p>
                </p>
            </p>
        </p>
    </p>
</body>
<script type="text/javascript">
    document.getElementById("delete-button").onclick= function(){
        var layout = document.getElementById("layout")
        layout.style.display = "block"
    }
    document.getElementById("confirm").onclick=function(){
        var layout = document.getElementById("layout")
        layout.style.display = "none"
    }
    document.getElementById("cancel").onclick=function(){
        var layout = document.getElementById("layout")
        layout.style.display = "none"
    }
    document.getElementById("add-button").onclick=function(){
        var layout = document.getElementsByClassName("layout2")
        layout[0].style.display = "block"
    }
    document.getElementById("close").onclick=function(){
        var layout = document.getElementsByClassName("layout2")
        layout[0].style.display = "none"
    }
</script>
</html>三、在fiexd内设置position:absolute,如下:
<p style="position:fiexd;bottom:0px;">
  <p style="position:absolute;">
  </p>
</p>
4、百分比布局 主要通过设置元素的宽度为百分比或者高度为百分比。比如:width:50%; height:50%; 这样的写法。
5、响应式布局(主要使用媒体查询来实现响应式设计) 主要使用CSS3 @media 来做不同终端的响应式设计
主要在css文件中写入
@media screen and (max-width:600px){
    写入当屏幕小于或等于600px时的样式
}
@media screen and (min-width:900px){
    写入当屏幕大于或等于900px时的样式
}
@media screen and (min-width:600px) and (max-width:900px){
    写入当屏幕在600px-900px之间的样式
}
@media screen and (max-device-width: 480px){
    写入最大设备宽度为480px,比如说iPhone上的显示,这里的max-device-width所指的是设备的实际分辨率,也就是指可视面积分辨率
}
@media only screen and (-webkit-min-device-pixel-ratio: 2){
    写入专门针对iPhone4的移动设备样式
}
@media all and (orientation:portrait){
    写入设备在纵向时的样式
}
@media all and (orientation:landscape){
    写入设备在横向时的样式
}
@media not print and (max-width: 1200px){
    not是用来排除某种制定的媒体类型
    写入在除打印设备和设备宽度小于1200px下的所有设备的样式
}
@media only screen and (max-device-width:240px){
    only用来定某种特定的媒体类型,可以用来排除不支持媒体查询的浏览器。
    写入只能在最大设备宽度为240px的屏幕下使用的样式
}相信看了本文案例你已经掌握了方法,更多精彩请关注php中文网其它相关文章!
推荐阅读:
Das obige ist der detaillierte Inhalt vonEine kurze Diskussion über das Layout von CSS-Webseiten. Für weitere Informationen folgen Sie bitte anderen verwandten Artikeln auf der PHP chinesischen Website!


