In diesem Artikel werden hauptsächlich Beispiele für den Aufbau eines einfachen neuronalen Netzwerks auf PyTorch zur Implementierung von Regression und Klassifizierung vorgestellt. Jetzt teile ich es mit Ihnen und gebe es als Referenz. Schauen Sie sich das gemeinsam an
Dieser Artikel stellt ein Beispiel für den Aufbau eines einfachen neuronalen Netzwerks zur Implementierung von Regression und Klassifizierung vor. Die Details sind wie folgt:

1. Erste Schritte mit PyTorch
1 >Melden Sie sich auf der offiziellen PyTorch-Website http://pytorch.org an. Sie können die folgende Benutzeroberfläche sehen:
Nachdem Sie die Option im Bild oben ausgewählt haben, können Sie dies tun Holen Sie sich den Befehl conda unter Linux: 
conda install pytorch torchvision -c soumith
2. Numpy und Torch
torch_data = Torch.from_numpy(np_data) kann das Numpy-Format (Array) in das Torch-Format (Tensor) konvertieren; kann auch das Tensorformat von Torch in das Array-Format von Numpy konvertieren. Beachten Sie, dass der Tensor von Torch und das Array von Numpy ihren Speicherplatz gemeinsam nutzen und die Änderung des einen zur Änderung des anderen führt.
Für eindimensionale (1-D) Daten druckt Numpy die Ausgabe in Form von Zeilenvektoren, während Torch die Ausgabe in Form von Spaltenvektoren druckt. Andere Funktionen in Numpy wie Sin, Cos, Abs, Mittelwert usw. können in Torch auf die gleiche Weise verwendet werden. Es ist zu beachten, dass die Matrixmultiplikation von np.matmul(data, data) und data.dot(data) in numpy zum gleichen Ergebnis führt; Matrix , tensor.dot(tensor) wandelt den Tensor in einen eindimensionalen Tensor um, multipliziert ihn dann Element für Element und summiert ihn, um eine reelle Zahl zu erhalten.Zugehöriger Code:
import torch
import numpy as np

np_data = np.arange(6).reshape((2, 3))
torch_data = torch.from_numpy(np_data) # 将numpy(array)格式转换为torch(tensor)格式
tensor2array = torch_data.numpy()
print(
  '\nnumpy array:\n', np_data,
  '\ntorch tensor:', torch_data,
  '\ntensor to array:\n', tensor2array,
) # torch数据格式在print的时候前后自动添加换行符

# abs
data = [-1, -2, 2, 2]
tensor = torch.FloatTensor(data)
print(
  '\nabs',
  '\nnumpy: \n', np.abs(data),
  '\ntorch: ', torch.abs(tensor)
) # 1维的数据,numpy是行向量形式显示,torch是列向量形式显示

# sin
print(
  '\nsin',
  '\nnumpy: \n', np.sin(data),
  '\ntorch: ', torch.sin(tensor)
)

# mean
print(
  '\nmean',
  '\nnumpy: ', np.mean(data),
  '\ntorch: ', torch.mean(tensor)
)

# 矩阵相乘
data = [[1,2], [3,4]]
tensor = torch.FloatTensor(data)

print(
  '\nmatrix multiplication (matmul)',
  '\nnumpy: \n', np.matmul(data, data),
  '\ntorch: ', torch.mm(tensor, tensor)
)

data = np.array(data)
print(
  '\nmatrix multiplication (dot)',
  '\nnumpy: \n', data.dot(data),
  '\ntorch: ', tensor.dot(tensor)
)
3. Variable
PyTorch Das neuronale Netzwerk stammt aus dem Autograd-Paket, das automatische Ableitungsmethoden für alle Operationen von Tensor bereitstellt.
autograd.Variable Dies ist die Kernklasse in diesem Paket. Variable kann als ein Container verstanden werden, der einen Tensor enthält, der einen Tensor umschließt und fast alle darauf definierten Operationen unterstützt. Sobald der Vorgang abgeschlossen ist, kann .backward() aufgerufen werden, um alle Farbverläufe automatisch zu berechnen. Mit anderen Worten: Nur durch Platzieren des Tensors in einer Variablen können Operationen wie Rückübertragung und automatische Ableitung im neuronalen Netzwerk implementiert werden. Auf den ursprünglichen Tensor kann über das Attribut .data zugegriffen werden, und der Gradient dieser Variablen kann über das Attribut .grad angezeigt werden.Zugehörige Codes:
import torch
from torch.autograd import Variable

tensor = torch.FloatTensor([[1,2],[3,4]])
variable = Variable(tensor, requires_grad=True)
# 打印展示Variable类型
print(tensor)
print(variable)

t_out = torch.mean(tensor*tensor) # 每个元素的^ 2
v_out = torch.mean(variable*variable)
print(t_out)
print(v_out)

v_out.backward() # Variable的误差反向传递

# 比较Variable的原型和grad属性、data属性及相应的numpy形式
print('variable:\n', variable)
# v_out = 1/4 * sum(variable*variable) 这是计算图中的 v_out 计算步骤
# 针对于 v_out 的梯度就是, d(v_out)/d(variable) = 1/4*2*variable = variable/2
print('variable.grad:\n', variable.grad) # Variable的梯度
print('variable.data:\n', variable.data) # Variable的数据
print(variable.data.numpy()) #Variable的数据的numpy形式
Teilausgabeergebnisse:
variable:
Variable enthält:1 23 4
4. Aktivierungsfunktion der Anregungsfunktion
[torch.FloatTensor der Größe 2x2]
variable.grad:
Variable enthält:
0,5000 1,0000
1,5000 2,0000
[torch.FloatTensor der Größe 2x2]
variable.data:
1 2
3 4
[torch.FloatTensor der Größe 2x2]
[[ 1 . 2.]
[ 3. 4.]]
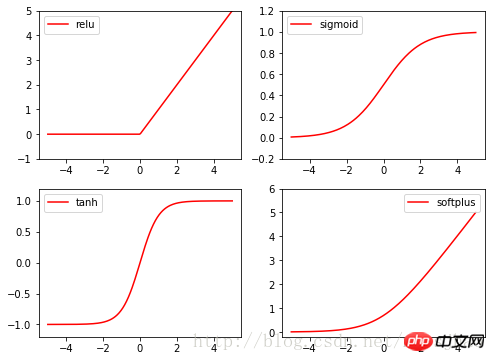
Die Aktivierungsfunktionen des Brenners sind alle in Torch.nn enthalten. In der Funktion sind Relu, Sigmoid, Tanh und Softplus häufig verwendete Anregungsfunktionen.

Zugehörige Codes:
import torch
import torch.nn.functional as F
from torch.autograd import Variable
import matplotlib.pyplot as plt

x = torch.linspace(-5, 5, 200)
x_variable = Variable(x) #将x放入Variable
x_np = x_variable.data.numpy()

# 经过4种不同的激励函数得到的numpy形式的数据结果
y_relu = F.relu(x_variable).data.numpy()
y_sigmoid = F.sigmoid(x_variable).data.numpy()
y_tanh = F.tanh(x_variable).data.numpy()
y_softplus = F.softplus(x_variable).data.numpy()

plt.figure(1, figsize=(8, 6))

plt.subplot(221)
plt.plot(x_np, y_relu, c='red', label='relu')
plt.ylim((-1, 5))
plt.legend(loc='best')

plt.subplot(222)
plt.plot(x_np, y_sigmoid, c='red', label='sigmoid')
plt.ylim((-0.2, 1.2))
plt.legend(loc='best')

plt.subplot(223)
plt.plot(x_np, y_tanh, c='red', label='tanh')
plt.ylim((-1.2, 1.2))
plt.legend(loc='best')

plt.subplot(224)
plt.plot(x_np, y_softplus, c='red', label='softplus')
plt.ylim((-0.2, 6))
plt.legend(loc='best')

plt.show()
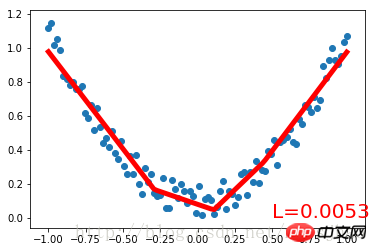
Sehen Sie sich zuerst den vollständigen Code an:
import torch
from torch.autograd import Variable
import torch.nn.functional as F
import matplotlib.pyplot as plt

x = torch.unsqueeze(torch.linspace(-1, 1, 100), dim=1) # 将1维的数据转换为2维数据
y = x.pow(2) + 0.2 * torch.rand(x.size())

# 将tensor置入Variable中
x, y = Variable(x), Variable(y)

#plt.scatter(x.data.numpy(), y.data.numpy())
#plt.show()

# 定义一个构建神经网络的类
class Net(torch.nn.Module): # 继承torch.nn.Module类
  def __init__(self, n_feature, n_hidden, n_output):
    super(Net, self).__init__() # 获得Net类的超类(父类)的构造方法
    # 定义神经网络的每层结构形式
    # 各个层的信息都是Net类对象的属性
    self.hidden = torch.nn.Linear(n_feature, n_hidden) # 隐藏层线性输出
    self.predict = torch.nn.Linear(n_hidden, n_output) # 输出层线性输出

  # 将各层的神经元搭建成完整的神经网络的前向通路
  def forward(self, x):
    x = F.relu(self.hidden(x)) # 对隐藏层的输出进行relu激活
    x = self.predict(x)
    return x

# 定义神经网络
net = Net(1, 10, 1)
print(net) # 打印输出net的结构

# 定义优化器和损失函数
optimizer = torch.optim.SGD(net.parameters(), lr=0.5) # 传入网络参数和学习率
loss_function = torch.nn.MSELoss() # 最小均方误差

# 神经网络训练过程
plt.ion()  # 动态学习过程展示
plt.show()

for t in range(300):
  prediction = net(x) # 把数据x喂给net,输出预测值
  loss = loss_function(prediction, y) # 计算两者的误差,要注意两个参数的顺序
  optimizer.zero_grad() # 清空上一步的更新参数值
  loss.backward() # 误差反相传播,计算新的更新参数值
  optimizer.step() # 将计算得到的更新值赋给net.parameters()

  # 可视化训练过程
  if (t+1) % 10 == 0:
    plt.cla()
    plt.scatter(x.data.numpy(), y.data.numpy())
    plt.plot(x.data.numpy(), prediction.data.numpy(), 'r-', lw=5)
    plt.text(0.5, 0, 'L=%.4f' % loss.data[0], fontdict={'size': 20, 'color': 'red'})
plt.pause(0.1)Laufergebnis:
Netto (
(versteckt): Linear (1 -> 10)(predict): Linear (10 -> 1)
)

三、PyTorch实现简单分类
完整代码:
import torch
from torch.autograd import Variable
import torch.nn.functional as F
import matplotlib.pyplot as plt

# 生成数据
# 分别生成2组各100个数据点,增加正态噪声,后标记以y0=0 y1=1两类标签,最后cat连接到一起
n_data = torch.ones(100,2)
# torch.normal(means, std=1.0, out=None)
x0 = torch.normal(2*n_data, 1) # 以tensor的形式给出输出tensor各元素的均值,共享标准差
y0 = torch.zeros(100)
x1 = torch.normal(-2*n_data, 1)
y1 = torch.ones(100)

x = torch.cat((x0, x1), 0).type(torch.FloatTensor) # 组装(连接)
y = torch.cat((y0, y1), 0).type(torch.LongTensor)

# 置入Variable中
x, y = Variable(x), Variable(y)

class Net(torch.nn.Module):
  def __init__(self, n_feature, n_hidden, n_output):
    super(Net, self).__init__()
    self.hidden = torch.nn.Linear(n_feature, n_hidden)
    self.out = torch.nn.Linear(n_hidden, n_output)

  def forward(self, x):
    x = F.relu(self.hidden(x))
    x = self.out(x)
    return x

net = Net(n_feature=2, n_hidden=10, n_output=2)
print(net)

optimizer = torch.optim.SGD(net.parameters(), lr=0.012)
loss_func = torch.nn.CrossEntropyLoss()

plt.ion()
plt.show()

for t in range(100):
  out = net(x)
  loss = loss_func(out, y) # loss是定义为神经网络的输出与样本标签y的差别,故取softmax前的值

  optimizer.zero_grad()
  loss.backward()
  optimizer.step()

  if t % 2 == 0:
    plt.cla()
    # 过了一道 softmax 的激励函数后的最大概率才是预测值
    # torch.max既返回某个维度上的最大值,同时返回该最大值的索引值
    prediction = torch.max(F.softmax(out), 1)[1] # 在第1维度取最大值并返回索引值
    pred_y = prediction.data.numpy().squeeze()
    target_y = y.data.numpy()
    plt.scatter(x.data.numpy()[:, 0], x.data.numpy()[:, 1], c=pred_y, s=100, lw=0, cmap='RdYlGn')
    accuracy = sum(pred_y == target_y)/200 # 预测中有多少和真实值一样
    plt.text(1.5, -4, 'Accu=%.2f' % accuracy, fontdict={'size': 20, 'color': 'red'})
    plt.pause(0.1)

plt.ioff()
plt.show()神经网络结构部分的Net类与前文的回归部分的结构相同。
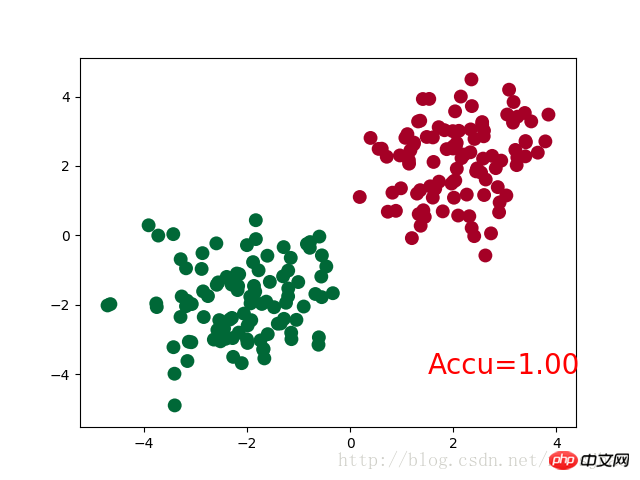
需要注意的是,在循环迭代训练部分,out定义为神经网络的输出结果,计算误差loss时不是使用one-hot形式的,loss是定义在out与y上的torch.nn.CrossEntropyLoss(),而预测值prediction定义为out经过Softmax后(将结果转化为概率值)的结果。
运行结果:
Net (
(hidden): Linear (2 -> 10)
(out):Linear (10 -> 2)
)

四、补充知识
1. super()函数
在定义Net类的构造方法的时候,使用了super(Net,self).__init__()语句,当前的类和对象作为super函数的参数使用,这条语句的功能是使Net类的构造方法获得其超类(父类)的构造方法,不影响对Net类单独定义构造方法,且不必关注Net类的父类到底是什么,若需要修改Net类的父类时只需修改class语句中的内容即可。
2. torch.normal()
torch.normal()可分为三种情况:(1)torch.normal(means,std, out=None)中means和std都是Tensor,两者的形状可以不必相同,但Tensor内的元素数量必须相同,一一对应的元素作为输出的各元素的均值和标准差;(2)torch.normal(mean=0.0, std, out=None)中mean是一个可定义的float,各个元素共享该均值;(3)torch.normal(means,std=1.0, out=None)中std是一个可定义的float,各个元素共享该标准差。
3. torch.cat(seq, dim=0)
torch.cat可以将若干个Tensor组装连接起来,dim指定在哪个维度上进行组装。
4. torch.max()
(1)torch.max(input)→ float
input是tensor,返回input中的最大值float。
(2)torch.max(input,dim, keepdim=True, max=None, max_indices=None) -> (Tensor, LongTensor)
同时返回指定维度=dim上的最大值和该最大值在该维度上的索引值。
相关推荐:
Das obige ist der detaillierte Inhalt vonBeispiel für den Aufbau eines einfachen neuronalen Netzwerks auf PyTorch zur Implementierung von Regression und Klassifizierung. Für weitere Informationen folgen Sie bitte anderen verwandten Artikeln auf der PHP chinesischen Website!
 So installieren Sie den PS-Filter
 Wie viel kostet ein Bitcoin in RMB?
 Was ist Blockchain Web3.0?
 Was ist der Unterschied zwischen JD International Self-Operated und JD Self-Operated?
 Wörter verschwinden nach dem Tippen
 Was ist los mit meinem Mobiltelefon, das telefonieren, aber nicht im Internet surfen kann?
 Hat die Inflationsrate einen Einfluss auf digitale Währungen?
 So öffnen Sie die Hosts-Datei


