
In diesem Artikel werden hauptsächlich die relevanten Informationen zur asynchronen Ajax-Anfrage für Daten im JSON-Format vorgestellt, die in der SpringMVC-Umgebung implementiert sind.
Eine Umgebungskonstruktion
Das erste ist die reguläre Einrichtung der Spring-MVC-Umgebung. Es ist unnötig zu erwähnen, dass hier das Jackson-bezogene JAR-Paket eingeführt werden muss und dann die JSON-Parsing-bezogenen Informationen zum Spring hinzugefügt werden Konfigurationsdatei „springmvc-servlet.xml“ Konfiguration, mein vollständiger Code hier ist wie folgt:
<?xml version="1.0" encoding="UTF-8"?>
<beans xmlns="http://www.springframework.org/schema/beans"
xmlns:xsi="http://www.w3.org/2001/XMLSchema-instance" xmlns:context="http://www.springframework.org/schema/context"
xmlns:mvc="http://www.springframework.org/schema/mvc"
xsi:schemaLocation="http://www.springframework.org/schema/beans
http://www.springframework.org/schema/beans/spring-beans-4.0.xsd
http://www.springframework.org/schema/context
http://www.springframework.org/schema/context/spring-context-4.0.xsd
http://www.springframework.org/schema/mvc
http://www.springframework.org/schema/mvc/spring-mvc-4.0.xsd">
<!-- 避免IE执行AJAX时,返回JSON出现下载文件 -->
<bean id="mappingJacksonHttpMessageConverter"
class="org.springframework.http.converter.json.MappingJacksonHttpMessageConverter">
<property name="supportedMediaTypes">
<list>
<value>text/html;charset=UTF-8</value>
<value>application/json;charset=UTF-8</value>
</list>
</property>
<property name="objectMapper">
<bean class="org.codehaus.jackson.map.ObjectMapper">
<property name="dateFormat">
<bean class="java.text.SimpleDateFormat">
<constructor-arg type="java.lang.String" value="yyyy-MM-dd HH:mm:ss"></constructor-arg>
</bean>
</property>
</bean>
</property>
</bean>
<!-- 启动Spring MVC的注解功能,完成请求和注解POJO的映射 -->
<bean
class="org.springframework.web.servlet.mvc.annotation.AnnotationMethodHandlerAdapter">
<property name="messageConverters">
<list>
<ref bean="mappingJacksonHttpMessageConverter" /><!-- json转换器 -->
</list>
</property>
</bean>
<mvc:annotation-driven
content-negotiation-manager="contentNegotiationManager" />
<bean id="contentNegotiationManager"
class="org.springframework.web.accept.ContentNegotiationManagerFactoryBean">
<!-- true,开启扩展名支持,false关闭支持 -->
<property name="favorPathExtension" value="false" />
<!-- 用于开启 /userinfo/123?format=json的支持 -->
<property name="favorParameter" value="true" />
<!-- 设置为true以忽略对Accept Header的支持 -->
<property name="ignoreAcceptHeader" value="false" />
<property name="mediaTypes">
<value>
atom=application/atom+xml
html=text/html
json=application/json
xml=application/xml
*=*/*
</value>
</property>
</bean>
<context:annotation-config />
<!-- 启动自动扫描该包下所有的Bean(例如@Controller) -->
<context:component-scan base-package="cn.zifangsky.controller" />
<mvc:default-servlet-handler />
<!-- 定义视图解析器 -->
<bean id="jspViewResolver"
class="org.springframework.web.servlet.view.InternalResourceViewResolver">
<property name="requestContextAttribute" value="rc" />
<property name="viewClass"
value="org.springframework.web.servlet.view.JstlView" />
<property name="prefix" value="/WEB-INF/jsp/" />
<property name="suffix" value=".jsp" />
<property name="order" value="1"></property>
</bean>
</beans>
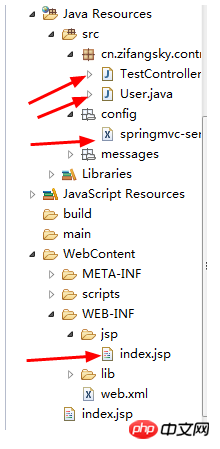
Projektstruktur:
Zwei Testbeispiele
(1) Erstellen Sie eine neue index.jsp-Datei im Verzeichnis WEB-INF/jsp, die eine einfache jQuery-Ajax-Anfrage enthält. Das Format der Anforderungsdaten ist JSON . Der spezifische Code lautet wie folgt:
<%@ page language="java" contentType="text/html; charset=UTF-8"
pageEncoding="UTF-8"%>
<%
String path = request.getContextPath();
String basePath = request.getScheme() + "://" + request.getServerName() + ":" + request.getServerPort()
+ path + "/";
%>
<html>
<head>
<meta http-equiv="Content-Type" content="text/html; charset=UTF-8">
<base href="<%=basePath%>">
<script type="text/javascript" src="scripts/jquery/jquery-1.6.2.min.js"></script>
<script type="text/javascript" src="scripts/jquery/jquery.i18n.properties-min-1.0.9.js"></script>
<script type="text/javascript" src="scripts/jquery/jquery.autocomplete.js"></script>
<script type="text/javascript" src="scripts/jquery/jquery.loadmask.js"></script>
<script type="text/javascript" src="scripts/jquery/jquery.form.js"></script>
<script type="text/javascript" src="scripts/jquery/jquery.timers.js"></script>
<title>jQuery i18n</title>
<script type="text/javascript">
$().ready(
function() {
$("#sub").click(
function() {
var name = $("#username").val();
var age = 18;
var user = {"username":name,"age":age};
$.ajax({
url : 'hello.json',
type : 'POST',
data : JSON.stringify(user), // Request body
contentType : 'application/json; charset=utf-8',
dataType : 'json',
success : function(response) {
//请求成功
alert("你好" + response.username + "[" + response.age + "],当前时间是:" + response.time + ",欢迎访问:http://www.zifangsky.cn");
},
error : function(msg) {
alert(msg);
}
});
});
});
</script>
</head>
<body>
<input type="text" id="username"
style="width: 100px; height: 30px; font-size: 20px; font-weight: bold;">
<input type="button" id="sub" value="Go"
style="height: 40px; height: 30px;">
<br>
</body>
</html>(2) Eine einfache Modellklasse Benutzer, der Code lautet wie folgt:
package cn.zifangsky.controller;
public class User {
private String username;
private int age;
public String getUsername() {
return username;
}
public void setUsername(String username) {
this.username = username;
}
public int getAge() {
return age;
}
public void setAge(int age) {
this.age = age;
}
}(3) Controller-Klasse TestController.java:
package cn.zifangsky.controller;
import java.text.Format;
import java.text.SimpleDateFormat;
import java.util.Date;
import java.util.HashMap;
import java.util.Map;
import org.springframework.context.annotation.Scope;
import org.springframework.stereotype.Controller;
import org.springframework.web.bind.annotation.RequestBody;
import org.springframework.web.bind.annotation.RequestMapping;
import org.springframework.web.bind.annotation.RequestMethod;
import org.springframework.web.bind.annotation.ResponseBody;
import org.springframework.web.servlet.ModelAndView;
@Controller
@Scope("prototype")
public class TestController {
/**
* 转到页面
*/
@RequestMapping(value = "/hello.html")
public ModelAndView list() {
ModelAndView view = new ModelAndView("index");
return view;
}
/**
* ajax异步请求, 请求格式是json
*/
@RequestMapping(value = "/hello.json", method = { RequestMethod.POST })
@ResponseBody
public Map<String, String> hello(@RequestBody User user) {
// 返回数据的Map集合
Map<String, String> result = new HashMap<String, String>();
Format format = new SimpleDateFormat("yyyy-MM-dd HH:mm:ss");
// 返回请求的username
result.put("username", user.getUsername());
// 返回年龄
result.put("age", String.valueOf(user.getAge()));
// 返回当前时间
result.put("time", format.format(new Date()));
return result;
}
}Lassen Sie mich kurz auf die konkreten Ausführungsschritte eingehen:
i) Nachdem das Projekt gestartet ist, besuchen Sie: http://localhost:8089/SpringDemo/hello.html im Browser, dann wird es losgehen Führen Sie die Listenmethode im Controller aus und gehen Sie dann zu /WEB-INF/jsp /index.jsp (PS: Die im Controller zurückgegebene logische Ansicht ist der tatsächliche Pfad der Datei, nachdem sie mit dem Pfadpräfix und gespleißt wurde Suffix definiert in der Datei springmvc-servlet.xml)
ii) Geben Sie im Index Text auf der .jsp-Seite ein und klicken Sie auf die Schaltfläche, wodurch eine Ajax-Anfrage ausgelöst wird. Diese Anfrage ruft die Daten im Eingabefeld ab und den Standardparameter „age“, spleißen Sie ihn in eine Zeichenfolge im JSON-Format und senden Sie ihn schließlich an die Anforderung „hello.json“, d. h. Führen Sie die hello-Methode im Controller aus
iii) Nach der hello-Methode Wird ausgeführt, wird eine Reihe von Daten zurückgegeben und schließlich auf der Seite angezeigt
(4) Der Effekt ist wie folgt:

Ich habe das Obige zusammengestellt Für Sie hoffe ich, dass es Ihnen in Zukunft hilfreich sein wird.
Verwandte Artikel:
Eine kurze Diskussion über die Ajax-Anfragetechnologie
Ajax Loading Chrysanthemum Loding Effect
Sehr praktisches Ajax-Benutzerregistrierungsmodul
Das obige ist der detaillierte Inhalt vonAjax-asynchrone Anforderung für Daten im JSON-Format, implementiert in der SpringMVC-Umgebung. Für weitere Informationen folgen Sie bitte anderen verwandten Artikeln auf der PHP chinesischen Website!


![[Web-Frontend] Node.js-Schnellstart](https://img.php.cn/upload/course/000/000/067/662b5d34ba7c0227.png)


