So verwenden Sie CropperJS in Vue (ausführliches Tutorial)
Dieser Artikel fasst die Verwendungsmethoden und Erkenntnisse von Cropperjs in .vue-Dateien zusammen.
In Projekten, die Vue verwenden, müssen Bilder zugeschnitten werden, also habe ich Cropperjs gelernt und ich Ich bin bei der Verwendung auch auf einige Fallstricke gestoßen. Im Folgenden finden Sie eine Zusammenfassung der Verwendungsmethoden und Erkenntnisse aus der .vue-Datei:
Bevor Sie es verwenden, stellen Sie es zuerst vor:

Führen Sie im Projekt aus:
npm install cropperjs -save
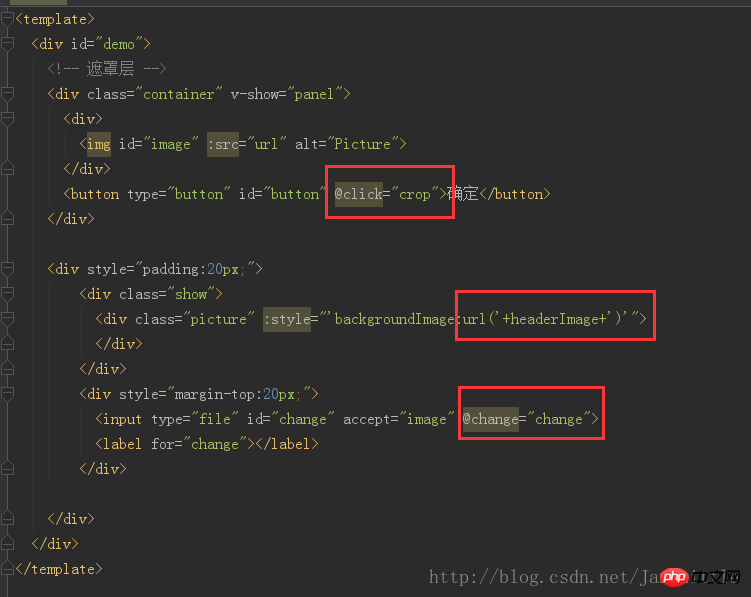
In der Vorlage:
<p id="demo">
<!-- 遮罩层 -->
<p class="container" v-show="panel">
<p>
<img src="/static/imghw/default1.png" data-src="url" class="lazy" id="image" : alt="Picture">
</p>
<button type="button" id="button" @click="crop">确定</button>
</p>
<p style="padding:20px;">
<p class="show">
<p class="picture" :style="'backgroundImage:url('+headerImage+')'">
</p>
</p>
<p style="margin-top:20px;">
<input type="file" id="change" accept="image" @change="change">
<label for="change"></label>
</p>
</p>
</p>
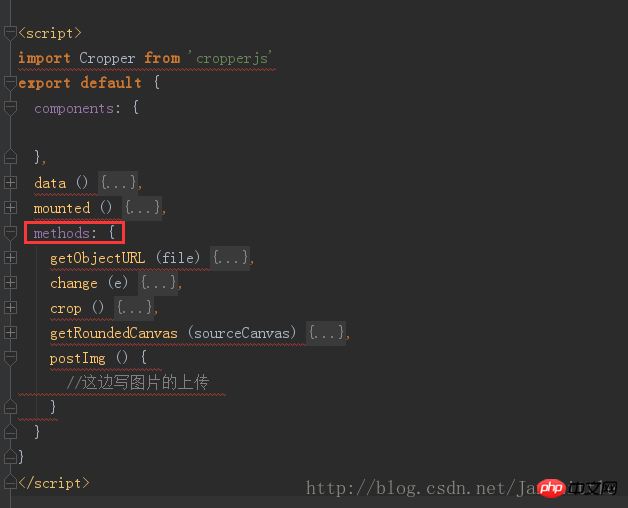
js-Code:
import Cropper from 'cropperjs'
export default {
 components: {
 },
 data () {
  return {
   headerImage:'',
   picValue:'',
   cropper:'',
   croppable:false,
   panel:false,
   url:''
  }
 },
 mounted () {
  //初始化这个裁剪框
  var self = this;
  var image = document.getElementById('image');
  this.cropper = new Cropper(image, {
   aspectRatio: 1,
   viewMode: 1,
   background:false,
   zoomable:false,
   ready: function () {
    self.croppable = true;
   }
  });
 },
 methods: {
  getObjectURL (file) {
   var url = null ;
   if (window.createObjectURL!=undefined) { // basic
    url = window.createObjectURL(file) ;
   } else if (window.URL!=undefined) { // mozilla(firefox)
    url = window.URL.createObjectURL(file) ;
   } else if (window.webkitURL!=undefined) { // webkit or chrome
    url = window.webkitURL.createObjectURL(file) ;
   }
   return url ;
  },
  change (e) {
   let files = e.target.files || e.dataTransfer.files;
   if (!files.length) return;
   this.panel = true;
   this.picValue = files[0];
   this.url = this.getObjectURL(this.picValue);
   //每次替换图片要重新得到新的url
   if(this.cropper){
    this.cropper.replace(this.url);
   }
   this.panel = true;
  },
  crop () {
    this.panel = false;
    var croppedCanvas;
    var roundedCanvas;
    if (!this.croppable) {
     return;
    }
    // Crop
    croppedCanvas = this.cropper.getCroppedCanvas();
    console.log(this.cropper)
    // Round
    roundedCanvas = this.getRoundedCanvas(croppedCanvas);
    this.headerImage = roundedCanvas.toDataURL();
    this.postImg()
  },
  getRoundedCanvas (sourceCanvas) {
   var canvas = document.createElement('canvas');
   var context = canvas.getContext('2d');
   var width = sourceCanvas.width;
   var height = sourceCanvas.height;
   canvas.width = width;
   canvas.height = height;
   context.imageSmoothingEnabled = true;
   context.drawImage(sourceCanvas, 0, 0, width, height);
   context.globalCompositeOperation = 'destination-in';
   context.beginPath();
   context.arc(width / 2, height / 2, Math.min(width, height) / 2, 0, 2 * Math.PI, true);
   context.fill();
   return canvas;
  },
  postImg () {
   //这边写图片的上传
  }
 }
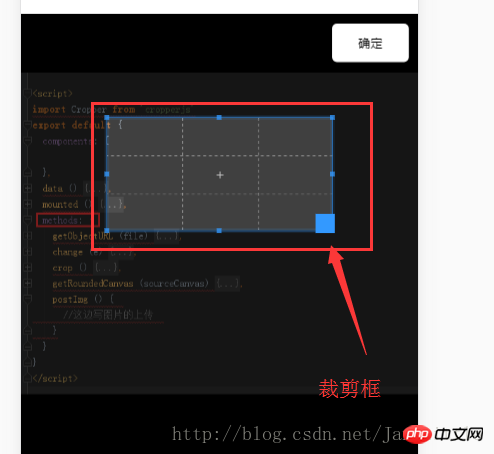
}Gesamteffekt:

CSS-Code (er ist ziemlich lang, das habe ich ursprünglich gemacht Ich möchte es nicht posten, aber um die Demo direkt laufen zu lassen, habe ich es trotzdem gepostet. Es ist zu lang.
*{
margin: 0;
padding: 0;
}
#demo #button {
position: absolute;
right: 10px;
top: 10px;
width: 80px;
height: 40px;
border:none;
border-radius: 5px;
background:white;
}
#demo .show {
width: 100px;
height: 100px;
overflow: hidden;
position: relative;
border-radius: 50%;
border: 1px solid #d5d5d5;
}
#demo .picture {
width: 100%;
height: 100%;
overflow: hidden;
background-position: center center;
background-repeat: no-repeat;
background-size: cover;
}
#demo .container {
z-index: 99;
position: fixed;
padding-top: 60px;
left: 0;
top: 0;
right: 0;
bottom: 0;
background:rgba(0,0,0,1);
}
#demo #image {
max-width: 100%;
}
.cropper-view-box,.cropper-face {
border-radius: 50%;
}
/*!
* Cropper.js v1.0.0-rc
* https://github.com/fengyuanchen/cropperjs
*
* Copyright (c) 2017 Fengyuan Chen
* Released under the MIT license
*
* Date: 2017-03-25T12:02:21.062Z
*/
.cropper-container {
font-size: 0;
line-height: 0;
position: relative;
-webkit-user-select: none;
-moz-user-select: none;
-ms-user-select: none;
user-select: none;
direction: ltr;
-ms-touch-action: none;
touch-action: none
}
.cropper-container img {
/* Avoid margin top issue (Occur only when margin-top <= -height) */
display: block;
min-width: 0 !important;
max-width: none !important;
min-height: 0 !important;
max-height: none !important;
width: 100%;
height: 100%;
image-orientation: 0deg
}
.cropper-wrap-box,
.cropper-canvas,
.cropper-drag-box,
.cropper-crop-box,
.cropper-modal {
position: absolute;
top: 0;
right: 0;
bottom: 0;
left: 0;
}
.cropper-wrap-box {
overflow: hidden;
}
.cropper-drag-box {
opacity: 0;
background-color: #fff;
}
.cropper-modal {
opacity: .5;
background-color: #000;
}
.cropper-view-box {
display: block;
overflow: hidden;
width: 100%;
height: 100%;
outline: 1px solid #39f;
outline-color: rgba(51, 153, 255, 0.75);
}
.cropper-dashed {
position: absolute;
display: block;
opacity: .5;
border: 0 dashed #eee
}
.cropper-dashed.dashed-h {
top: 33.33333%;
left: 0;
width: 100%;
height: 33.33333%;
border-top-width: 1px;
border-bottom-width: 1px
}
.cropper-dashed.dashed-v {
top: 0;
left: 33.33333%;
width: 33.33333%;
height: 100%;
border-right-width: 1px;
border-left-width: 1px
}
.cropper-center {
position: absolute;
top: 50%;
left: 50%;
display: block;
width: 0;
height: 0;
opacity: .75
}
.cropper-center:before,
.cropper-center:after {
position: absolute;
display: block;
content: ' ';
background-color: #eee
}
.cropper-center:before {
top: 0;
left: -3px;
width: 7px;
height: 1px
}
.cropper-center:after {
top: -3px;
left: 0;
width: 1px;
height: 7px
}
.cropper-face,
.cropper-line,
.cropper-point {
position: absolute;
display: block;
width: 100%;
height: 100%;
opacity: .1;
}
.cropper-face {
top: 0;
left: 0;
background-color: #fff;
}
.cropper-line {
background-color: #39f
}
.cropper-line.line-e {
top: 0;
right: -3px;
width: 5px;
cursor: e-resize
}
.cropper-line.line-n {
top: -3px;
left: 0;
height: 5px;
cursor: n-resize
}
.cropper-line.line-w {
top: 0;
left: -3px;
width: 5px;
cursor: w-resize
}
.cropper-line.line-s {
bottom: -3px;
left: 0;
height: 5px;
cursor: s-resize
}
.cropper-point {
width: 5px;
height: 5px;
opacity: .75;
background-color: #39f
}
.cropper-point.point-e {
top: 50%;
right: -3px;
margin-top: -3px;
cursor: e-resize
}
.cropper-point.point-n {
top: -3px;
left: 50%;
margin-left: -3px;
cursor: n-resize
}
.cropper-point.point-w {
top: 50%;
left: -3px;
margin-top: -3px;
cursor: w-resize
}
.cropper-point.point-s {
bottom: -3px;
left: 50%;
margin-left: -3px;
cursor: s-resize
}
.cropper-point.point-ne {
top: -3px;
right: -3px;
cursor: ne-resize
}
.cropper-point.point-nw {
top: -3px;
left: -3px;
cursor: nw-resize
}
.cropper-point.point-sw {
bottom: -3px;
left: -3px;
cursor: sw-resize
}
.cropper-point.point-se {
right: -3px;
bottom: -3px;
width: 20px;
height: 20px;
cursor: se-resize;
opacity: 1
}
@media (min-width: 768px) {
.cropper-point.point-se {
width: 15px;
height: 15px
}
}
@media (min-width: 992px) {
.cropper-point.point-se {
width: 10px;
height: 10px
}
}
@media (min-width: 1200px) {
.cropper-point.point-se {
width: 5px;
height: 5px;
opacity: .75
}
}
.cropper-point.point-se:before {
position: absolute;
right: -50%;
bottom: -50%;
display: block;
width: 200%;
height: 200%;
content: ' ';
opacity: 0;
background-color: #39f
}
.cropper-invisible {
opacity: 0;
}
.cropper-bg {
background-image: url('data:image/png;base64,iVBORw0KGgoAAAANSUhEUgAAABAAAAAQAQMAAAAlPW0iAAAAA3NCSVQICAjb4U/gAAAABlBMVEXMzMz////TjRV2AAAACXBIWXMAAArrAAAK6wGCiw1aAAAAHHRFWHRTb2Z0d2FyZQBBZG9iZSBGaXJld29ya3MgQ1M26LyyjAAAABFJREFUCJlj+M/AgBVhF/0PAH6/D/HkDxOGAAAAAElFTkSuQmCC');
}
.cropper-hide {
position: absolute;
display: block;
width: 0;
height: 0;
}
.cropper-hidden {
display: none !important;
}
.cropper-move {
cursor: move;
}
.cropper-crop {
cursor: crosshair;
}
.cropper-disabled .cropper-drag-box,
.cropper-disabled .cropper-face,
.cropper-disabled .cropper-line,
.cropper-disabled .cropper-point {
cursor: not-allowed;
}Gesamtbild:

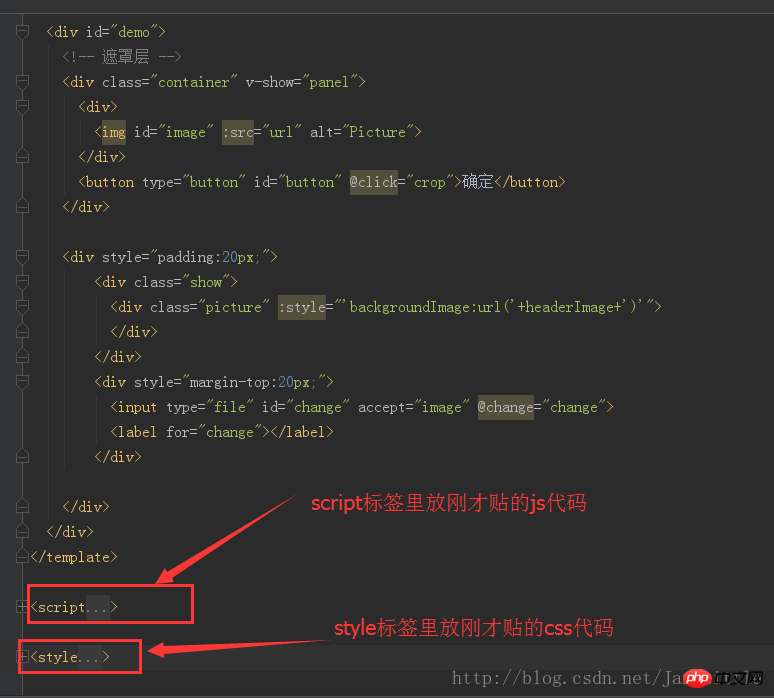
Fügen Sie den oben genannten Code in Ihr Projekt ein oder erstellen Sie eine separate .vue und fügen Sie sie in das Projekt ein. Sie können diesen Effekt erzielen:

Das Obige habe ich für alle zusammengestellt, ich hoffe, es wird in Zukunft nützlich sein. Hilfreich für alle.
Verwandte Artikel:
Benutzerdefinierte Eingabekomponentenmethode für Ereignisformulare von Vue.js
Eine Zusammenfassung verschiedener Möglichkeiten zum Registrieren von Komponenten in Vue
Verwenden Sie verwenden, um globale Vue-Komponenten und globale Anweisungen zu registrieren
Das obige ist der detaillierte Inhalt vonSo verwenden Sie CropperJS in Vue (ausführliches Tutorial). Für weitere Informationen folgen Sie bitte anderen verwandten Artikeln auf der PHP chinesischen Website!

Heiße KI -Werkzeuge

Undresser.AI Undress
KI-gestützte App zum Erstellen realistischer Aktfotos

AI Clothes Remover
Online-KI-Tool zum Entfernen von Kleidung aus Fotos.

Undress AI Tool
Ausziehbilder kostenlos

Clothoff.io
KI-Kleiderentferner

AI Hentai Generator
Erstellen Sie kostenlos Ai Hentai.

Heißer Artikel

Heiße Werkzeuge

Notepad++7.3.1
Einfach zu bedienender und kostenloser Code-Editor

SublimeText3 chinesische Version
Chinesische Version, sehr einfach zu bedienen

Senden Sie Studio 13.0.1
Leistungsstarke integrierte PHP-Entwicklungsumgebung

Dreamweaver CS6
Visuelle Webentwicklungstools

SublimeText3 Mac-Version
Codebearbeitungssoftware auf Gottesniveau (SublimeText3)

Heiße Themen
 1378
1378
 52
52
 So verwenden Sie Magnetlinks
Feb 18, 2024 am 10:02 AM
Magnet-Link ist eine Link-Methode zum Herunterladen von Ressourcen, die bequemer und effizienter ist als herkömmliche Download-Methoden. Mit Magnet-Links können Sie Ressourcen im Peer-to-Peer-Verfahren herunterladen, ohne auf einen Zwischenserver angewiesen zu sein. In diesem Artikel erfahren Sie, wie Sie Magnetlinks verwenden und worauf Sie achten sollten. 1. Was ist ein Magnet-Link? Ein Magnet-Link ist eine Download-Methode, die auf dem P2P-Protokoll (Peer-to-Peer) basiert. Über Magnet-Links können Benutzer eine direkte Verbindung zum Herausgeber der Ressource herstellen, um die gemeinsame Nutzung und das Herunterladen von Ressourcen abzuschließen. Im Vergleich zu herkömmlichen Download-Methoden magnetisch
 So verwenden Sie MDF- und MDS-Dateien
Feb 19, 2024 pm 05:36 PM
Verwendung von MDF- und MDS-Dateien Dank der kontinuierlichen Weiterentwicklung der Computertechnologie können wir Daten auf vielfältige Weise speichern und teilen. Im Bereich digitaler Medien stoßen wir häufig auf spezielle Dateiformate. In diesem Artikel besprechen wir ein gängiges Dateiformat – MDF- und MDS-Dateien – und stellen deren Verwendung vor. Zuerst müssen wir die Bedeutung von MDF-Dateien und MDS-Dateien verstehen. mdf ist die Erweiterung der CD/DVD-Imagedatei und die mds-Datei ist die Metadatendatei der mdf-Datei.
 Mar 18, 2024 pm 02:58 PM
CrystalDiskMark ist ein kleines HDD-Benchmark-Tool für Festplatten, das schnell sequentielle und zufällige Lese-/Schreibgeschwindigkeiten misst. Lassen Sie sich als Nächstes vom Redakteur CrystalDiskMark und die Verwendung von CrystalDiskMark vorstellen ). Zufällige I/O-Leistung. Es ist eine kostenlose Windows-Anwendung und bietet eine benutzerfreundliche Oberfläche und verschiedene Testmodi zur Bewertung verschiedener Aspekte der Festplattenleistung. Sie wird häufig in Hardware-Reviews verwendet
 Mar 18, 2024 am 10:58 AM
foobar2000 ist eine Software, die Ihnen jederzeit Musik aller Art mit verlustfreier Klangqualität bietet Spielen Sie das erweiterte Audio auf dem Computer ab, um ein bequemeres und effizienteres Musikwiedergabeerlebnis zu ermöglichen. Das Interface-Design ist einfach, klar und benutzerfreundlich. Es nimmt einen minimalistischen Designstil an, ohne übermäßige Dekoration Es unterstützt außerdem eine Vielzahl von Skins und Themes, personalisiert Einstellungen nach Ihren eigenen Vorlieben und erstellt einen exklusiven Musikplayer, der die Wiedergabe mehrerer Audioformate unterstützt. Außerdem unterstützt es die Audio-Gain-Funktion zum Anpassen der Lautstärke Passen Sie die Lautstärke entsprechend Ihrem Hörzustand an, um Hörschäden durch zu hohe Lautstärke zu vermeiden. Als nächstes lass mich dir helfen
 So verwenden Sie NetEase Mailbox Master
Mar 27, 2024 pm 05:32 PM
NetEase Mailbox ist eine von chinesischen Internetnutzern weit verbreitete E-Mail-Adresse und hat mit seinen stabilen und effizienten Diensten schon immer das Vertrauen der Benutzer gewonnen. NetEase Mailbox Master ist eine E-Mail-Software, die speziell für Mobiltelefonbenutzer entwickelt wurde. Sie vereinfacht das Senden und Empfangen von E-Mails erheblich und macht unsere E-Mail-Verarbeitung komfortabler. Wie Sie NetEase Mailbox Master verwenden und welche spezifischen Funktionen es bietet, wird Ihnen der Herausgeber dieser Website im Folgenden ausführlich vorstellen und hofft, Ihnen weiterzuhelfen! Zunächst können Sie die NetEase Mailbox Master-App im Mobile App Store suchen und herunterladen. Suchen Sie im App Store oder im Baidu Mobile Assistant nach „NetEase Mailbox Master“ und befolgen Sie dann die Anweisungen zur Installation. Nachdem der Download und die Installation abgeschlossen sind, öffnen wir das NetEase-E-Mail-Konto und melden uns an. Die Anmeldeschnittstelle ist wie unten dargestellt
 So verwenden Sie die Baidu Netdisk-App
Mar 27, 2024 pm 06:46 PM
Cloud-Speicher sind heutzutage aus unserem täglichen Leben und Arbeiten nicht mehr wegzudenken. Als einer der führenden Cloud-Speicherdienste in China hat Baidu Netdisk mit seinen leistungsstarken Speicherfunktionen, der effizienten Übertragungsgeschwindigkeit und dem komfortablen Bedienerlebnis die Gunst einer großen Anzahl von Benutzern gewonnen. Und egal, ob Sie wichtige Dateien sichern, Informationen teilen, Videos online ansehen oder Musik hören möchten, Baidu Cloud Disk kann Ihre Anforderungen erfüllen. Viele Benutzer verstehen jedoch möglicherweise nicht die spezifische Verwendung der Baidu Netdisk-App. Dieses Tutorial führt Sie daher im Detail in die Verwendung der Baidu Netdisk-App ein. Wenn Sie immer noch verwirrt sind, folgen Sie bitte diesem Artikel, um mehr im Detail zu erfahren. So verwenden Sie Baidu Cloud Network Disk: 1. Installation Wählen Sie beim Herunterladen und Installieren der Baidu Cloud-Software zunächst die benutzerdefinierte Installationsoption aus.
 BTCC-Tutorial: Wie kann ich die MetaMask-Wallet an der BTCC-Börse binden und verwenden?
Apr 26, 2024 am 09:40 AM
MetaMask (auf Chinesisch auch Little Fox Wallet genannt) ist eine kostenlose und beliebte Verschlüsselungs-Wallet-Software. Derzeit unterstützt BTCC die Bindung an die MetaMask-Wallet. Nach der Bindung können Sie sich mit der MetaMask-Wallet schnell anmelden, Werte speichern, Münzen kaufen usw. und bei der erstmaligen Bindung einen Testbonus von 20 USDT erhalten. Im BTCCMetaMask-Wallet-Tutorial stellen wir detailliert vor, wie man MetaMask registriert und verwendet und wie man das Little Fox-Wallet in BTCC bindet und verwendet. Was ist die MetaMask-Wallet? Mit über 30 Millionen Nutzern ist MetaMask Little Fox Wallet heute eines der beliebtesten Kryptowährungs-Wallets. Die Nutzung ist kostenlos und kann als Erweiterung im Netzwerk installiert werden
 So verwenden Sie den Xiaoai-Lautsprecher. So verbinden Sie den Xiaoai-Lautsprecher mit dem Mobiltelefon
Feb 22, 2024 pm 05:19 PM
Nachdem Sie lange auf die Wiedergabetaste des Lautsprechers gedrückt haben, stellen Sie in der Software eine WLAN-Verbindung her und schon können Sie ihn verwenden. Tutorial Anwendbares Modell: Xiaomi 12 System: EMUI11.0 Version: Xiaoai Classmate 2.4.21 Analyse 1 Suchen Sie zunächst die Wiedergabetaste des Lautsprechers und halten Sie sie gedrückt, um in den Netzwerkverteilungsmodus zu gelangen. 2 Melden Sie sich in der Xiaoai Speaker-Software auf Ihrem Telefon bei Ihrem Xiaomi-Konto an und klicken Sie, um einen neuen Xiaoai Speaker hinzuzufügen. 3. Nachdem Sie den Namen und das Passwort des WLAN eingegeben haben, können Sie Xiao Ai anrufen, um es zu verwenden. Ergänzung: Welche Funktionen hat Xiaoai Speaker? 1 Xiaoai Speaker verfügt über Systemfunktionen, soziale Funktionen, Unterhaltungsfunktionen, Wissensfunktionen, Smart Home und Trainingspläne. Zusammenfassung/Hinweise: Für eine einfache Verbindung und Nutzung muss die Xiao Ai App vorab auf Ihrem Mobiltelefon installiert werden.


