
In diesem Artikel wird hauptsächlich detailliert beschrieben, wie Sie Nextcloud in CentOS7 mit Nginx und PHP7-FPM installieren und Nextcloud über Nginx und PHP7-FPM ausführen und MariaDB als Datenbanksystem verwenden.
Nextcloud ist eine kostenlose (Open Source) Dropbox-ähnliche Software, die aus dem ownCloud-Zweig hervorgegangen ist. Es ist in PHP und JavaScript geschrieben und unterstützt mehrere Datenbanksysteme wie MySQL/MariaDB, PostgreSQL, Oracle Database und SQLite. Es kann Dateien in Ihrem Desktop-System und Cloud-Servern synchronisieren. Nextcloud bietet Client-Unterstützung für Windows-, Linux-, Mac-, Android- und Apple-Telefone. Nextcloud ist nicht nur ein Dropbox-Klon, sondern bietet auch viele zusätzliche Funktionen wie Kalender, Kontakte, geplante Aufgaben und Streaming-Medien Ampache.
In diesem Artikel zeige ich Ihnen, wie Sie die neueste Version von Nextcloud 10 auf dem CentOS 7-Server installieren und konfigurieren. Ich werde Nextcloud über Nginx und PHP7-FPM ausführen und MariaDB als Datenbanksystem verwenden.
Voraussetzungen
CentOS 7 64-bit
Root-Zugriff auf den Server
Schritt 1 – Nginx und PHP7-FPM in CentOS 7 installieren
Bevor wir mit der Installation von Nginx und php7-fpm beginnen, lernen wir Sie auch kennen Sie müssen zunächst die Warehouse-Quelle des EPEL-Pakets hinzufügen. Verwenden Sie den folgenden Befehl:
yum -y install epel-release
Beginnen Sie nun mit der Installation von Nginx aus dem EPEL-Repository:
yum -y install nginx
Dann müssen wir auch ein weiteres Repository für php7-fpm hinzufügen. Es gibt viele Remote-Repositories im Internet, die Pakete der PHP 7-Serie bereitstellen. Ich verwende hier webtatic.
PHP7-FPM-Webtatic-Repository hinzufügen:
rpm -Uvh https://mirror.webtatic.com/yum/el7/webtatic-release.rpm
Dann installieren Sie PHP7-FPM und einige von Nextcloud benötigte Pakete.
Kopieren Sie den Code Der Code lautet wie folgt:
yum -y install php70w-fpm php70w-cli php70w-gd php70w-mcrypt php70w-mysql php70w-pear php70w-xml php70w-mbstring php70w-pdo php70w-json php70w-pecl-apcu php70w-pecl-apcu-devel
Überprüfen Sie abschließend die PHP-Versionsnummer vom Serverterminal, um zu überprüfen, ob PHP korrekt installiert ist.
php -v

Schritt 2 – PHP7-FPM konfigurieren
In diesem Schritt konfigurieren wir php-fpm so, dass es zusammen mit Nginx läuft. PHP7-fpm wird als Benutzer nginx ausgeführt und überwacht Port 9000.
Verwenden Sie vim, um die Standardkonfigurationsdatei von php7-fpm zu bearbeiten.
vim /etc/php-fpm.d/www.conf
In den Zeilen 8 und 10 wird user und group der Wert nginx zugewiesen.
user = nginx
group = nginx
Stellen Sie in Zeile 22 sicher, dass php-fpm auf dem angegebenen Port ausgeführt wird.
listen = 127.0.0.1:9000
Entkommentieren Sie die Zeilen 366-370 und aktivieren Sie die Systemumgebungsvariable von php-fpm.
env[HOSTNAME] = $HOSTNAME
env[PATH] = /usr/local/bin:/usr/bin:/bin
env[TMP] = /tmp
env[TMPDIR] = /tmp
env[TEMP] = /tmp
Speichern Sie die Datei und beenden Sie den VIM-Editor.
Der nächste Schritt besteht darin, einen neuen Ordner /var/lib/ im Verzeichnis session zu erstellen und seinen Besitzer in den Benutzer nginx zu ändern.
mkdir -p /var/lib/php/session
chown nginx:nginx -R /var/lib/php/session/
Dann starten Sie php-fpm und Nginx und legen Sie sie als Dienste fest, die beim Booten starten.
sudo systemctl start php-fpm
sudo systemctl start nginx
sudo systemctl enable php-fpm
sudo systemctl enable nginx

PHP7-FPM-Konfiguration abgeschlossen
Schritt 3 – Installation und MariaDB konfigurieren
Ich verwende MariaDB als Datenbank von Nextcloud. Sie können den Befehl yum direkt verwenden, um das Paket mariadb-server aus dem CentOS-Standard-Remote-Repository zu installieren.
yum -y install mariadb mariadb-server
Starten Sie MariaDB und fügen Sie es zu den mit dem System gestarteten Diensten hinzu.
systemctl start mariadb
systemctl enable mariadb
Jetzt beginnen Sie mit der Konfiguration des Root-Benutzerpassworts von MariaDB.
mysql_secure_installation
Geben Sie Y ein und legen Sie das Root-Passwort für MariaDB fest.
Set root password? [Y/n] Y
New password:
Re-enter new password:
Remove anonymous users? [Y/n] Y
Disallow root login remotely? [Y/n] Y
Remove test database and access to it? [Y/n] Y
Reload privilege tables now? [Y/n] Y
Nachdem das Passwort festgelegt ist, melden Sie sich jetzt bei der MySQL-Shell an und erstellen Sie eine neue Datenbank und einen neuen Benutzer für Nextcloud. Hier erstelle ich eine Datenbank namens nextcloud_db und einen Benutzer namens nextclouduser mit dem Benutzerpasswort nextclouduser@. Wählen Sie natürlich ein sichereres Passwort für Ihr eigenes System.
mysql -u root -p
Geben Sie das Root-Passwort von MariaDB ein, um sich bei der MySQL-Shell anzumelden.
Geben Sie die folgende MySQL-Abfrage ein, um eine neue Datenbank und einen neuen Benutzer zu erstellen.
create database nextcloud_db;
create user nextclouduser@localhost identified by 'nextclouduser@';
grant all privileges on nextcloud_db.* to nextclouduser@localhost identified by 'nextclouduser@';
flush privileges;
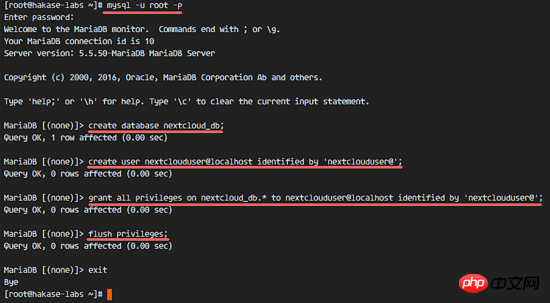
nextcloud_db Datenbank und nextclouduserDatenbankbenutzererstellung abgeschlossen
Schritt 4 – Generieren Sie ein selbstsigniertes SSL-Zertifikat für Nextcloud
在教程中,我会让客户端以 https 连接来运行 Nextcloud。你可以使用诸如 let's encrypt 等免费 SSL 证书,或者是自己创建自签名 (self signed) SSL 证书。这里我使用 OpenSSL 来创建自己的自签名 SSL 证书。
为 SSL 文件创建新目录:
mkdir -p /etc/nginx/cert/
如下,使用 openssl 生成一个新的 SSL 证书。
复制代码 代码如下:
openssl req -new -x509 -days 365 -nodes -out /etc/nginx/cert/nextcloud.crt -keyout /etc/nginx/cert/nextcloud.key
最后使用 chmod 命令将所有证书文件的权限设置为 600。
chmod 700 /etc/nginx/cert
chmod 600 /etc/nginx/cert/*
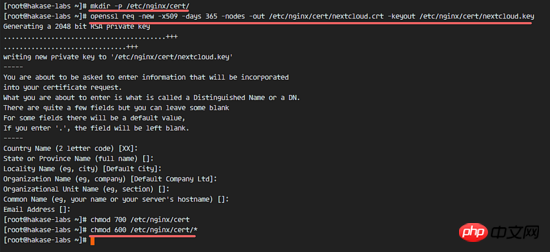
步骤 5 - 下载和安装 Nextcloud
我直接使用 wget 命令下载 Nextcloud 到服务器上,因此需要先行安装 wget。此外,还需要安装 unzip 来进行解压。使用 yum 命令来安装这两个程序。
yum -y install wget unzip
先进入 /tmp 目录,然后使用 wget 从官网下载最新的 Nextcloud 10。
cd /tmp
wget https://download.nextcloud.com/server/releases/nextcloud-10.0.2.zip
解压 Nextcloud,并将其移动到 /usr/share/nginx/html/ 目录。
unzip nextcloud-10.0.2.zip
mv nextcloud/ /usr/share/nginx/html/
下一步,转到 Nginx 的 web 根目录为 Nextcloud 创建一个 data 文件夹。
cd /usr/share/nginx/html/
mkdir -p nextcloud/data/
变更 nextcloud 目录的拥有者为 nginx 用户和组。
chown nginx:nginx -R nextcloud/
步骤 6 - 在 Nginx 中为 Nextcloud 配置虚拟主机
在步骤 5 我们已经下载好了 Nextcloud 源码,并配置好了让它运行于 Nginx 服务器中,但我们还需要为它配置一个虚拟主机。在 Nginx 的 conf.d 目录下创建一个新的虚拟主机配置文件 nextcloud.conf。
cd /etc/nginx/conf.d/
vim nextcloud.conf
将以下内容粘贴到虚拟主机配置文件中:
upstream php-handler {
  server 127.0.0.1:9000;
  #server unix:/var/run/php5-fpm.sock;
}
server {
  listen 80;
  server_name cloud.nextcloud.co;
  # enforce https
  return 301 https://$server_name$request_uri;
}
server {
  listen 443 ssl;
  server_name cloud.nextcloud.co;
  ssl_certificate /etc/nginx/cert/nextcloud.crt;
  ssl_certificate_key /etc/nginx/cert/nextcloud.key;
  # Add headers to serve security related headers
  # Before enabling Strict-Transport-Security headers please read into this
  # topic first.
  add_header Strict-Transport-Security "max-age=15768000;
  includeSubDomains; preload;";
  add_header X-Content-Type-Options nosniff;
  add_header X-Frame-Options "SAMEORIGIN";
  add_header X-XSS-Protection "1; mode=block";
  add_header X-Robots-Tag none;
  add_header X-Download-Options noopen;
  add_header X-Permitted-Cross-Domain-Policies none;
  # Path to the root of your installation
  root /usr/share/nginx/html/nextcloud/;
  location = /robots.txt {
    allow all;
    log_not_found off;
    access_log off;
  }
  # The following 2 rules are only needed for the user_webfinger app.
  # Uncomment it if you're planning to use this app.
  #rewrite ^/.well-known/host-meta /public.php?service=host-meta last;
  #rewrite ^/.well-known/host-meta.json /public.php?service=host-meta-json
  # last;
  location = /.well-known/carddav {
   return 301 $scheme://$host/remote.php/dav;
  }
  location = /.well-known/caldav {
   return 301 $scheme://$host/remote.php/dav;
  }
  # set max upload size
  client_max_body_size 512M;
  fastcgi_buffers 64 4K;
  # Disable gzip to avoid the removal of the ETag header
  gzip off;
  # Uncomment if your server is build with the ngx_pagespeed module
  # This module is currently not supported.
  #pagespeed off;
  error_page 403 /core/templates/403.php;
  error_page 404 /core/templates/404.php;
  location / {
    rewrite ^ /index.php$uri;
  }
  location ~ ^/(?:build|tests|config|lib|3rdparty|templates|data)/ {
    deny all;
  }
  location ~ ^/(?:\.|autotest|occ|issue|indie|db_|console) {
    deny all;
  }
  location ~ ^/(?:index|remote|public|cron|core/ajax/update|status|ocs/v[12]|updater/.+|ocs-provider/.+|core/templates/40[34])\.php(?:$|/) {
    include fastcgi_params;
    fastcgi_split_path_info ^(.+\.php)(/.*)$;
    fastcgi_param SCRIPT_FILENAME $document_root$fastcgi_script_name;
    fastcgi_param PATH_INFO $fastcgi_path_info;
    fastcgi_param HTTPS on;
    #Avoid sending the security headers twice
    fastcgi_param modHeadersAvailable true;
    fastcgi_param front_controller_active true;
    fastcgi_pass php-handler;
    fastcgi_intercept_errors on;
    fastcgi_request_buffering off;
  }
  location ~ ^/(?:updater|ocs-provider)(?:$|/) {
    try_files $uri/ =404;
    index index.php;
  }
  # Adding the cache control header for js and css files
  # Make sure it is BELOW the PHP block
  location ~* \.(?:css|js)$ {
    try_files $uri /index.php$uri$is_args$args;
    add_header Cache-Control "public, max-age=7200";
    # Add headers to serve security related headers (It is intended to
    # have those duplicated to the ones above)
    # Before enabling Strict-Transport-Security headers please read into
    # this topic first.
    add_header Strict-Transport-Security "max-age=15768000;
    includeSubDomains; preload;";
    add_header X-Content-Type-Options nosniff;
    add_header X-Frame-Options "SAMEORIGIN";
    add_header X-XSS-Protection "1; mode=block";
    add_header X-Robots-Tag none;
    add_header X-Download-Options noopen;
    add_header X-Permitted-Cross-Domain-Policies none;
    # Optional: Don't log access to assets
    access_log off;
  }
  location ~* \.(?:svg|gif|png|html|ttf|woff|ico|jpg|jpeg)$ {
    try_files $uri /index.php$uri$is_args$args;
    # Optional: Don't log access to other assets
    access_log off;
  }
}保存文件并退出 vim。
下载测试以下该 Nginx 配置文件是否有错误,没有的话就可以重启服务了。
nginx -t
systemctl restart nginx

步骤 7 - 为 Nextcloud 配置 SELinux 和 FirewallD 规则
本教程中,我们将以强制模式运行 SELinux,因此需要一个 SELinux 管理工具来为 Nextcloud 配置 SELinux。
使用以下命令安装 SELinux 管理工具。
yum -y install policycoreutils-python
然后以 root 用户来运行以下命令,以便让 Nextcloud 运行于 SELinux 环境之下。如果你是用的其他名称的目录,记得将 nextcloud 替换掉。
semanage fcontext -a -t httpd_sys_rw_content_t '/usr/share/nginx/html/nextcloud/data(/.*)?'
semanage fcontext -a -t httpd_sys_rw_content_t '/usr/share/nginx/html/nextcloud/config(/.*)?'
semanage fcontext -a -t httpd_sys_rw_content_t '/usr/share/nginx/html/nextcloud/apps(/.*)?'
semanage fcontext -a -t httpd_sys_rw_content_t '/usr/share/nginx/html/nextcloud/assets(/.*)?'
semanage fcontext -a -t httpd_sys_rw_content_t '/usr/share/nginx/html/nextcloud/.htaccess'
semanage fcontext -a -t httpd_sys_rw_content_t '/usr/share/nginx/html/nextcloud/.user.ini'
restorecon -Rv '/usr/share/nginx/html/nextcloud/'
接下来,我们要启用 firewalld 服务,同时为 Nextcloud 开启 http 和 https 端口。
启动 firewalld 并设置随系统启动。
systemctl start firewalld
systemctl enable firewalld
现在使用 firewall-cmd 命令来开启 http 和 https 端口,然后重新加载防火墙。
firewall-cmd --permanent --add-service=http
firewall-cmd --permanent --add-service=https
firewall-cmd --reload

至此,服务器配置完成。
步骤 8 - Nextcloud 安装
打开你的 Web 浏览器,输入你为 Nextcloud 设置的域名,我这里设置为 cloud.nextcloud.co,然后会重定向到安全性更好的 https 连接。
设置你的管理员用户名和密码,然后输入数据验证信息,点击 '完成安装 (Finish Setup)'。
Nextcloud 安装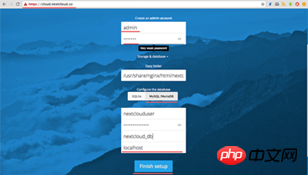
Nextcloud 管理面板大致如下:
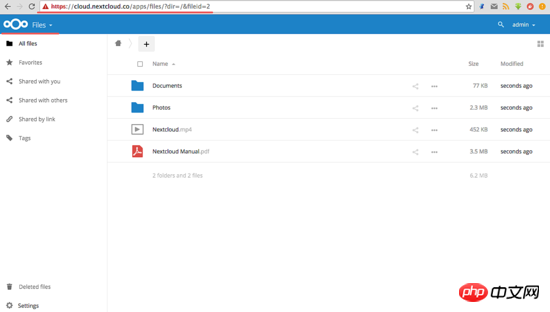
Nextcloud 用户设置:

Ausführliche Erklärung zur Installation von Nextcloud mit Nginx und PHP7-FPM in CentOS7:
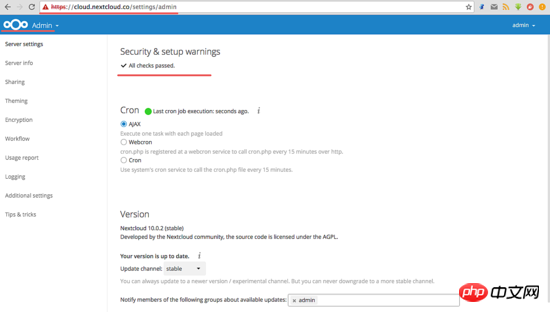
至此,我们在 CentOS 7 服务器上通过使用 Nginx、PHP7-FPM、MariaDB 完成了 Nextcloud 的安装。
Das obige ist der detaillierte Inhalt vonAusführliche Erklärung zur Installation von Nextcloud mit Nginx und PHP7-FPM in CentOS7. Für weitere Informationen folgen Sie bitte anderen verwandten Artikeln auf der PHP chinesischen Website!


