In diesem Artikel wird hauptsächlich die detaillierte Interpretation des PHP-Upload-Fortschrittsbalkens vorgestellt (empfohlen). Ich hoffe, dass er für alle hilfreich ist.
Drei Lösungen zum Hochladen von Dateien im Web Mit allen teilen:

Was ich hier verwenden möchte, ist das Formularmethode . Durch Festlegen des enctype="multipart/form-data"-Attributs für das Formularelement werden die vom Formular übermittelten Daten in binärer Codierung übermittelt, und der Inhalt der hochgeladenen Datei kann mithilfe des Binärstreams abgerufen werden das Servlet, das diese Anfrage empfängt. Dadurch wird das Hochladen der Datei ermöglicht.
Das enctype-Attribut des Formularelements gibt die Kodierungsmethode der Formulardaten an. Dieses Attribut hat 3 Werte:

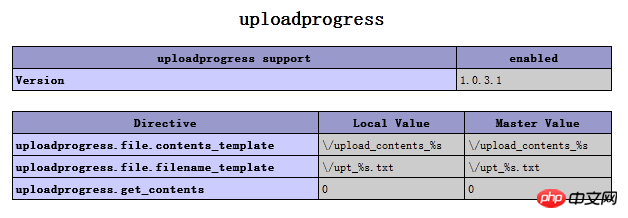
Ich habe zwei Methoden im Internet gefunden . PHP arbeitet mit apc zusammen, um es zu implementieren, und dieses Mal möchte ich uploadprogress verwenden. Installieren Sie die Erweiterung php_uploadprogress.dll und starten Sie Apache neu.

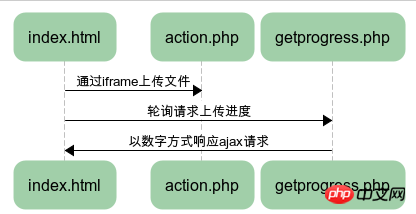
Prinzip der Fortschrittsbalken-Implementierung:

Hier wird eine Iframe-Methode zum Hochladen von Dateien ohne Aktualisierung verwendet.

Das Bild nach Abschluss des Uploads:
<body>
<p style="padding:20px">
<form action="action.php" enctype="multipart/form-data" method="post" target="iframeUpload">
<iframe name="iframeUpload" width="400" height="400" frameborder='1'></iframe>
<input type="hidden" name="UPLOAD_IDENTIFIER" value="1" />
<input id="file1" name="file1" type="file"/>
<input value="上传" type="submit" onclick="startProgress()"/>
</form>
</p>
<p style="width: 500px; height: 20px;border:1px solid red">
<p style="position: relative; height: 20px; background-color: purple; width: 0%;" class="barinner"></p>
</p>
<p id='showNum'></p>
<p class="prbar">
<p class="prpos barinner"></p>
</p>
</body>Bitte achten Sie im obigen HTML-Code auf UPLOAD_IDENTIFIER. Dies wird zum Auffinden und Anzeigen verwendet Datei wird hochgeladen. Ich werde es hier als 1 schreiben, aber Sie können es als eine von PHP generierte Zufallszahl schreiben. Das Folgende ist das JS-Skript:
 var proNum=0;
  var loop=0;
  var progressResult = "";
  var interval;
  function sendURL() {
   $.ajax({
    type : 'GET',
    url : "getprogress.php",
    async : true,
    cache : false,
    dataType : 'json',
    data: "progress_key=" + $('input[name=UPLOAD_IDENTIFIER]').val(),
    success : function(e) {
     proNum=parseInt(e);
     if(e){
      $('.barinner').css('width', proNum+"%");
      $('#showNum').html(proNum+"%");
      setTimeout("getProgress()", 200);

     }else{
      if(interval == 1){
       $('.barinner').css('width', "100%");
       $('#showNum').html("100%");
      }
     }
    }
   });
  }
  function getProgress(){
   loop++;
   sendURL();
  }
  function startProgress(){
   interval = 1;
   $('.barinner').css('width', proNum+"%");
   $('#showNum').html(proNum+"%");
  setTimeout("getProgress()", 500);
}Das Folgende ist der Inhalt in der Datei getprogress.php:
<?php
if (function_exists("uploadprogress_get_info")) {
$info = uploadprogress_get_info($_GET['progress_key']);
if(!empty($info)){
if(($info['bytes_uploaded'] < $info['bytes_total']) && !empty($info['bytes_uploaded']) && !empty($info['bytes_total'])){
$proNum = floor(($info['bytes_uploaded']/$info['bytes_total'])*100);
}else{
$proNum = 100;
}
echo $proNum;
}else{
echo 0;
}
}Nachdem der Upload abgeschlossen ist, zeige ich das CSS von zwei Fortschrittsbalken, dem zweiten Einer verwendet das neueste in CSS3 geschriebene. Es werden einige CSS3-Animationseigenschaften verwendet.

 .prbar {
  margin:5px;
  width:500px;
  background-color:#dddddd;
  overflow:hidden;

  /* 边框效果 */
  border: 1px solid #bbbbbb;
  -moz-border-radius: 15px;
  border-radius: 15px;

  /* 为进度条增加阴影效果 */
  -webkit-box-shadow: 0px 2px 4px #555555;
  -moz-box-shadow: 0px 2px 4px #555555;
  box-shadow: 0px 2px 4px #555555;
 }
 /* No rounded corners for Opera, because the overflow:hidden dont work with rounded corners */
 doesnotexist:-o-prefocus, .prbar {
 border-radius:0px;
 }
 .prpos {
  width:0%;
  height:30px;
  background-color:#3399ff;
  border-right:1px solid #bbbbbb;
  /* CSS3 进度条渐变 */
  transition: width 2s ease;
  -webkit-transition: width 0s ease;
  -o-transition: width 0s ease;
  -moz-transition: width 0s ease;
  -ms-transition: width 0s ease;
  /* CSS3 Stripes */
  background-image: linear-gradient(135deg,#3399ff 25%,#99ccff 25%,#99ccff 50%, #3399ff 50%, #3399ff 75%,#99ccff 75%,#99ccff 100%);
  background-image: -moz-linear-gradient(135deg,#3399ff 25%,#99ccff 25%,#99ccff 50%, #3399ff 50%, #3399ff 75%,#99ccff 75%,#99ccff 100%);
  background-image: -ms-linear-gradient(135deg,#3399ff 25%,#99ccff 25%,#99ccff 50%, #3399ff 50%, #3399ff 75%,#99ccff 75%,#99ccff 100%);
  background-image: -o-linear-gradient(135deg,#3399ff 25%,#99ccff 25%,#99ccff 50%, #3399ff 50%, #3399ff 75%,#99ccff 75%,#99ccff 100%);
  background-image: -webkit-gradient(linear, 100% 100%, 0 0,color-stop(.25, #99ccff), color-stop(.25, #3399ff),color-stop(.5, #3399ff),color-stop(.5, #99ccff),color-stop(.75, #99ccff),color-stop(.75, #3399ff),color-stop(1, #3399ff));
  background-image: -webkit-linear-gradient(135deg,#3399ff 25%,#99ccff 25%,#99ccff 50%, #3399ff 50%, #3399ff 75%,#99ccff 75%,#99ccff 100%);
  background-size: 40px 40px;
  /* Background stripes animation */
  animation: bganim 3s linear 2s infinite;
  -moz-animation: bganim 3s linear 2s infinite;
  -webkit-animation: bganim 3s linear 2s infinite;
  -o-animation: bganim 3s linear 2s infinite;
  -ms-animation: bganim 3s linear 2s infinite;
 }
 @keyframes bganim {
  from {background-position:0px;} to { background-position:40px;}
 }
 @-moz-keyframes bganim {
  from {background-position:0px;} to { background-position:40px;}
 }
 @-webkit-keyframes bganim {
  from {background-position:0px;} to { background-position:40px;}
 }
 @-o-keyframes bganim {
  from {background-position:0px;} to { background-position:40px;}
 }
 @-ms-keyframes bganim {
  from {background-position:0px;} to { background-position:40px;}
}Zusammenfassung: Das Obige ist der gesamte Inhalt dieses Artikels, ich hoffe, dass er für das Studium aller hilfreich sein wird.
Verwandte Empfehlungen:
SSO-Single-Sign-On-Systemschnittstelle implementiert von PHP-Funktionsbeispielanalyse
Das obige ist der detaillierte Inhalt vonDetaillierte Interpretation des PHP-Upload-Fortschrittsbalkens (empfohlen). Für weitere Informationen folgen Sie bitte anderen verwandten Artikeln auf der PHP chinesischen Website!
 Konfigurieren Sie die HOSTS-Datei
 So deaktivieren Sie die Win10-Upgrade-Eingabeaufforderung
 Was sind die Unterschiede zwischen Weblogic und Tomcat?
 So verwenden Sie Excel-Makros
 Software zur Verschlüsselung von Mobiltelefonen
 Mobile Festplattenpartitionssoftware
 Verwendung von Eigenschaftsbeschreibungen
 So lösen Sie 404 nicht gefunden
 Multifunktionsnutzung


