 Web-Frontend
 Front-End-Fragen und Antworten
 CSS zum Implementieren von Pfeilen und Eingabeaufforderungsfeldern mit Lücken
CSS zum Implementieren von Pfeilen und Eingabeaufforderungsfeldern mit Lücken
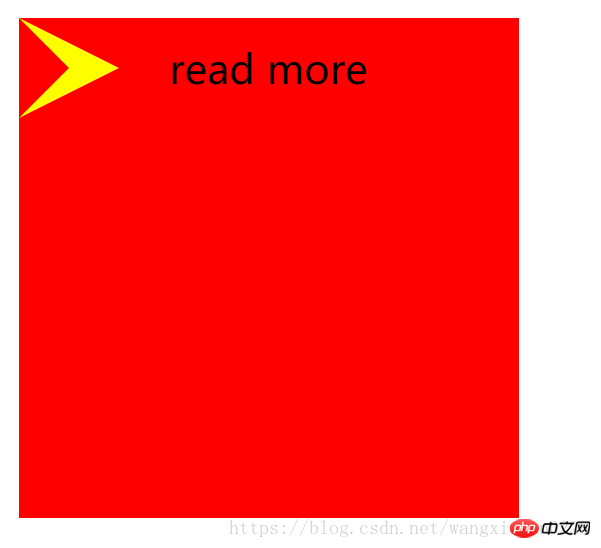
1. Implementieren Sie den Pfeil wie im Bild gezeigt

<!DOCTYPE html>
<html>
<head>
	<title></title>
<style type="text/css">
.out{
	width: 200px;
	height: 200px;
	background: #f00;
	position: relative;
}
.word{
	position: absolute;
	left: 60px;
	line-height: 40px;
}
.triangle-out{
	position: absolute;
	top: 0px;
	left: 0px;
	width: 0px;
	height: 0px;
	display: block;
	border-top: 20px solid #f00;
	border-right: 20px solid #f00;
	border-bottom: 20px solid #f00;
	border-left: 40px solid #ff0;
}
.triangle-in{
	position: absolute;
	top: 0px;
	left: 0px;
	width: 0px;
	height: 0px;
	display: block;
	border-top: 20px solid transparent;
	border-right: 20px solid transparent;
	border-bottom: 20px solid transparent;
	border-left: 20px solid #f00;
}
</style>
</head>
<body>
	<p class="out">
		<span class="triangle-out"></span>
		<span class="triangle-in"></span>
		<span class="word">read more</span>
	</p>
</body>
</html>2. Implementieren Sie das eingekerbte Eingabeaufforderungsfeld

<!DOCTYPE html PUBLIC "-//W3C//DTD XHTML 1.0 Transitional//EN" "http://www.w3.org/TR/xhtml1/DTD/xhtml1-transitional.dtd">
<html xmlns="http://www.w3.org/1999/xhtml">
<head>
<meta http-equiv="Content-Type" content="text/html; charset=utf-8" />
<title>带缺口的提示框-/</title>
<style>
.wrap{
	font-size: 12px;
	margin:40px auto;
	width:600px;
}
.ui-slider-tooltip{
	background:#FCFDFD;
	border:1px solid green;
	color:#222222;
	display: block;
	text-align: center;
	padding: 5px 3px 5px 3px;
	width: 190px;
	position: relative;
}
.ui-corner-all {
	-moz-border-radius-bottomleft:5px;
	-moz-border-radius-bottomright:5px;
	-moz-border-radius-topleft:5px;
	-moz-border-radius-topright:5px;
	-webkit-border-top-left-radius:5px 5px;
	-webkit-border-top-right-radius:5px 5px;
	-webkit-border-bottom-right-radius:5px 5px;
	-webkit-border-bottom-left-radius:5px 5px;
}
.ui-tooltip-pointer-down {
	border-bottom-width: 0;
	border-left: 7px dashed transparent;
	border-right: 7px dashed transparent;
	border-top: 8px solid green;
	bottom:	-8px;
	display: block;
	height:0;
	left: 50%;
	margin-left: -7px;
	position: absolute;
	width:0;
}

.ui-tooltip-pointer-down-inner {
	border-left: 6px dashed transparent;
	border-right: 6px dashed transparent;
	border-top: 7px solid #fff;
	left: -6px;
	top: -9px;
	position: absolute;
}

.a{
	display: block;width:0;height:0;
	border-left: 7px dashed transparent;
	border-right: 7px dashed transparent;
	border-top: 8px solid green;
	border-bottom: 0;
	position: absolute;
}
.b{
	position: absolute;
	border-left: 6px dashed transparent;
	border-right: 6px dashed transparent;
	border-top: 7px solid #fff;
	top: -9px;
	left: -6px;
}
</style>
</head>
<body>
<p class="wrap">
	<h1>用CSS实现带缺口的提示框</h1>
	<span class="a">
		<span class="b"></span>
	</span>
	<br/>
	<span class="a">
		<span class="b" style="top:-11px;"></span>
	</span>
	<br/>


	<span class="ui-slider-tooltip  ui-corner-all">
		<span>带缺口提示框</span>
		<span class="ui-tooltip-pointer-down">
		<span class="ui-tooltip-pointer-down-inner" ></span>
		</span>
	</span>
	<br/>
	<span class="ui-slider-tooltip  ui-corner-all" style="background: #f00">
		<span>加个背景就可以看清原理啦</span>
		<span class="ui-tooltip-pointer-down">
		<span class="ui-tooltip-pointer-down-inner" ></span>
		</span>
	</span>
</p>
</p>
</body>
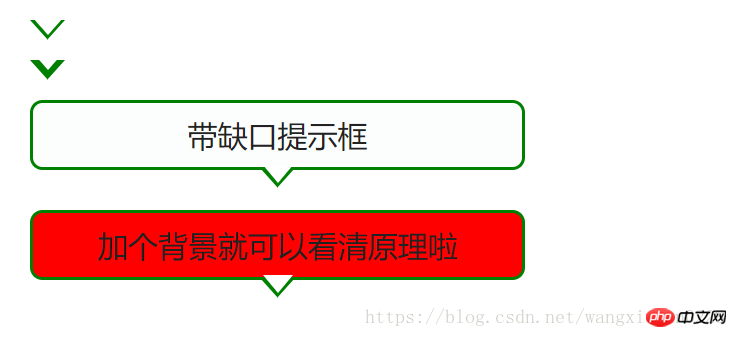
</html>Tatsächlich besteht es darin, ein Feld mit einer Breite und Höhe von 0 zu verwenden, den Rand festzulegen, das gewünschte Dreieck zu erhalten und durch die überlagerte Anzeige von Dreiecken den Effekt eines Pfeils zu erzeugen~
In diesem Artikel wird erläutert, wie Pfeile und Streifen mit der CSS-Lücken-Eingabeaufforderungsbox implementiert werden. Weitere verwandte Inhalte finden Sie auf der chinesischen PHP-Website.
Verwandte Empfehlungen:
Front-End-Ingenieure erlernen Grundkenntnisse
Verwandte Erklärungen zum objektorientierten DesignVerwandte Erklärungen
Das obige ist der detaillierte Inhalt vonCSS zum Implementieren von Pfeilen und Eingabeaufforderungsfeldern mit Lücken. Für weitere Informationen folgen Sie bitte anderen verwandten Artikeln auf der PHP chinesischen Website!

Heiße KI -Werkzeuge

Undresser.AI Undress
KI-gestützte App zum Erstellen realistischer Aktfotos

AI Clothes Remover
Online-KI-Tool zum Entfernen von Kleidung aus Fotos.

Undress AI Tool
Ausziehbilder kostenlos

Clothoff.io
KI-Kleiderentferner

AI Hentai Generator
Erstellen Sie kostenlos Ai Hentai.

Heißer Artikel

Heiße Werkzeuge

Notepad++7.3.1
Einfach zu bedienender und kostenloser Code-Editor

SublimeText3 chinesische Version
Chinesische Version, sehr einfach zu bedienen

Senden Sie Studio 13.0.1
Leistungsstarke integrierte PHP-Entwicklungsumgebung

Dreamweaver CS6
Visuelle Webentwicklungstools

SublimeText3 Mac-Version
Codebearbeitungssoftware auf Gottesniveau (SublimeText3)

Heiße Themen
 Was bedeutet Platzhalter in Vue?
May 07, 2024 am 09:57 AM
In Vue.js gibt das Platzhalterattribut den Platzhaltertext des Eingabeelements an, der angezeigt wird, wenn der Benutzer keinen Inhalt eingegeben hat, Eingabetipps oder Beispiele bereitstellt und die Barrierefreiheit des Formulars verbessert. Seine Verwendung besteht darin, das Platzhalterattribut für das Eingabeelement festzulegen und das Erscheinungsbild mithilfe von CSS anzupassen. Zu den Best Practices gehört es, relevant für die Eingabe zu sein, kurz und klar zu sein, Standardtexte zu vermeiden und die Barrierefreiheit zu berücksichtigen.
 Was bedeutet span in js
May 06, 2024 am 11:42 AM
Das Span-Tag kann Stile, Attribute oder Verhaltensweisen zum Text hinzufügen. Es wird verwendet, um Stile wie Farbe und Schriftgröße hinzuzufügen. Legen Sie Attribute wie ID, Klasse usw. fest. Zugehörige Verhaltensweisen wie Klicks, Hovers usw. Markieren Sie Text zur weiteren Bearbeitung oder zum Zitieren.
 Was bedeutet rem in js
May 06, 2024 am 11:30 AM
REM in CSS ist eine relative Einheit relativ zur Schriftgröße des Stammelements (HTML). Es weist die folgenden Merkmale auf: relativ zur Schriftgröße des Stammelements, nicht vom übergeordneten Element beeinflusst. Wenn sich die Schriftgröße des Stammelements ändert, werden Elemente, die REM verwenden, entsprechend angepasst. Kann mit jeder CSS-Eigenschaft verwendet werden. Zu den Vorteilen der Verwendung von REM gehören: Reaktionsfähigkeit: Halten Sie den Text auf verschiedenen Geräten und Bildschirmgrößen lesbar. Konsistenz: Stellen Sie sicher, dass die Schriftgrößen auf Ihrer gesamten Website einheitlich sind. Skalierbarkeit: Ändern Sie die globale Schriftgröße ganz einfach, indem Sie die Schriftgröße des Stammelements anpassen.
 So führen Sie Bilder in Vue ein
May 02, 2024 pm 10:48 PM
Es gibt fünf Möglichkeiten, Bilder in Vue einzuführen: über URL, Require-Funktion, statische Datei, V-Bind-Direktive und CSS-Hintergrundbild. Dynamische Bilder können in den berechneten Eigenschaften oder Listenern von Vue verarbeitet werden, und gebündelte Tools können zum Optimieren des Bildladens verwendet werden. Stellen Sie sicher, dass der Pfad korrekt ist, da sonst ein Ladefehler auftritt.
 So verpacken Sie eine Eingabeaufforderung in js
May 01, 2024 am 06:24 AM
Wenn Sie die Methode prompt() in JavaScript verwenden, können Sie Zeilenumbrüche durch die folgenden drei Methoden erreichen: 1. Fügen Sie das Zeichen „\n“ an der Position ein, an der Sie die Zeile umbrechen möchten. 2. Verwenden Sie das Zeilenumbruchzeichen in der Zeile Eingabeaufforderungstext; 3. Verwenden Sie den CSS-Stil „white“ -space: pre“, um Zeilenumbrüche zu erzwingen.
 Was ist ein Knoten in js?
May 07, 2024 pm 09:06 PM
Knoten sind Entitäten im JavaScript-DOM, die HTML-Elemente darstellen. Sie stellen ein bestimmtes Element auf der Seite dar und können verwendet werden, um auf dieses Element zuzugreifen und es zu bearbeiten. Zu den gängigen Knotentypen gehören Elementknoten, Textknoten, Kommentarknoten und Dokumentknoten. Über DOM-Methoden wie getElementById() können Sie auf Knoten zugreifen und diese bearbeiten, einschließlich der Änderung von Eigenschaften, dem Hinzufügen/Entfernen untergeordneter Knoten, dem Einfügen/Ersetzen von Knoten und dem Klonen von Knoten. Das Durchqueren von Knoten hilft bei der Navigation innerhalb der DOM-Struktur. Knoten sind nützlich für die dynamische Erstellung von Seiteninhalten, die Ereignisbehandlung, Animation und Datenbindung.
 In welcher Sprache ist das Browser-Plugin geschrieben?
May 08, 2024 pm 09:36 PM
Browser-Plugins werden normalerweise in den folgenden Sprachen geschrieben: Front-End-Sprachen: JavaScript, HTML, CSS Back-End-Sprachen: C++, Rust, WebAssembly Andere Sprachen: Python, Java
 So legen Sie unbekannte Attribute in vscode fest vscode-Methode zum Festlegen unbekannter Attribute
May 09, 2024 pm 02:43 PM
1. Öffnen Sie zunächst das Einstellungssymbol in der unteren linken Ecke und klicken Sie auf die Option „Einstellungen“. 2. Suchen Sie dann die CSS-Spalte im Sprungfenster. 3. Ändern Sie abschließend die Dropdown-Option im Menü „Unbekannte Eigenschaften“ in die Schaltfläche „Fehler“. .


