 WeChat-Applet
 Mini-Programmentwicklung
 Detaillierte Erläuterung einer angepassten WeChat-Applet-Komponente (modale Popup-Komponente)
Detaillierte Erläuterung einer angepassten WeChat-Applet-Komponente (modale Popup-Komponente)
Ich weiß nicht, wann Miniprogramme populär wurden, und viele Leute haben sich darauf eingelassen, egal ob es sich um Android, iOS oder das sehr beliebte WeChat-Miniprogramm handelt:
Jeder wird feststellen, dass die vom Beamten bereitgestellten nativen Steuerelemente unsere Entwicklungsanforderungen nicht mehr vollständig erfüllen können. Daher stellt dieser Artikel eine angepasste WeChat-Applet-Komponente (modale Popup-Komponente) vor.
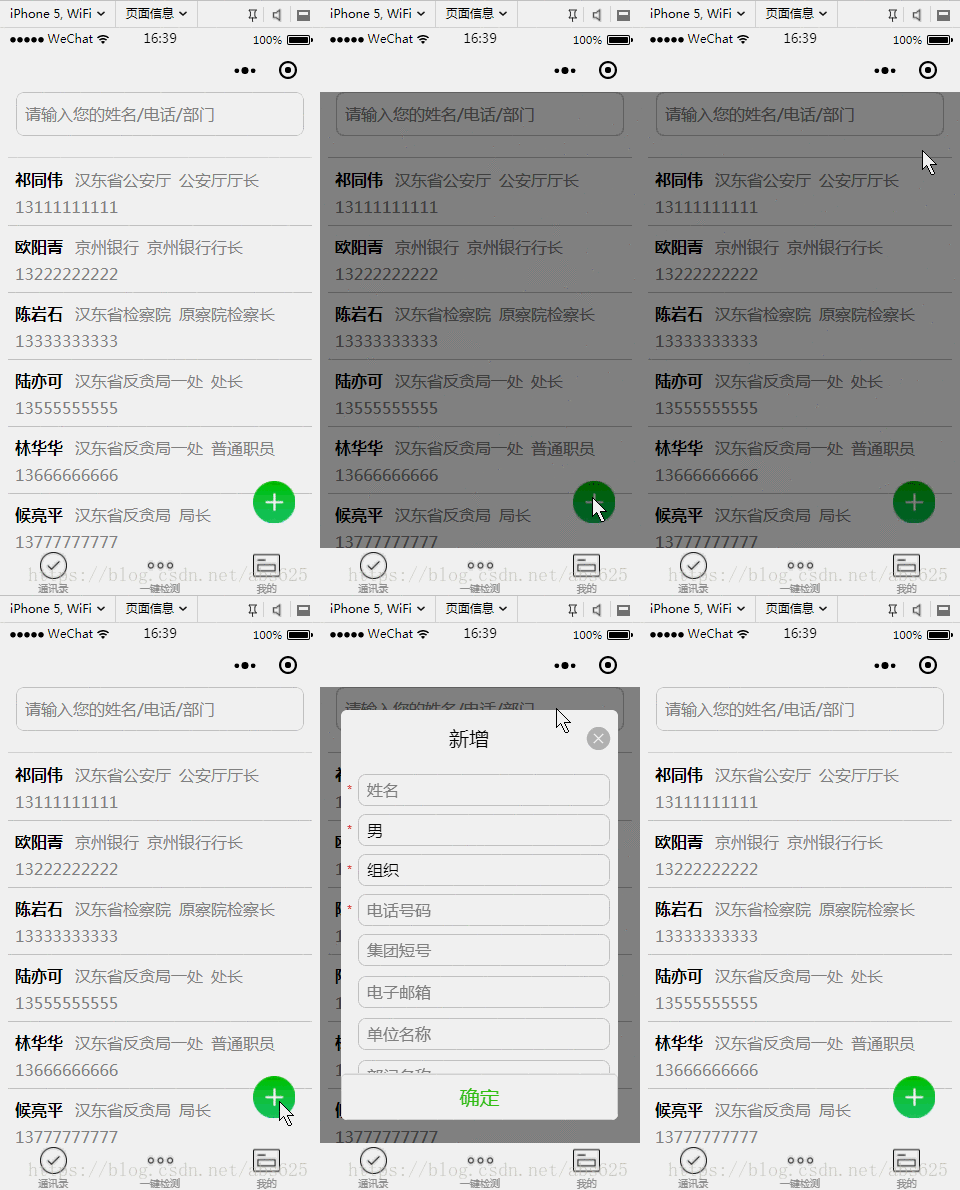
Nehmen wir zunächst einmal ein Bild.

Jetzt, wo Sie das gesehen haben, sind die Renderings immer noch ein bisschen attraktiv für Sie, haha, lasst uns aufhören, Unsinn zu reden, und mit dem Codieren beginnen. . .
Es gibt insgesamt vier Dateien: js, json, xml und wxss. Wenn Sie sich darüber immer noch nicht im Klaren sind, gehen Sie bitte nach links und denken Sie 5 Minuten lang darüber nach.
Laden Sie zuerst die Layoutdatei dialog.xml hoch
<!--mask dialog-->
<view class="drawer_screen" bindtap="hideDialog" wx:if="{{isShow}}" catchtouchmove="myCatchTouch"></view>
<!--content-->
<!--使用animation属性指定需要执行的动画-->
<view animation="{{animationData}}" class="drawer_box" wx:if="{{isShow}}">
<!--drawer content-->
<view class='row'>
<view class="drawer_title" style='width:100%;padding-left:60rpx'>{{title}}</view>
<icon type="clear" style='margin-top:40rpx;margin-right:20rpx;' bindtap="hideDialog"></icon>
</view>
<form bindsubmit="_formSubmit">
<scroll-view scroll-y>
<view class="drawer_content">
<view wx:for="{{dataObject}}" wx:key="{{id}}">
<view class="top grid">
<label class="title col-0" style="color:red" wx:if="{{item.must}}">*</label>
<label class="title col-0" wx:else> </label>
<input class="input_base input_h30 col-1" placeholder='{{item.placeholder}}' wx:if="{{item.type === type_input}}" name="{{item.id}}" value="{{bean[item.id]}}"></input>
<view class="input_base input_h30 col-1" wx:elif="{{item.id === id_sex}}" hover-class='btn_ok_hover' bindtap='{{item.event}}'>{{sexDefault}}</view>
<view class="input_base input_h30 col-1" wx:elif="{{item.id === id_group}}" hover-class='btn_ok_hover' bindtap='{{item.event}}'>{{groupDefault}}</view>
</view>
</view>
</view>
</scroll-view>
<button class="btn_ok" hover-class='btn_ok_hover' formType="submit">确定</button>
</form>
</view>Dann die Datei dialog.wxss
/*mask dialog start*/
.drawer_screen {
  width: 100%;
  height: 100%;
  position: fixed;
  top: 0;
  left: 0;
  right:0;
  bottom:0;
  z-index: 1000;
  background: #000;
  opacity: 0.5;
  overflow: hidden;
}

/*content*/

.drawer_box {
  width: 650rpx;
  overflow: hidden;
  position: fixed;
  top: 50%;
  left: 0;
  z-index: 1001;
  background: #fafafa;
  margin: -480rpx 50rpx 0 50rpx;
  border-radius: 6px;
}

.drawer_title {
  padding: 15px;
  font: 20px "microsoft yahei";
  text-align: center;
}

.drawer_content {
  height: 720rpx;
  /*overflow-y: scroll; 超出父盒子高度可滚动*/
}

.btn_ok {
  padding: 10px;
  font: 20px "microsoft yahei";
  text-align: center;
  border-top: 1rpx solid #e8e8ea;
  color: #3cc51f;
}

.btn_ok_hover {
  color: #aaa;
  background: #d9d9d9;
}

.top {
  padding-top: 8px;
}

.input_base {
  border: 2rpx solid #ccc;
  border-radius: 20rpx;
  padding-left: 20rpx;
  margin-right: 20rpx;
}

.input_h30 {
  height: 30px;
  line-height: 30px;
}

.title {
  height: 30px;
  line-height: 30px;
  width: 40rpx;
  text-align: center;
  display: inline-block;
  font: 300 28rpx/30px "microsoft yahei";
}

.grid {
  display: -webkit-box;
  display: box;
}

.col-0 {
  -webkit-box-flex: 0;
  box-flex: 0;
}

.col-1 {
  -webkit-box-flex: 1;
  box-flex: 1;
}

/*mask dialog end*/

.row {
  display: flex;
  flex-direction: row;
}Dann die Datei dialog.js
// components/Dialog/dialog.js
Component({
  options: {
    multipleSlots: true // 在组件定义时的选项中启用多slot支持
  },
  /**
   * 组件的属性列表
   */
  properties: {
    title: { // 属性名
      type: String, // 类型(必填),目前接受的类型包括:String, Number, Boolean, Object, Array, null(表示任意类型)
      value: '标题' // 属性初始值(可选),如果未指定则会根据类型选择一个
    }

  },

  /**
   * 组件的初始数据
   */
  data: {
    // 弹窗显示控制
    isShow: false,
    type_input: "input",
    type_btn: "button",
    id_sex: "sex",
    id_group: "group",
    dataObject: [],
    sexDefault: "男",
    groupDefault: "组织",
    sexArray: ['男', '女'],
    groupArray: ['组织', '群众'],
    bean: {},
  },

  /**
   * 组件的方法列表
   */
  methods: {
    /*
     * 公有方法
     */
    setDataObj(dataObj,beanObj) {
      this.setData({
        dataObject: dataObj,
        bean: beanObj
      })
      if (beanObj.hasOwnProperty("sex") && beanObj.sex != ""){
        this.setData({
          sexDefault: beanObj.sex
        })
      }
      if (beanObj.hasOwnProperty("group") && beanObj.group != "") {
        this.setData({
          groupDefault: beanObj.group
        })
      }
    },
    //隐藏弹框
    hideDialog() {
      this._showOrCloseDialog("close")
    },
    //展示弹框
    showDialog() {
      this._showOrCloseDialog("open")
    },
    /*
     * 内部私有方法建议以下划线开头
     * triggerEvent 用于触发事件
     */

    _formSubmit(e) {
      if ("" === e.detail.value.name) {
        wx.showToast({
          title: '请填写姓名',
          icon: 'none'
        })
        return
      }
      if ("" === e.detail.value.phone) {
        wx.showToast({
          title: '请填写电话',
          icon: 'none'
        })
        return
      }
      this._showOrCloseDialog("close")
      //触发成功回调
      this.triggerEvent("confirmEvent", {
        e: e
      });
    },

    sexButton: function() {
      var that = this;
      wx.showActionSheet({
        itemList: this.data.sexArray,
        success: function(res) {
          console.log(res.tapIndex)
          that.setData({
            sexDefault: that.data.sexArray[res.tapIndex]
          })
        },
        fail: function(res) {
          console.log(res.errMsg)
        }
      })
    },
    groupButton: function() {
      var that = this;
      wx.showActionSheet({
        itemList: this.data.groupArray,
        success: function(res) {
          console.log(res.tapIndex)
          that.setData({
            groupDefault: that.data.groupArray[res.tapIndex]
          })
        },
        fail: function(res) {
          console.log(res.errMsg)
        }
      })
    },
    _showOrCloseDialog: function(currentStatu) {
      var that = this;
      /* 动画部分 */
      // 第1步:创建动画实例
      var animation = wx.createAnimation({
        duration: 200, //动画时长
        timingFunction: "linear", //线性
        delay: 0 //0则不延迟
      });

      // 第2步:这个动画实例赋给当前的动画实例
      this.animation = animation;

      // 第3步:执行第一组动画
      animation.opacity(0).rotateX(-100).step();

      // 第4步:导出动画对象赋给数据对象储存
      that.setData({
        animationData: animation.export()
      })

      // 第5步:设置定时器到指定时候后,执行第二组动画
      setTimeout(function() {
        // 执行第二组动画
        animation.opacity(1).rotateX(0).step();
        // 给数据对象储存的第一组动画,更替为执行完第二组动画的动画对象
        that.setData({
          animationData: animation
        })

        //关闭
        if (currentStatu == "close") {
          that.setData({
            isShow: false
          });
        }
      }.bind(this), 200)

      // 显示
      if (currentStatu == "open") {
        that.setData({
          isShow: true
        });
      }
    }
  },
  //解决滚动穿透问题
  myCatchTouch: function () {
    return
  }
})siehe hier Einige Freunde haben vielleicht gefragt: Sie sind ein Parallelimporteur. Warum unterscheidet sich die js-Dateistruktur von meiner? Sind Sie hier, um uns zu täuschen? Machen Sie sich keine Sorgen, Sir, bitte hören Sie mir zu: Um den Anruf zu vereinfachen, habe ich diesen Dialog in eine Komponente gekapselt. Sie fragen mich, wie man Komponenten kapselt? Bitte wechseln Sie zum offiziellen Tutorial:
https://developers.weixin.qq.com/miniprogram/dev/framework/custom-component/
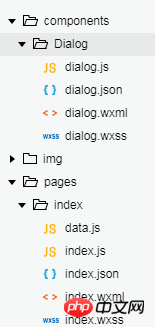
Nachdem die Verpackung abgeschlossen ist, folgt die Projektstruktur lautet wie folgt:

Das Missverständnis wurde hier klar erklärt, bitte geben Sie mir etwas Gesicht und lesen Sie weiter. .
Die drei Könige wurden angezeigt, und es gibt eine dialog.json-Datei, die nicht angezeigt wird. Diese Datei ist sehr einfach.
{
  "component": true,//作为组件
  "usingComponents": {}//引用别的组件
}Diese Datei unterscheidet sich hauptsächlich von der allgemeinen JSON-Datei weil es als konfiguriert ist Die Komponente dient anderen als Referenz, daher wurde die Komponente zu diesem Zeitpunkt gekapselt
Vielleicht können es viele Kinder zu diesem Zeitpunkt kaum erwarten, den Code zu kopieren, einzufügen und dann in den Code einzufügen Projekt, um das tatsächliche Erscheinungsbild zu sehen und die laufenden Ergebnisse und Renderings zu finden. Dann könnten einige Leute sagen: Niang Xipi ist tatsächlich ein Parallelimporteur und ein Lügner! ! ! An dieser Stelle kann ich nur sagen: Liebe Dorfbewohner, Danding, Danding. . . , da es in js keine dataObjects und Beans gibt, daher unterscheidet sich das Rendering von dem, was ich am Anfang des Artikels gezeigt habe. Lassen Sie mich Ihnen sagen, wie Sie es nennen und den gleichen Effekt erzielen wie ich.
Fügen Sie den folgenden Code in die referenzierte XML ein
<image src="../../img/add.png" class="buttom" bindtap="bindAdd"></image> <dialog id='dialog' title='新增' bind:confirmEvent="_confirmEvent"></dialog>
buttom Dies ist eine schwebende Schaltfläche, wxss gibt Ihnen auch
.buttom{
  width: 100rpx;
  height: 100rpx;
  display: flex;
  flex-direction: row;
  position: fixed;
  bottom:60rpx;
  right: 60rpx;
}Verweisen Sie dann auf die js-Datei der Seite
onReady: function() {
    //获得dialog组件
    this.dialog = this.selectComponent("#dialog");
}


//响应button弹框
bindAdd: function(e) {
    this.dialog.setDataObj(addObject, {})
    this.dialog.showDialog();
}An dieser Stelle können Sie grundsätzlich auf die schwebende Schaltfläche klicken, um das Popup-Fenster zu öffnen. Ein paar vollbusige Dei sagten noch einmal: Hey, hey, warte, addObject und die add.png wurden noch nicht gegeben. Okay, gib es, gib es dir
const addObject = [{
  id: "name",
  must: true,
  placeholder: "姓名",
  type: "input",
  event: "nameInput"
},
{
  id: "sex",
  must: true,
  placeholder: "男",
  type: "button",
  event: "sexButton"
},
{
  id: "group",
  must: true,
  placeholder: "组织",
  type: "button",
  event: "groupButton"
},
{
  id: "phone",
  must: true,
  placeholder: "电话号码",
  type: "input",
  event: "phoneInput"
},
{
  id: "shortNum",
  must: false,
  placeholder: "集团短号",
  type: "input",
  event: "shortNumInput"
},
{
  id: "mail",
  must: false,
  placeholder: "电子邮箱",
  type: "input",
  event: "mailInput"
},
{
  id: "unit",
  must: false,
  placeholder: "单位名称",
  type: "input",
  event: "unitInput"
},
{
  id: "department",
  must: false,
  placeholder: "部门名称",
  type: "input",
  event: "departmentInput"
},
{
  id: "job",
  must: false,
  placeholder: "职务",
  type: "input",
  event: "jobInput"
},
{
  id: "function",
  must: false,
  placeholder: "涉及工作内容",
  type: "input",
  event: "functionInput"
},
{
  id: "comPhone",
  must: false,
  placeholder: "办公电话",
  type: "input",
  event: "comPhoneInput"
},
{
  id: "fax",
  must: false,
  placeholder: "传真",
  type: "input",
  event: "faxInput"
},
{
  id: "homePhone",
  must: false,
  placeholder: "家庭电话",
  type: "input",
  event: "homePhoneInput"
},
{
  id: "showOrder",
  must: false,
  placeholder: "显示顺序",
  type: "input",
  event: "showOrderInput"
},
{
  id: "departOrder",
  must: false,
  placeholder: "部门顺序",
  type: "input",
  event: "departOrderInput"
},
{
  id: "remark",
  must: false,
  placeholder: "备注",
  type: "input",
  event: "remarkInput"
}
]Bilder

An diesem Punkt solltest du in der Lage sein, den gleichen Effekt wie ich zu erzielen, mach weiter und spiel damit.
Verwandte Artikel:
WeChat-Applet – selbst Definitionserstellung
Ähnliche Videos:
WeChat-Applet-Entwicklung vom Einstieg bis zur Beherrschung, Video-Tutorial
Das obige ist der detaillierte Inhalt vonDetaillierte Erläuterung einer angepassten WeChat-Applet-Komponente (modale Popup-Komponente). Für weitere Informationen folgen Sie bitte anderen verwandten Artikeln auf der PHP chinesischen Website!

Heiße KI -Werkzeuge

Undresser.AI Undress
KI-gestützte App zum Erstellen realistischer Aktfotos

AI Clothes Remover
Online-KI-Tool zum Entfernen von Kleidung aus Fotos.

Undress AI Tool
Ausziehbilder kostenlos

Clothoff.io
KI-Kleiderentferner

Video Face Swap
Tauschen Sie Gesichter in jedem Video mühelos mit unserem völlig kostenlosen KI-Gesichtstausch-Tool aus!

Heißer Artikel

Heiße Werkzeuge

Notepad++7.3.1
Einfach zu bedienender und kostenloser Code-Editor

SublimeText3 chinesische Version
Chinesische Version, sehr einfach zu bedienen

Senden Sie Studio 13.0.1
Leistungsstarke integrierte PHP-Entwicklungsumgebung

Dreamweaver CS6
Visuelle Webentwicklungstools

SublimeText3 Mac-Version
Codebearbeitungssoftware auf Gottesniveau (SublimeText3)

Heiße Themen
 1666
1666
 14
14
 1425
1425
 52
52
 1325
1325
 25
25
 1273
1273
 29
29
 1252
1252
 24
24

