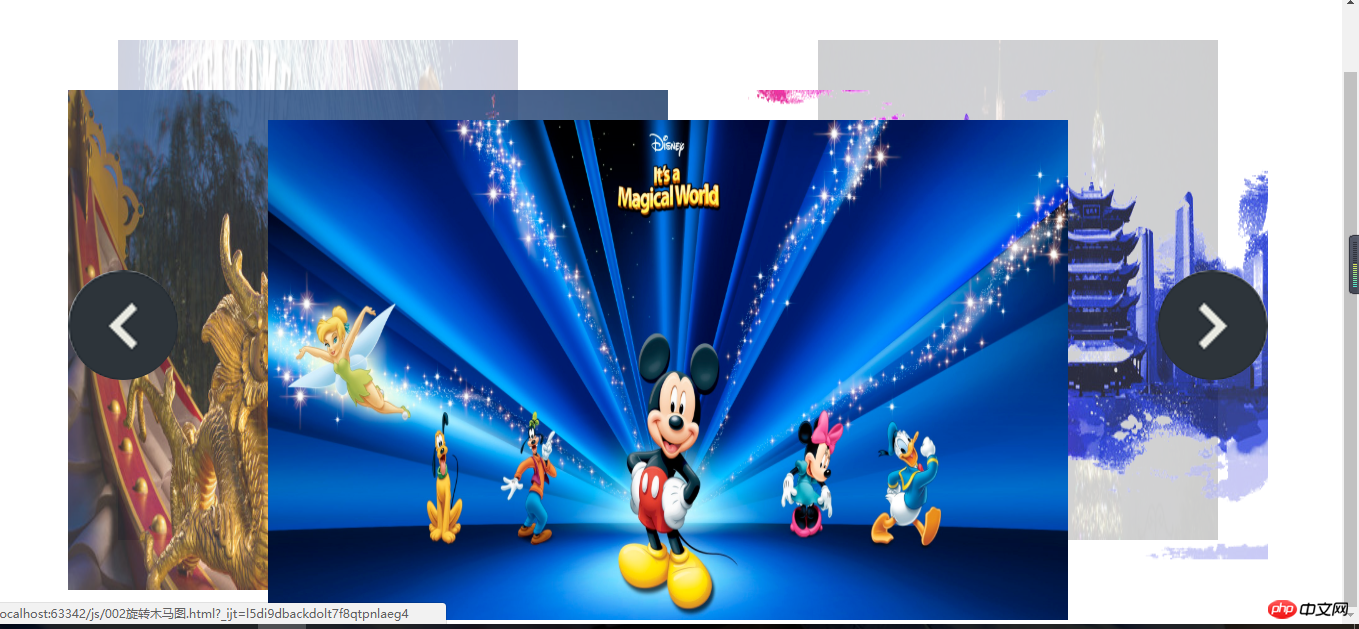
Der Inhalt dieses Artikels befasst sich mit dem Animationseffekt des nativen JS-Karussell-Renderings (mit Code). Ich hoffe, dass er für Sie hilfreich ist.
Natives JS-Karussell
Heute habe ich einen Karussell-JS-Effekt geschrieben, der in nativem JS geschrieben ist.
Implementierungsprinzip:
1. Erstellen Sie ein Array und schreiben Sie den entsprechenden Z-Index, die Deckkraft, die Oberseite und die Breite für jedes Bild.
2 Der erste Wertesatz im Array wird im letzten Satz platziert und beim Klicken auf die Schaltfläche einmal ausgeführt.
Display-Rendering: 
HTML-Layout:
<p class="wrap" id="wrap">
    <p class="slide" id="slide">
        <ul>
            <li><a href=""><img src="/static/imghw/default1.png"  data-src="images/logo.png"  class="lazy"      style="max-width:90%"  style="max-width:90%" alt=""></a></li>
            <li><a href=""><img src="/static/imghw/default1.png"  data-src="images/slide.jpg"  class="lazy"      style="max-width:90%"  style="max-width:90%" alt=""></a></li>
            <li><a href=""><img src="/static/imghw/default1.png"  data-src="images/slide2.jpg"  class="lazy"      style="max-width:90%"  style="max-width:90%" alt=""></a></li>
            <li><a href=""><img src="/static/imghw/default1.png"  data-src="images/i1.jpg"  class="lazy"      style="max-width:90%"  style="max-width:90%" alt=""></a></li>
            <li><a href=""><img src="/static/imghw/default1.png"  data-src="images/sto.jpg"  class="lazy"      style="max-width:90%"  style="max-width:90%" alt=""></a></li>
        </ul>
        <p class="arrow" id="arrow">
            <a href="javascript:;" id="arrLeft" class="prev"></a>
            <a href="javascript:;" id="arrRight" class="next"></a>
        </p>
</p></p>CSS-Stil:
* {            margin: 0;            padding: 0;        }

        ul {            list-style: none;        }

        .wrap {            width: 1200px;            margin: 100px auto;        }

        .slide {            height: 500px;            position: relative;            width: 1200px;        }

        .slide ul li {            position: absolute;            top: 0;            left: 0;            z-index: 1;        }

        .slide li img {            width: 100%;        }

        .arrow {            position: absolute;            width: 100%;            top: 50%;            opacity: 0;            z-index: 3;        }

        .prev,        .next {            position: absolute;            height: 110px;            width: 110px;            border-radius: 50%;            top: 50%;            //margin-top: -56px;            overflow: hidden;            text-decoration: none;        }
        .prev{            left: 0;            background: url("images/slider-icons.png") no-repeat left top;        }
.next{ right: 0; background: url("images/slider-icons.png") no-repeat right top; }JS-Teil:
Als nächstes speichern wir zunächst den Stil des entsprechenden Bildes in einem Array.
//写每张图片对应的样式
    var config = [
        {            "width": 400,            "top": 20,            "left": 50,            "opacity": 0.2,            "zIndex": 2
        },      //0
        {            "width": 600,            "top": 70,            "left": 0,            "opacity": 0.8,            "zIndex": 3
        },     //1
        {            "width": 800,            "top": 100,            "left": 200,            "opacity": 1,            "zIndex": 4
        },     //2
        {            "width": 600,            "top": 70,            "left": 600,            "opacity": 0.8,            "zIndex": 3
        },    //3
        {            "width": 400,            "top": 20,            "left": 750,            "opacity": 0.2,            "zIndex": 2
        }    //4
];Wenn die Seite geladen wird, werden die Bilder verstreut, das heißt, das gerade erstellte Array wird aufgerufen und jedem Bild einzeln zugewiesen
var list=my$("slide").getElementsByTagName("li"); //拿到所有li
        function assign() {    //分配函数
            for (var i=0;i<list.length;i++){
                animate(list[i],config[i],function () {
                    flag=true;
                });
            }
        }
assign();Es bleibt übrig und Rechtspfeile beim Ein- und Ausblenden, das Prinzip der Tastendrehung besteht darin, den ersten Teil des Arrays in den letzten oder die letzte Gruppe in den ersten zu ändern. Das Flag soll steuern, wann auf die Schaltfläche geklickt wird, um sicherzustellen, dass eine Reihe von Animationen abgeschlossen ist, bevor die nächste Rotationsanimation fortgesetzt werden kann.
//鼠标进入,左右焦点的p显示
        my$("wrap").onmouseover=function () {
            animate(my$("arrow"),{"opacity":1});
        };        //鼠标离开,左右焦点的p隐藏
        my$("wrap").onmouseout=function () {
            animate(my$("arrow"),{"opacity":0});
        };        //点击右边按钮事件
        my$("arrRight").onclick=function () {
            if (flag){
                flag=false;
                config.push(config.shift());     //把第一组值放到最后一组

                assign();
            }

        };        //点击左边按钮事件
        my$("arrLeft").onclick=function () {
            if (flag){
                flag=false;
                config.unshift(config.pop());   //把最后一组值放到第一组
                assign();
            }
        };
};Vollständiger JS-Code:
<script>
//变速动画函数
function animate(element, json, fn) {
clearInterval(element.timeId); //清理定时器
element.timeId = setInterval(function () {
var flag = true; //假设默认为当前值已经等于目标值
for (var arrt in json) { if (arrt == "opacity") { //如果属性值为opacity
var current = getStyle(element, arrt) * 100; //current和target先扩大100倍
target = json[arrt] * 100; var step = (target - current) / 10;
step = step > 0 ? Math.ceil(step) : Math.floor(step);
current += step;
element.style[arrt] = current / 100; //运算完后缩小100倍
} else if (arrt == "zIndex") { //如果属性值为zindex
element.style[arrt] = json[arrt];
} else { //普通属性
var current = parseInt(getStyle(element, arrt));
target = json[arrt]; var step = (target - current) / 10;
step = step > 0 ? Math.ceil(step) : Math.floor(step); //step大于零向上取整,小于零向下取整
current += step;
element.style[arrt] = current + "px";
} if (current != target) {
flag = false;
}
} if (flag) { //只有所有属性的当前值已经等于目标值,才清理定时器
clearInterval(element.timeId); if (fn) { //回调函数
fn();
}
}
console.log("当前位置:" + current + "目标位置:" + target + " 移动步数:" + step); //测试函数
}, 20);
} function getStyle(element, arrt) {
return window.getComputedStyle ? window.getComputedStyle(element, null)[arrt] : element.currentStyle[arrt];
} function my$(id) {
return document.getElementById(id);
} //写每张图片对应的样式
var config = [
{ "width": 400, "top": 20, "left": 50, "opacity": 0.2, "zIndex": 2
}, //0
{ "width": 600, "top": 70, "left": 0, "opacity": 0.8, "zIndex": 3
}, //1
{ "width": 800, "top": 100, "left": 200, "opacity": 1, "zIndex": 4
}, //2
{ "width": 600, "top": 70, "left": 600, "opacity": 0.8, "zIndex": 3
}, //3
{ "width": 400, "top": 20, "left": 750, "opacity": 0.2, "zIndex": 2
} //4
]; var flag=true; //假设动画全部执行完毕-----锁
//页面加载的事件
window.onload=function () {
//1---散开图片
var list=my$("slide").getElementsByTagName("li"); //拿到所有li
function assign() { //分配函数
for (var i=0;i<list.length;i++){
animate(list[i],config[i],function () {
flag=true;
});
}
}
assign(); //鼠标进入,左右焦点的p显示
my$("wrap").onmouseover=function () {
animate(my$("arrow"),{"opacity":1});
}; //鼠标离开,左右焦点的p隐藏
my$("wrap").onmouseout=function () {
animate(my$("arrow"),{"opacity":0});
}; //点击右边按钮事件
my$("arrRight").onclick=function () {
if (flag){
flag=false;
config.push(config.shift()); //把第一组值放到最后一组
assign();
}
}; //点击左边按钮事件
my$("arrLeft").onclick=function () {
if (flag){
flag=false;
config.unshift(config.pop()); //把最后一组值放到第一组
assign();
}
};
};</script>Verwandte Empfehlungen:
Javascript-Bildkomprimierungscode
Javascript implementiert Code-Sharing für die Provinz- und StadtverknüpfungDas obige ist der detaillierte Inhalt vonAnimationseffekt nativer JS-Karussell-Renderings (mit Code). Für weitere Informationen folgen Sie bitte anderen verwandten Artikeln auf der PHP chinesischen Website!
 Was bedeutet OEM?
 Oracle fügt Trigger-Methode hinzu
 So reparieren Sie das Win7-System, wenn es beschädigt ist und nicht gestartet werden kann
 Die Rolle der Server-Netzwerkkarte
 Über Seiten verteilte Worttabelle
 Zuweisungsmethode für String-Arrays
 Einführung in die Hauptarbeitsinhalte des Backends
 Was bedeutet TS-Version?
 Der Unterschied zwischen der Win10-Home-Version und der Professional-Version