 Web-Frontend
 CSS-Tutorial
 So erstellen Sie mit HTML5 + CSS3 12 häufig verwendete Schaltflächenschalterstile (vollständiger Code im Anhang)
So erstellen Sie mit HTML5 + CSS3 12 häufig verwendete Schaltflächenschalterstile (vollständiger Code im Anhang)
Heutzutage wird bei der Entwicklung von Front-End-Webseiten immer mehr Wert auf den Sinn für Design gelegt, und dieser Sinn für Design spiegelt sich mehr in den Details wider. Heute werde ich Ihnen detailliert vorstellen, wie verschiedene Schalterschaltflächen hergestellt werden Ich hoffe, Sie können allen helfen.
Das Prinzip der Verwendung von HTML5 + CSS3 zum Erstellen von Tastenschaltern
Füllen Sie verschiedene Farben entsprechend den Anforderungen des Design.
Die Form des Knopfschalters erfordert eine detaillierte Analyse spezifischer Probleme. Beispielsweise muss der runde Knopfschalter die Randradius-Anweisung verwenden, und der quadratische Knopfschalter kann Verwenden Sie direkt Div-Einstellungen usw.
-
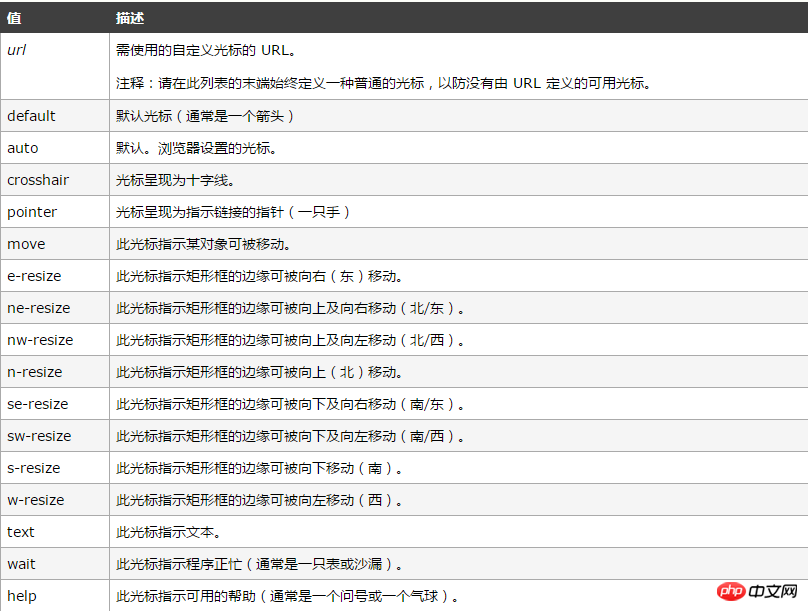
Die Konvertierung des Cursorstils beim Schweben der Maus spiegelt auch den Fokus auf Design wider. Hier konzentrieren wir uns auf die Verwendung des Cursors:
Der Cursor Das Attribut gibt den anzuzeigenden Cursor an. Dieses Attribut definiert die Cursorform, die verwendet wird, wenn der Mauszeiger innerhalb der Grenzen eines Elements platziert wird. Gemäß W3C-Standards sind fast alle Browser auf dem Markt mit dem Cursorattribut kompatibel Machen Sie sich keine Sorgen über Kompatibilitätsprobleme mit Browsern.
Die Verwendung des Cursor-Attributs ist in der folgenden Tabelle dargestellt

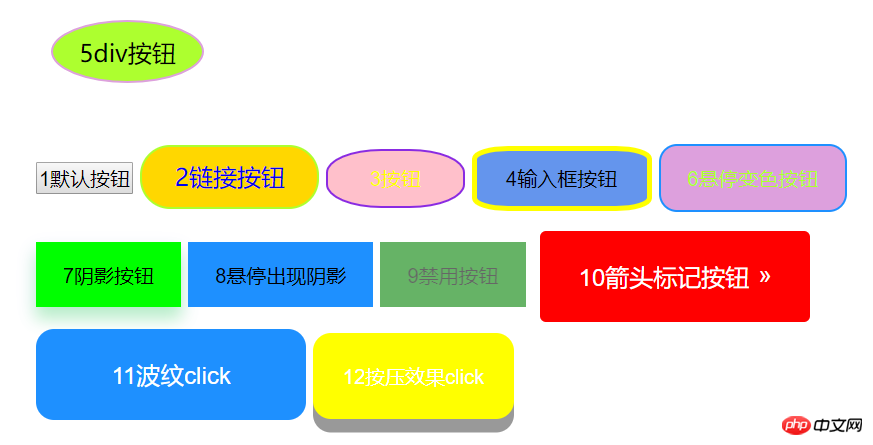
Die in diesem Artikel gezeigten 12 Tastenschalterstile sind : Div-Schaltfläche, Standardschaltfläche, Link-Schaltfläche, abgerundete Schaltfläche, Eingabefeld-Schaltfläche, Farbänderungsschaltfläche beim Hover, Schattenschaltfläche, Schaltfläche „Erscheinen“ beim Hover, deaktivierte Schaltfläche, Pfeilmarkierungsschaltfläche, Ripple-Schaltfläche und Schaltfläche „Drücken Sie den Effekt“.
Code zum Erstellen von Tastenschaltern mit HTML5+CSS3
<!DOCTYPE html>
<html>
<head>
<meta charset="UTF-8">
<title>各式各样的按钮</title>
<style type="text/css">
*{
margin: 0;
padding: 0;
}
.wrap{
width: 600px;
height: 400px;
margin: 0 auto;
/*background: pink;*/
padding: 30px 50px;
}
/*div按钮*/
.button5{
width: 100px;
height: 30px;
float: left;
/*position: absolute;*/
text-align: center;
padding-top: 10px;
margin:0px 10px ;
background: greenyellow;
border: 1px solid plum;
cursor: pointer;
border-radius: 50%;
}
/*链接按钮*/
.button2{
background: gold;
border: 1px solid greenyellow;
text-decoration: none;
display: inline-block;
padding: 10px 22px;
border-radius: 20px;
/*cursor: pointer;靠近按钮的一只手*/
}
/*按钮*/
.button3{
background: pink;
border: 1px solid blueviolet;
padding: 10px 28px;
cursor: pointer;
color: yellow;
border-radius: 40%;
}
/*输入框按钮*/
.button4{
background: cornflowerblue;
border: 3px solid yellow;
padding: 10px 20px;
border-radius: 20%;
outline-style: none;/*去除点击时外部框线*/
}
/*悬停变色按钮*/
.button6{
background: plum;
color: greenyellow;
border: 1px solid dodgerblue;
transition-duration: 1s;/*过渡时间*/
border-radius: 12px;
padding: 13px 18px;
margin-top: 20px;
outline-style: none;/*去除点击时外部框线*/
}
.button6:hover{
background: yellow;
color: magenta;
transition-duration: 1s;
}
/*阴影按钮*/
.button7{
/*display: inline-block;*/
border: none;
background: lime;
padding: 13px 18px;
margin-top: 20px;
/*outline-style: none;!*去除点击时外部框线*!*/
/*-webkit-transition-duration: 0.6s;*/
transition-duration: 0.6s;
/*设置按钮阴影*/
box-shadow: 0 8px 16px 0 rgba(0,255,0,0.2),0 6px 20px 0 rgba(0,0,255,0.1);
}
/*悬停出现阴影按钮*/
.button8{
border: none;
background: dodgerblue;
padding: 13px 18px;
margin-top: 20px;
transition-duration: 0.6s;
}
.button8:hover{
box-shadow: 0 12px 16px 0 rgba(0,255,0,0.24),0 17px 50px 0 rgba(0,0,255,0.19);
}
/*禁用按钮*/
.button9{
border: none;
background: green;
padding: 13px 18px;
margin-top: 20px;
opacity: 0.6;/*设置按钮的透明度*/
cursor: not-allowed;/*设置按钮为禁用状态*/
}
/*箭头标记按钮*/
.button10{
display: inline-block;
border: none;
background: red;
color: white;
padding: 20px;
text-align: center;
border-radius: 4px;
width: 180px;
font-size: 16px;/*可以通过字体控制button大小*/
transition: all 0.5s;
margin: 5px;
cursor: pointer;
}
.button10 span{
cursor: pointer;
display: inline-block;
position: relative;
transition: 0.5s;
}
.button10 span:after{
content: '»';
color: white;
position: absolute;
opacity: 0;/*先设置透明度为0,即不可见*/
right:-20px;/*新增箭头出来的方向*/
transition: 0.5s;
}
.button10:hover span{
padding-right: 15px;/*新增箭头与前面文字的距离*/
}
.button10:hover span:after{
opacity: 1;/*设置透明度为1,即可见状态*/
right: 0;
}
/*点击出现波纹效果按钮*/
.button11{
position: relative;/*必须添上这一句,否则波纹布满整个页面*/
background: dodgerblue;
border: none;
color: white;
width: 180px;
font-size: 16px;/*可以通过字体控制button大小*/
padding: 20px;
border-radius: 12px;
transition-duration: 0.4s;
overflow: hidden;
outline-style: none;/*去除点击时外部框线*/
}
.button11:after{
content:"";
background: aquamarine;
opacity: 0;
display: block;
position: absolute;
padding-top: 300%;
padding-left: 350%;
margin-left: -20px!important;
margin-top: -120%;
transition: all 0.5s;
}
.button11:active:after{
padding: 0;
margin: 0;
opacity: 1;
transition: 0.1s;
}
/*点击出现按压效果*/
.button12{
outline-style: none;/*去除点击时外部框线*/
padding: 20px;
color: white;
background: yellow;
border: none;
border-radius: 12px;
box-shadow: 0px 9px 0px rgba(144,144,144,1),0px 9px 25px rgba(0,0,0,.7);
}
.button12:hover{
background: gold;
}
.button12:active{
background: gold;
box-shadow: 0 5px #666;
transform: translateY(4px);
transition-duration: 0s;/*过渡效果持续时间*/
}
</style>
</head>
<body>
<div>
<div>5div按钮</div>
<p style="clear: both"><br></p>
<button>1默认按钮</button>
<a href="#">2链接按钮</a>
<button>3按钮</button>
<input type="button" value="4输入框按钮">
<button>6悬停变色按钮</button>
<button>7阴影按钮</button>
<button>8悬停出现阴影</button>
<button>9禁用按钮</button>
<button style="vertical-align: middle"><span>10箭头标记按钮</span></button>
<button>11波纹click</button>
<button>12按压效果click</button>
</div>
</body>
</html>Der Tastenschalterstil ist wie folgt Wie im Bild gezeigt

Das obige ist der detaillierte Inhalt vonSo erstellen Sie mit HTML5 + CSS3 12 häufig verwendete Schaltflächenschalterstile (vollständiger Code im Anhang). Für weitere Informationen folgen Sie bitte anderen verwandten Artikeln auf der PHP chinesischen Website!

Heiße KI -Werkzeuge

Undresser.AI Undress
KI-gestützte App zum Erstellen realistischer Aktfotos

AI Clothes Remover
Online-KI-Tool zum Entfernen von Kleidung aus Fotos.

Undress AI Tool
Ausziehbilder kostenlos

Clothoff.io
KI-Kleiderentferner

AI Hentai Generator
Erstellen Sie kostenlos Ai Hentai.

Heißer Artikel

Heiße Werkzeuge

Notepad++7.3.1
Einfach zu bedienender und kostenloser Code-Editor

SublimeText3 chinesische Version
Chinesische Version, sehr einfach zu bedienen

Senden Sie Studio 13.0.1
Leistungsstarke integrierte PHP-Entwicklungsumgebung

Dreamweaver CS6
Visuelle Webentwicklungstools

SublimeText3 Mac-Version
Codebearbeitungssoftware auf Gottesniveau (SublimeText3)

Heiße Themen
 1378
1378
 52
52
 So beheben Sie den weißen Bildschirm von Microsoft Teams
Apr 17, 2023 pm 05:07 PM
Starten Sie Microsoft Teams neu. Wenn nach dem Start von Teams ein leerer Bildschirm angezeigt wird, ist ein Neustart der App selbst ein guter Anfang. So schließen Sie Microsoft Teams und starten es neu: Klicken Sie mit der rechten Maustaste auf das Teams-Symbol im Infobereich der Taskleiste und klicken Sie im Menü auf Beenden. Starten Sie Microsoft Teams über das Startmenü oder die Desktop-Verknüpfung neu und prüfen Sie, ob es funktioniert. Schließen Sie Microsoft Teams über den Task-Manager. Wenn ein einfacher Neustart des Teams-Prozesses nicht funktioniert, rufen Sie den Task-Manager auf und beenden Sie die Aufgabe. Gehen Sie wie folgt vor, um Teams über den Task-Manager zu schließen
 Was ist die Windows-Sicherheitsschaltfläche? Alles was Sie wissen müssen
Apr 13, 2023 pm 10:22 PM
Was ist die Windows-Sicherheitsschaltfläche? Wie der Name schon sagt, handelt es sich bei der Windows-Sicherheitsschaltfläche um eine Sicherheitsfunktion, mit der Sie sicher auf das Anmeldemenü zugreifen und sich mit einem Kennwort bei Ihrem Gerät anmelden können. In diesem Fall haben Smartphones definitiv die Nase vorn. Aber tragbare Windows-Geräte wie Tablets haben damit begonnen, eine Windows-Sicherheitsschaltfläche hinzuzufügen, die mehr als nur eine Möglichkeit ist, unerwünschte Benutzer fernzuhalten. Es bietet außerdem zusätzliche Anmeldemenüoptionen. Wenn Sie jedoch versuchen, die Windows-Sicherheitsschaltfläche auf Ihrem Desktop-PC oder Laptop zu finden, werden Sie möglicherweise enttäuscht. Warum ist das so? Tablets vs. PCs Die Windows-Sicherheitstaste ist eine physische Taste, die auf Tablets vorhanden ist
 5 Möglichkeiten zum Deaktivieren des Übermittlungsoptimierungsdienstes in Windows
May 17, 2023 am 09:31 AM
Es gibt viele Gründe, warum Sie den Übermittlungsoptimierungsdienst auf Ihrem Windows-Computer deaktivieren möchten. Unsere Leser beschweren sich jedoch darüber, dass sie die richtigen Schritte nicht kennen. In dieser Anleitung wird erläutert, wie Sie den Lieferoptimierungsdienst in wenigen Schritten deaktivieren können. Um mehr über Dienste zu erfahren, lesen Sie vielleicht unsere Anleitung zum Öffnen von „services.msc“ für weitere Informationen. Was macht der Lieferoptimierungsdienst? Delivery Optimization Service ist ein HTTP-Downloader mit Cloud-Hosting-Lösung. Es ermöglicht Windows-Geräten, Windows-Updates, Upgrades, Anwendungen und andere große Paketdateien von alternativen Quellen herunterzuladen. Darüber hinaus trägt es dazu bei, den Bandbreitenverbrauch zu reduzieren, indem es mehreren Geräten in einer Bereitstellung ermöglicht, diese Pakete herunterzuladen. Außerdem Windo
 So starten Sie das iPad Mini 6 neu, erzwingen einen Neustart und fahren es herunter
Apr 29, 2023 pm 12:19 PM
So erzwingen Sie einen Neustart des iPad Mini 6. Das Erzwingen eines Neustarts des iPad Mini 6 erfolgt durch eine Reihe von Tastendrücken und funktioniert folgendermaßen: Drücken und loslassen, um die Lautstärke zu erhöhen. Drücken und loslassen, um die Lautstärke zu verringern. Drücken Sie die Ein-/Aus-/Sperrtaste und lassen Sie sie los, bis Sie Folgendes sehen: Apple-Logo, das darauf hinweist, dass das iPad Mini zwangsweise neu gestartet wurde. Das ist alles. Der erzwungene Neustart wird normalerweise aus Gründen der Fehlerbehebung verwendet, z. B. wenn das iPad Mini einfriert, Apps einfrieren oder ein anderes allgemeines Fehlverhalten auftritt. Beim Verfahren zum erzwungenen Neustart des iPad Mini der 6. Generation ist zu beachten, dass es auch für alle anderen Geräte gilt, die über ultradünne Rahmen verfügen und diese verwenden
 Nach dem Umschreiben:
So beheben Sie, dass der PS5-Controller unter Windows 11 nicht erkannt wird
May 09, 2023 pm 10:16 PM
<h3>Was sollte ich über den Anschluss meines PS5-Controllers wissen? </h3><p>So gut der DualSense-Controller auch ist, es gab Berichte darüber, dass der Controller keine Verbindung herstellte oder nicht erkannt wurde. Der einfachste Weg, dieses Problem zu lösen, besteht darin, den Controller über ein entsprechendes USB-Kabel mit Ihrem PC zu verbinden. </p><p>Einige Spiele unterstützen DualSense nativ. In diesen Fällen können Sie den Controller einfach einstecken. Dies wirft jedoch andere Fragen auf, z. B. was, wenn Sie kein USB-Kabel haben oder keins verwenden möchten
 Wie lösche ich den Download-Verlauf des Microsoft Edge-Browsers?
Apr 21, 2023 am 09:34 AM
<ul><li><strong>Klicken Sie hier, um Folgendes aufzurufen:</strong>ChatGPT-Tool-Plug-in-Navigation</li></ul><h2>Download-Verlauf in Edge suchen und löschen</h2> ;<p>Edge verfügt wie andere Browser über einen<strong>Download
![Ändern Sie die Aktion des Netzschalters unter Windows 11 [5 Tipps]](https://img.php.cn/upload/article/000/887/227/169600135086895.png?x-oss-process=image/resize,m_fill,h_207,w_330) Ändern Sie die Aktion des Netzschalters unter Windows 11 [5 Tipps]
Sep 29, 2023 pm 11:29 PM
Ändern Sie die Aktion des Netzschalters unter Windows 11 [5 Tipps]
Sep 29, 2023 pm 11:29 PM
Der Netzschalter kann mehr als nur Ihren PC herunterfahren, obwohl dies die Standardaktion für Desktop-Benutzer ist. Wenn Sie die Power-Button-Aktion in Windows 11 ändern möchten, ist das einfacher als Sie denken! Beachten Sie, dass sich der physische Netzschalter von der Schaltfläche im Startmenü unterscheidet und die folgenden Änderungen keinen Einfluss auf die Funktion des letzteren haben. Darüber hinaus gibt es leicht unterschiedliche Energieoptionen, je nachdem, ob es sich um einen Desktop-PC oder einen Laptop handelt. Warum sollten Sie die Power-Button-Aktion in Windows 11 ändern? Wenn Sie Ihren Computer häufiger in den Ruhezustand versetzen als herunterfahren, reicht es aus, das Verhalten Ihres Hardware-Netzschalters (d. h. des physischen Netzschalters an Ihrem PC) zu ändern. Die gleiche Idee gilt für den Schlafmodus oder das einfache Ausschalten des Displays. Windows 11 ändern
 So implementieren Sie mit Vue Schaltflächen-Countdown-Effekte
Sep 21, 2023 pm 02:03 PM
So verwenden Sie Vue zum Implementieren von Button-Countdown-Effekten Mit der zunehmenden Beliebtheit von Webanwendungen müssen wir häufig einige dynamische Effekte verwenden, um die Benutzererfahrung zu verbessern, wenn Benutzer mit der Seite interagieren. Unter diesen ist der Countdown-Effekt der Taste ein sehr häufiger und praktischer Effekt. In diesem Artikel wird die Verwendung des Vue-Frameworks zum Implementieren von Button-Countdown-Effekten vorgestellt und spezifische Codebeispiele gegeben. Zuerst müssen wir eine Vue-Komponente erstellen, die eine Schaltfläche und eine Countdown-Funktion enthält. In Vue ist eine Komponente eine wiederverwendbare Vue-Instanz, und eine Ansicht ist dies


