Machen Sie sich mit den Prinzipien der Javascript-Vererbung vertraut!
Der Inhalt dieses Artikels soll Ihnen helfen, die Prinzipien der Javascript-Vererbung gründlich zu verstehen! Es hat einen gewissen Referenzwert. Freunde in Not können sich darauf beziehen. Ich hoffe, es wird Ihnen hilfreich sein.
Bevor Sie die Vererbung verstehen, müssen Sie drei Dinge über js wissen:
Was ist die JS-Prototypkette
dieses Welchen Wert hat das Neue in JS?
Wir wissen, dass JS Objekte hat, wie zum Beispiel -
var obj = { name: 'obj' }Nach dem Login kopierenWir drucken obj über die Konsole aus:
Dann ist die Frage: Woher kommt valueOf / toString / Konstruktor? Wir haben obj.valueOf keinen Wert zugewiesen.
Das obige Bild ist etwas schwer zu verstehen. Ich habe ein schematisches Diagramm von Hand gezeichnet: 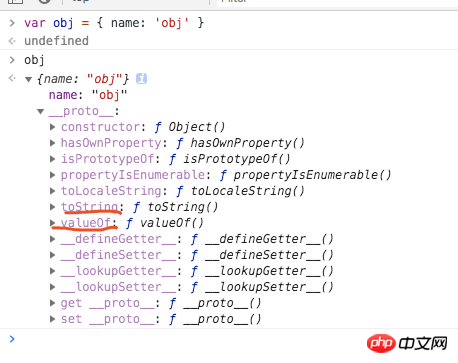
Wir haben es gefunden dass die Konsole es eingegeben hat. Das Ergebnis ist:
obj selbst hat einen Attributnamen (das haben wir hinzugefügt)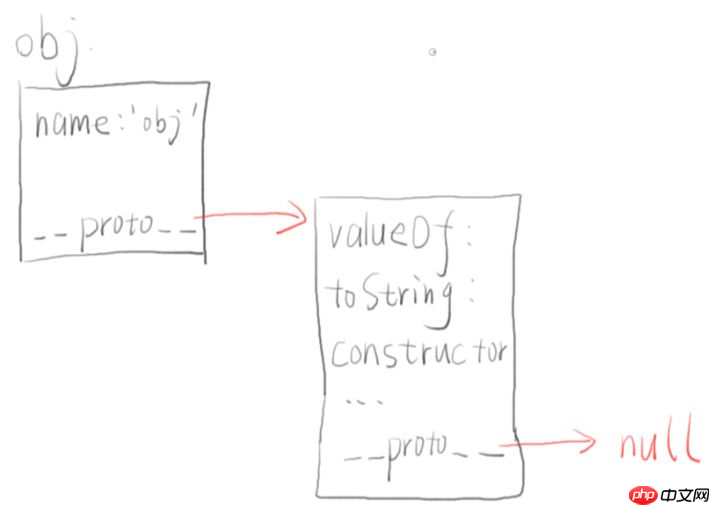
obj hat auch ein Attribut namens __proto__ (Es ist ein Objekt)
obj hat auch ein Attribut, einschließlich valueOf, toString, Konstruktor usw.
obj.__proto__ hat tatsächlich auch ein Attribut namens __proto__ (console.log wird nicht angezeigt), der Wert ist null
Nun zurück zu unserer Frage: Warum hat obj diese Attribute valueOf? / toString / Konstruktor?
- Antwort: Dies hängt mit __proto__ zusammen. Wenn wir obj.toString „lesen“, macht die JS-Engine Folgendes:
Überprüfen Sie, ob das obj-Objekt selbst ein toString-Attribut hat. Wenn nicht, fahren Sie mit dem nächsten Schritt fort.
Überprüfen Sie, ob das obj.__proto__-Objekt ein toString-Attribut hat, und haben Sie festgestellt, dass obj.__proto__ ein toString-Attribut hat, also haben wir es gefunden, also ist obj.toString tatsächlich das obj .__proto__ wurde in Schritt 2 gefunden. .toString.
Wenn obj.__proto__ nicht vorhanden ist, zeigt der Browser weiterhin obj.__proto__.__proto__ an
Wenn obj.__proto__.__proto__ ebenfalls Wenn nicht, prüft der Browser weiterhin obj.__proto__.__proto__.__proto__
-
5, bis toString gefunden wird oder
proto null ist. -
Der obige Prozess ist der „Suchprozess“ zum „Lesen“ von Attributen. Und dieser „Suchprozess“ ist mit der Kette aus
Proto verbunden.
Shared Prototype Chain
Jetzt haben wir ein weiteres Objekt var obj2 = { name: 'obj2' }
Um es ganz klar auszudrücken: Wenn wir einen von ihnen ändern __proto__.toString, dann wird sich der andere tatsächlich ändern!
Differenzierung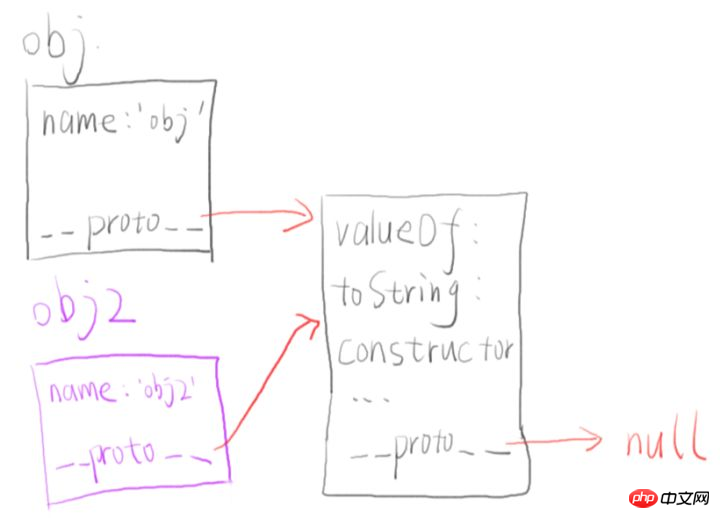 Wenn wir obj.toString und obj2.toString wollen Was was tun, wenn Ihr Verhalten anders ist? Weisen Sie einfach den Wert direkt zu:
obj.toString = function(){ return '新的 toString 方法' }
Zusammenfassung
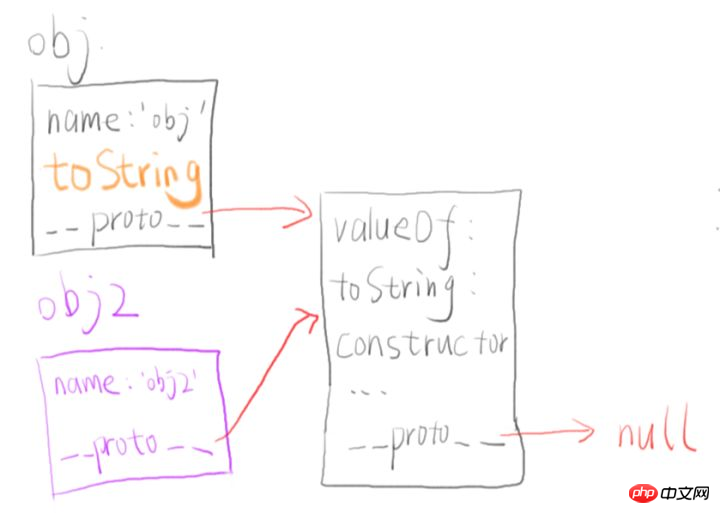 [Lesen] Beim Lesen von Attributen wird entlang der Prototypenkette gesucht
[Neu] Beim Lesen von Attributen wird nicht entlang der Prototypenkette gesucht
-
2. Was ist der Wert von
Möglicherweise sind Sie auf diese JS-Interviewfrage gestoßen: -
var obj = {
  foo: function(){
    console.log(this)
  }
}

var bar = obj.foo
obj.foo() // 打印出的 this 是 obj
bar() // 打印出的 this 是 window
Nach dem Login kopierenBitte erläutern Sie, warum die Werte der Funktionen in den letzten beiden Zeilen unterschiedlich sind .
Funktionsaufruf
Es gibt drei Funktionsaufrufformen in JS (ES5):
func(p1, p2)
obj.child.method(p1, p2)
func.call(context, p1, p2) // 先不讲 apply
Im Allgemeinen kennen Anfänger die ersten beiden Formen und denken, dass die ersten beiden Formen „besser“ sind als die dritte Form.
Die Oma unseres Lehrers Fang Fang sagte, dass Sie sich daran erinnern müssen, dass die dritte Aufrufform die normale Aufrufform ist:func.call(context, p1, p2)
Bisher hat unser Funktionsaufruf nur eine Form:
func.call(context, p1, p2)
Dies ist der Kontext oben.
Dies ist der Kontext, der übergeben wird, wenn Sie eine Funktion aufrufen. Da Sie nie die Aufrufform „Funktionsaufruf“ verwenden, wissen Sie es nie.
Schauen wir uns zunächst an, wie man dies in func(p1, p2) ermittelt:
当你写下面代码时

function func(){
  console.log(this)
}

func()
等价于

function func(){
  console.log(this)
}

func.call(undefined) // 可以简写为 func.call() Logischerweise sollte das gedruckte this undefiniert sein, aber es gibt eine Regel im Browser: 如果你传的 context 就 null 或者 undefined,那么 window 对象就是默认的 context(严格模式下默认 context 是 undefined) 因此上面的打印结果是 window。如果你希望这里的 this 不是 window,很简单: 回到题目: 我们可以把 arr0 想象为arr.0( ),虽然后者的语法错了,但是形式与转换代码里的 obj.child.method(p1, p2) 对应上了,于是就可以愉快的转换了: 假想为 arr.0() 小结: this 就是你 call 一个函数时,传入的第一个参数。 如果你的函数调用不是 call 形式, 请将其转换为 call 形式 我们声明一个士兵,具有如下属性: 我们制造一个士兵, 只需要这样: 如果需要制造 100 个士兵怎么办呢? 如果你重新对「士兵.prototype」赋值,那么这个 constructor 属性就没了,所以你应该这么写: 或者你也可以自己给 constructor 重新赋值: 继承的本质就是上面的讲的原型链 打印结果: 这个主要是借用call 来改变this的指向,通过 call 调用 Parent ,此时 Parent 中的 this 是指 Child1。有个缺点,从打印结果看出 Child1并没有say方法,所以这种只能继承父类的实例属性和方法,不能继承原型属性/方法。 打印: 通过一讲的,我们知道要共享莫些属性,需要 对象.__proto__ = 父亲对象的.prototype,但实际上我们是不能直接 操作__proto__,这时我们可以借用 new 来做,所以 打印: 将 1 和 2 两种方式组合起来,就可以解决1和2存在问题,这种方式为组合继承。这种方式有点缺点就是我实例一个对象的时, 父类 new 了两次,一次是var s3 = new Child3()对应 Child3.prototype = new Parent3()还要new 一次。 这边主要为 Child4.prototype = Parent4.prototype, 因为我们通过构造函数就可以拿到所有属性和实例的方法,那么现在我想继承父类的原型对象,所以你直接赋值给我就行,不用在去 new 一次父类。其实这种方法还是有问题的,如果我在控制台打印以下两句: 咦,你会发现它指向的是父类 ,这显然不是我们想要的结果, 上面讲过我们 prototype里面有一个 constructor, 而我们此时子类的 prototype 指向是 父类的 prototye ,而父类prototype里面的contructor当然是父类自己的,这个就是产生该问题的原因。 这里主要使用Object.create(),它的作用是将对象继承到__proto__属性上。举个例子: 那大家可能说这样解决了吗,其实没有解决,因为这时 Child5.prototype 还是没有自己的 constructor,它要找的话还是向自己的原型对象上找最后还是找到 Parent5.prototype, constructor还是 Parent5 ,所以要给 Child5.prototype 写自己的 constructor:func.call(obj) // 那么里面的 this 就是 obj 对象了
var obj = {
  foo: function(){
    console.log(this)
  }
}

var bar = obj.foo
obj.foo() // 转换为 obj.foo.call(obj),this 就是 obj
bar()
// 转换为 bar.call()
// 由于没有传 context
// 所以 this 就是 undefined
// 最后浏览器给你一个默认的 this —— window 对象[ ] 语法
function fn (){ console.log(this) }
var arr = [fn, fn2]
arr[0]() // 这里面的 this 又是什么呢? arr[0]()
然后转换为 arr.0.call(arr)
那么里面的 this 就是 arr 了 :)
三、JS 的 new 到底是干什么的?
var 士兵 = {
  ID: 1, // 用于区分每个士兵
  兵种:"美国大兵",
  攻击力:5,
  生命值:42,
  行走:function(){ /*走俩步的代码*/},
  奔跑:function(){ /*狂奔的代码*/  },
  死亡:function(){ /*Go die*/    },
  攻击:function(){ /*糊他熊脸*/   },
  防御:function(){ /*护脸*/       }
}兵营.制造(士兵)
循环 100 次吧:

var 士兵们 = []
var 士兵
for(var i=0; i<p>哎呀,看起来好简单</p><h4 id="质疑">质疑</h4><p>上面的代码存在一个问题:浪费了很多内存</p><ol class=" list-paddingleft-2">
<li><p>行走、奔跑、死亡、攻击、防御这五个动作对于每个士兵其实是一样的,只需要各自引用同一个函数就可以了,没必要重复创建 100 个行走、100个奔跑……</p></li>
<li><p>这些士兵的兵种和攻击力都是一样的,没必要创建 100 次。</p></li>
<li><p>只有 ID 和生命值需要创建 100 次,因为每个士兵有自己的 ID 和生命值。</p></li>
</ol><h4 id="改进">改进</h4><p>通过第一节可以知道 ,我们可以通过原型链来解决重复创建的问题:我们先创建一个「士兵原型」,然后让「士兵」的 <strong>proto</strong> 指向「士兵原型」。</p><pre class="brush:php;toolbar:false">var 士兵原型 = {
  兵种:"美国大兵",
  攻击力:5,
  行走:function(){ /*走俩步的代码*/},
  奔跑:function(){ /*狂奔的代码*/  },
  死亡:function(){ /*Go die*/    },
  攻击:function(){ /*糊他熊脸*/   },
  防御:function(){ /*护脸*/       }
}

var 士兵们 = []
var 士兵
for(var i=0; i<h4 id="优雅">优雅?</h4><p>有人指出创建一个士兵的代码分散在两个地方很不优雅,于是我们用一个函数把这两部分联系起来:</p><pre class="brush:php;toolbar:false">function 士兵(ID){
  var 临时对象 = {};
  临时对象.__proto__ = 士兵.原型;
  临时对象.ID = ID;
  临时对象.生命值 = 42;

  return 临时对象;
}

士兵.原型 = {
  兵种:"美国大兵",
  攻击力:5,
  行走:function(){ /*走俩步的代码*/},
  奔跑:function(){ /*狂奔的代码*/  },
  死亡:function(){ /*Go die*/    },
  攻击:function(){ /*糊他熊脸*/   },
  防御:function(){ /*护脸*/       }
}

// 保存为文件:士兵.js

 然后就可以愉快地引用「士兵」来创建士兵了:

var 士兵们 = []
for(var i=0; i<p>JS 之父看到大家都这么搞,觉得何必呢,我给你们个糖吃,于是 JS 之父创建了 new 关键字,可以让我们少写几行代码:</p><p style="text-align: center;"><span class="img-wrap"><img src="/static/imghw/default1.png" data-src="https://img.php.cn//upload/image/223/671/797/1538126235427481.png" class="lazy" title="1538126235427481.png" alt="Machen Sie sich mit den Prinzipien der Javascript-Vererbung vertraut!"></span></p><p><strong>只要你在士兵前面使用 new 关键字,那么可以少做四件事情:</strong></p><ol class=" list-paddingleft-2">
<li><p>不用创建临时对象,因为 new 会帮你做(你使用「this」就可以访问到临时对象);</p></li>
<li><p>不用绑定原型,因为new 会帮你做(new 为了知道原型在哪,所以指定原型的名字 prototype);</p></li>
<li><p>不用 return 临时对象,因为 new 会帮你做;</p></li>
<li><p>不要给原型想名字了,因为 new 指定名字为 prototype。</p></li>
</ol><h4 id="这一次用-new-来写">这一次用 new 来写</h4><pre class="brush:php;toolbar:false">function 士兵(ID){
  this.ID = ID
  this.生命值 = 42
}

士兵.prototype = {
  兵种:"美国大兵",
  攻击力:5,
  行走:function(){ /*走俩步的代码*/},
  奔跑:function(){ /*狂奔的代码*/  },
  死亡:function(){ /*Go die*/    },
  攻击:function(){ /*糊他熊脸*/   },
  防御:function(){ /*护脸*/       }
}

// 保存为文件:士兵.js
然后是创建士兵(加了一个 new 关键字):

var 士兵们 = []
for(var i=0; i<p><strong>new 的作用,就是省那么几行代码。(也就是所谓的语法糖)</strong></p><h4 id="注意-constructor-属性">注意 constructor 属性</h4><p>new 操作为了记录「临时对象是由哪个函数创建的」,所以预先给「士兵.prototype」加了一个 constructor 属性:</p><pre class="brush:php;toolbar:false">士兵.prototype = {
  constructor: 士兵
}士兵.prototype.兵种 = "美国大兵"
士兵.prototype.攻击力 = 5
士兵.prototype.行走 = function(){ /*走俩步的代码*/}
士兵.prototype.奔跑 = function(){ /*狂奔的代码*/ }
士兵.prototype.死亡 = function(){ /*Go die*/ }
士兵.prototype.攻击 = function(){ /*糊他熊脸*/ }
士兵.prototype.防御 = function(){ /*护脸*/ }士兵.prototype = {
constructor: 士兵,
兵种:"美国大兵",
攻击力:5,
行走:function(){ /*走俩步的代码*/},
奔跑:function(){ /*狂奔的代码*/ },
死亡:function(){ /*Go die*/ },
攻击:function(){ /*糊他熊脸*/ },
防御:function(){ /*护脸*/ }
}四、继承
1)借助构造函数实现继承
 function Parent1() {
   this.name = 'parent1';
 }

 Parent1.prototype.say = function () {}

 function Child1() {
   Parent1.call(this);
   this.type = 'child';
 }

 console.log(new Child1);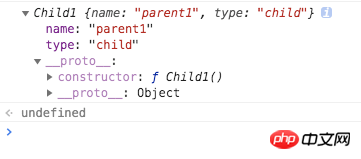
2)借助原型链实现继承
/**
 * 借助原型链实现继承
 */
function Parent2() {
  this.name = 'parent2';
  this.play = [1, 2, 3];
}

function Child2() {
  this.type = 'child2';
}
Child2.prototype = new Parent2();

console.log(new Child2);

var s1 = new Child2();
var s2 = new Child2();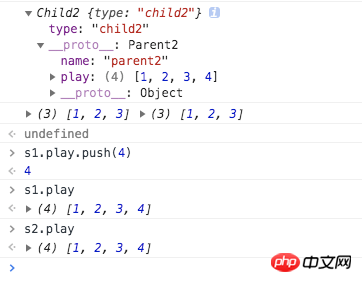
Child2.prototype = new Parent2(); Child2.prototype.__proto__ = Parent2.prototype; 这样我们借助 new 这个语法糖,就可以实现原型链继承。但这里有个总是,如打印结果,我们给 s1.play新增一个值 ,s2 也跟着改了。所以这个是原型链继承的缺点,原因是 s1.__pro__ 和 s2.__pro__指向同一个地址即 父类的prototype。3)组合方式实现继承
/**
 * 组合方式
 */

function Parent3() {
  this.name = 'parent3';
  this.play = [1, 2, 3];
}

Parent3.prototype.say = function () { }

function Child3 () {
  Parent3.call(this);
  this.type = 'child3';
}

Child3.prototype = new Parent3();

var s3 = new Child3();
var s4 = new Child3();
s3.play.push(4);
console.log(new Child3);
console.log(s3.play, s4.play)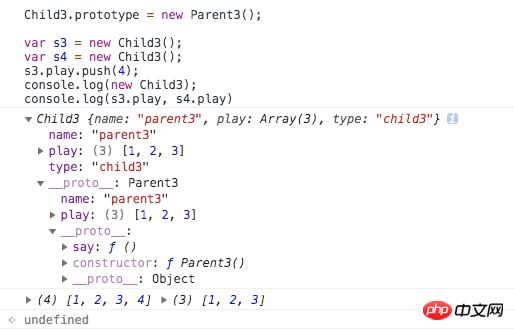
4)组合继承的优化1
function Parent4() {
  this.name = 'parent4';
  this.play = [1, 2, 3];
}

Parent4.prototype.say = function () { }

function Child4() {
  Parent4.call(this);
  this.type = 'child4';
}

Child4.prototype = Parent4.prototype;

var s5 = new Child4();
var s6 = new Child4();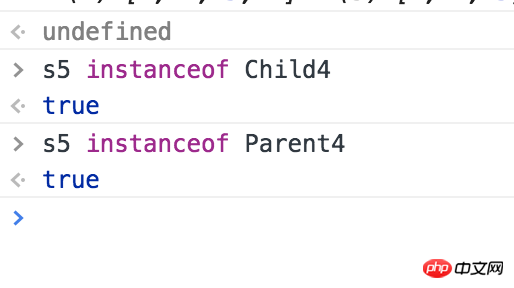
从打印可以看出,此时我是没有办法区分一个对象 是直接 由它的子类实例化还是父类呢?我们还有一个方法判断来判断对象是否是类的实例,那就是用 constructor,我在控制台打印以下内容: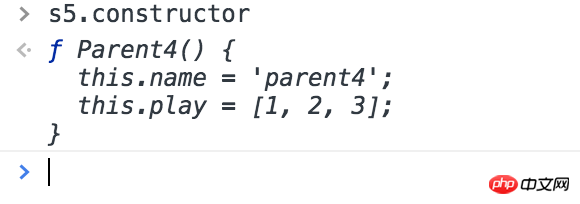
组合继承的优化2
/**
 * 组合继承的优化2
 */

function Parent5() {
  this.name = 'parent4';
  this.play = [1, 2, 3];
}

Parent5.prototype.say = function () { }

function Child5() {
  Parent5.call(this);
  this.type = 'child4';
}

Child5.prototype = Object.create(Parent5.prototype);var test = Object.create({x:123,y:345});
console.log(test);//{}
console.log(test.x);//123
console.log(test.__proto__.x);//3
console.log(test.__proto__.x === test.x);//trueChild5.prototype = Object.create(Parent5.prototype);
Child5.prototype.constructor = Child5;
Das obige ist der detaillierte Inhalt vonMachen Sie sich mit den Prinzipien der Javascript-Vererbung vertraut!. Für weitere Informationen folgen Sie bitte anderen verwandten Artikeln auf der PHP chinesischen Website!

Heiße KI -Werkzeuge

Undresser.AI Undress
KI-gestützte App zum Erstellen realistischer Aktfotos

AI Clothes Remover
Online-KI-Tool zum Entfernen von Kleidung aus Fotos.

Undress AI Tool
Ausziehbilder kostenlos

Clothoff.io
KI-Kleiderentferner

AI Hentai Generator
Erstellen Sie kostenlos Ai Hentai.

Heißer Artikel

Heiße Werkzeuge

Notepad++7.3.1
Einfach zu bedienender und kostenloser Code-Editor

SublimeText3 chinesische Version
Chinesische Version, sehr einfach zu bedienen

Senden Sie Studio 13.0.1
Leistungsstarke integrierte PHP-Entwicklungsumgebung

Dreamweaver CS6
Visuelle Webentwicklungstools

SublimeText3 Mac-Version
Codebearbeitungssoftware auf Gottesniveau (SublimeText3)

Heiße Themen
 1378
1378
 52
52
 So implementieren Sie ein Online-Spracherkennungssystem mit WebSocket und JavaScript
Dec 17, 2023 pm 02:54 PM
So implementieren Sie mit WebSocket und JavaScript ein Online-Spracherkennungssystem. Einführung: Mit der kontinuierlichen Weiterentwicklung der Technologie ist die Spracherkennungstechnologie zu einem wichtigen Bestandteil des Bereichs der künstlichen Intelligenz geworden. Das auf WebSocket und JavaScript basierende Online-Spracherkennungssystem zeichnet sich durch geringe Latenz, Echtzeit und plattformübergreifende Eigenschaften aus und hat sich zu einer weit verbreiteten Lösung entwickelt. In diesem Artikel wird erläutert, wie Sie mit WebSocket und JavaScript ein Online-Spracherkennungssystem implementieren.
 WebSocket und JavaScript: Schlüsseltechnologien zur Implementierung von Echtzeitüberwachungssystemen
Dec 17, 2023 pm 05:30 PM
WebSocket und JavaScript: Schlüsseltechnologien zur Realisierung von Echtzeit-Überwachungssystemen Einführung: Mit der rasanten Entwicklung der Internet-Technologie wurden Echtzeit-Überwachungssysteme in verschiedenen Bereichen weit verbreitet eingesetzt. Eine der Schlüsseltechnologien zur Erzielung einer Echtzeitüberwachung ist die Kombination von WebSocket und JavaScript. In diesem Artikel wird die Anwendung von WebSocket und JavaScript in Echtzeitüberwachungssystemen vorgestellt, Codebeispiele gegeben und deren Implementierungsprinzipien ausführlich erläutert. 1. WebSocket-Technologie
 Verwendung von JavaScript und WebSocket zur Implementierung eines Echtzeit-Online-Bestellsystems
Dec 17, 2023 pm 12:09 PM
Einführung in die Verwendung von JavaScript und WebSocket zur Implementierung eines Online-Bestellsystems in Echtzeit: Mit der Popularität des Internets und dem Fortschritt der Technologie haben immer mehr Restaurants damit begonnen, Online-Bestelldienste anzubieten. Um ein Echtzeit-Online-Bestellsystem zu implementieren, können wir JavaScript und WebSocket-Technologie verwenden. WebSocket ist ein Vollduplex-Kommunikationsprotokoll, das auf dem TCP-Protokoll basiert und eine bidirektionale Kommunikation zwischen Client und Server in Echtzeit realisieren kann. Im Echtzeit-Online-Bestellsystem, wenn der Benutzer Gerichte auswählt und eine Bestellung aufgibt
 So implementieren Sie ein Online-Reservierungssystem mit WebSocket und JavaScript
Dec 17, 2023 am 09:39 AM
So implementieren Sie ein Online-Reservierungssystem mit WebSocket und JavaScript. Im heutigen digitalen Zeitalter müssen immer mehr Unternehmen und Dienste Online-Reservierungsfunktionen bereitstellen. Es ist von entscheidender Bedeutung, ein effizientes Online-Reservierungssystem in Echtzeit zu implementieren. In diesem Artikel wird erläutert, wie Sie mit WebSocket und JavaScript ein Online-Reservierungssystem implementieren, und es werden spezifische Codebeispiele bereitgestellt. 1. Was ist WebSocket? WebSocket ist eine Vollduplex-Methode für eine einzelne TCP-Verbindung.
 JavaScript und WebSocket: Aufbau eines effizienten Echtzeit-Wettervorhersagesystems
Dec 17, 2023 pm 05:13 PM
JavaScript und WebSocket: Aufbau eines effizienten Echtzeit-Wettervorhersagesystems Einführung: Heutzutage ist die Genauigkeit von Wettervorhersagen für das tägliche Leben und die Entscheidungsfindung von großer Bedeutung. Mit der Weiterentwicklung der Technologie können wir genauere und zuverlässigere Wettervorhersagen liefern, indem wir Wetterdaten in Echtzeit erhalten. In diesem Artikel erfahren Sie, wie Sie mit JavaScript und WebSocket-Technologie ein effizientes Echtzeit-Wettervorhersagesystem aufbauen. In diesem Artikel wird der Implementierungsprozess anhand spezifischer Codebeispiele demonstriert. Wir
 So verwenden Sie insertBefore in Javascript
Nov 24, 2023 am 11:56 AM
Verwendung: In JavaScript wird die Methode insertBefore() verwendet, um einen neuen Knoten in den DOM-Baum einzufügen. Diese Methode erfordert zwei Parameter: den neuen Knoten, der eingefügt werden soll, und den Referenzknoten (d. h. den Knoten, an dem der neue Knoten eingefügt wird).
 Einfaches JavaScript-Tutorial: So erhalten Sie den HTTP-Statuscode
Jan 05, 2024 pm 06:08 PM
JavaScript-Tutorial: So erhalten Sie HTTP-Statuscode. Es sind spezifische Codebeispiele erforderlich. Vorwort: Bei der Webentwicklung ist häufig die Dateninteraktion mit dem Server erforderlich. Bei der Kommunikation mit dem Server müssen wir häufig den zurückgegebenen HTTP-Statuscode abrufen, um festzustellen, ob der Vorgang erfolgreich ist, und die entsprechende Verarbeitung basierend auf verschiedenen Statuscodes durchführen. In diesem Artikel erfahren Sie, wie Sie mit JavaScript HTTP-Statuscodes abrufen und einige praktische Codebeispiele bereitstellen. Verwenden von XMLHttpRequest
 JavaScript und WebSocket: Aufbau eines effizienten Echtzeit-Bildverarbeitungssystems
Dec 17, 2023 am 08:41 AM
JavaScript ist eine in der Webentwicklung weit verbreitete Programmiersprache, während WebSocket ein Netzwerkprotokoll für die Echtzeitkommunikation ist. Durch die Kombination der leistungsstarken Funktionen beider können wir ein effizientes Echtzeit-Bildverarbeitungssystem erstellen. In diesem Artikel wird erläutert, wie dieses System mithilfe von JavaScript und WebSocket implementiert wird, und es werden spezifische Codebeispiele bereitgestellt. Zunächst müssen wir die Anforderungen und Ziele des Echtzeit-Bildverarbeitungssystems klären. Angenommen, wir haben ein Kameragerät, das Bilddaten in Echtzeit sammeln kann


