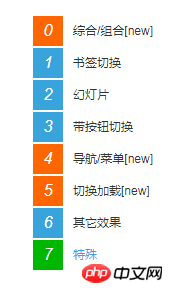
In diesem Artikel erfahren Sie, wie Sie mit CSS einen coolen schwebenden Menüleisteneffekt erzielen. Ich hoffe, dass er für Freunde hilfreich ist.
Standardanzeigeeffekt:

Maus-Hover-Effekt:

Die HTML- und JS-Codes lauten wie folgt:
<!DOCTYPE html>
<html>
    <head>
        <meta charset="UTF-8">
        <title></title>
        <script src="jquery-1.11.1.min.js"></script>
        <style type="text/css">
            *{margin:0;padding:0;}
            body{ color:#333;font:12px/20px Arial,"Microsoft YaHei","宋体",sans-serif; text-align:center; background:#fff;  }
            a{text-decoration:none;color:#333;}
            .rightNav{ position:fixed; width:140px;  right:0; top:100px; _position:absolute; text-align:left; cursor:pointer; background-image:url(about:blank);  }
            .rightNav a{ display:block; position:relative; height:30px; line-height:30px; margin-bottom:2px; background:#fff; padding-right:10px; width:130px; overflow:hidden;  cursor:pointer; right:-110px; }
            .rightNav a:hover{ text-decoration:none; color:#39A4DC;  }
            .rightNav a:hover em{ background:#00b700}
            .rightNav a em{ display:block; float:left; width:30px; background:#39A4DC; color:#fff; font-size:16px; text-align:center; margin-right:10px;}
            .rightNav a.new em{ background:#f60;}
        </style>
    </head>
    <body>
        <div class="rightNav">
            <a class="new" href="#effect0" style="right: -110px;"><em>0</em>综合/组合[new]</a>
            <a href="#effect1" style="right: -110px;"><em>1</em>书签切换</a>
            <a href="#effect2" style="right: -110px;"><em>2</em>幻灯片</a>
            <a href="#effect3" style="right: -110px;"><em>3</em>带按钮切换</a>
            <a class="new" href="#effect4" style="right: -110px;"><em>4</em>导航/菜单[new]</a>
            <a class="new" href="#effect5" style="right: -110px;"><em>5</em>切换加载[new]</a>
            <a href="#effectT1" style="right: -110px;"><em>6</em>其它效果</a>
            <a href="#effectT1" style="right: -110px;"><em>7</em>特殊</a>
        </div>
        <script type="text/javascript">

            //右侧导航
            var btb=$(".rightNav");
            var tempS;
            $(".rightNav").hover(function(){
                    var thisObj = $(this);
                    tempS = setTimeout(function(){
                    thisObj.find("a").each(function(i){
                        var tA=$(this);
                        console.log(i);
                        setTimeout(function(){ tA.animate({right:"0"},200);},50*i);
                    });
                },200);

            },function(){
                if(tempS){ clearTimeout(tempS); }
                $(this).find("a").each(function(i){
                    var tA=$(this);
                    setTimeout(function(){ tA.animate({right:"-110"},200,function(){
                    });},50*i);
                });

            });


        </script>
    </body>
</html>Zusammenfassung: Das Obige ist der gesamte Inhalt dieses Artikels, ich hoffe, dass er für das Lernen aller hilfreich sein wird. Weitere verwandte Tutorials finden Sie unter CSS-Video-Tutorial !
Verwandte Empfehlungen:
PHP-Video-Tutorial zur öffentlichen Wohlfahrtsschulung
Das obige ist der detaillierte Inhalt vonCSS, um einen coolen, rechts schwebenden Menüleisteneffekt zu erzielen (Codebeispiel). Für weitere Informationen folgen Sie bitte anderen verwandten Artikeln auf der PHP chinesischen Website!