
Der Inhalt dieses Artikels besteht darin, den Nutzen von jQuery-Traversal vorzustellen. Implementierung von jQuery-Traversal. Es hat einen gewissen Referenzwert. Freunde in Not können sich darauf beziehen. Ich hoffe, es wird Ihnen hilfreich sein.
Mit der jQuery-Traversierung können Sie sich ausgehend vom ausgewählten (aktuellen) Element problemlos im Stammbaum nach oben (Vorfahren), nach unten (Nachkommen) und horizontal (Geschwister) bewegen. Diese Bewegung wird als Durchqueren des DOM bezeichnet. [Empfohlene verwandte Video-Tutorials: jQuery-Tutorial]
1. Durchlaufen Sie den DOM-Baum nach oben, um die Vorfahren von Elementen zu finden
Verwenden Sie: parent( ) Methode, Parents() Methode, ParentsUntil() Methode
<!DOCTYPE html>
<html>

	<head>
		<meta http-equiv="Content-Type" content="text/html; charset=utf-8" />
		<title>My Test JQuery</title>
		<script type="text/javascript" src="./js/jquery-1.10.2.min.js"></script>
		<script type="text/javascript">
			$(function() {
				//parent() 方法返回被选元素的直接父元素。该方法只会向上一级对 DOM 树进行遍历。
				//parents() 方法返回被选元素的所有祖先元素,它一路向上直到文档的根元素 (<html>)。
				//parentsUntil() 方法返回介于两个给定元素之间的所有祖先元素。
				$("#btn_parent").click(function() {
					$("#myp3").parent().css({
						"color": "red",
						"border": "3px solid red"
					});
				});
				$("#btn_parents").click(function() {
					$("#myp3").parents().css({
						"color": "red",
						"border": "3px solid red"
					});
				});
				$("#btn_parentsUntil").click(function() {
					$("#myp3").parentsUntil("body").css({
						"color": "red",
						"border": "3px solid red"
					});
				});
			});
		</script>
	</head>

	<body>
		<button type="button" id="btn_parent">parent</button><br/>
		<button type="button" id="btn_parents">parents</button><br/>
		<button type="button" id="btn_parentsUntil">parentsUntil</button><br/>
		<p id="myp1" style="width:210px;height:90px;padding: 10px;border:2px solid blue;">
			<p id="myp2" style="width:140px;height:60px;padding: 10px;border:2px solid green;">
				<p id="myp3" style="width:70px;height:30px;padding: 10px;border:2px solid yellow;">
				</p>
			</p>
		</p>
	</body>

</html>

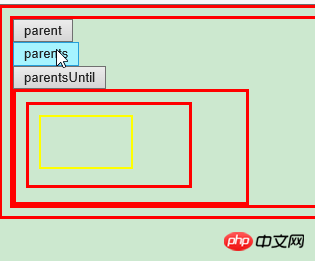
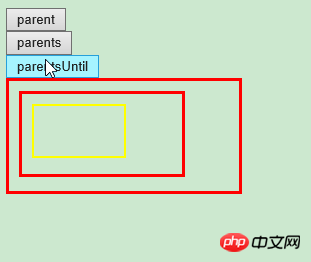
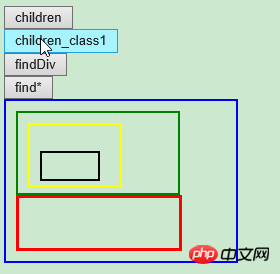
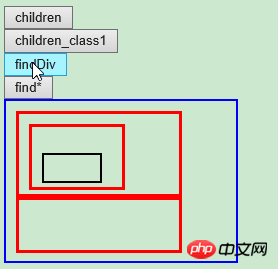
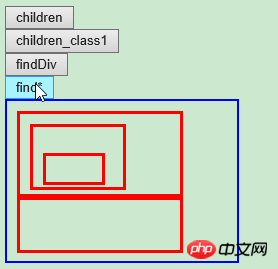
2. Durchqueren Sie die DOM abwärts Baum, finden Sie die Nachkommen von Elementen
mit: Methode children(), Methode find().
<html>

	<head>
		<meta http-equiv="Content-Type" content="text/html; charset=utf-8" />
		<title>My Test JQuery</title>
		<script type="text/javascript" src="./js/jquery-1.10.2.min.js"></script>
		<script type="text/javascript">
			$(function() {
				//children() 方法返回被选元素的所有直接子元素。该方法只会向下一级对 DOM 树进行遍历。
				//find() 方法返回被选元素的后代元素,一路向下直到最后一个后代。
				$("#btn_children1").click(function() {
					$("#myp1").children().css({
						"color": "red",
						"border": "3px solid red"
					});
				});
				$("#btn_children2").click(function() {
					$("#myp1").children("p.class1").css({
						"color": "red",
						"border": "3px solid red"
					});
				});
				$("#btn_find1").click(function() {
					$("#myp1").find("p").css({
						"color": "red",
						"border": "3px solid red"
					});
				});
				$("#btn_find2").click(function() {
					$("#myp1").find("*").css({
						"color": "red",
						"border": "3px solid red"
					});
				});
			});
		</script>
	</head>

	<body>
		<button type="button" id="btn_children1">children</button><br/>
		<button type="button" id="btn_children2">children_class1</button><br/>
		<button type="button" id="btn_find1">findp</button><br/>
		<button type="button" id="btn_find2">find*</button><br/>
		<p id="myp1" style="width:210px;height:140px;padding: 10px;border:2px solid blue;">
			<p id="myp2" style="width:140px;height:60px;padding: 10px;border:2px solid green;">
				<p id="myp3" style="width:70px;height:40px;padding: 10px;border:2px solid yellow;">
					<p id="myP1" style="width:50px;height:20px;padding: 3px;border:2px solid black;">
					</p>
				</p>
			</p>
			<p Class="class1" style="width:140px;height:30px;padding: 10px;border:2px solid green;">
			</p>
		</p>
	</body>

</html>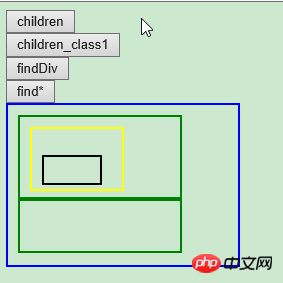
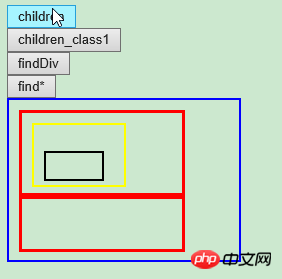
3. Durchlaufen Sie die Geschwisterelemente des Elements:
Verwenden Sie: siblings()-Methode, next()-Methode, nextAll()-Methode, nextUntil()-Methode.
<!DOCTYPE html>
<html>

	<head>
		<meta http-equiv="Content-Type" content="text/html; charset=utf-8" />
		<title>My Test JQuery</title>
		<script type="text/javascript" src="./js/jquery-1.10.2.min.js"></script>
		<script type="text/javascript">
			$(function() {
				//children() 方法返回被选元素的所有直接子元素。该方法只会向下一级对 DOM 树进行遍历。
				//find() 方法返回被选元素的后代元素,一路向下直到最后一个后代。
				$("#btn_siblings").click(function() {
					$("#myp21").siblings().css({
						"color": "red",
						"border": "3px solid red"
					});
				});
				$("#btn_next").click(function() {
					$("#myp21").next().css({
						"color": "red",
						"border": "3px solid red"
					});
				});
				$("#btn_nextAll").click(function() {
					$("#myp21").nextAll().css({
						"color": "red",
						"border": "3px solid red"
					});
				});
				$("#btn_nextUntil").click(function() {
					$("#myp21").nextUntil("h5").css({
						"color": "red",
						"border": "3px solid red"
					});
				});
			});
		</script>
	</head>

	<body>
		<button type="button" id="btn_siblings">siblings</button><br/>
		<button type="button" id="btn_next">next</button><br/>
		<button type="button" id="btn_nextAll">nextAll</button><br/>
		<button type="button" id="btn_nextUntil">nextUntil</button><br/>
		<p id="myp1" style="width:210px;height:190px;padding: 10px;border:2px solid blue;">
			<p id="myp21" style="width:140px;height:20px;padding: 5px;border:2px solid green;">
			</p>
			<p id="myp22" style="width:140px;height:20px;padding: 5px;border:2px solid green;">
			</p>
			<p id="myp23" style="width:140px;height:20px;padding: 5px;border:2px solid green;">
			</p>
			<h5>Hello</h5>
			<p id="myp24" style="width:140px;height:20px;padding: 5px;border:2px solid green;">
			</p>
		</p>
	</body>

</html>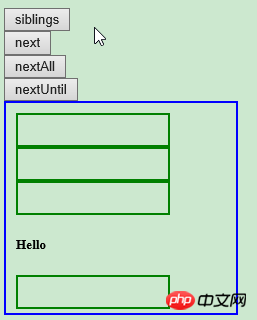

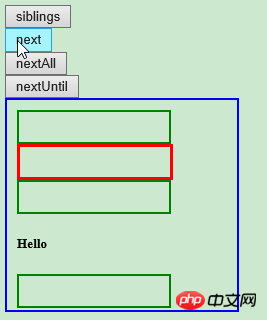
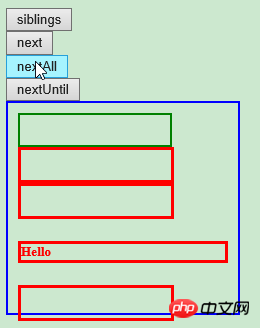

4. Filtermethode: basierend auf seiner Präsenz in einer Reihe von Elemente Position zum Auswählen eines bestimmten Elements
Verwendung: first()-Methode, last()-Methode, eq()-Methode, filter()-Methode, not()-Methode
<!DOCTYPE html>
<html>

	<head>
		<meta http-equiv="Content-Type" content="text/html; charset=utf-8" />
		<title>My Test JQuery</title>
		<script type="text/javascript" src="./js/jquery-1.10.2.min.js"></script>
		<script type="text/javascript">
			$(function() {
				//first() 方法返回被选元素的首个元素。
				//last() 方法返回被选元素的最后一个元素。
				//eq() 方法返回被选元素中带有指定索引号的元素。
				//filter() 方法允许你规定一个标准。不匹配这个标准的元素会被从集合中删除,匹配的元素会被返回。
				//not() 方法返回不匹配标准的所有元素。
				$("#btn_first").click(function() {
					$("#myp1 p").first().css({
						"color": "red",
						"border": "3px solid red"
					});
				});
				$("#btn_last").click(function() {
					$("#myp1 p").last().css({
						"color": "red",
						"border": "3px solid red"
					});
				});
				$("#btn_eq").click(function() {
					$("#myp1 p").eq(2).css({
						"color": "red",
						"border": "3px solid red"
					});
				});
				$("#btn_filter").click(function() {
					$("#myp1 *").filter("h5").css({
						"color": "red",
						"border": "3px solid red"
					});
				});
				$("#btn_not").click(function() {
					$("#myp1 *").not("h5").css({
						"color": "red",
						"border": "3px solid red"
					});
				});
			});
		</script>
	</head>

	<body>
		<button type="button" id="btn_first">first</button>
		<button type="button" id="btn_last">last</button>
		<button type="button" id="btn_eq">eq</button>
		<button type="button" id="btn_filter">filter</button>
		<button type="button" id="btn_not">not</button>
		<p id="myp1" style="width:210px;height:190px;padding: 10px;border:2px solid blue;">
			<p id="myp21" style="width:140px;height:20px;padding: 5px;border:2px solid green;">
			</p>
			<p id="myp22" style="width:140px;height:20px;padding: 5px;border:2px solid green;">
			</p>
			<p id="myp23" style="width:140px;height:20px;padding: 5px;border:2px solid green;">
			</p>
			<h5>Hello</h5>
			<p id="myp24" style="width:140px;height:20px;padding: 5px;border:2px solid green;">
			</p>
		</p>
	</body>

</html>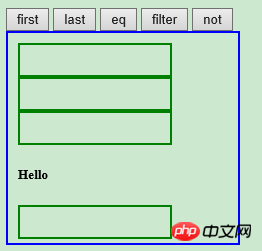
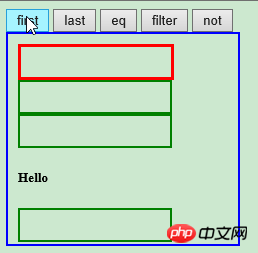
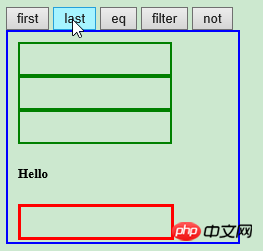
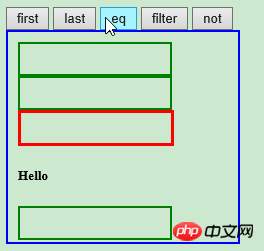
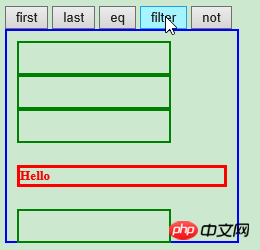
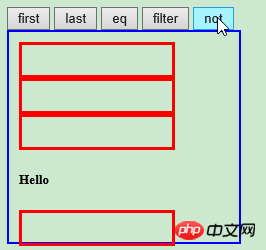
Zusammenfassung: Das Obige ist der gesamte Inhalt dieses Artikels, ich hoffe, er kann für das Studium aller hilfreich sein .
Das obige ist der detaillierte Inhalt vonWas nützt jQuery-Traversal? Implementierung von jQuery-Traversal. Für weitere Informationen folgen Sie bitte anderen verwandten Artikeln auf der PHP chinesischen Website!
 Häufige Verwendungen von set
 nh-Datei
 So konfigurieren Sie Maven in der Idee
 So stellen Sie eine MySQL-Datenbank wieder her
 Konfiguration von Python-Umgebungsvariablen
 Der Unterschied zwischen der Win10-Home-Version und der Professional-Version
 Verwendung der qsort-Funktion
 So lösen Sie das Problem, dass CAD nicht in die Zwischenablage kopiert werden kann