DIV+CSS自适应布局 - holiday1123
自适应布局分两类:高度和宽度,方法有很多,我用三列布局举例,我就列几个通俗易懂的例子呗,懂了三列的,两列的原理一样,呵呵哒。
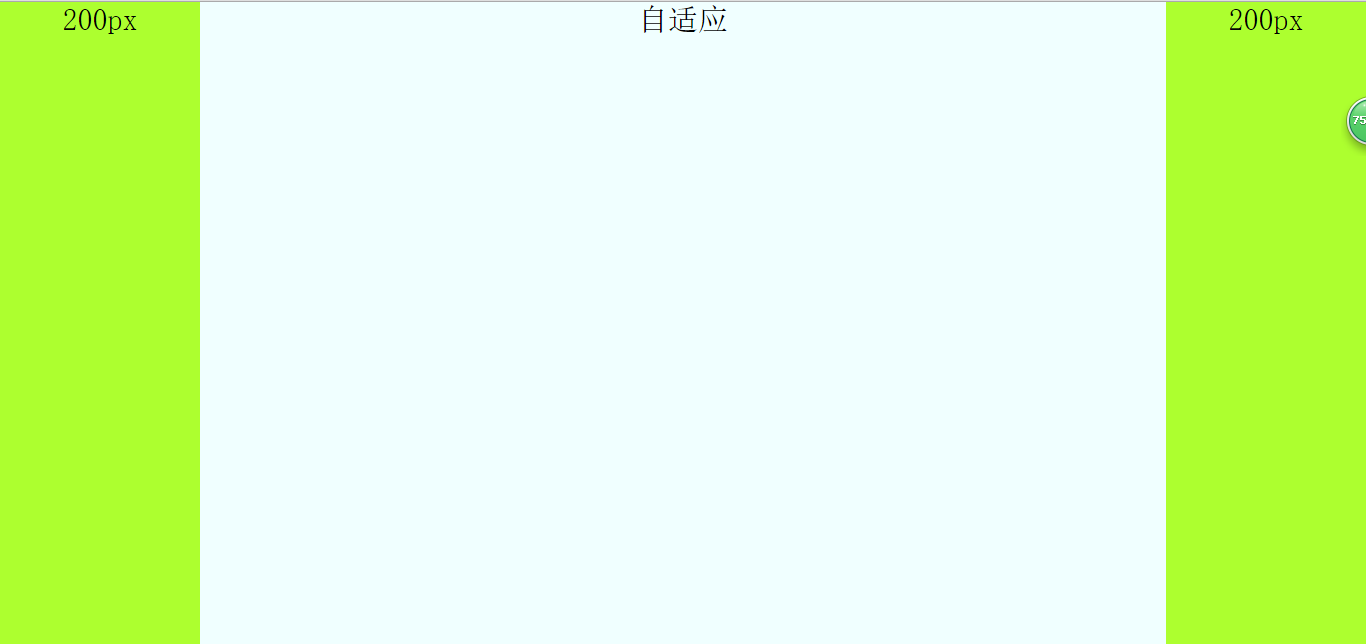
效果图如下:高度自适应——宽度自适应


1,高度自适应布局
原理就是把每个模块设置为绝对定位,然后设置中间自适应的模块的top和bottom属性的值分别为头部模块和底部模块的高,然后中间模块的高度就自适应了。代码如下:
html代码:
<span style="color: #0000ff;"><span style="color: #800000;">body</span><span style="color: #0000ff;">></span>
        <span style="color: #0000ff;"><span style="color: #800000;">div </span><span style="color: #ff0000;">class</span><span style="color: #0000ff;">="top"</span><span style="color: #0000ff;">></span><span style="color: #000000;">
            120px
        </span><span style="color: #0000ff;"></span><span style="color: #800000;">div</span><span style="color: #0000ff;">></span>
        <span style="color: #0000ff;"><span style="color: #800000;">div </span><span style="color: #ff0000;">class</span><span style="color: #0000ff;">="main"</span><span style="color: #0000ff;">></span><span style="color: #000000;">
            自适应
        </span><span style="color: #0000ff;"></span><span style="color: #800000;">div</span><span style="color: #0000ff;">></span>
        <span style="color: #0000ff;"><span style="color: #800000;">div </span><span style="color: #ff0000;">class</span><span style="color: #0000ff;">="bottom"</span><span style="color: #0000ff;">></span><span style="color: #000000;">
            120px
        </span><span style="color: #0000ff;"></span><span style="color: #800000;">div</span><span style="color: #0000ff;">></span>
<span style="color: #0000ff;"></span><span style="color: #800000;">body</span><span style="color: #0000ff;">></span></span></span></span></span>
css代码:
<span style="color: #800000;">.top</span>{<span style="color: #ff0000;">
    width</span>:<span style="color: #0000ff;"> 100%</span>;<span style="color: #ff0000;">
    height</span>:<span style="color: #0000ff;"> 120px</span>;<span style="color: #ff0000;">
    position</span>:<span style="color: #0000ff;"> absolute</span>;<span style="color: #ff0000;">
    background-color</span>:<span style="color: #0000ff;"> greenyellow</span>;

}<span style="color: #800000;">
.main</span>{<span style="color: #ff0000;">
    position</span>:<span style="color: #0000ff;"> absolute</span>;<span style="color: #ff0000;">
    width</span>:<span style="color: #0000ff;"> 100%</span>;<span style="color: #ff0000;">
    top</span>:<span style="color: #0000ff;"> 120px</span>;<span style="color: #ff0000;">
    bottom</span>:<span style="color: #0000ff;"> 120px</span>;<span style="color: #ff0000;">
    background-color</span>:<span style="color: #0000ff;"> azure</span>;<span style="color: #ff0000;">
    height</span>:<span style="color: #0000ff;"> auto</span>;
}<span style="color: #800000;">
.bottom</span>{<span style="color: #ff0000;">
    position</span>:<span style="color: #0000ff;"> absolute</span>;<span style="color: #ff0000;">
    bottom</span>:<span style="color: #0000ff;"> 0</span>;//别漏了<span style="color: #ff0000;">
    width</span>:<span style="color: #0000ff;"> 100%</span>;<span style="color: #ff0000;">
    height</span>:<span style="color: #0000ff;"> 120px</span>;<span style="color: #ff0000;">
    background-color</span>:<span style="color: #0000ff;">greenyellow </span>;
}
2,宽度自适应,有三种方法,分别是用绝对定位;利用margin,中间模块先渲染;自身浮动。
a,用绝对定位来设置宽度自适应布局,原理:针对自适应模块使用绝对定位,在把left和right设置为左右两列的宽,其实原理和高度自适应一样,另外左右两列分别左右浮动。
html代码:
<span style="color: #0000ff;"><span style="color: #800000;">body</span><span style="color: #0000ff;">></span>
        <span style="color: #0000ff;"><span style="color: #800000;">div </span><span style="color: #ff0000;">class</span><span style="color: #0000ff;">="left"</span><span style="color: #0000ff;">></span><span style="color: #000000;">
            200px
        </span><span style="color: #0000ff;"></span><span style="color: #800000;">div</span><span style="color: #0000ff;">></span>
        <span style="color: #0000ff;"><span style="color: #800000;">div </span><span style="color: #ff0000;">class</span><span style="color: #0000ff;">="main"</span><span style="color: #0000ff;">></span><span style="color: #000000;">
            自适应
        </span><span style="color: #0000ff;"></span><span style="color: #800000;">div</span><span style="color: #0000ff;">></span>
        <span style="color: #0000ff;"><span style="color: #800000;">div </span><span style="color: #ff0000;">class</span><span style="color: #0000ff;">="right"</span><span style="color: #0000ff;">></span><span style="color: #000000;">
            200px
        </span><span style="color: #0000ff;"></span><span style="color: #800000;">div</span><span style="color: #0000ff;">></span>
<span style="color: #0000ff;"></span><span style="color: #800000;">body</span><span style="color: #0000ff;">></span></span></span></span></span>css代码:
<span style="color: #800000;">html,
body </span>{<span style="color: #ff0000;">
    margin</span>:<span style="color: #0000ff;"> 0</span>;<span style="color: #ff0000;">
    height</span>:<span style="color: #0000ff;"> 100%</span>;<span style="color: #ff0000;">
    padding</span>:<span style="color: #0000ff;"> 0</span>;<span style="color: #ff0000;">
    font-size</span>:<span style="color: #0000ff;"> 30px</span>;<span style="color: #ff0000;">
    font-weight</span>:<span style="color: #0000ff;"> 500</span>;<span style="color: #ff0000;">
    text-align</span>:<span style="color: #0000ff;"> center</span>;
}<span style="color: #800000;">

.left,
.right </span>{<span style="color: #ff0000;">
    width</span>:<span style="color: #0000ff;"> 200px</span>;<span style="color: #ff0000;">
    display</span>:<span style="color: #0000ff;"> inline</span>;<span style="color: #ff0000;">
    height</span>:<span style="color: #0000ff;"> 100%</span>;<span style="color: #ff0000;">
    background-color</span>:<span style="color: #0000ff;"> greenyellow</span>;
}<span style="color: #800000;">

.left </span>{<span style="color: #ff0000;">
    float</span>:<span style="color: #0000ff;"> left</span>;
}<span style="color: #800000;">

.right </span>{<span style="color: #ff0000;">
    float</span>:<span style="color: #0000ff;"> right</span>;
}<span style="color: #800000;">

.main </span>{<span style="color: #ff0000;">
    position</span>:<span style="color: #0000ff;"> absolute</span>;<span style="color: #ff0000;">
    left</span>:<span style="color: #0000ff;"> 200px</span>;<span style="color: #ff0000;">
    right</span>:<span style="color: #0000ff;"> 200px</span>;<span style="color: #ff0000;">
    height</span>:<span style="color: #0000ff;"> 100%</span>;<span style="color: #ff0000;">
    background-color</span>:<span style="color: #0000ff;"> azure</span>;<span style="color: #ff0000;">
    display</span>:<span style="color: #0000ff;"> inline</span>;
}b,中间一列优先渲染的自适应三列布局,优先渲染(加载)的关键:内容在html里面必须放在前面。自适应的div必须放在left和right前面且包含在一个父div里。父div,left和right模块都向左浮动,然后对自适应的div(就是父div里的子div)设置margin:0 200px,然后对left的margin-left的属性值设置为100%的负数,就是margin-left:-100%;对right的margin-left的属性值设置为自身宽度的负数,就是margin-left:-200px。
注意:自适应的div必须放在left和right前面且包含在一个父div里。
html代码:
<span style="color: #0000ff;"><span style="color: #800000;">body</span><span style="color: #0000ff;">></span>
        <span style="color: #0000ff;"><span style="color: #800000;">div </span><span style="color: #ff0000;">class</span><span style="color: #0000ff;">="main"</span><span style="color: #0000ff;">></span> <span style="color: #008000;"><!--</span><span style="color: #008000;">看清楚,这里用一个父div包住</span><span style="color: #008000;">--></span>
            <span style="color: #0000ff;"><span style="color: #800000;">div </span><span style="color: #ff0000;">class</span><span style="color: #0000ff;">="content"</span><span style="color: #0000ff;">></span><span style="color: #000000;">
                自适应
            </span><span style="color: #0000ff;"></span><span style="color: #800000;">div</span><span style="color: #0000ff;">></span>
        <span style="color: #0000ff;"></span><span style="color: #800000;">div</span><span style="color: #0000ff;">></span>
        <span style="color: #0000ff;"><span style="color: #800000;">div </span><span style="color: #ff0000;">class</span><span style="color: #0000ff;">="left"</span><span style="color: #0000ff;">></span><span style="color: #000000;">
            200px
        </span><span style="color: #0000ff;"></span><span style="color: #800000;">div</span><span style="color: #0000ff;">></span>
        <span style="color: #0000ff;"><span style="color: #800000;">div </span><span style="color: #ff0000;">class</span><span style="color: #0000ff;">="right"</span><span style="color: #0000ff;">></span><span style="color: #000000;">
            200px
        </span><span style="color: #0000ff;"></span><span style="color: #800000;">div</span><span style="color: #0000ff;">></span>
<span style="color: #0000ff;"></span><span style="color: #800000;">body</span><span style="color: #0000ff;">></span></span></span></span></span></span>css代码:
<span style="color: #800000;">html,
body </span>{<span style="color: #ff0000;">
    margin</span>:<span style="color: #0000ff;"> 0</span>;<span style="color: #ff0000;">
    height</span>:<span style="color: #0000ff;"> 100%</span>;<span style="color: #ff0000;">
    padding</span>:<span style="color: #0000ff;"> 0</span>;<span style="color: #ff0000;">
    font-size</span>:<span style="color: #0000ff;"> 30px</span>;<span style="color: #ff0000;">
    font-weight</span>:<span style="color: #0000ff;"> 500</span>;<span style="color: #ff0000;">
    text-align</span>:<span style="color: #0000ff;"> center</span>;
}<span style="color: #800000;">

.main </span>{<span style="color: #ff0000;">
    width</span>:<span style="color: #0000ff;"> 100%</span>;<span style="color: #ff0000;">
    height</span>:<span style="color: #0000ff;"> 100%</span>;<span style="color: #ff0000;">
    float</span>:<span style="color: #0000ff;"> left</span>;
}<span style="color: #800000;">

.main .content </span>{<span style="color: #ff0000;">
    margin</span>:<span style="color: #0000ff;"> 0 200px</span>;<span style="color: #ff0000;">
    background-color</span>:<span style="color: #0000ff;"> azure</span>;<span style="color: #ff0000;">
    height</span>:<span style="color: #0000ff;"> 100%</span>;
}<span style="color: #800000;">

.left,
.right </span>{<span style="color: #ff0000;">
    width</span>:<span style="color: #0000ff;"> 200px</span>;<span style="color: #ff0000;">
    height</span>:<span style="color: #0000ff;"> 100%</span>;<span style="color: #ff0000;">
    float</span>:<span style="color: #0000ff;"> left</span>;<span style="color: #ff0000;">
    background-color</span>:<span style="color: #0000ff;"> greenyellow</span>;
}<span style="color: #800000;">

.left </span>{<span style="color: #ff0000;">
    margin-left</span>:<span style="color: #0000ff;"> -100%</span>;<span style="color: #ff0000;"> //important
</span>}<span style="color: #800000;">

.right </span>{<span style="color: #ff0000;">
    margin-left</span>:<span style="color: #0000ff;"> -200px</span>;<span style="color: #ff0000;"> //important
</span>}c,自身浮动,原理:中间列设置margin属性,就是把左右列分别左右浮动。注意:使用这个方法布局自适应的话,必须把自适应的那一列在html中放在left和right后面。
html代码:
<span style="color: #0000ff;"><span style="color: #800000;">body</span><span style="color: #0000ff;">></span>
        <span style="color: #0000ff;"><span style="color: #800000;">div </span><span style="color: #ff0000;">class</span><span style="color: #0000ff;">="left"</span><span style="color: #0000ff;">></span><span style="color: #000000;">
            200px
        </span><span style="color: #0000ff;"></span><span style="color: #800000;">div</span><span style="color: #0000ff;">></span>
        <span style="color: #0000ff;"><span style="color: #800000;">div </span><span style="color: #ff0000;">class</span><span style="color: #0000ff;">="right"</span><span style="color: #0000ff;">></span><span style="color: #000000;">
            200px
        </span><span style="color: #0000ff;"></span><span style="color: #800000;">div</span><span style="color: #0000ff;">></span>
        <span style="color: #0000ff;"><span style="color: #800000;">div </span><span style="color: #ff0000;">class</span><span style="color: #0000ff;">="main"</span><span style="color: #0000ff;">></span><span style="color: #000000;">
            自适应
        </span><span style="color: #0000ff;"></span><span style="color: #800000;">div</span><span style="color: #0000ff;">></span>
<span style="color: #0000ff;"></span><span style="color: #800000;">body</span><span style="color: #0000ff;">></span></span></span></span></span>css代码:
<span style="color: #800000;">html,
body </span>{<span style="color: #ff0000;">
    margin</span>:<span style="color: #0000ff;"> 0</span>;<span style="color: #ff0000;">
    height</span>:<span style="color: #0000ff;"> 100%</span>;<span style="color: #ff0000;">
    padding</span>:<span style="color: #0000ff;"> 0</span>;<span style="color: #ff0000;">
    font-size</span>:<span style="color: #0000ff;"> 30px</span>;<span style="color: #ff0000;">
    font-weight</span>:<span style="color: #0000ff;"> 500</span>;<span style="color: #ff0000;">
    text-align</span>:<span style="color: #0000ff;"> center</span>;
}<span style="color: #800000;">
.main </span>{<span style="color: #ff0000;">
    margin</span>:<span style="color: #0000ff;"> 0 200px</span>;<span style="color: #ff0000;">
    height</span>:<span style="color: #0000ff;"> 100%</span>;<span style="color: #ff0000;">
    background-color</span>:<span style="color: #0000ff;"> azure</span>;
}<span style="color: #800000;">
.left,
.right </span>{<span style="color: #ff0000;">
    width</span>:<span style="color: #0000ff;"> 200px</span>;<span style="color: #ff0000;">
    height</span>:<span style="color: #0000ff;"> 100%</span>;<span style="color: #ff0000;">
    background-color</span>:<span style="color: #0000ff;"> greenyellow</span>;
}<span style="color: #800000;">
.left </span>{<span style="color: #ff0000;">
    float</span>:<span style="color: #0000ff;"> left</span>;
}<span style="color: #800000;">
.right </span>{<span style="color: #ff0000;">
    float</span>:<span style="color: #0000ff;"> right</span>;
}

Heiße KI -Werkzeuge

Undresser.AI Undress
KI-gestützte App zum Erstellen realistischer Aktfotos

AI Clothes Remover
Online-KI-Tool zum Entfernen von Kleidung aus Fotos.

Undress AI Tool
Ausziehbilder kostenlos

Clothoff.io
KI-Kleiderentferner

AI Hentai Generator
Erstellen Sie kostenlos Ai Hentai.

Heißer Artikel

Heiße Werkzeuge

Notepad++7.3.1
Einfach zu bedienender und kostenloser Code-Editor

SublimeText3 chinesische Version
Chinesische Version, sehr einfach zu bedienen

Senden Sie Studio 13.0.1
Leistungsstarke integrierte PHP-Entwicklungsumgebung

Dreamweaver CS6
Visuelle Webentwicklungstools

SublimeText3 Mac-Version
Codebearbeitungssoftware auf Gottesniveau (SublimeText3)

Heiße Themen
 Was ist der Zweck des & lt; datalist & gt; Element?
Mar 21, 2025 pm 12:33 PM
Der Artikel erörtert den HTML & lt; Datalist & gt; Element, das die Formulare verbessert, indem automatische Vorschläge bereitgestellt, die Benutzererfahrung verbessert und Fehler reduziert werden.Character Count: 159
 Was ist der Zweck des & lt; Fortschritts & gt; Element?
Mar 21, 2025 pm 12:34 PM
Der Artikel erörtert den HTML & lt; Progress & gt; Element, Absicht, Styling und Unterschiede vom & lt; Meter & gt; Element. Das Hauptaugenmerk liegt auf der Verwendung & lt; Fortschritt & gt; Für Aufgabenabschluss und & lt; Meter & gt; für stati
 Was ist der Zweck des & lt; Meter & gt; Element?
Mar 21, 2025 pm 12:35 PM
Der Artikel erörtert das HTML & lt; Meter & gt; Element, verwendet zur Anzeige von Skalar- oder Bruchwerten innerhalb eines Bereichs und seine gemeinsamen Anwendungen in der Webentwicklung. Es differenziert & lt; Meter & gt; von & lt; Fortschritt & gt; und Ex
 Wie verwende ich HTML5 -Formularvalidierungsattribute, um die Benutzereingabe zu validieren?
Mar 17, 2025 pm 12:27 PM
In dem Artikel werden unter Verwendung von HTML5 -Formularvalidierungsattributen wie Erforderlich, Muster, Min, MAX und Längengrenzen erörtert, um die Benutzereingabe direkt im Browser zu validieren.
 Was ist das Ansichtsfenster -Meta -Tag? Warum ist es wichtig für reaktionsschnelles Design?
Mar 20, 2025 pm 05:56 PM
In dem Artikel wird das Ansichtsfenster -Meta -Tag erörtert, das für das reaktionsschnelle Webdesign auf mobilen Geräten unerlässlich ist. Es wird erläutert, wie die ordnungsgemäße Verwendung eine optimale Skalierung von Inhalten und Benutzerinteraktion gewährleistet, während Missbrauch zu Design- und Zugänglichkeitsproblemen führen kann.
 Was ist der Zweck des & lt; iframe & gt; Etikett? Was sind die Sicherheitsüberlegungen bei der Verwendung?
Mar 20, 2025 pm 06:05 PM
Der Artikel erörtert das & lt; iframe & gt; Der Zweck von Tag, externe Inhalte in Webseiten, seine gemeinsamen Verwendungen, Sicherheitsrisiken und Alternativen wie Objekt -Tags und APIs einzubetten.
 Was sind die besten Praktiken für die Kompatibilität des Cross-Browsers in HTML5?
Mar 17, 2025 pm 12:20 PM
In Artikel werden Best Practices zur Gewährleistung der HTML5-Cross-Browser-Kompatibilität erörtert und sich auf die Erkennung von Merkmalen, die progressive Verbesserung und die Testmethoden konzentriert.
 Wie benutze ich die HTML5 & lt; Zeit & gt; Element, um Daten und Zeiten semantisch darzustellen?
Mar 12, 2025 pm 04:05 PM
Dieser Artikel erklärt den HTML5 & lt; Time & gt; Element für semantische Datum/Uhrzeit. Es betont die Wichtigkeit des DateTime-Attributs für die Maschinenlesbarkeit (ISO 8601-Format) neben menschenlesbarem Text, das Zubehör steigert


