
Das Beispiel in diesem Artikel teilt Ihnen den spezifischen Code zur Implementierung des Karusselleffekts mit JS als Referenz mit. Der spezifische Inhalt ist wie folgt
Wissen Punkte

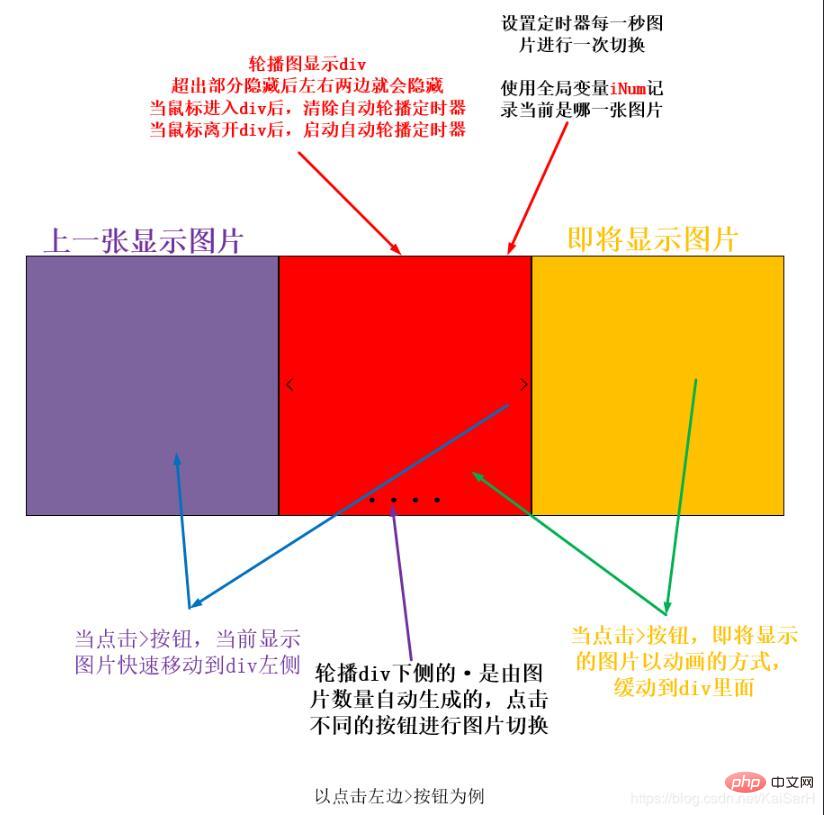
Karussell-Bildidee:
① Erstellen Sie einen globalen Variablenindex, um immer das aktuell angezeigte Bild zu markieren.
② Erstellen Sie dynamisch die untenstehende Bildanzeige basierend auf der aktuellen Anzahl von Bildern.
③ Der Ausgangszustand des Karussellbildes ist, dass sich das erste Bild in der Mitte befindet und alle übrigen Bilder an der Position platziert werden, an der das Bild angezeigt wird.
④ Wenn Sie auf > klicken, ruft das aktuelle Bild die Animationsbewegungsfunktion auf, um sich nach links zu bewegen. Gleichzeitig ruft das neue Bild die Animationsfunktion auf, um sich nach p zu bewegen, und das nächste angezeigte Bild wird nach links verschoben rechts von der Seite.
⑤ Eine Grenzbeurteilung ist erforderlich. Wenn das aktuelle Bild größer als die Anzahl der Bilder oder kleiner oder gleich 0 ist, weisen Sie den Index neu zu.
⑥ Wenn auf den Bildindikator geklickt wird, wird zunächst die Positionsbeziehung zwischen dem Klick und dem Index bestimmt und dann die Animationsbewegung ausgeführt.
⑦ Fügen Sie p einen Timer hinzu, um Bilder automatisch zu verschieben. Wenn die Maus p betritt, wird der Timer gelöscht. Wenn sich die Maus aus p herausbewegt, wird der Timer eingestellt.
Bedienungseffekt
1. Klicken Sie nach links und rechts, um die Bilder zu wechseln
3 🎜>

Einführung in die MyTools.js-Bibliothek
1.html
<!DOCTYPE html>
<html>
<head>
 <meta charset="UTF-8">
 <title>Title</title>
 <link rel="stylesheet" href="1.css" rel="external nofollow" >
</head>
<body>
<div id="box">
 <div id="box_content">
 <div><img src="casual01.jpg" alt=""></div>
 <div><img src="casual02.jpg" alt=""></div>
 <div><img src="casual03.jpg" alt=""></div>
 <div><img src="casual04.jpg" alt=""></div>
 <div><img src="casual05.jpg" alt=""></div>
 </div>
 <div id="box_control">
 <a href="javascript:;"><i><</i></a>
 <a href="javascript:;"><i>></i></a>
 <ul>
 </ul>
 </div>
</div>
<script src="../JavaScript学习/00MyTools/MyTools.js"></script>
<script src="1.js"></script>
</body>
</html>
2. css
*{margin: 0;padding: 0;}
a{
 color: #999;
 text-decoration: none;
 position: absolute;
 top: 50%;
 transform: translateY(-50%);
 background-color: rgba(0, 0, 0, .4);
}
a:hover{
 color: #f8b62b;
}
i{
 font-size: 50px;
 font-family: "Helvetica Neue", Helvetica, Arial, sans-serif;
}
#box{
 height: 482px;
 width: 830px;
 background-color: red;
 position: absolute;
 left: 50%;
 top: 50%;
 transform: translate(-50%,-50%);
 overflow: hidden;
}
#box_content{
 height: 100%;
 width: 100%;
 cursor: pointer;
}
#box_content img{
 position: absolute;
 vertical-align: top;
 height: 100%;
 width: 100%;
 /*left: 830px;*/
}
.box_img{
 width: 100%;
 height: 100%;
 position: absolute;}
.box_control_right{
 position: absolute;
 right: 0;
}
.box_control_left{
 position: absolute;
 left: 0;
}
ul{
 position: absolute;
 bottom: 30px;
 left: 50%;
 transform: translateX(-50%);
 display: flex;
 justify-content:space-evenly;
}
ul>li{
 list-style: none;
 width: 16px;
 height: 16px;
 background-color: #fff;
 margin: 0 3px;
 border-radius: 50%;
 cursor: pointer;
}
ul>li.current{
 background-color: darkorange;
}3.js
window.addEventListener('load',function (ev) {
// 轮播图
(function () {
// 1. 获取需要标签
var boxContent = myTool.$('box_content');
var contentImg = boxContent.children;
var boxControl = myTool.$('box_control');
var controlBottom = boxControl.children[2];
// 2. 全局索引
var iNow = 0;
// 3. 根据图片个数动态添加下方图片指示器
for (var i = 0; i < contentImg.length; i++) {
var li = document.createElement('li');
controlBottom.insertBefore(li,controlBottom.children[0]);
}
// 4. 让第一个图片指示器选中
controlBottom.children[0].className = 'current';
// 5. 让除了第一张图片以外所有图片进入待显示区域
var scrollImgWidth = boxContent.offsetWidth;
for (var j = 1; j < contentImg.length; j++) {
contentImg[j].style.left = scrollImgWidth + 'px';
}
// 6. 处理左右两侧点击
var cPrev = boxControl.children[0];
var cNext = boxControl.children[1];
// 6.1 点击左边
cPrev.addEventListener('click',function (evt) {
// 1. 当前可视区域图片快速右移
// 2. 上一张幻灯片出现在可视区域左侧
// 3. 让这张幻灯片做动画进入
myTool.slowMoving(contentImg[iNow],{'left':scrollImgWidth},null);
iNow--;
// 边界处理
if (iNow < 0){
iNow = contentImg.length - 1;
}
contentImg[iNow].style.left = -scrollImgWidth + 'px';
myTool.slowMoving(contentImg[iNow],{'left':0},null);
// 切换索引
changeIndex();
},false);
// 6.2 点击右边
cNext.addEventListener('click',function (evt) {
autoPlay();
},false);
// 7. 下侧图片指示器操作
for (var k = 0; k < controlBottom.children.length; k++) {
// 取出单个li标签
var bottomLi = controlBottom.children[k];
// 监听鼠标进入
(function (index) {
bottomLi.addEventListener('mouseover',function (evt) {
// 比较当前索引和点击指示器位置关系
if (index > iNow){
myTool.slowMoving(contentImg[iNow],{'left':-scrollImgWidth},null);
contentImg[index].style.left = scrollImgWidth + 'px';
}else if(index < iNow){
myTool.slowMoving(contentImg[iNow],{'left':scrollImgWidth},null);
contentImg[index].style.left = -scrollImgWidth + 'px';
}
iNow = index;
myTool.slowMoving(contentImg[iNow],{'left':0});
// 切换索引
changeIndex();
},false);
})(k)
}
/**
* 切换索引操作
*/
function changeIndex() {
for (var i = 0; i < controlBottom.children.length; i++) {
controlBottom.children[i].className = '';
}
// 当前的被选中
controlBottom.children[iNow].className = 'current';
}
/**
* 点击右侧和图片自动运动操作
*/
function autoPlay(){
// 1. 当前可视区域图片快速左移
// 2. 下一张图片出现在可视区域右侧
// 3. 让这张图片做动画进入
myTool.slowMoving(contentImg[iNow],{'left':-scrollImgWidth},null);
iNow++;
// 边界处理
if (iNow >= contentImg.length) {
iNow = 0;
}
contentImg[iNow].style.left = scrollImgWidth + 'px';
myTool.slowMoving(contentImg[iNow], {"left": 0},null);
// 切换索引
changeIndex();
}
// 8. 设置定时器
var timerId = setInterval(autoPlay,2000);
// 9. 鼠标进入图片p后设置和清除定时器
myTool.$('box').addEventListener('mouseover',function () {
clearInterval(timerId);
});
myTool.$('box').addEventListener('mouseout',function () {
timerId = setInterval(autoPlay,2000);
});
})();
},false);Weitere js-Spezialeffekte finden Sie in der Spalte
js-Spezialeffekte-DownloadDas obige ist der detaillierte Inhalt vonWie implementiert man einfache Karusselleffekte mit JS? (Ausführliche Erklärung mit Bildern und Text). Für weitere Informationen folgen Sie bitte anderen verwandten Artikeln auf der PHP chinesischen Website!