Methoden für die Kommunikation zwischen vue.js-Komponenten: 1. Durch [props/$emit]; 2. Durch [$attrs/$listeners]; ] Methode.

Die Betriebsumgebung dieses Tutorials: Windows10-System, vue2.9, dieser Artikel gilt für alle Computermarken.
【Empfohlene verwandte Artikel: vue.js】
Kommunikationsmethoden zwischen vue.js-Komponenten:
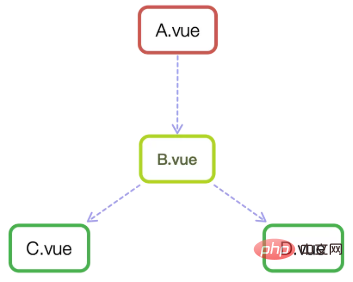
Komponenten sind eine der leistungsstärksten Funktionen von vue.js und Komponenten Instanzbereiche sind unabhängig voneinander, was bedeutet, dass Daten zwischen verschiedenen Komponenten nicht aufeinander verweisen können. Im Allgemeinen können Komponenten die folgenden Beziehungen haben:

Wie in der Abbildung oben gezeigt, sind A und B, B und C, B und D alle Eltern-Kind-Beziehungen, C und D sind Bruderbeziehungen und A und C sind getrennte Generationenbeziehungen (möglicherweise mehrere Generationen).
Wie wählt man eine effektive Kommunikationsmethode für verschiedene Nutzungsszenarien aus? Dies ist das Thema, das wir untersuchen werden. In diesem Artikel werden verschiedene Möglichkeiten der Kommunikation zwischen Vue-Komponenten zusammengefasst, z. B. props, $emit/$on, vuex, $parent / $children, $attrs/$listeners und Provide/Inject, beschreiben die Unterschiede und Verwendungsszenarien anhand leicht verständlicher Beispiele meine Freunde. Etwas hilfreich. $emit/$on、vuex、$parent / $children、$attrs/$listeners和 provide/inject,以通俗易懂的实例讲述这其中的差别及使用场景,希望对小伙伴有些许帮助。
本文的代码请猛戳github 博客,纸上得来终觉浅,大家动手多敲敲代码!
props/$emit
父组件 A 通过 props 的方式向子组件 B 传递,B to A 通过在 B 组件中 $emit, A 组件中 v-on 的方式实现。
接下来我们通过一个例子,说明父组件如何向子组件传递值:在子组件 Users.vue 中如何获取父组件 App.vue 中的数据 users:["Henry","Bucky","Emily"]
//App.vue父组件
<template>
  <p id="app">
    <users v-bind:users="users"></users>//前者自定义名称便于子组件调用,后者要传递数据名
  </p>
</template>
<script>
import Users from "./components/Users"
export default {
  name: 'App',
  data(){
    return{
      users:["Henry","Bucky","Emily"]
    }
  },
  components:{
    "users":Users
  }
}//users子组件
<template>
<p class="hello">
<ul>
<li v-for="user in users">{{user}}</li>//遍历传递过来的值,然后呈现到页面
</ul>
</p>
</template>
<script>
export default {
name: 'HelloWorld',
props:{
users:{ //这个就是父组件中子标签自定义名字
type:Array,
required:true
}
}
}
</script>总结:父组件通过 props 向下传递数据给子组件。注:组件中的数据共有三种形式:data、props、computed
接下来我们通过一个例子,说明子组件如何向父组件传递值:当我们点击“Vue.js Demo”后,子组件向父组件传递值,文字由原来的“传递的是一个值”变成“子向父组件传值”,实现子组件向父组件值的传递。

// 子组件
<template>
  <header>
    <h1 @click="changeTitle">{{title}}</h1>//绑定一个点击事件
  </header>
</template>
<script>
export default {
  name: 'app-header',
  data() {
    return {
      title:"Vue.js Demo"
    }
  },
  methods:{
    changeTitle() {
      this.$emit("titleChanged","子向父组件传值");//自定义事件  传递值“子向父组件传值”
    }
  }
}
</script>// 父组件
<template>
<p id="app">
<app-header v-on:titleChanged="updateTitle" ></app-header>//与子组件titleChanged自定义事件保持一致
// updateTitle($event)接受传递过来的文字
<h2>{{title}}</h2>
</p>
</template>
<script>
import Header from "./components/Header"
export default {
name: 'App',
data(){
return{
title:"传递的是一个值"
}
},
methods:{
updateTitle(e){ //声明这个函数
this.title = e;
}
},
components:{
"app-header":Header,
}
}
</script>总结:子组件通过 events 给父组件发送消息,实际上就是子组件把自己的数据发送到父组件。
$emit/$on
这种方法通过一个空的 Vue 实例作为中央事件总线(事件中心),用它来触发事件和监听事件,巧妙而轻量地实现了任何组件间的通信,包括父子、兄弟、跨级。当我们的项目比较大时,可以选择更好的状态管理解决方案 vuex。
    var Event=new Vue();
    Event.$emit(事件名,数据);
Event.$on(事件名,data => {});假设兄弟组件有三个,分别是 A、B、C 组件,C 组件如何获取 A 或者 B 组件的数据
<p id="itany">
	<my-a></my-a>
	<my-b></my-b>
	<my-c></my-c>
</p>
<template id="a">
  <p>
    <h3>A组件:{{name}}</h3>
    <button @click="send">将数据发送给C组件</button>
  </p>
</template>
<template id="b">
  <p>
    <h3>B组件:{{age}}</h3>
    <button @click="send">将数组发送给C组件</button>
  </p>
</template>
<template id="c">
  <p>
    <h3>C组件:{{name}},{{age}}</h3>
  </p>
</template>
<script>
var Event = new Vue();//定义一个空的Vue实例
var A = {
	template: '#a',
	data() {
	  return {
	    name: 'tom'
	  }
	},
	methods: {
	  send() {
	    Event.$emit('data-a', this.name);
	  }
	}
}
var B = {
	template: '#b',
	data() {
	  return {
	    age: 20
	  }
	},
	methods: {
	  send() {
	    Event.$emit('data-b', this.age);
	  }
	}
}
var C = {
	template: '#c',
	data() {
	  return {
	    name: '',
	    age: ""
	  }
	},
	mounted() {//在模板编译完成后执行
	 Event.$on('data-a',name => {
	     this.name = name;//箭头函数内部不会产生新的this,这边如果不用=>,this指代Event
	 })
	 Event.$on('data-b',age => {
	     this.age = age;
	 })
	}
}
var vm = new Vue({
	el: '#itany',
	components: {
	  'my-a': A,
	  'my-b': B,
	  'my-c': C
	}
});
</script>
$on
props/$emit
Übergeordnete Komponente A wird über Requisiten an untergeordnete Komponente B übergeben, B an A implementiert durch $emit in Komponente B und v-on in Komponente A. 
users:["Henry","Bucky","Emily"]
let defaultCity = "上海"
try {   // 用户关闭了本地存储功能,此时在外层加个try...catch
  if (!defaultCity){
    defaultCity = JSON.parse(window.localStorage.getItem('defaultCity'))
  }
}catch(e){}
export default new Vuex.Store({
  state: {
    city: defaultCity
  },
  mutations: {
    changeCity(state, city) {
      state.city = city
      try {
      window.localStorage.setItem('defaultCity', JSON.stringify(state.city));
      // 数据改变的时候把数据拷贝一份保存到localStorage里面
      } catch (e) {}
    }
  }
})JSON.stringify(state.subscribeList); // array -> string
JSON.parse(window.localStorage.getItem("subscribeList")); // string -> array 🎜
🎜// index.vue
<template>
<p>
<h2>浪里行舟</h2>
<child-com1
:foo="foo"
:boo="boo"
:coo="coo"
:doo="doo"
title="前端工匠"
></child-com1>
</p>
</template>
<script>
const childCom1 = () => import("./childCom1.vue");
export default {
components: { childCom1 },
data() {
return {
foo: "Javascript",
boo: "Html",
coo: "CSS",
doo: "Vue"
};
}
};
</script>// childCom1.vue
<template class="border">
<p>
<p>foo: {{ foo }}</p>
<p>childCom1的$attrs: {{ $attrs }}</p>
<child-com2 v-bind="$attrs"></child-com2>
</p>
</template>
<script>
const childCom2 = () => import("./childCom2.vue");
export default {
components: {
childCom2
},
inheritAttrs: false, // 可以关闭自动挂载到组件根元素上的没有在props声明的属性
props: {
foo: String // foo作为props属性绑定
},
created() {
console.log(this.$attrs); // { "boo": "Html", "coo": "CSS", "doo": "Vue", "title": "前端工匠" }
}
};
</script>$emit/$on🎜🎜🎜Diese Methode verwendet eine leere Vue-Instanz als zentralen Ereignisbus (Ereigniszentrum), verwenden Sie es, um Ereignisse auszulösen und auf Ereignisse zu warten, wodurch die Kommunikation zwischen allen Komponenten, einschließlich Eltern-Kind-, Bruder- und Ebenenübergreifender Kommunikation, geschickt und leicht realisiert wird. Wenn unser Projekt relativ groß ist, können wir vuex wählen, eine bessere Lösung für das Zustandsmanagement. 🎜// childCom2.vue
<template>
<p class="border">
<p>boo: {{ boo }}</p>
<p>childCom2: {{ $attrs }}</p>
<child-com3 v-bind="$attrs"></child-com3>
</p>
</template>
<script>
const childCom3 = () => import("./childCom3.vue");
export default {
components: {
childCom3
},
inheritAttrs: false,
props: {
boo: String
},
created() {
console.log(this.$attrs); // { "boo": "Html", "coo": "CSS", "doo": "Vue", "title": "前端工匠" }
}
};
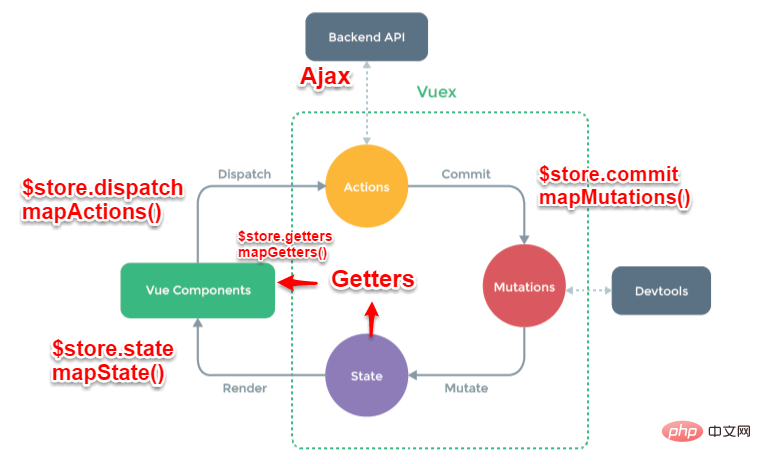
</script>$on hört auf die benutzerdefinierten Ereignisse data-a und data-b, da manchmal nicht sicher ist, wann das Ereignis ausgelöst wird, normalerweise in Der montierte oder erstellte Haken kommt zum Überwachen. 🎜🎜Methode 3, Vuex🎜🎜🎜🎜🎜1. Kurze Einführung in das Vuex-Prinzip🎜🎜Vuex implementiert einen unidirektionalen Datenfluss und verfügt über einen Status zum globalen Speichern von Daten muss über Mutation erfolgen. Mutation bietet auch einen Abonnentenmodus, den externe Plug-Ins aufrufen können, um Aktualisierungen der Statusdaten zu erhalten. Wenn alle asynchronen Vorgänge (allgemein als Back-End-Schnittstellen bezeichnet, werden asynchron abgerufen, um aktualisierte Daten zu erhalten) oder synchrone Batch-Vorgänge eine Aktion erfordern, können die Statusdaten durch die Aktion nicht direkt geändert werden. Abschließend wird es basierend auf den Zustandsänderungen in der Ansicht gerendert. 🎜$store.dispatch('action 名称', data1)来触发。然后由 commit()来触发 mutation 的调用 , 间接更新 state。负责处理 Vue Components 接收到的所有交互行为。包含同步/异步操作,支持多个同名方法,按照注册的顺序依次触发。向后台 API 请求的操作就在这个模块中进行,包括触发其他 action 以及提交 mutation 的操作。该模块提供了 Promise 的封装,以支持 action 的链式触发。commit('mutation 名称')来触发。是 Vuex 修改 state 的唯一推荐方法。该方法只能进行同步操作,且方法名只能全局唯一。操作之中会有一些 hook 暴露出来,以进行 state 的监控等。vuex 是 vue 的状态管理器,存储的数据是响应式的。但是并不会保存起来,刷新之后就回到了初始状态,具体做法应该在 vuex 里数据改变的时候把数据拷贝一份保存到 localStorage 里面,刷新之后,如果 localStorage 里有保存的数据,取出来再替换 store 里的 state。
let defaultCity = "上海"
try { // 用户关闭了本地存储功能,此时在外层加个try...catch
if (!defaultCity){
defaultCity = JSON.parse(window.localStorage.getItem('defaultCity'))
}
}catch(e){}
export default new Vuex.Store({
state: {
city: defaultCity
},
mutations: {
changeCity(state, city) {
state.city = city
try {
window.localStorage.setItem('defaultCity', JSON.stringify(state.city));
// 数据改变的时候把数据拷贝一份保存到localStorage里面
} catch (e) {}
}
}
})这里需要注意的是:由于 vuex 里,我们保存的状态,都是数组,而 localStorage 只支持字符串,所以需要用 JSON 转换:
JSON.stringify(state.subscribeList);   // array -> string
JSON.parse(window.localStorage.getItem("subscribeList")); // string -> array$attrs/$listeners
多级组件嵌套需要传递数据时,通常使用的方法是通过 vuex。但如果仅仅是传递数据,而不做中间处理,使用 vuex 处理,未免有点大材小用。为此 Vue2.4 版本提供了另一种方法----$attrs/$listeners
$attrs:包含了父作用域中不被 prop 所识别 (且获取) 的特性绑定 (class 和 style 除外)。当一个组件没有声明任何 prop 时,这里会包含所有父作用域的绑定 (class 和 style 除外),并且可以通过 v-bind="$attrs" 传入内部组件。通常配合 interitAttrs 选项一起使用。$listeners:包含了父作用域中的 (不含 .native 修饰器的) v-on 事件监听器。它可以通过 v-on="$listeners" 传入内部组件接下来我们看个跨级通信的例子:
// index.vue
<template>
  <p>
    <h2>浪里行舟</h2>
    <child-com1
      :foo="foo"
      :boo="boo"
      :coo="coo"
      :doo="doo"
      title="前端工匠"
    ></child-com1>
  </p>
</template>
<script>
const childCom1 = () => import("./childCom1.vue");
export default {
  components: { childCom1 },
  data() {
    return {
      foo: "Javascript",
      boo: "Html",
      coo: "CSS",
      doo: "Vue"
    };
  }
};
</script>// childCom1.vue
<template class="border">
<p>
<p>foo: {{ foo }}</p>
<p>childCom1的$attrs: {{ $attrs }}</p>
<child-com2 v-bind="$attrs"></child-com2>
</p>
</template>
<script>
const childCom2 = () => import("./childCom2.vue");
export default {
components: {
childCom2
},
inheritAttrs: false, // 可以关闭自动挂载到组件根元素上的没有在props声明的属性
props: {
foo: String // foo作为props属性绑定
},
created() {
console.log(this.$attrs); // { "boo": "Html", "coo": "CSS", "doo": "Vue", "title": "前端工匠" }
}
};
</script>// childCom2.vue
<template>
<p class="border">
<p>boo: {{ boo }}</p>
<p>childCom2: {{ $attrs }}</p>
<child-com3 v-bind="$attrs"></child-com3>
</p>
</template>
<script>
const childCom3 = () => import("./childCom3.vue");
export default {
components: {
childCom3
},
inheritAttrs: false,
props: {
boo: String
},
created() {
console.log(this.$attrs); // { "boo": "Html", "coo": "CSS", "doo": "Vue", "title": "前端工匠" }
}
};
</script>// childCom3.vue
<template>
<p class="border">
<p>childCom3: {{ $attrs }}</p>
</p>
</template>
<script>
export default {
props: {
coo: String,
title: String
}
};
</script>
如上图所示$attrs表示没有继承数据的对象,格式为{属性名:属性值}。Vue2.4 提供了$attrs , $listeners 来传递数据与事件,跨级组件之间的通讯变得更简单。
简单来说:$attrs与$listeners 是两个对象,$attrs 里存放的是父组件中绑定的非 Props 属性,$listeners里存放的是父组件中绑定的非原生事件。
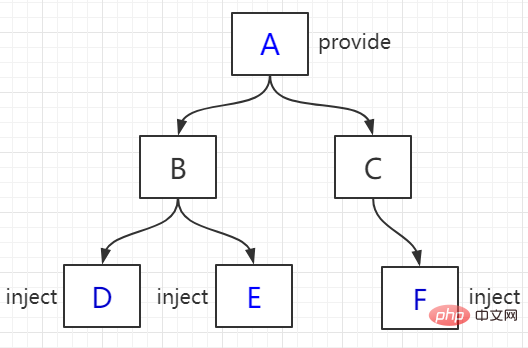
Vue2.2.0 新增 API,这对选项需要一起使用,以允许一个祖先组件向其所有子孙后代注入一个依赖,不论组件层次有多深,并在起上下游关系成立的时间里始终生效。一言而蔽之:祖先组件中通过 provider 来提供变量,然后在子孙组件中通过 inject 来注入变量。
provide / inject API 主要解决了跨级组件间的通信问题,不过它的使用场景,主要是子组件获取上级组件的状态,跨级组件间建立了一种主动提供与依赖注入的关系。
假设有两个组件: A.vue 和 B.vue,B 是 A 的子组件
// A.vue
export default {
  provide: {
    name: '浪里行舟'
  }
}// B.vue
export default {
inject: ['name'],
mounted () {
console.log(this.name); // 浪里行舟
}
}可以看到,在 A.vue 里,我们设置了一个 provide: name,值为 浪里行舟,它的作用就是将 name 这个变量提供给它的所有子组件。而在 B.vue 中,通过 inject 注入了从 A 组件中提供的 name 变量,那么在组件 B 中,就可以直接通过 this.name 访问这个变量了,它的值也是 浪里行舟。这就是 provide / inject API 最核心的用法。
需要注意的是:provide 和 inject 绑定并不是可响应的。这是刻意为之的。然而,如果你传入了一个可监听的对象,那么其对象的属性还是可响应的----vue 官方文档
所以,上面 A.vue 的 name 如果改变了,B.vue 的 this.name 是不会改变的,仍然是 浪里行舟。
一般来说,有两种办法:
我们来看个例子:孙组件 D、E 和 F 获取 A 组件传递过来的 color 值,并能实现数据响应式变化,即 A 组件的 color 变化后,组件 D、E、F 不会跟着变(核心代码如下:)

// A 组件
<p>
      <h1>A 组件</h1>
      <button @click="() => changeColor()">改变color</button>
      <ChildrenB />
      <ChildrenC />
</p>
......
  data() {
    return {
      color: "blue"
    };
  },
  // provide() {
  //   return {
  //     theme: {
  //       color: this.color //这种方式绑定的数据并不是可响应的
  //     } // 即A组件的color变化后,组件D、E、F不会跟着变
  //   };
  // },
  provide() {
    return {
      theme: this//方法一:提供祖先组件的实例
    };
  },
  methods: {
    changeColor(color) {
      if (color) {
        this.color = color;
      } else {
        this.color = this.color === "blue" ? "red" : "blue";
      }
    }
  }
  // 方法二:使用2.6最新API Vue.observable 优化响应式 provide
  // provide() {
  //   this.theme = Vue.observable({
  //     color: "blue"
  //   });
  //   return {
  //     theme: this.theme
  //   };
  // },
  // methods: {
  //   changeColor(color) {
  //     if (color) {
  //       this.theme.color = color;
  //     } else {
  //       this.theme.color = this.theme.color === "blue" ? "red" : "blue";
  //     }
  //   }
// }// F 组件
<template functional>
<p class="border2">
<h3 :style="{ color: injections.theme.color }">F 组件</h3>
</p>
</template>
<script>
export default {
inject: {
theme: {
//函数式组件取值不一样
default: () => ({})
}
}
};
</script>虽说 provide 和 inject 主要为高阶插件/组件库提供用例,但如果你能在业务中熟练运用,可以达到事半功倍的效果!
$parent / $children与 ref
ref:如果在普通的 DOM 元素上使用,引用指向的就是 DOM 元素;如果用在子组件上,引用就指向组件实例$parent / $children:访问父 / 子实例需要注意的是:这两种都是直接得到组件实例,使用后可以直接调用组件的方法或访问数据。我们先来看个用 ref来访问组件的例子:
// component-a 子组件
export default {
  data () {
    return {
      title: 'Vue.js'
    }
  },
  methods: {
    sayHello () {
      window.alert('Hello');
    }
  }
}// 父组件
<template>
<component-a ref="comA"></component-a>
</template>
<script>
export default {
mounted () {
const comA = this.$refs.comA;
console.log(comA.title); // Vue.js
comA.sayHello(); // 弹窗
}
}
</script>不过,这两种方法的弊端是,无法在跨级或兄弟间通信。
// parent.vue
<component-a></component-a>
<component-b></component-b>
<component-b></component-b>
我们想在 component-a 中,访问到引用它的页面中(这里就是 parent.vue)的两个 component-b 组件,那这种情况下,就得配置额外的插件或工具了,比如 Vuex 和 Bus 的解决方案。
常见使用场景可以分为三类:
$emit);通过父链 / 子链也可以通信($parent / $children);ref 也可以访问组件实例;provide / inject API;$attrs/$listeners
$attrs/$listeners
相关免费学习推荐:JavaScript(视频)
Das obige ist der detaillierte Inhalt vonSo kommunizieren Sie zwischen vue.js-Komponenten. Für weitere Informationen folgen Sie bitte anderen verwandten Artikeln auf der PHP chinesischen Website!
 Warum meldet vue.js einen Fehler?
 Wozu dienen vue.js-Slots?
 So springen Sie mit Parametern in vue.js
 Was sind die Oracle-Wildcards?
 So löschen Sie leere Seiten in Word
 Überprüfen Sie den Speicherplatz unter Linux
 Schritte zur SpringBoot-Projekterstellung
 Warum verschwinden die Wörter nach der Worteingabe?