

Vor kurzem lerne ich die WeChat-Applet-Entwicklung und arbeite außerdem mit zwei Klassenkameraden daran, das WeChat-Applet von Wu APP zu imitieren. Hier werde ich hauptsächlich meinen Lernprozess und einige Fallstricke teilen, auf die ich gestoßen bin. Ich hoffe, dass es Ihnen hilfreich sein wird.
Die Teile, für die ich im Projekt verantwortlich bin, sind hauptsächlich die folgenden (einige Daten sind feste Daten, die in config geschrieben sind, und js-Dateien werden übergeben). durch module.exports Exposed, wenn eine Referenz benötigt wird, fügen Sie sie in den entsprechenden js-Header der Seite ein, zum Beispiel const {} = require('../../../ ../config/buys')) . Ich verwende viele vant-Komponenten im Projekt und muss beim Erstellen des npm-Pakets vant einführen. Weitere Informationen finden Sie unter Es gibt eine NPM-Installation wie vant config中,js文件通过module.exports暴露,需要引用时在页面对应js头部引入,例const {} = require('../../../../config/buys'))。项目中我使用的较多vant组件,需要在构建npm包时引入vant,详情可见有赞vant的npm安装。页面使用第三方组件时须在对应json文件中声明,为了不做重复工作可直接在app.json中声明。例:("usingComponents": "van-search": "@vant/weapp/search/index"})
    |-config  对应数据
        |-assem.js
        |-buys.js
        |-detail.js
        |-kind.js
        |-search.js
    |-pages
        |-buy_page
            |-page
                |-assem   筛选排序页
                |-buy     购买首页
                |-detail  商品详情页
                |-kinds   品牌分类页
                |-produce 鉴别简介页
|-search 搜索页参照得物APP微信小程序,下面是我的小程序的tabBar。(有点糙,但是还能看)

  "tabBar": {
    "selectedColor": "#000000",
    "borderStyle": "white",
    "backgroundColor": "#fff",
    "list": [
      {
        "text": "购买",
        "pagePath": "pages/buy_page/page/buy/buy",
        "iconPath": "images/buy.png",
        "selectedIconPath": "images/buy_active.png"
      },
      {
        "text": "鉴别查询",
        "pagePath": "pages/disting/disting",
        "iconPath": "images/disting.png",
        "selectedIconPath": "images/disting_active.png"
      },
      {
        "text": "洗护",
        "pagePath": "pages/wash/wash",
        "iconPath": "images/wash.png",
        "selectedIconPath": "images/wash_active.png"
      },
      {
        "text": "我",
        "pagePath": "pages/my_page/my/my",
        "iconPath": "images/my.png",
        "selectedIconPath": "images/my_active.png"
      }
    ]
},云数据库是一种NoSQL数据库。每一张表是一个集合。 对于我的项目部分,我主要建立了一个商品集合。
dewu_goods 商品表 用于存储创商品的信息
    - _id
    - amway  是否为推荐
    - brand  品牌
    - buyer  已购买人数
    - ctime  数据创建时间
    - digest 详情介绍
    - img    详情图
    - pic    商品展示图
    - kind   种类
    - price  价格
    - sex    适应人群
    - title  简介
    - type   首页索引
建立数据集合后需修改数据权限才可正常访问。
可对在数据库中进行这些操作,注意导入数据格式需要是.csv或.json. Wenn eine Seite Komponenten von Drittanbietern verwendet, muss sie in der entsprechenden JSON-Datei deklariert werden. Um Doppelarbeit zu vermeiden, kann sie direkt in app.json deklariert werden. Beispiel: ("usingComponents": "van-search": "@vant/weapp/search/index"})
const db = wx.cloud.database() //云数据库
const dewuCollection = db.collection('dewu') //在js文件中导入数据集合
Projektplanung
Beziehen Sie sich auf das Dewu APP WeChat-Applet. Das Folgende ist die TabBar meines Applets. (Etwas rau, aber trotzdem anschaubar)


<view class="page">
  <!-- 使用van-sticky设置dewu-hd吸顶 搜索栏-->
  <van-sticky>
  <!-- dewu-hd使用flex布局 -->
    <view class="dewu-hd">
      <view class="dewu-hd-search" bindtap="gotoSearch">
        <van-search placeholder="搜索单号" disabled />
      </view>
      <view class="dewu-kinds" bindtap="kinds"><image src=""></image>
      </view>
    </view>
  </van-sticky>
  <!-- van-tabs实现购买页导航及与内容页对应 -->
  <van-tabs class="dewu-tabs">
    <van-tab title="推荐">
      <view class="dewu-tip">
        <view class="dewu-tip-img-hd"><image src=""></image>
        </view>
        <!-- 使用van-grid布局设置边框隐藏快速定位 -->
        <van-grid>
          <van-grid-item use-slot>
            <image  src=""></image>
            <text>正品保障</text>
          </van-grid-item>
        </van-grid>
      </view>
      <view class="van-items">
        <van-grid class="van-grid-bd">
        <!-- grid布局自定义van-grid-item样式 -->
          <van-grid-item use-slot>
            <view class="item-img"><image src=""></image></view>
            <view class="item-text">
              <span>{{}}</span>
            </view>
          </van-grid-item>
        </van-grid>
      </view>
    </van-tab>
  </van-tabs>
</view>
  async onLoad() {
     this.proData()   //获取推荐数据项
     this.shoeData()  //获取鞋类数据项
  },
  proData() {
     const {data} = await dewuCollection
    .where({
      amway: db.command.eq('TRUE')
    })
    .field({          //获取指定数据项,提升性能
      _id:true,
      pic:true,
      title:true,
      buyer:true,
      price:true
    })
    .get()
    // console.log(data);
    this.setData({
      produces: data,
    })
  }
  shoeData() {
    let data1 = await dewuCollection
    .where({
      type: 1
    })
    .get()
    // console.log(data1.data);
    this.setData({
      shoes: data1.data
    })
} Nachdem Sie eine Datensammlung erstellt haben, müssen Sie die Datenberechtigungen ändern, bevor Sie normal darauf zugreifen können.
.csv- oder .json-Datei sein muss. Sie können zunächst eine Excel-Tabelle verwenden, um eine zu erstellen Datensatz und wie man ihn direkt in eine entsprechende Formatdatei konvertiert. gotoDetail(e) {
// console.log(e);
wx.navigateTo({
url: '/pages/buy_page/page/detail/detail?id='+e.currentTarget.dataset.id,
})
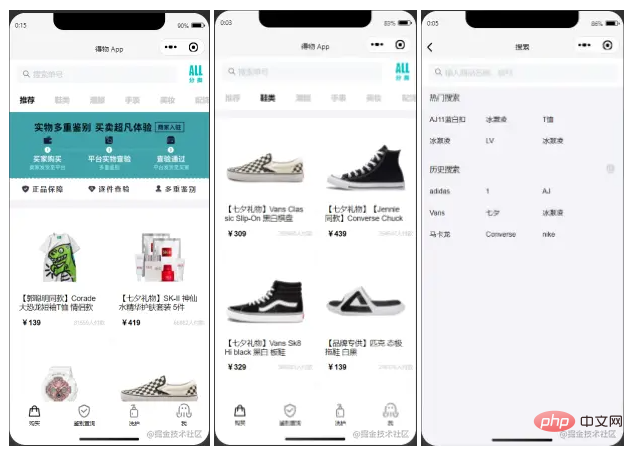
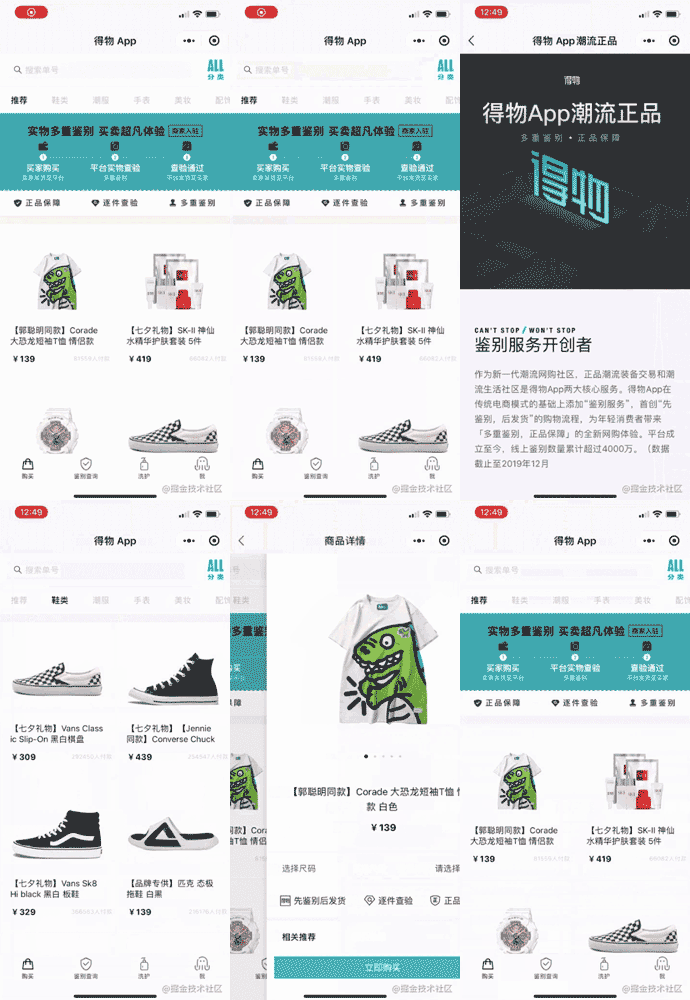
}, Projektdekonstruktion🎜🎜🎜Das Folgende ist die Dewu APP-Applet-Schnittstelle, die ich hauptsächlich implementiert habe🎜🎜🎜🎜🎜🎜🎜🎜 Als Nächstes werde ich die Details jeder Seite dekonstruieren. 🎜🎜Homepage kaufen🎜🎜🎜🎜🎜🎜Homepage-Stil kaufen🎜🎜🎜🎜🎜
<view class="page">
  <!-- 使用van-sticky设置dewu-hd吸顶 搜索栏-->
  <van-sticky>
  <!-- dewu-hd使用flex布局 -->
    <view class="dewu-hd">
      <view class="dewu-hd-search" bindtap="gotoSearch">
        <van-search placeholder="搜索单号" disabled />
      </view>
      <view class="dewu-kinds" bindtap="kinds"><image src=""></image>
      </view>
    </view>
  </van-sticky>
  <!-- van-tabs实现购买页导航及与内容页对应 -->
  <van-tabs class="dewu-tabs">
    <van-tab title="推荐">
      <view class="dewu-tip">
        <view class="dewu-tip-img-hd"><image src=""></image>
        </view>
        <!-- 使用van-grid布局设置边框隐藏快速定位 -->
        <van-grid>
          <van-grid-item use-slot>
            <image  src=""></image>
            <text>正品保障</text>
          </van-grid-item>
        </van-grid>
      </view>
      <view class="van-items">
        <van-grid class="van-grid-bd">
        <!-- grid布局自定义van-grid-item样式 -->
          <van-grid-item use-slot>
            <view class="item-img"><image src=""></image></view>
            <view class="item-text">
              <span>{{}}</span>
            </view>
          </van-grid-item>
        </van-grid>
      </view>
    </van-tab>
  </van-tabs>
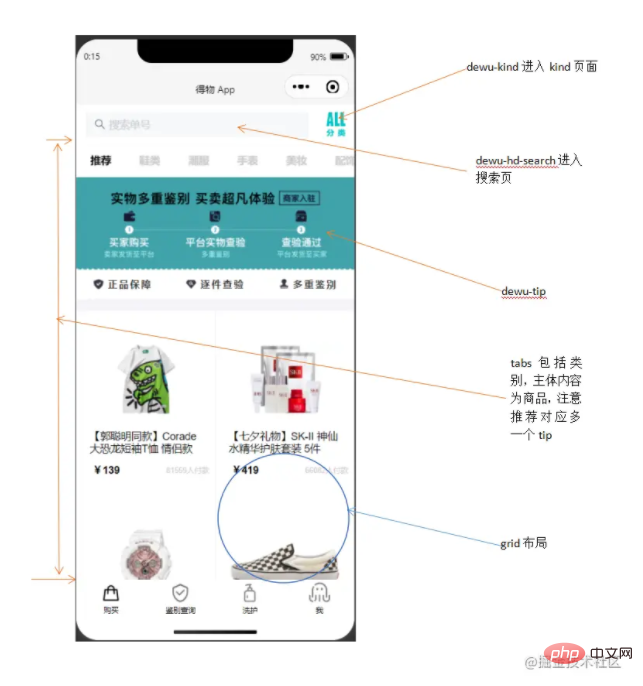
</view>商品项van-grid-item中采用绝对定位。tips中将direction属性设置为horizontal,可以让宫格的内容呈横向排列。搜索框设置disabled属性为禁用状态解决单击自动聚焦的问题。在使用van-grid布局时自定义每一项的属性需设置use-slot属性,否则不生效。
这个页面布局并不复杂,不过我在写这个布局时还是遇到了坑(感觉是自己跳进去的 我太了)。在做dewu-hd吸顶时我是直接用van-sticky包起来实现,但是实际效果是tabs也需要固定在dewu-hd下面。这里不可以使用同上的方法,实际效果会使得整个van-tabs吸顶导致页面无法滑动。其实在这里只需要给van-tabs添加一个sticky属性并且设置offset-top,注意这两个属性需一起使用才能生效。
  async onLoad() {
     this.proData()   //获取推荐数据项
     this.shoeData()  //获取鞋类数据项
  },
  proData() {
     const {data} = await dewuCollection
    .where({
      amway: db.command.eq('TRUE')
    })
    .field({          //获取指定数据项,提升性能
      _id:true,
      pic:true,
      title:true,
      buyer:true,
      price:true
    })
    .get()
    // console.log(data);
    this.setData({
      produces: data,
    })
  }
  shoeData() {
    let data1 = await dewuCollection
    .where({
      type: 1
    })
    .get()
    // console.log(data1.data);
    this.setData({
      shoes: data1.data
    })
} gotoDetail(e) {
// console.log(e);
wx.navigateTo({
url: '/pages/buy_page/page/detail/detail?id='+e.currentTarget.dataset.id,
})
},利用商品_id属性唯一,当设定数据项id等于_id时跳转到详情页且展示对应数据。

<view class="page">
<!-- 头部 滑块及标题 -->
<view class="detail_hd">
<swiper class="swiper__hd">
<swiper-item class="swiper_hd"></swiper-item>
</swiper>
<view class="dots1">
<view class="{{current==index?'active':''}}"></view>
</view>
<view class="detail_hd-title">{{img.digest}}</view>
<view class="detail_hd-price">
<text id="p2">¥{{img.price}}</text>
</view>
</view>
<van-cell class="size" bind:click="showPopup1">
<view class="size-l">选择尺码</view>
<view class="size-r">请选择尺码</view>
<image class="ricon" style="width:26rpx;height:26rpx;" ></image>
</van-cell>
<!-- flex布局 每一个swiper-item包含三项 -->
<view class="detail_bd">
<swiper></swiper></view>
<van-goods-action>
<button>立即购买</button>
</van-goods-action>
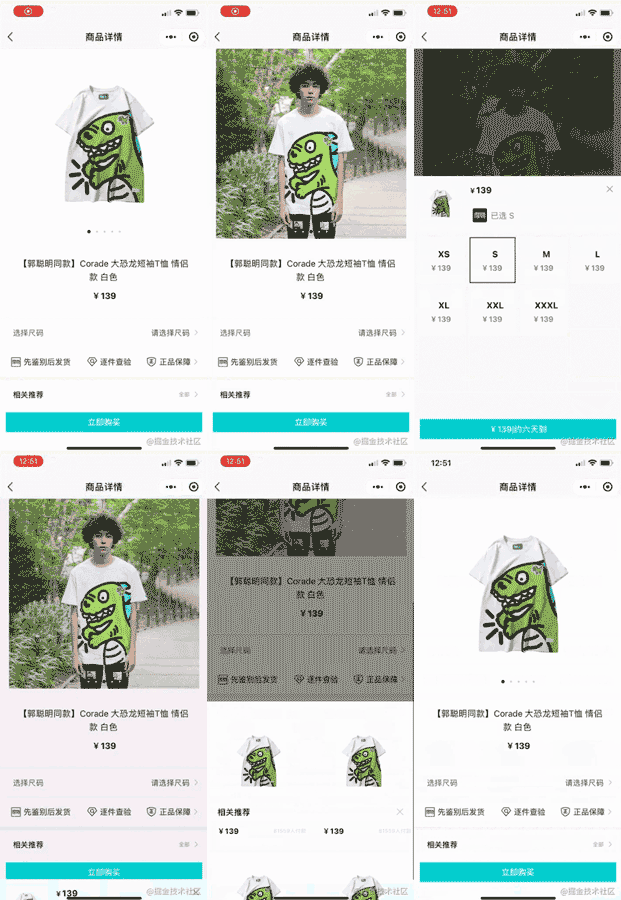
</view>整体分为detail_hd和detail_bd两部分。自定义swiper需设置dot对应展示图片并更改样式,circular属性设置是否启用滑块切换动画,这里使用三目运算符判断是否添加新的样式类名。在定义商品价格的样式的时候可以通过first-letter伪元素来定义¥符号样式。引用组件van-goods-action使得购买按钮吸底。

<van-popup closeable position="bottom" custom-  style="max-width:90%">
    <view class="detail_size-hd">
      <view class="detail_size-hd-img">
        <image bindtap="previewImage" mode="aspectFit" >
        </image>
      </view>
      <view class="detail_size-hd-price">
        <text style="font-size:25rpx;">¥</text>
        <text wx:if="{{activeSizeIndex==-1}}">--</text>
        <text wx:if="{{activeSizeIndex==index}}">{{item.price}}</text>
      </view>
      <view>
        <image src=""></image>
        <text wx:if="{{activeSizeIndex==-1}}">请选择商品</text>
        <text wx:if="{{activeSizeIndex==index}}">已选 {{item.size}}</text>
      </view>
    </view>
    <!-- 尺码布局 -->
    <view class="detail_size-bd">
      <van-grid square gutter="10">
        <van-grid-item>
          <view class="size">
            <text id="p3">{{item.size}}</text>
            <text id="p4">¥{{item.price}}</text>
          </view>
        </van-grid-item>
      </van-grid>
    </view>
    <view>
      <button>{{}}</button>
    </view>
</van-popup>使用van-popup组件,给对应标签设置事件即可绑定弹出。例:<van-cell bind:click="showPopup"></van-cell>。三目运算符设置默认样式并且控制选中边框样式,设置closeable属性启用关闭按钮。square设置van-grid-item为方形,gutter设置格子间距。
<van-sticky sticky offset-top="{{ 180 }}">
      <view class="head">
        <view class="detail_produce-hd">相关推荐</view>
        <view class="detail_close" bindtap="onClose2">
          <image style="width:40rpx;height:40rpx;" ></image>
        </view>
      </view>
</van-sticky>设置detail_produce-hd吸顶,给右侧关闭icon绑定bind:close="onClose"事件。
  async onLoad(options) {  //获取对应_id的商品数据
    console.log(options);
    let id = options.id
    console.log(id);
    wx.cloud.database().collection('dewu')
    .doc(id)
    .get()
    .then(res => {
      console.log(res);
      this.setData({
       img :res.data
      })
    })
}, showPopup() { //显示弹出层
this.setData({
show: true,
});
},
onClose() { //关闭弹出层
this.setData({
show: false,
});
}, pickSize(e) {
let flag = e.currentTarget.dataset.flag
let index = e.currentTarget.dataset.index
if(flag==index) {
this.setData({
activeSizeIndex: -1,
flag: -1
})
}
else {
this.setData({
activeSizeIndex: index,
flag: index
})
}
},点击尺码,flag==index即为选中状态,再次点击时或者点击其他尺码时设置为非选中状态,否则使flag等于index,使其变成选中状态。

<view class="page">
<view class="search">
<van-stichy>
<van-search value="{{value}}" bind:clear="onClear" placeholder="输入商品名称、货号"/>
</van-stichy>
<!-- block包装 flex布局 -->
<block wx:if="{{showHistory == true && historyList.length > 0}}">
<view class="historyContainer">
<view class="title">历史搜索<image class="delete" ></image>
</view>
<view class="historyList">
<view class="historyItem">
<text class="order">{{}}</text>
</view>
</view>
</view>
</block>
</view>
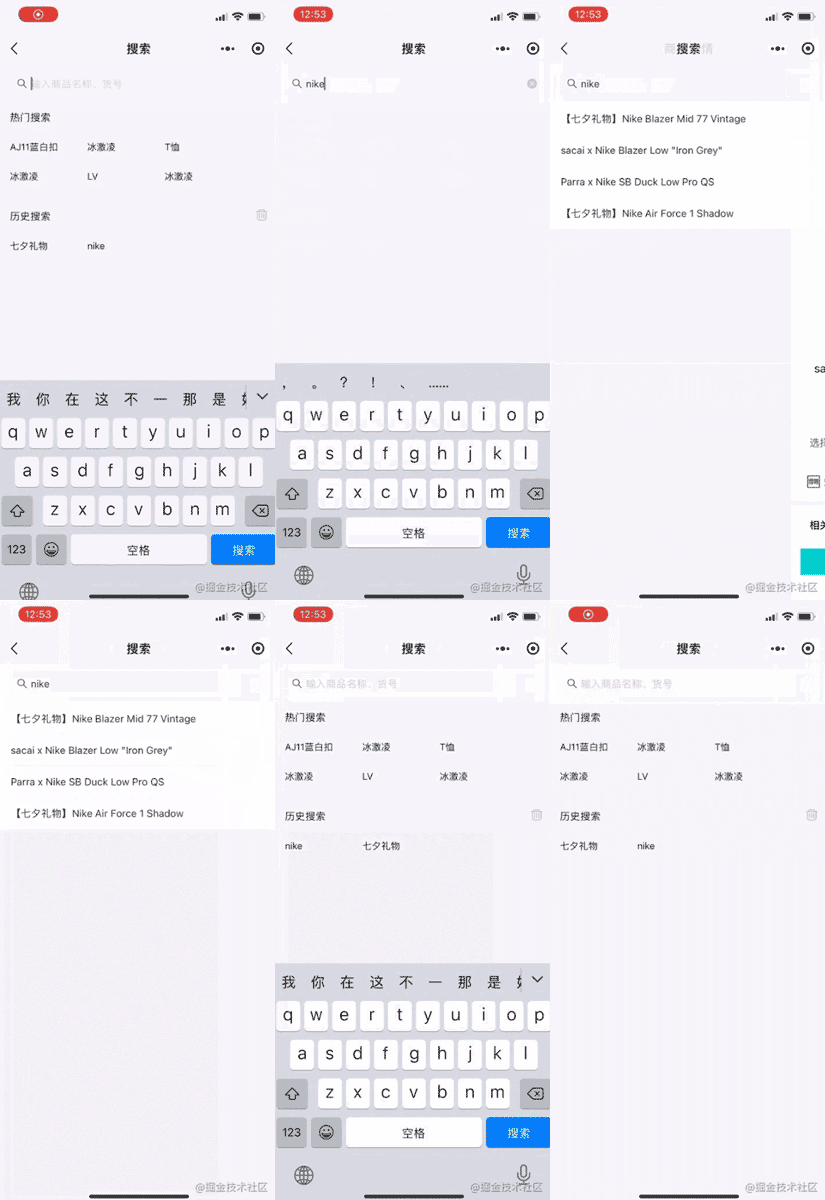
</view>搜索页面主要分为头部搜索框和内容(搜索推荐,历史记录和搜索到的商品列表)两部分。这里用van-sticky包装搜索框使吸顶,内容部分则用block标签包装,利用wx:if这个控制属性来判断是否显示。
async onSearch(e) {
// console.log(e);
if (!e.detail.trim()) {
wx.showToast({
title: '请输入商品名',
})
return
}
let {value, historyList} = this.data
if(historyList.indexOf(value) !== -1) {
historyList.splice(historyList.indexOf(value), 1)
}
historyList.unshift(value)
this.setData({
historyList
})
wx.setStorageSync('value', historyList)
let keyword = e.detail.trim()
let results = await dewuCollection
.where({
title: db.RegExp({
regexp: keyword,
options: 'i'
})
})
.get()
if (results.data.length == 0 || keyword == '') {
wx.showToast({
title: '不存在'+keyword,
})
}
else {
await dewuCollection
.where({
title: db.RegExp({
regexp: keyword,
options: 'i'
})
})
.orderBy('hot', 'desc')
.get()
.then(res => {
console.log(res);
this.setData({
results: res.data
})
})
}
},
onLoad() {
this.getSearchHistory() //获取历史搜索
},
getSearchHistory() {
let historyList = wx.getStorageSync('value')
if(historyList) {
this.setData({
historyList
})
}
},页面加载时从本地storage中获取历史搜索记录,在确定搜索onSearch时判断value是否为空,将合法value插入historyList中,这里使用的时unshift方法,这样可以保证最近的搜索记录展示在前面,利用正则表达式模糊查询数据库中符合的项存入数组results中,当results.length > 0时显示商品列表。利用wx.setStorageSync将value存入缓存,wx.getStorageSync获取打印出来。通过indexOf方法判断value是否已经存在,是则删除historyList中的该项。
async historySearch(e) {
// console.log(e);
let historyList = this.data.historyList
let value = historyList[e.currentTarget.dataset.index]
this.setData({
value, //修改value
showHotList: false, //隐藏热门搜索
showHistory: false, //隐藏历史搜索
results: [] //清空商品列表
})
},点击历史搜索项时setData使对应值改变,再调用onSearch方法。
onClear() {
this.setData({
results: [],
value: '',
showHotList: true,
showHistory: true
});
},
onChange(e) { //search框输入改变时实时修改数据
// console.log(e.detail);
this.setData({
value: e.detail,
showHotList: false,
showHistory: false,
results: []
})
// console.log(this.data.showHotList);
if (this.data.value=='') {
this.setData({
showHotList: true,
showHistory: true
})
}
}, deleteSearchHistory() {
wx.showModal({
content: '确认清空历史记录',
success: (res) => {
if(res.confirm) {
this.setData({
historyList: []
})
}
}
})
wx.removeStorageSync('value')
},点击删除icon弹出对话框wx.showModal实现交互,用户点击确定则清空historyList并利用wx.removeStorageSync将本地存储的历史记录删除。


<view class="page">
<van-sticky>
<view class="search" bindtap="gotoSearch">
<van-search placeholder="搜索商品" input-align="center" disabled />
</view>
</van-sticky>
<view class="kinds">
<view class="hd">
<scroll-view class="scroll-view-left">
<view class="scroll-view-left-item {{activeNavIndex == index?'active': ''}}">
<text>{{}}</text>
</view>
</scroll-view>
</view>
<view class="bd">
<scroll-view>
<view>
<view class="kind-title">
<van-divider contentPosition="center">{{}}</van-divider>
</view>
<van-grid>
<van-grid-item>{{}}</van-grid-item>
</van-grid>
</view>
</scroll-view>
</view>
</view>
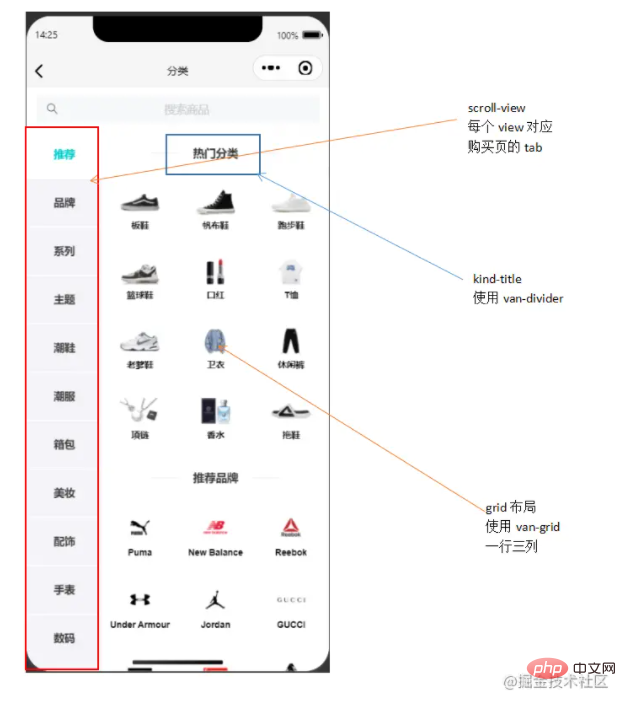
</view>分类页面主要是使用了scroll-view设置竖向滚动,点击左侧scroll-view-left-item时该项变为得物色(#00cbcc)并显示对应的品牌种类项kindsItem。整体采用flex布局,这里的坑是scroll-view-left应该把font-size设为0,在子元素scroll-view-left-item中设置font,避免块元素边距影响布局。
onLoad: function (options) {
this.setData({
kindNav: kindNav,
kindall: kindItem,
// console.log(this.data.kindall);
let kinds=[];
// console.log(this.data.kindall)
this.data.kindall.forEach(kind => { //循环从所有品类中获取对应kindNav的并存入数组中
if(kind.camptype == 0) {
kinds.push(kind)
}
})
this.setData({
kindItem: kinds,
})
}, )
}, changeKinds(e) {
console.log(e);
let {index, type} = e.currentTarget.dataset;
console.log(index, type);//index与推荐品牌的索引有关。type与kind.js的camptype有关
this.setData({
activeNavIndex: index,
})
let title=[]
this.data.kindTitles.forEach(kindTitle => {
if(index == kindTitle.titletype) {
title.push(kindTitle)
}
})
this.setData({
kindItem: kinds,
})
}, gotoAssem(e) {
// console.log(e); 利用kind属性值唯一(buy页面tabs的title)
wx.navigateTo({
url: '/pages/buy_page/page/assem/assem?title='+e.currentTarget.dataset.title,
})
},
<view class="page">
<van-sticky>
<view class="search" bindtap="gotoSearch">
<van-search placeholder="{{titles}}" disabled />
</view>
<view class="tab">
<view wx:for="{{tabs}}" wx:key="index" data-index="{{index}}"
class="tab-item {{activeTabIndex == index?'active': ''}}" bindtap="changeItem">
<text>{{item.title}}</text>
<image style="width:26rpx;height:26rpx;" src="{{item.pic}}"></image>
</view>
</view>
</van-sticky>
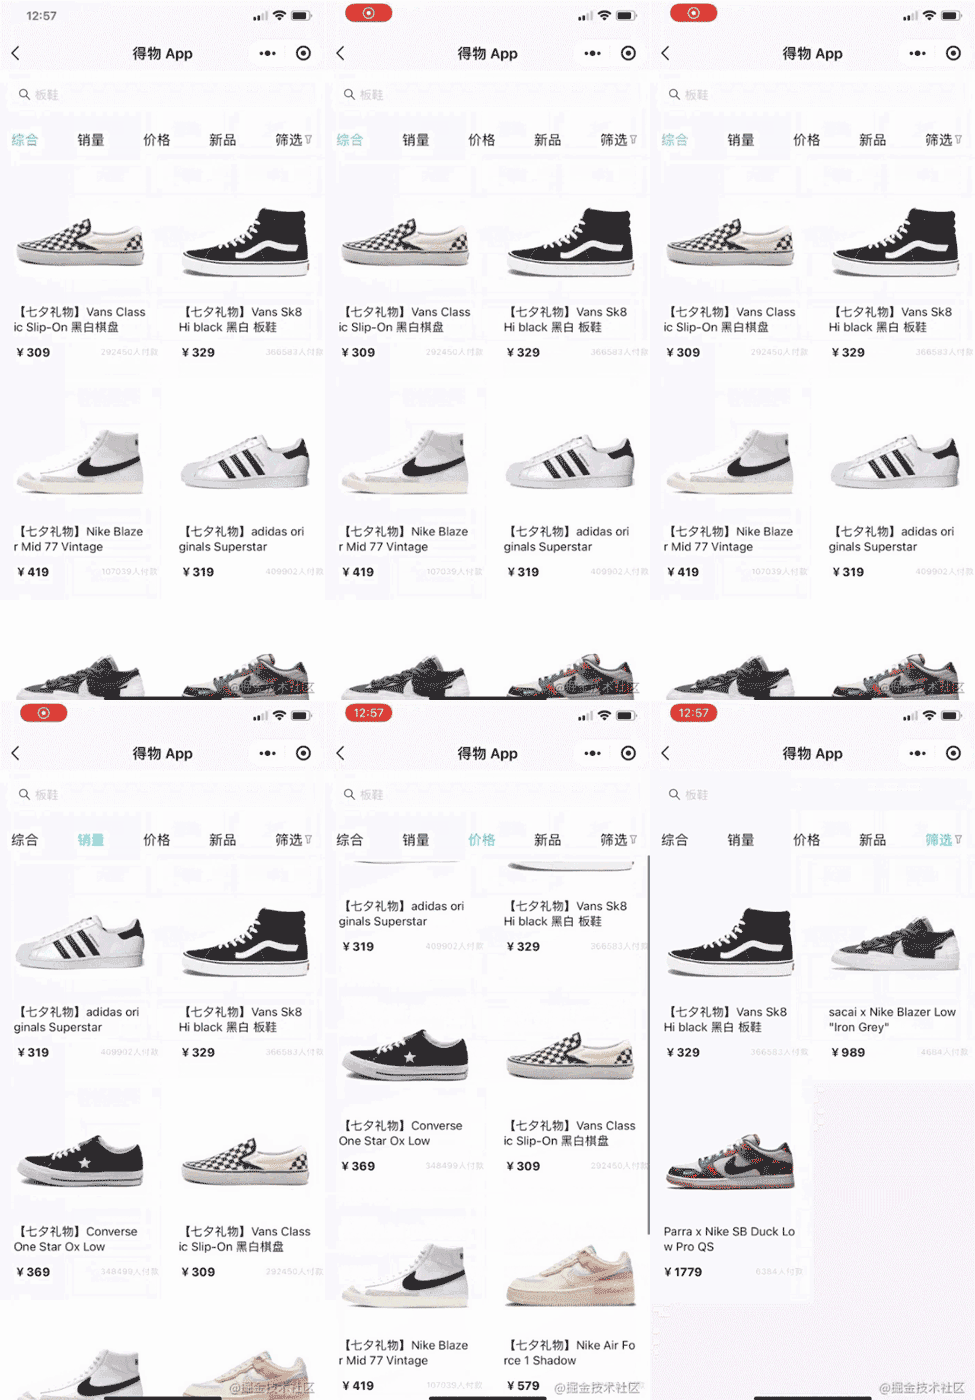
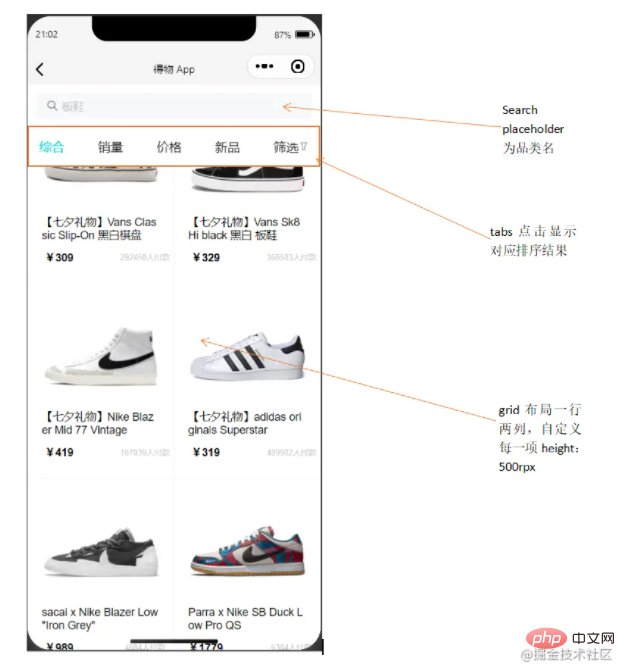
</view>tab使用flex布局。goods部分布局参照buy页面的商品布局。
<van-popup>
<scroll-view class="pop" scroll-y>
<van-collapse>
<van-collapse-item title="适用人群" value="全部" name="1">
</van-collapse-item>
<van-grid column-num="3" gutter="{{ 10 }}">
<van-grid-item class="{{activeIndex1==index?'active1':''}}">{{}}</van-grid-item>
</van-grid>
</van-collapse>
<van-goods-action>
<button>重置</button>
<button>确定</button>
</van-goods-action>
</scroll-view>
</van-popup>这里使用van-collapse组件做折叠面板时有个坑,不应该将van-grid内容部分放在van-collapse-item中,应与其同级,否则会在该单元格下形成留白且无法正常显示内容,多次尝试后还是放在外面方便实现效果。
async onLoad(options) {
// console.log(options);
let title = options.title
let data1 = await dewuCollection
.where({
kind: title //绑定跳转时(kind唯一)获取对应数据
})
.get()
// console.log(data1);
this.setData({
goods: data1.data,
titles: title
})
}, async changeItem(e) {
// console.log(e);
let index = e.currentTarget.dataset.index //index对应排序方式
this.setData({
activeTabIndex: index
})
// console.log(index);
if(index == 1) { //销量排序
await dewuCollection
.where({
kind: this.data.titles
})
.orderBy('buyer', 'desc')
.get()
.then(res => {
this.setData({
goods: res.data,
index: index
})
// console.log(this.data.index);
})
}
if(index == 0) { //综合排序
await dewuCollection
.where({
kind: this.data.titles
})
.get()
.then(res => {
this.setData({
goods: res.data
})
})
}
if(index == 2 && this.data.flag == -1) { //价格降序排序
await dewuCollection
.where({
kind: this.data.titles
})
.orderBy('price', 'desc')
.get()
.then(res => {
this.setData({
goods: res.data,
flag: 1
})
})
return
}
if(index == 3) { //创建时间排序
await dewuCollection
.where({
kind: this.data.titles
})
.orderBy('ctime', 'desc')
.get()
.then(res => {
this.setData({
goods: res.data
})
})
}
if(index == 4) { //弹出筛选层
this.setData({
show: true,
})
}
else if(index == 2 && this.data.flag == 1) { //价格升序排序
await dewuCollection
.where({
kind: this.data.titles
})
.orderBy('price', 'asc')
.get()
.then(res => {
this.setData({
goods: res.data,
flag: -1
})
})
}
},设置一个flag属性默认值为-1,flag==-1时点击价格降序排序并设置flag==1,flag==1时点击价格升序排序并设置flag==-1。
pick(e) {
let flag = e.currentTarget.dataset.flag
let index = e.currentTarget.dataset.index
let cd = this.data.human[index].kind
if(flag==index) {
this.setData({
activeIndex1: -1,
flag1: -1,
cd1: ''
})
}
else {
this.setData({
activeIndex1: index,
flag1: index,
cd1: cd
})
}
}, replace() { // 点击重置按钮将所有筛选条件回复默认
this.setData({
flag1: -1,
activeIndex1: -1,
flag2: -1,
activeIndex2: -1,
flag3: -1,
activeIndex3: -1,
cd1: '',
cd2: '',
cd3: 0,
cd4: 10000000,
})
},这里有一个坑是,不可在data中声明(num:Infinity),这里无穷大并不会生效,目前优化是声明为常量.
async ischeck() { //点击确定按钮进行筛选显示结果
let cd3 = Number(this.data.cd3)
let cd4 = Number(this.data.cd4)==0?1000000:Number(this.data.cd4)
let index = Number(this.data.index)
if(this.data.cd1!='' && this.data.cd2!=''){
await dewuCollection
.where({
kind: this.data.titles,
sex: this.data.cd1,
brand: this.data.cd2,
price: _.gt(cd3).and(_.lt(cd4)),
})
.get()
.then(res => {
this.setData({
goods: res.data,
show: false,
})
})
return
}
},gotoDetail(e) { // console.log(e); wx.navigateTo({ url: '/pages/buy_page/page/detail/detail?id='+e.currentTarget.dataset.id, }) },
跳转到详情页且保留对应数据项。这里利用_id唯一,将每一项的_id赋给data-id,当id相等时才能跳转并接受对应_id的数据。
<van-grid-item class="{{activeSizeIndex==index?'size-active':''}}"
use-slot wx:for="{{size}}" wx:key="index" data-flag="{{flag}}"
data-index="{{index}}" bindtap="pickSize">
<view class="size">
<text id="p3">{{item.size}}</text>
<text id="p4">¥{{item.price}}</text>
</view>
</van-grid-item>
  pickSize(e) {
    let flag = e.currentTarget.dataset.flag
    let index = e.currentTarget.dataset.index
    if(flag==index) {
      this.setData({
        activeSizeIndex: -1,
        flag: -1
      })
    }
    else {
      this.setData({
        activeSizeIndex: index,
        flag: index
      })
    }
},点击尺码时选中并更改text,再次点击该项则重置样式,若点击其他项则取消选中,选中被点击项。这里通过多设一个flag,结合index双重控制是否选中。
<view
wx:for="{{kindNav}}"
wx:key="index"
data-index="{{index}}"
data-type="{{item.type}}"
bindtap="changeKinds"
class="scroll-view-left-item {{activeNavIndex == index?'active': ''}}">
<text>{{item.text}}</text>
</view>
changeKinds(e) {
console.log(e);
let {index, type} = e.currentTarget.dataset;
console.log(index, type);//index与推荐品牌的索引有关。type与kind.js的camptype
this.setData({
activeNavIndex: index,
})
let kinds = []
this.data.kindall.forEach(kind => {
if(kind.camptype == type) {
kinds.push(kind)
}
})
this.setData({
kindItem: kinds,
})
}绑定type和kind.camptype,当点击项改变时,将当前项index赋给activeNavIndex,用kindall存储所有数据项,使用foreach循环遍历kindall,将满足条件kind.camptype==type的数据存入一个数组中kinds,再将setData即可。
  deleteSearchHistory() {
    wx.showModal({
      content: '确认清空历史记录',
      success: (res) => {
        if(res.confirm) {
          this.setData({
            historyList: []
          })
        }
      }
    })
    wx.removeStorageSync('value')
},清空历史记录时不仅将historyList设为空,且利用wx.removeStorageSync将本地存储的缓存清除。
在自己写项目时,多使用console.log()打印,跟进数据变化;多查看文档w3cschool,微信开发文档,Vant-Weapp。
Quellcode dieses Projekts: https://gitee.com/onepiece1205/dewu_weapp
Der Prozess, ein Projekt zu schreiben, ist schließlich eine Herausforderung für mich Als ich mich zum ersten Mal auf das Kollaborationsprojekt konzentriere, werden die im Projekt aufgetretenen Fehler ärgerlich sein, aber nachdem ich die Schreibfunktionen beharrt habe, bin ich den Lehrern und Klassenkameraden, die mir während des Projektschreibprozesses geholfen haben, sehr dankbar. Wenn Ihnen dieser Artikel von mir gefällt oder er für Sie hilfreich ist, geben Sie ihm bitte ein „Gefällt mir“! Gleichzeitig hoffe ich sehr, dass Sie mir nach der Lektüre des Artikels einige Anregungen geben können, und freue mich darauf, mit Ihnen über die WeChat-Miniprogramme zu diskutieren und sie zu erlernen!
Weitere Kenntnisse zum Thema Programmierung finden Sie unter: Einführung in die Programmierung! !
Das obige ist der detaillierte Inhalt vonBringen Sie Ihnen bei, wie Sie das WeChat-Applet der Wu APP nachahmen. Für weitere Informationen folgen Sie bitte anderen verwandten Artikeln auf der PHP chinesischen Website!
 App-Testtools
 Mini-Programmpfaderfassung
 Vollständiger Name der App
 So schließen Sie die App-Ressourcenbibliothek
 Der fatale Fehler von Blade-Servern
 Was sind die Anwendungsbereiche von Mongodb?
 Einführung in Screenshot-Tastenkombinationen in Win8
 Windows kann die Lösung für das Zertifikat nicht finden
 MySQL erstellt eine gespeicherte Prozedur