 Web-Frontend
 js-Tutorial
 Führen Sie Sie Schritt für Schritt durch die Entwicklung eines Atlas-Verpackungstools mithilfe von Node
Führen Sie Sie Schritt für Schritt durch die Entwicklung eines Atlas-Verpackungstools mithilfe von Node
In diesem Artikel erfahren Sie Schritt für Schritt, wie Sie mit node ein Album-Verpackungstool handschriftlich erstellen. Ich hoffe, dass er für alle hilfreich ist.

Ich habe zufällig eine sehr nützliche plattformübergreifende Bildkodierungs- und -dekodierungsbibliothek node-images entdeckt.
Nachdem ich die API sorgfältig gelesen hatte, kam mir die Idee, damit einen Elf-Atlas zu erstellen .
So wurde dieses Tool sprites-pack-tool geboren.sprites-pack-tool.
你可以在github查看
https://github.com/xdq1553/MySpritesPackTool
你可以使用npm安装
https://www.npmjs.com/package/sprites-pack-tool
对于精灵图集, 我想大家都不陌生.
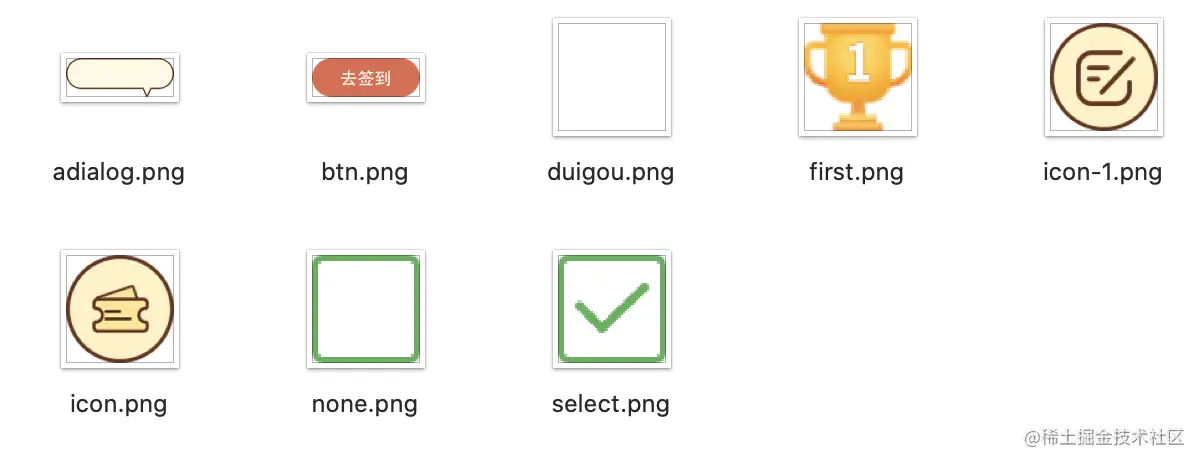
比如把下面的几张图片合成一张.


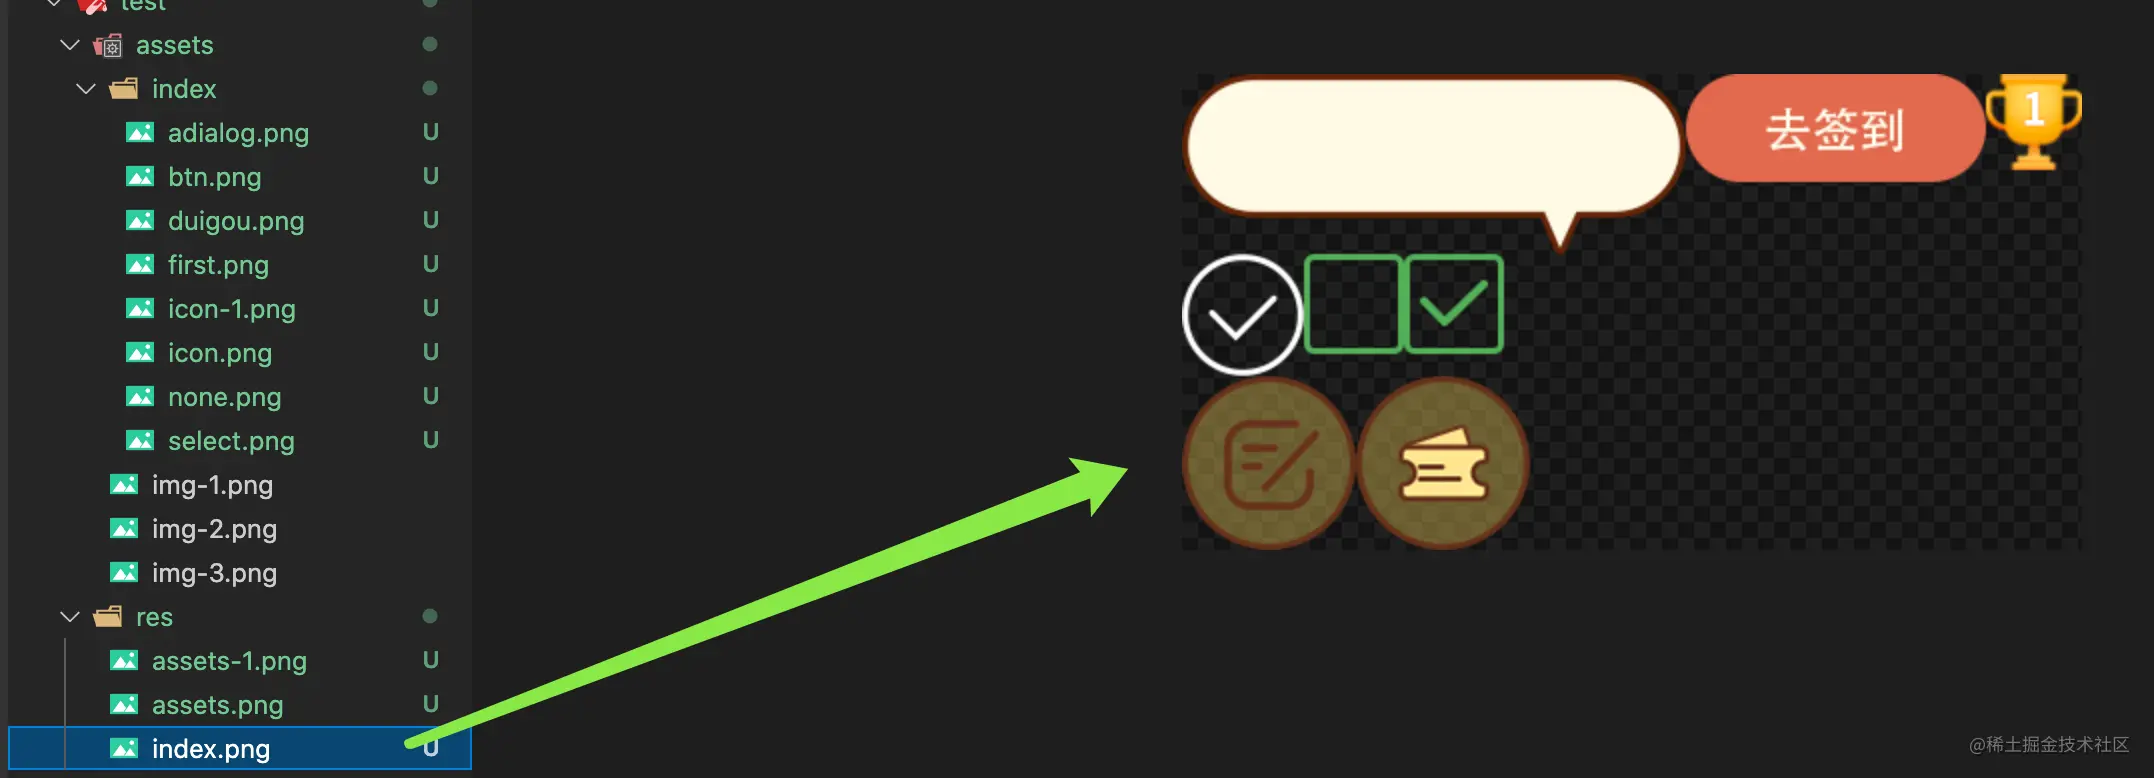
这一张图集就是我用本文介绍的工具打包合成的.
合成的图片品质依然十分高呢.
为什么需要使用图集
web开发
我们在web开发中, 每次在浏览器展示一张图片都需要请求一次服务器资源.
举个例子, 3次请求每次4k, 和一次请求12k还是有本质区别的, 然后更多的时候一次请求并不是3 * 4k.
使用图集能让我们优化资源加载, 提高网站的性能.
游戏开发
在游戏开发中, 图集的使用至关重要, 不管是一般帧动画还是svga等动画解决方案, 都不会每张图片去请求资源.
更多的时候, 我们都是打包成图集, 而图集打包工具texturepacker更是大行其道.
其次, 游戏场景过多, 我们一般都需要分步加载资源, 有的时候一个动画模型, 涉及的图片少则十来张, 多则近百张.
图集的使用不可或缺.
下面我们就来看下如何编写一款图集打包工具.
工具设计
开发一个图集打包工具脚本需要什么技能.
node.js编程能力
二维矩形装箱算法
然后我们思考如何去打包一张图集.
我们需要找到需要打包的文件夹, 可能有多个或者嵌套文件夹.
图集是多张散图拼合而成.
图集的大小需要可配置
尽可能的压缩图集空间, 使每张图紧密贴合
每个文件夹打包成一个图集, 需要考虑图片过多的情况
可能需要生成图集所需要的json文件, 记录图片位置信息
开始编写脚本
脚本IO
我这里是这样设计.
首先我们需要一个打包对象实例MySpritePackTool, 同时支持写入配置参数options.
/** 图集打包对象 */
const MySpritePackTool = function (opt) {
    this.options = {
        //一个文件夹图片过多或者过长 递归最大次数
        maxCount: opt.maxCount || 2,
        //需要打包图集的文件路径
        assetsPath: opt.assetsPath,
        //输出文件路径
        outPutPath: opt.outPutPath,
        //一张图集打包最大size
        maxSize: { width: 2048, height: 2048 }
    }
};然后我们需要输出这个对象, 可以被其他项目所引用.
module.exports = MySpritePackTool;
遍历文件生成节点树
我们的输入参数尽可能的少, 这样就需要我们程序去遍历文件夹.
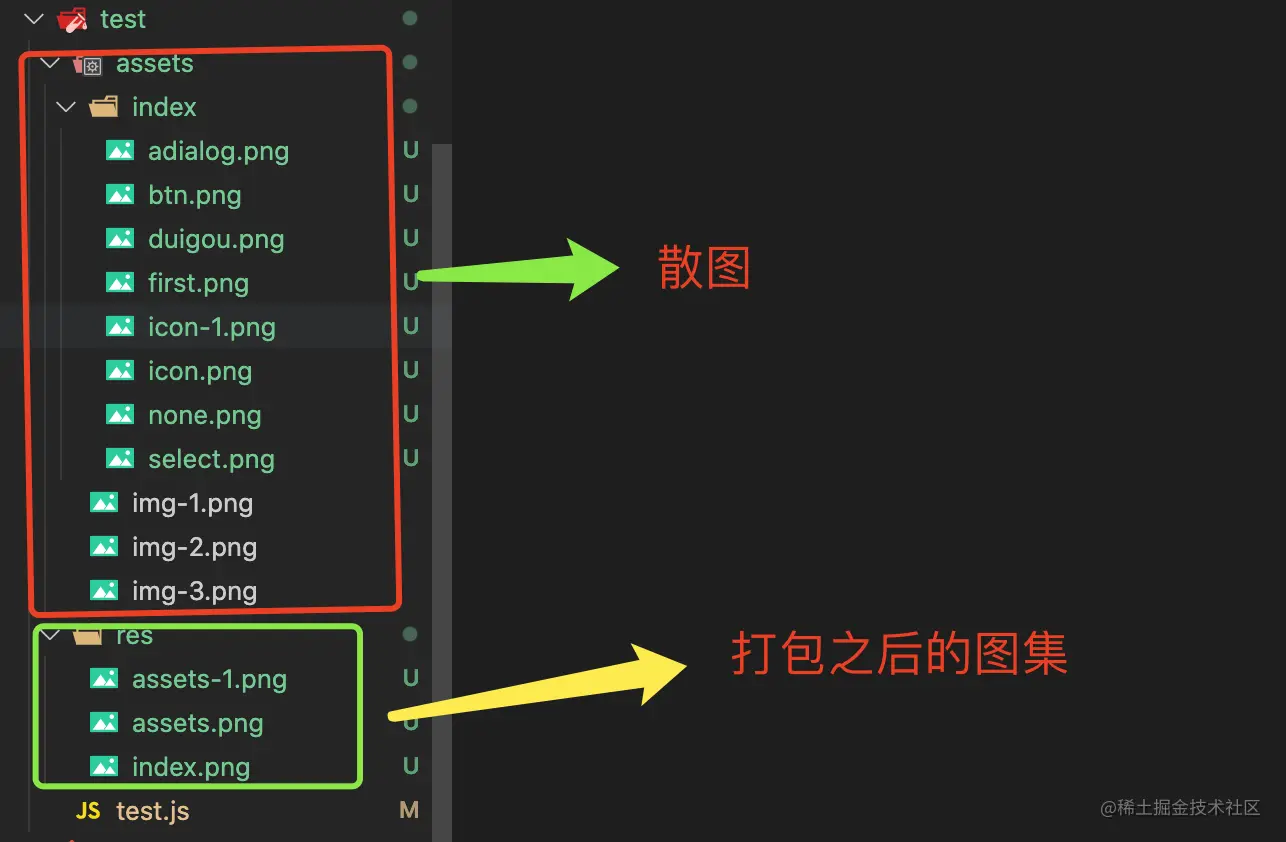
例如, 我们有如下的目录树:
|--assets
   |--index
      |--img-Führen Sie Sie Schritt für Schritt durch die Entwicklung eines Atlas-Verpackungstools mithilfe von Node
      |--img-Führen Sie Sie Schritt für Schritt durch die Entwicklung eines Atlas-Verpackungstools mithilfe von Node
   |--login
      |--img-Führen Sie Sie Schritt für Schritt durch die Entwicklung eines Atlas-Verpackungstools mithilfe von Node
   |--img-Führen Sie Sie Schritt für Schritt durch die Entwicklung eines Atlas-Verpackungstools mithilfe von Node
|--img-Führen Sie Sie Schritt für Schritt durch die Entwicklung eines Atlas-Verpackungstools mithilfe von Node我们需要每个文件夹下打包出一张图集.
思考: 需要什么样的数据结构?
首先便于js解析, 我们约定一个对象,
每一层, 需要一个图片信息容器assets;
一个所包含的图片标识keys;
一个文件夹名字, 也方便我们后面为图集命名name;
然后每层文件夹前套相同对象;
结构如下:
{
  assets: [
    {
      id: 'assets/img-Führen Sie Sie Schritt für Schritt durch die Entwicklung eines Atlas-Verpackungstools mithilfe von Node',
      width: 190,
      height: 187
    },
    ...
  ],
  name: 'assets',
  keys: 'img-Führen Sie Sie Schritt für Schritt durch die Entwicklung eines Atlas-Verpackungstools mithilfe von Node,img-Führen Sie Sie Schritt für Schritt durch die Entwicklung eines Atlas-Verpackungstools mithilfe von Node,',
  index: {
    assets: [
        {
            id: 'assets/index/img-Führen Sie Sie Schritt für Schritt durch die Entwicklung eines Atlas-Verpackungstools mithilfe von Node',
            width: 190,
            height: 187
        },
        ...
    ],
    name: 'index',
    keys: 'img-Führen Sie Sie Schritt für Schritt durch die Entwicklung eines Atlas-Verpackungstools mithilfe von Node,img-Führen Sie Sie Schritt für Schritt durch die Entwicklung eines Atlas-Verpackungstools mithilfe von Node,'
  },
  login: {
    assets: [
        {
            id: 'assets/login/img-Führen Sie Sie Schritt für Schritt durch die Entwicklung eines Atlas-Verpackungstools mithilfe von Node',
            width: 190,
            height: 187
        }
    ],
    name: 'index',
    keys: 'img-Führen Sie Sie Schritt für Schritt durch die Entwicklung eines Atlas-Verpackungstools mithilfe von Node,'
  },
}不难发现, 我们已经可以得到需要打包的所有文件和文件夹.
那么用程序如何实现呢?
主要用到nodejs的fs模块来递归操作文件夹, 并输出所需要的节点树.
注意在书写的时候需要判断是图片还是文件夹.
MySpritePackTool.prototype.findAllFiles = function (obj, rootPath) {
    let nodeFiles = [];
    if (fs.existsSync(rootPath)) {
        //获取所有文件名
        nodeFiles = fs.readdirSync(rootPath);

        //组装对象
        let nameArr = rootPath.split('/');
        obj["assets"] = [];
        obj["name"] = nameArr[nameArr.length - 1];
        obj["keys"] = "";

        nodeFiles.forEach(item => {
            //判断不是图片路径
            if (!/(.png)|(.jpe?g)$/.test(item)) {
                let newPath = path.join(rootPath, item);
                //判断存在文件 同时是文件夹系统
                if (fs.existsSync(newPath) && fs.statSync(newPath).isDirectory()) {
                    // console.log("获得新的地址", newPath);
                    obj[item] = {};
                    this.findAllFiles(obj[item], newPath);

                } else {
                    console.log(`文件路径: ${newPath}不存在!`);
                }

            } else {
                console.log(`图片路径: ${item}`);
                obj["keys"] += item + ",";
                let params = {};
                params["id"] = path.resolve(rootPath, `./${item}`);
                //获得图片宽高
                params["width"] = images(path.resolve(rootPath, `./${item}`)).width();
                params["height"] = images(path.resolve(rootPath, `./${item}`)).height();
                obj["assets"].push(params);
            }
        })

    } else {
        console.log(`文件路径: ${rootPath}不存在!`);
    }
}这样子我们就可以得到我们所需要的节点树了.
获取新的图集位置信息
我们对文件夹的操作已经完成, 这时候我们就需要思考.
如何把这些零散的图片打包到一张图片上.
散图有两个信息, 一个width和一个height
Sie können es auf Github ansehen🎜🎜https://github.com/xdq1553/MySpritesPackTool🎜🎜Das können Sie Verwenden Sie npm zum Installieren🎜🎜 https://www.npmjs.com/package/sprites-pack-tool🎜
🎜Ich denke, jeder kennt den 🎜Sprite Atlas🎜.🎜🎜🎜Zum Beispiel Machen Sie die folgenden Bilder. Die Bilder werden zu einem zusammengefasst.🎜🎜🎜
 🎜🎜
🎜🎜 🎜🎜Dieser Atlas wurde von mir mit den in diesem Artikel vorgestellten Tools gepackt und synthetisiert.🎜🎜Die Qualität der synthetisierten Bilder ist immer noch sehr hoch.🎜
Warum muss ich den Atlas verwenden
Webentwicklung
🎜Bei der Webentwicklung müssen wir jedes Mal, wenn wir ein Bild im Browser anzeigen, eine Anfrage stellen Serverressourcen.🎜🎜Zum Beispiel 🎜3 Es gibt einen grundlegenden Unterschied zwischen jeder Anfrage von 4k🎜 und 🎜einer Anfrage von 12k🎜, und in den meisten Fällen ist eine Anfrage nicht 🎜3 * 4k🎜.🎜🎜Verwendung des Atlas ermöglicht es uns, die Ressourcenbelastung zu optimieren und die Leistung der Website zu verbessern. 🎜Spieleentwicklung
🎜Bei der Spieleentwicklung ist die Verwendung von Atlanten von entscheidender Bedeutung Frame-Animationen oder Animationslösungen wie SVGA werden nicht jedes Mal verwendet, um Bilder anzufordern.🎜🎜Häufiger packen wir sie in Atlanten, und das Atlas-Paketierungstooltexturepacker ist noch beliebter .🎜🎜Zweitens gibt es zu viele Spielszenen, und wir müssen die Ressourcen normalerweise Schritt für Schritt laden. Manchmal umfasst ein animiertes Modell nur ein Dutzend oder fast hundert Bilder Alben sind unverzichtbar. 🎜🎜🎜Schauen wir uns an, wie man es schreibt. Ein Atlas-Verpackungstool.🎜Werkzeugdesign
🎜Welche Fähigkeiten sind erforderlich, um eine Atlas-Verpackung zu entwickeln? Werkzeugskript.🎜- 🎜🎜node.js🎜Programmierfähigkeit🎜
- 🎜Zweidimensionaler rechteckiger Binning-Algorithmus🎜
- 🎜Wir müssen den Ordner finden, der verpackt werden muss, möglicherweise gibt es einen mehrere oder verschachtelte Ordner.🎜
- 🎜Bild Das Set besteht aus mehreren verstreuten Bildern 🎜
- 🎜Die Größe des Atlas muss konfigurierbar sein🎜
- 🎜Komprimieren Sie den Platz des Atlas so weit wie möglich, damit jedes Bild genau passt 🎜
- 🎜Jeder Ordner ist in einem Atlas verpackt, Sie müssen die Situation berücksichtigen 🎜< /li>
- 🎜Es kann erforderlich sein, die für den Atlas erforderliche JSON-Datei zu generieren und die Standortinformationen der Bilder aufzuzeichnen 🎜
Beginnen Sie mit dem Schreiben eines Skripts
Script IO
🎜Hier bin ich so gestaltet.🎜🎜Zuerst benötigen wir eine VerpackungsobjektinstanzMySpritePackTool , das auch das Schreiben von Konfigurationsparametern options unterstützt.🎜/**
* 确定宽高 w h
* 空白区域先放一个, 剩下的寻找右边和下边
* 是否有满足右边的, 有则 放入 无则 继续遍历
* 是否有满足下边的, 有则 放入 无则 继续遍历
*/
const Packer = function (w, h) {
this.root = { x: 0, y: 0, width: w, height: h };
// /** 匹配所有的方格 */
Packer.prototype.fit = function (blocks) {
let node;
for (let i = 0; i < blocks.length; i++) {
let block = blocks[i];
node = this.findNode(this.root, block.width, block.height);
if (node) {
let fit = this.findEmptyNode(node, block.width, block.height);
block.x = fit.x;
block.y = fit.y;
block.fit = fit;
}
}
}
/** 找到可以放入的节点 */
Packer.prototype.findNode = function (node, w, h) {
if (node.used) {
return this.findNode(node.rightArea, w, h) || this.findNode(node.downArea, w, h);
} else if (node.width >= w && node.height >= h) {
return node;
} else {
return null;
}
}
/** 找到空位 */
Packer.prototype.findEmptyNode = function (node, w, h) {
//已经使用过的 删除
node.used = true;
//右边空间
node.rightArea = {
x: node.x + w,
y: node.y,
width: node.width - w,
height: h
};
//下方空位
node.downArea = {
x: node.x,
y: node.y + h,
width: node.width,
height: node.height - h
}
return node;
}
}//记录使用的总的区域
this.usedArea = { width: 0, height: 0 };
//记录未被装入的矩形
this.levelBlocks = [];Dateien durchqueren, um einen Knotenbaum zu generieren
🎜Unsere Eingabeparameter sind so gering wie möglich, daher benötigen wir unser Programm, um den Ordner zu durchqueren.🎜🎜Zum Beispiel haben wir den folgenden Verzeichnisbaum:🎜`${obj['name'] + (count ? "-" + count : '')}` Assets; 🎜🎜Ein enthaltener Bildidentifikator keys; 🎜🎜Ein Ordnername, der für uns auch praktisch ist, um später ein Album zu erstellen;🎜🎜 Legen Sie dann das gleiche Objekt vor jede Ordnerebene. 🎜🎜🎜Die Struktur ist wie folgt:🎜🎜MySpritePackTool.prototype.dealImgsPacking = function (obj) {
let count = 0;
if (obj.hasOwnProperty("assets")) {
let newBlocks = obj["assets"];
obj["assets"] = [];
while (newBlocks.length > 0 && count < this.options.maxCount) {
let packer1 = new Packer(this.options.maxSize.width, this.options.maxSize.height);
packer1.fit(newBlocks);
let sheets1 = {
maxArea: packer1.usedArea,
atlas: newBlocks,
fileName: `${obj['name'] + (count ? "-" + count : '')}`
};
newBlocks = packer1.levelBlocks;
obj["assets"].push(sheets1);
count++;
}
}
for (let item in obj) {
if (obj[item].hasOwnProperty("assets")) {
this.dealImgsPacking(obj[item]);
}
}
} assets: [
{
maxArea: { width: 180,height: 340 },
atlas: [
{
id: 'assets/index/img-Führen Sie Sie Schritt für Schritt durch die Entwicklung eines Atlas-Verpackungstools mithilfe von Node',
width: 190,
height: 187,
x: 0,
y: 0
}
],
fileName: 'assets' },
...
]Neue Atlas-Standortinformationen abrufen
🎜Unser Vorgang für den Ordner wurde abgeschlossen. Zu diesem Zeitpunkt müssen wir nachdenken.🎜🎜Wie man diese verstreuten Bilder in ein Bild packt.🎜🎜Verstreute Bilder haben zwei Informationen, einewidth und eine height, Es ist eigentlich ein Rechteck.🎜我们现在所要做的就是把这些不同面积的矩形放到一个具有最大长宽的大矩形中.
跳开图片, 从矩形放置入手
二维矩形装箱算法有不少, 我这里选用一种比较简单的.
首先得到一个具有最大长宽的矩形盒子.
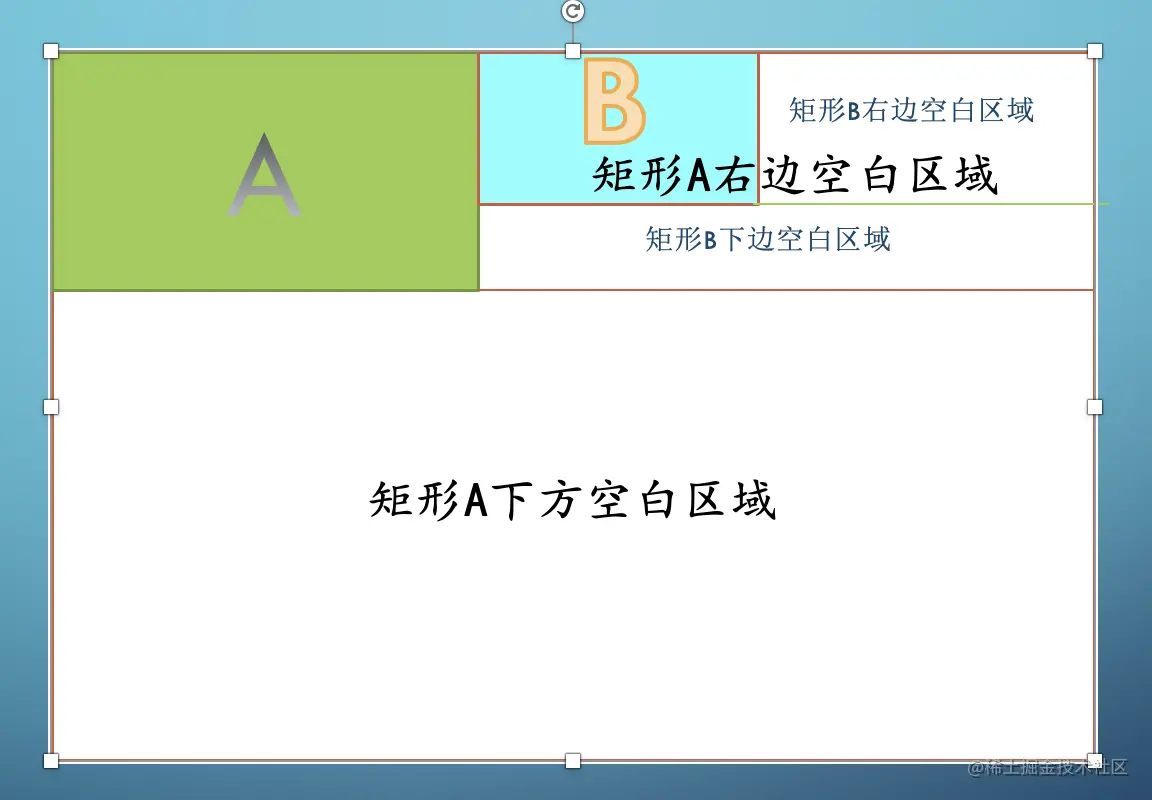
我们先放入一个矩形A, 这样子, 剩余区域就有两块: 矩形A的右边和矩形A的下边.

然后我们继续放入矩形B, 可以先右再下, 然后基于矩形B又有两块空白空间.

依次类推, 我们就可以将合适的矩形全部放入.
举个例子
把左边的散装矩形放入右边的矩形框中, 可以得到:

可以看到, 我们节省了很多空间, 矩形排列紧凑.
如果用代码实现, 是怎么样的呢?
/**
 * 确定宽高 w h
 * 空白区域先放一个, 剩下的寻找右边和下边
 * 是否有满足右边的, 有则 放入 无则 继续遍历
 * 是否有满足下边的, 有则 放入 无则 继续遍历
 */
const Packer = function (w, h) {
    this.root = { x: 0, y: 0, width: w, height: h };
    // /** 匹配所有的方格 */
    Packer.prototype.fit = function (blocks) {

        let node;
        for (let i = 0; i < blocks.length; i++) {
            let block = blocks[i];
            node = this.findNode(this.root, block.width, block.height);
            if (node) {
                let fit = this.findEmptyNode(node, block.width, block.height);
                block.x = fit.x;
                block.y = fit.y;
                block.fit = fit;
            }
        }

    }

    /** 找到可以放入的节点 */
    Packer.prototype.findNode = function (node, w, h) {
        if (node.used) {
            return this.findNode(node.rightArea, w, h) || this.findNode(node.downArea, w, h);
        } else if (node.width >= w && node.height >= h) {
            return node;
        } else {
            return null;
        }
    }

    /** 找到空位 */
    Packer.prototype.findEmptyNode = function (node, w, h) {
        //已经使用过的 删除
        node.used = true;
        //右边空间
        node.rightArea = {
            x: node.x + w,
            y: node.y,
            width: node.width - w,
            height: h
        };

        //下方空位
        node.downArea = {
            x: node.x,
            y: node.y + h,
            width: node.width,
            height: node.height - h
        }
        return node;
    }
}使用递归, 代码量很少, 但是功能强大.
但是有一个问题, 如果超出定长定宽, 或者一个矩形装不完, 我们的算法是不会放入到大矩形中的.
这样子就有点不满足我们的图集打包思路了.
所以我们还需要将这个算法改进一下;
加入两个变量, 一个记录使用的总的区域, 一个记录未被装入的矩形.
//记录使用的总的区域
this.usedArea = { width: 0, height: 0 };
//记录未被装入的矩形
this.levelBlocks = [];详细代码可以查看源码中的packing.
当然, 这里只是最简单的一种二维装箱算法
还有一种加强版的装箱算法, 我放在源码里了, 这里就不赘述了, 原理基本一致
现在, 我们已经可以将矩形合适的装箱了, 那怎么使用去处理成图集呢?
定义一个dealImgsPacking方法, 继续去处理我们的节点树.
这里用到了我们的配置项maxCount, 就是为了一张图集装不完, 多打出几张图集的作用.
然后我们打包出来的图集命名使用文件夹 + 当前是第几张的形式.
`${obj['name'] + (count ? "-" + count : '')}`具体方法如下:
MySpritePackTool.prototype.dealImgsPacking = function (obj) {
let count = 0;
if (obj.hasOwnProperty("assets")) {
let newBlocks = obj["assets"];
obj["assets"] = [];
while (newBlocks.length > 0 && count < this.options.maxCount) {
let packer1 = new Packer(this.options.maxSize.width, this.options.maxSize.height);
packer1.fit(newBlocks);
let sheets1 = {
maxArea: packer1.usedArea,
atlas: newBlocks,
fileName: `${obj['name'] + (count ? "-" + count : '')}`
};
newBlocks = packer1.levelBlocks;
obj["assets"].push(sheets1);
count++;
}
}
for (let item in obj) {
if (obj[item].hasOwnProperty("assets")) {
this.dealImgsPacking(obj[item]);
}
}
}通过这个方法我们改造了之前的节点树;
将之前节点树中的assest变为了一个数组, 每个数组元素代表一张图集信息.
结构如下:
  assets: [
    {
        maxArea: { width: 180,height: 340 },
        atlas: [
            {
                id: 'assets/index/img-Führen Sie Sie Schritt für Schritt durch die Entwicklung eines Atlas-Verpackungstools mithilfe von Node',
                width: 190,
                height: 187,
                x: 0,
                y: 0
            }
        ],
        fileName: 'assets' },
        ...
]我们可以清晰的得到, 打包之后的图集, 最大宽高是maxArea, 每张图宽高位置信息是atlas,以及图集名称fileName.
接下来, 就是最后一步了, 绘制新的图片, 并输出图片文件.
注意
我们在使用打包算法的时候, 可以先进行一下基于图片大小的排序
这样以来打包出来的图集会留白更小
图集打包并输出
这里图集的绘制和输出均是使用了node-images的API;
遍历之前得到的节点树, 首先绘制一张maxArea大小的空白图像.
images(item["maxArea"].width, item["maxArea"].height)
然后遍历一张图集所需要的图片信息, 将每一张图片绘制到空白图像上.
//绘制空白图像
let newSprites = images(item["maxArea"].width, item["maxArea"].height);
//绘制图集
imgObj.forEach(it => {
    newSprites.draw(images(it["id"]), it["x"], it["y"]);
});然后绘制完一张图集输出一张.
newSprites.save(`${this.options.outPutPath}/${item['fileName']}.png`);最后对节点树递归调用, 绘制出所有的图集.
具体代码如下:
MySpritePackTool.prototype.drawImages = function (obj) {
    let count = 0;
    if (obj.hasOwnProperty("assets")) {
        //打包出一个或者多个图集
        let imgsInfo = obj["assets"];
        imgsInfo.forEach(item => {
            if (item.hasOwnProperty("atlas")) {
                let imgObj = item["atlas"];
                // console.log("8888",imgObj)
                //绘制一张透明图像
                let newSprites = images(item["maxArea"].width, item["maxArea"].height);
                imgObj.forEach(it => {
                    newSprites.draw(images(it["id"]), it["x"], it["y"]);
                });

                newSprites.save(`${this.options.outPutPath}/${item['fileName']}.png`);
                count++;
            }
        })
    }

    for (let item in obj) {
        if (obj[item].hasOwnProperty("assets")) {
            this.drawImages(obj[item]);
        }
    }

}这样子, 我们就大功告成了,
运行测试一下, 可以得到如下的图集:


效果还不错.
如何使用
安装
npm i sprites-pack-tool
使用
const MySpritePackTool = require("sprites-pack-tool");
const path = require("path");
/** 打包最多递归次数 */
const MAX_COUNT = 2;
//需要合成的图集的路径
const assetsPath = path.resolve(__dirname, "./assets");

/** 图集打包工具配置*/
const mySpritePackTool = new MySpritePackTool({
    //一个文件夹图片过多或者过长 递归最大次数
    maxCount: MAX_COUNT,
    //需要打包图集的文件路径
    assetsPath: assetsPath,
    //输出文件路径
    outPutPath: path.resolve(__dirname, "./res"),
    //一张图集打包最大size
    maxSize: { width: 2048,height: 2048}
});
/** 图集打包 */
mySpritePackTool.Pack2Sprite();展望
当然, 这个工具只是初版, 后续还会继续优化并增加新的功能.
算法可以继续优化, 现在留白也挺多.
文件夹操作,可以优化. 比如写入图片可以每个文件夹下一张图集.
增加更多配置项, 比如开启图片压缩
增加json文件
...
我大致看了下, 市场上有几款图集打包工具, 要么基于texturePacker, 要么基于imagemagick;
使用这俩应用开放的API也是可以打包图集的, 效果品质可能更好.
但是你还得额外安装一个应用.
同样的, 你也可以使用webpack的一些loader或者plugins. 目的都是打包图集.
Die in diesem Artikel vorgestellten Tools sind relativ leichtgewichtig, können aber sofort verwendet werden.
Späterer Text
Ich habe aus Versehen keinen Artikel geschrieben Dieses Wochenende habe ich ein Tool, also habe ich es in die Praxis umgesetzt.
Wenn Sie einen besseren Weg haben, können Sie Ihre Kommentare hinterlassen, vielen Dank~.
Jeder ist willkommen, Vorschläge und Korrekturen zu machen. Die Fähigkeiten des Autors sind immer noch oberflächlich. Bitte korrigieren Sie mich, wenn etwas Unangemessenes vorliegt zum Installieren: https://www.npmjs.com/package/sprites-pack-tool
Referenz
node-images: https://github.com/zhangyuanwei/node-imagesspritesheet: https: //github.com/krzysztof-o/spritesheet.jsDer Artikel ist oberflächlich, ich hoffe, Sie alle zögern nicht, Ihre Kommentare und Likes zu hinterlassen~
Originaladresse: https://juejin.cn /post/7035809483666227230Autor: Seit meiner Kindheit ein Bär
Weitere Node-bezogenes Wissen finden Sie unter: nodejs-Tutorial
! !Das obige ist der detaillierte Inhalt vonFühren Sie Sie Schritt für Schritt durch die Entwicklung eines Atlas-Verpackungstools mithilfe von Node. Für weitere Informationen folgen Sie bitte anderen verwandten Artikeln auf der PHP chinesischen Website!

Heiße KI -Werkzeuge

Undresser.AI Undress
KI-gestützte App zum Erstellen realistischer Aktfotos

AI Clothes Remover
Online-KI-Tool zum Entfernen von Kleidung aus Fotos.

Undress AI Tool
Ausziehbilder kostenlos

Clothoff.io
KI-Kleiderentferner

AI Hentai Generator
Erstellen Sie kostenlos Ai Hentai.

Heißer Artikel

Heiße Werkzeuge

Notepad++7.3.1
Einfach zu bedienender und kostenloser Code-Editor

SublimeText3 chinesische Version
Chinesische Version, sehr einfach zu bedienen

Senden Sie Studio 13.0.1
Leistungsstarke integrierte PHP-Entwicklungsumgebung

Dreamweaver CS6
Visuelle Webentwicklungstools

SublimeText3 Mac-Version
Codebearbeitungssoftware auf Gottesniveau (SublimeText3)

Heiße Themen
 1378
1378
 52
52
 So löschen Sie einen Knoten in NVM
Dec 29, 2022 am 10:07 AM
So löschen Sie einen Knoten mit nvm: 1. Laden Sie „nvm-setup.zip“ herunter und installieren Sie es auf dem Laufwerk C. 2. Konfigurieren Sie Umgebungsvariablen und überprüfen Sie die Versionsnummer mit dem Befehl „nvm -v“. install“-Befehl Knoten installieren; 4. Löschen Sie den installierten Knoten über den Befehl „nvm uninstall“.
 So verwenden Sie Express für den Datei-Upload im Knotenprojekt
Mar 28, 2023 pm 07:28 PM
Wie gehe ich mit dem Datei-Upload um? Der folgende Artikel stellt Ihnen vor, wie Sie Express zum Hochladen von Dateien im Knotenprojekt verwenden. Ich hoffe, er ist hilfreich für Sie!
 Wie führt man eine Docker-Spiegelung des Node-Dienstes durch? Detaillierte Erläuterung der ultimativen Optimierung
Oct 19, 2022 pm 07:38 PM
Während dieser Zeit habe ich einen dynamischen HTML-Dienst entwickelt, der allen Kategorien von Tencent-Dokumenten gemeinsam ist. Um die Generierung und Bereitstellung des Zugriffs auf verschiedene Kategorien zu erleichtern und dem Trend der Cloud-Migration zu folgen, habe ich über die Verwendung von Docker nachgedacht Serviceinhalte verwalten und Produktversionen einheitlich verwalten. In diesem Artikel werden die Optimierungserfahrungen, die ich bei der Bereitstellung von Docker gesammelt habe, als Referenz weitergegeben.
 Eine ausführliche Analyse des Prozessmanagement-Tools „pm2' von Node
Apr 03, 2023 pm 06:02 PM
In diesem Artikel stellen wir Ihnen das Prozessmanagement-Tool „pm2“ von Node vor und sprechen darüber, warum PM2 benötigt wird und wie Sie PM2 installieren und verwenden. Ich hoffe, dass es für alle hilfreich ist!
 PI -Knotenunterricht: Was ist ein PI -Knoten? Wie installiere und richte ich einen PI -Knoten ein?
Mar 05, 2025 pm 05:57 PM
Detaillierte Erläuterungs- und Installationshandbuch für Pinetwork -Knoten In diesem Artikel wird das Pinetwork -Ökosystem im Detail vorgestellt - PI -Knoten, eine Schlüsselrolle im Pinetwork -Ökosystem und vollständige Schritte für die Installation und Konfiguration. Nach dem Start des Pinetwork -Blockchain -Testnetzes sind PI -Knoten zu einem wichtigen Bestandteil vieler Pioniere geworden, die aktiv an den Tests teilnehmen und sich auf die bevorstehende Hauptnetzwerkveröffentlichung vorbereiten. Wenn Sie Pinetwork noch nicht kennen, wenden Sie sich bitte an was Picoin ist? Was ist der Preis für die Auflistung? PI -Nutzung, Bergbau und Sicherheitsanalyse. Was ist Pinetwork? Das Pinetwork -Projekt begann 2019 und besitzt seine exklusive Kryptowährung PI -Münze. Das Projekt zielt darauf ab, eine zu erstellen, an der jeder teilnehmen kann
 Lassen Sie uns darüber sprechen, wie Sie mit pkg Node.js-Projekte in ausführbare Dateien packen.
Dec 02, 2022 pm 09:06 PM
Wie packe ich die ausführbare Datei von nodejs mit pkg? Im folgenden Artikel erfahren Sie, wie Sie mit pkg ein Node-Projekt in eine ausführbare Datei packen. Ich hoffe, dass er Ihnen weiterhilft!
 Was tun, wenn npm node gyp ausfällt?
Dec 29, 2022 pm 02:42 PM
npm node gyp schlägt fehl, weil „node-gyp.js“ nicht mit der Version von „Node.js“ übereinstimmt. Die Lösung ist: 1. Löschen Sie den Knotencache über „npm cache clean -f“ 2. Über „npm install -“ g n“ Installieren Sie das n-Modul. 3. Installieren Sie die Version „node v12.21.0“ über den Befehl „n v12.21.0“.
 Tokenbasierte Authentifizierung mit Angular und Node
Sep 01, 2023 pm 02:01 PM
Die Authentifizierung ist einer der wichtigsten Teile jeder Webanwendung. In diesem Tutorial werden tokenbasierte Authentifizierungssysteme und ihre Unterschiede zu herkömmlichen Anmeldesystemen erläutert. Am Ende dieses Tutorials sehen Sie eine voll funktionsfähige Demo, die in Angular und Node.js geschrieben wurde. Traditionelle Authentifizierungssysteme Bevor wir zu tokenbasierten Authentifizierungssystemen übergehen, werfen wir einen Blick auf traditionelle Authentifizierungssysteme. Der Benutzer gibt seinen Benutzernamen und sein Passwort im Anmeldeformular ein und klickt auf „Anmelden“. Nachdem Sie die Anfrage gestellt haben, authentifizieren Sie den Benutzer im Backend, indem Sie die Datenbank abfragen. Wenn die Anfrage gültig ist, wird eine Sitzung mit den aus der Datenbank erhaltenen Benutzerinformationen erstellt und die Sitzungsinformationen werden im Antwortheader zurückgegeben, sodass die Sitzungs-ID im Browser gespeichert wird. Bietet Zugriff auf Anwendungen, die unterliegen


