 Web-Frontend
 Bootstrap-Tutorial
 Wie man mit Django und Bootstrap einen Taschenrechner erstellt (praktisch)
Wie man mit Django und Bootstrap einen Taschenrechner erstellt (praktisch)
Dieser Artikel führt Sie Schritt für Schritt durch die Verwendung von Django+ Bootstrap zum Erstellen eines Taschenrechners. Ich hoffe, er wird Ihnen hilfreich sein!

Vorbereitung
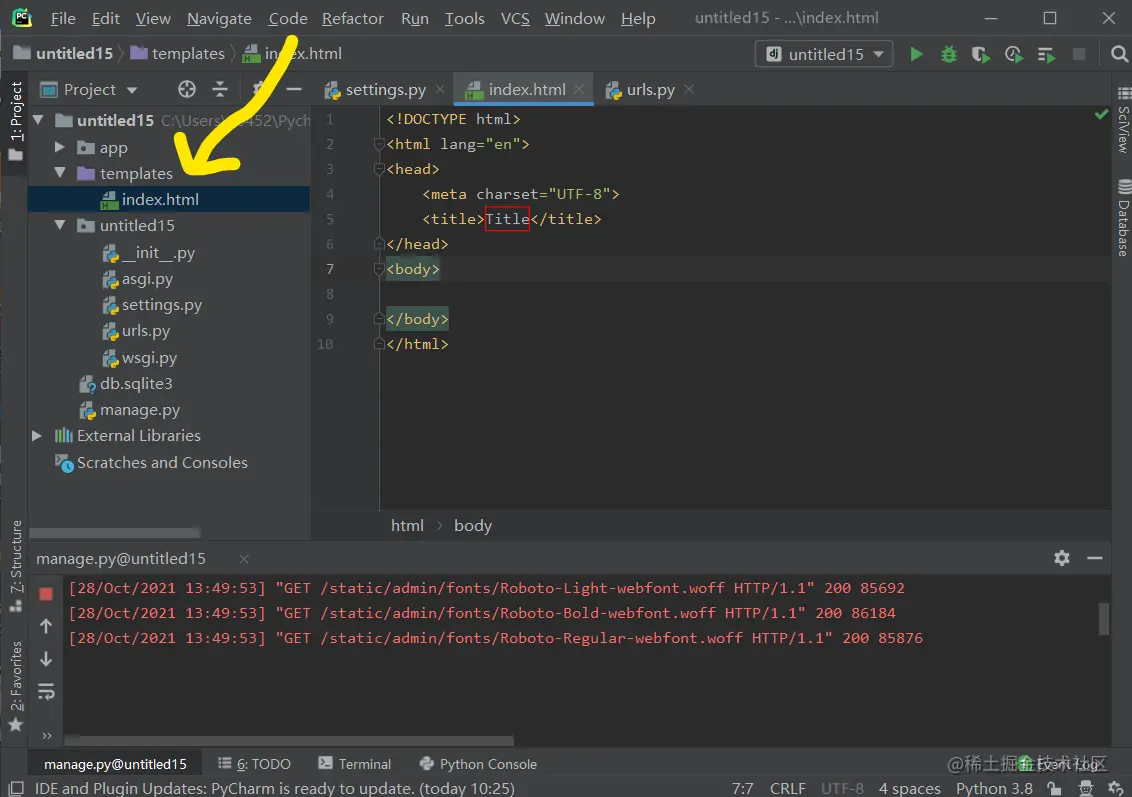
Erstellen Sie eine Anwendung.

Anwendung zur Konfiguration hinzufügen

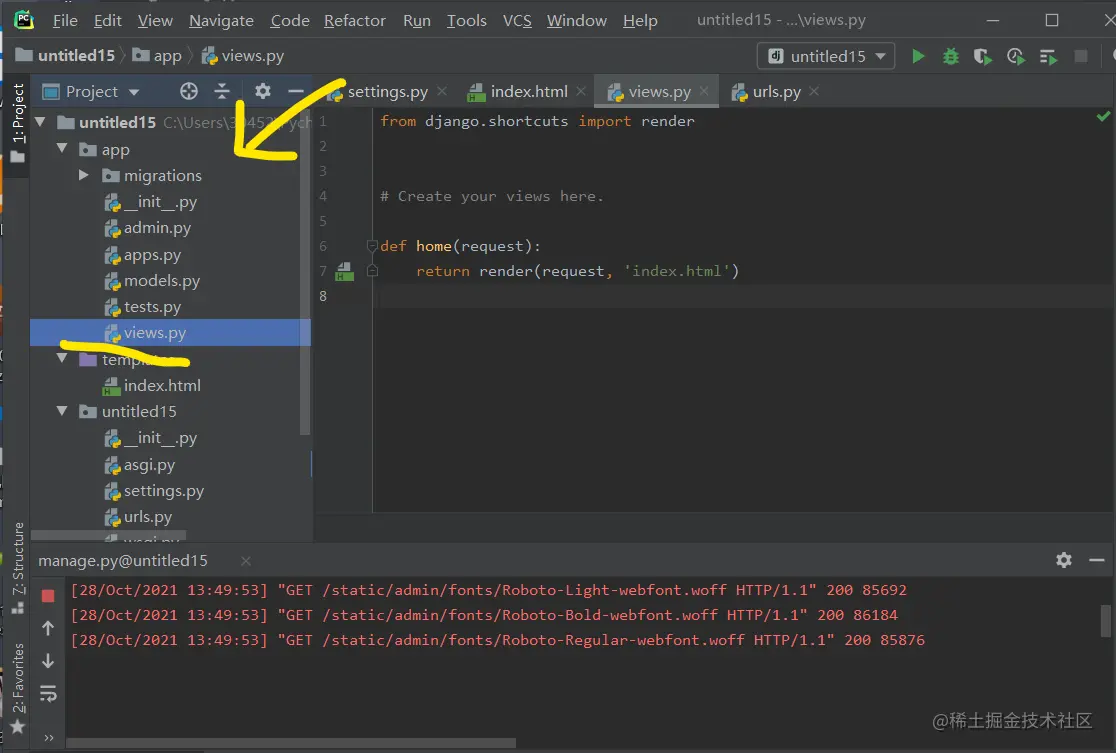
from django.shortcuts import render


# Create your views here.

def home(request):
    return render(request, 'index.html')
Download-Adresse: Schriftarten, js Beim Kopieren in den statischen Ordner wird der Ordner erstellt. [Verwandte Empfehlungen: „ Bootstrap-Tutorial

from django.contrib import admin
from django.urls import path,include

from app.views import home

urlpatterns = [
    path('admin/', admin.site.urls),
    path('',home,name='hoome'),
]
Nach dem Login kopieren
Schreiben von Ansichtsfunktionenfrom django.contrib import admin
from django.urls import path,include
from app.views import home
urlpatterns = [
path('admin/', admin.site.urls),
path('',home,name='hoome'),
]Testen{% load static %} <!DOCTYPE html> <html> <head> <meta charset="UTF-8"> <title>计算器</title> <link rel="stylesheet" href="{% static 'css/bootstrap.min.css' %}"> <script ></script> <script src="{% static 'js/bootstrap.min.js' %}"></script> <style> body{ background-position: center 0; background-repeat: no-repeat; background-attachment: fixed; background-size: cover; -webkit-background-size: cover; -o-background-size: cover; -moz-background-size: cover; -ms-background-size:cover; } .input_show{ margin-top: 35px; max-width: 280px; height: 35px; } .btn_num{ margin:1px 1px 1px 1px; width: 60px; } .btn_clear{ margin-left: 40px; margin-right: 20px; } .extenContent{ height: 300px; } </style> </head> <body> <div> <div> <div class="col-xs-1 col-sm-4"> </div> <div id="computer" class="col-xs-1 col-sm-6"> <input type="text" id="txt_code" name="txt_code" value="" class="form-control input_show" placeholder="" disabled> <input type="text" id="txt_result" name="txt_result" value="" class="form-control input_show" placeholder="结果" disabled> <br> <div> <button type="button" class="btn btn-default btn_num" onclick="fun_7()">7</button> <button type="button" class="btn btn-default btn_num" onclick="fun_8()">8</button> <button type="button" class="btn btn-default btn_num" onclick="fun_9()">9</button> <button type="button" class="btn btn-default btn_num" onclick="fun_div()">/</button> <br> <button type="button" class="btn btn-default btn_num" onclick="fun_4()">4</button> <button type="button" class="btn btn-default btn_num" onclick="fun_5()">5</button> <button type="button" class="btn btn-default btn_num" onclick="fun_6()">6</button> <button type="button" class="btn btn-default btn_num" onclick="fun_mul()">*</button> <br> <button type="button" class="btn btn-default btn_num" onclick="fun_1()">1</button> <button type="button" class="btn btn-default btn_num" onclick="fun_2()">2</button> <button type="button" class="btn btn-default btn_num" onclick="fun_3()">3</button> <button type="button" class="btn btn-default btn_num" onclick="fun_sub()">-</button> <br> <button type="button" class="btn btn-default btn_num" onclick="fun_0()">0</button> <button type="button" class="btn btn-default btn_num" onclick="fun_00()">00</button> <button type="button" class="btn btn-default btn_num" onclick="fun_dot()">.</button> <button type="button" class="btn btn-default btn_num" onclick="fun_add()">+</button> </div> <div> <br> <button type="button" class="btn btn-success btn-lg btn_clear" id="lgbut_clear" onclick="fun_clear()"> 清空 </button> <button type="button" class="btn btn-primary btn-lg" id="lgbut_compute" > 计算 </button> </div> </div> <div class="col-xs-1 col-sm-2"></div> </div> </div> <div></div> <script> var x=document.getElementById("txt_code"); var y=document.getElementById("txt_result"); function fun_7() { x.value+='7'; } function fun_8() { x.value+='8'; } function fun_9() { x.value+='9'; } function fun_div() { x.value+='/'; } function fun_4() { x.value+='4'; } function fun_5() { x.value+='5'; } function fun_6() { x.value+='6'; } function fun_mul() { x.value+='*'; } function fun_1() { x.value+='1'; } function fun_2() { x.value+='2'; } function fun_3() { x.value+='3'; } function fun_sub() { x.value+='-'; } function fun_0() { x.value+='0'; } function fun_00() { x.value+='00'; } function fun_dot() { x.value+='.'; } function fun_add() { x.value+='+'; } function fun_clear() { x.value=''; y.value=''; } </script> <script> function ShowResult(data) { var y = document.getElementById('txt_result'); y.value = data['result']; } </script> <script> $('#lgbut_compute').click(function () { $.ajax({ url:'compute/', type:'POST', data:{ 'code':$('#txt_code').val() }, dataType:'json', success:ShowResult }) }) </script> </body> </html>Nach dem Login kopieren
)
Mehr relevantes Wissen über Bootstrap , können Sie besuchen:
Bootstrap Basic Tutorial! !
Das obige ist der detaillierte Inhalt vonWie man mit Django und Bootstrap einen Taschenrechner erstellt (praktisch). Für weitere Informationen folgen Sie bitte anderen verwandten Artikeln auf der PHP chinesischen Website!

Heiße KI -Werkzeuge

Undresser.AI Undress
KI-gestützte App zum Erstellen realistischer Aktfotos

AI Clothes Remover
Online-KI-Tool zum Entfernen von Kleidung aus Fotos.

Undress AI Tool
Ausziehbilder kostenlos

Clothoff.io
KI-Kleiderentferner

AI Hentai Generator
Erstellen Sie kostenlos Ai Hentai.

Heißer Artikel

Heiße Werkzeuge

Notepad++7.3.1
Einfach zu bedienender und kostenloser Code-Editor

SublimeText3 chinesische Version
Chinesische Version, sehr einfach zu bedienen

Senden Sie Studio 13.0.1
Leistungsstarke integrierte PHP-Entwicklungsumgebung

Dreamweaver CS6
Visuelle Webentwicklungstools

SublimeText3 Mac-Version
Codebearbeitungssoftware auf Gottesniveau (SublimeText3)

Heiße Themen
 1382
1382
 52
52
 So erhalten Sie die Bootstrap -Suchleiste
Apr 07, 2025 pm 03:33 PM
So verwenden Sie Bootstrap, um den Wert der Suchleiste zu erhalten: Bestimmt die ID oder den Namen der Suchleiste. Verwenden Sie JavaScript, um DOM -Elemente zu erhalten. Holen Sie sich den Wert des Elements. Führen Sie die erforderlichen Maßnahmen aus.
 So verwenden Sie Bootstrap in Vue
Apr 07, 2025 pm 11:33 PM
Die Verwendung von Bootstrap in Vue.js ist in fünf Schritte unterteilt: Startstrap installieren. Bootstrap in main.js. Verwenden Sie die Bootstrap -Komponente direkt in der Vorlage. Optional: benutzerdefinierter Stil. Optional: Verwenden Sie Plug-Ins.
 So schreiben Sie geteilte Zeilen auf Bootstrap
Apr 07, 2025 pm 03:12 PM
Es gibt zwei Möglichkeiten, eine Bootstrap -Split -Zeile zu erstellen: Verwenden des Tags, das eine horizontale Split -Linie erstellt. Verwenden Sie die CSS -Border -Eigenschaft, um benutzerdefinierte Style Split -Linien zu erstellen.
 Wie man vertikale Zentrierung von Bootstrap macht
Apr 07, 2025 pm 03:21 PM
Verwenden Sie Bootstrap, um die vertikale Zentrierung zu implementieren: FlexBox-Methode: Verwenden Sie den D-Flex, den Justify-Content-Center und die Ausrichtungsklassen aus Align-Item-Center, um Elemente in den Flexbox-Behälter zu platzieren. Methode für Ausstellungs-Iitem-Center-Klassen: Bei Browsern, die Flexbox nicht unterstützen, verwenden Sie die Klasse aus Align-items-Center-Klasse, vorausgesetzt, das übergeordnete Element hat eine definierte Höhe.
 So ändern Sie Bootstrap
Apr 07, 2025 pm 03:18 PM
Um die Größe der Elemente in Bootstrap anzupassen, können Sie die Dimensionsklasse verwenden, einschließlich: Einstellbreite:.
 So richten Sie das Framework für Bootstrap ein
Apr 07, 2025 pm 03:27 PM
Um das Bootstrap -Framework einzurichten, müssen Sie die folgenden Schritte befolgen: 1. Verweisen Sie die Bootstrap -Datei über CDN; 2. Laden Sie die Datei auf Ihrem eigenen Server herunter und hosten Sie sie. 3.. Fügen Sie die Bootstrap -Datei in HTML hinzu; 4. Kompilieren Sie Sass/weniger bei Bedarf; 5. Importieren Sie eine benutzerdefinierte Datei (optional). Sobald die Einrichtung abgeschlossen ist, können Sie die Grid -Systeme, -Komponenten und -stile von Bootstrap verwenden, um reaktionsschnelle Websites und Anwendungen zu erstellen.
 So fügen Sie Bilder auf Bootstrap ein
Apr 07, 2025 pm 03:30 PM
Es gibt verschiedene Möglichkeiten, Bilder in Bootstrap einzufügen: Bilder direkt mit dem HTML -IMG -Tag einfügen. Mit der Bootstrap -Bildkomponente können Sie reaktionsschnelle Bilder und weitere Stile bereitstellen. Legen Sie die Bildgröße fest und verwenden Sie die IMG-Fluid-Klasse, um das Bild anpassungsfähig zu machen. Stellen Sie den Rand mit der img-beliebten Klasse ein. Stellen Sie die abgerundeten Ecken ein und verwenden Sie die IMG-Rund-Klasse. Setzen Sie den Schatten, verwenden Sie die Schattenklasse. Größen Sie die Größe und positionieren Sie das Bild im CSS -Stil. Verwenden Sie mit dem Hintergrundbild die CSS-Eigenschaft im Hintergrund.
 Was tun, wenn die Bootstrap -Tabelle Ajax verwendet, um Daten durchzuziehen
Apr 07, 2025 am 11:54 AM
Lösungen für den verstümmelten Code der Bootstrap-Tabelle, wenn Sie AJAX verwenden, um Daten vom Server zu erhalten: 1. Legen Sie die korrekte Zeichenkodierung des serverseitigen Codes (z. B. UTF-8) fest. 2. Stellen Sie den Anforderungsheader in der AJAX-Anforderung ein und geben Sie die akzeptierte Zeichenkodierung an (Akzeptanz-Charge). 3. Verwenden Sie den "Unscape" -Verwandler der Bootstrap -Tabelle, um die entkommene HTML -Entität in Originalzeichen zu dekodieren.


)
