
Dieser Artikel vermittelt Ihnen das relevante Wissen, das üblicherweise im CSS-Box-Modell verwendet wird. Das sogenannte Box-Modell behandelt die Elemente in der HTML-Seite als einen Container, aus dem jedes Rechteck besteht den Inhalt, den Abstand, die Ränder und die Ränder eines Elements. Schauen wir sie uns einzeln an und hoffen, dass sie für alle hilfreich sind.

Tatsächlich verfügt CSS über drei Hauptmodule: Boxmodell, Floating, Positionierung und der Rest sind Details. Es ist erforderlich, dass diese drei Teile auf jeden Fall sehr kompetent erlernt werden.
Das sogenannte Box-Modell behandelt die Elemente in der HTML-Seite als rechteckige Box, also einen Container, der Inhalte enthält. Jedes Rechteck besteht aus dem Inhalt, dem Abstand, dem Rand und dem Rand des Elements.
Wie ordnen wir beim Webseiten-Layout den Text und die Bilder ordentlich und ordentlich an, entsprechend den Darstellungen, die uns der Künstler gegeben hat?
Inline-Elemente wie Text ähneln Milch und benötigen auch eine Box, um sie aufzunehmen. Die doppelten Beschriftungen, die wir zuvor gelernt haben, sind alle eine Box. Mit der Box können wir es überall platzieren, wo wir wollen.
Verstehen Sie die Essenz des Webseitenlayouts: Der Prozess, Webseitenelemente wie Text, Bilder usw. in Felder einzufügen und die Felder dann mithilfe von CSS zu platzieren, ist das Webseitenlayout.
CSS hat eigentlich überhaupt nicht viel Logik. Es ähnelt den Bausteinen, mit denen wir als Kinder gespielt haben. Wir können sie frei und zufällig platzieren, um die gewünschten Effekte zu erzielen.
Hier überspringen Das alte IE-Box-Modell (unter IE6), sorry, ich habe den IE5-Browser noch nie gesehen.
Schauen wir uns zunächst ein Bild an, um zu verstehen, was ein Boxmodell ist.
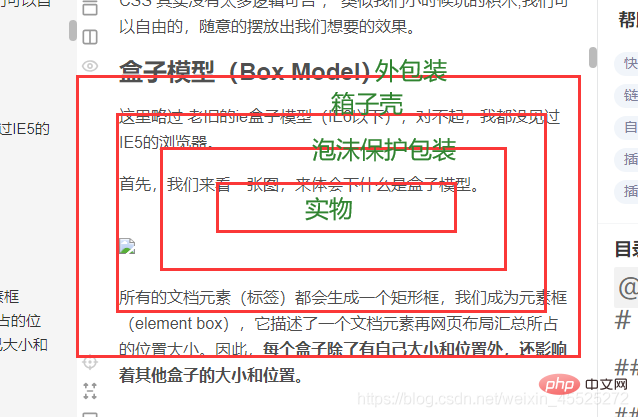
Alle Dokumentelemente (Tags) erzeugen ein rechteckiges Feld, das wir Elementfeld nennen und das die Position und Größe eines Dokumentelements im Webseitenlayout beschreibt. Daher Jede Box hat nicht nur ihre eigene Größe und Position, sondern beeinflusst auch die Größe und Position anderer Boxen.
Der Rand ist die Hautschicht. Orangenschale. . Grapefruitschale. . Orangenschale. . .
Syntax:
border : border-width || border-style || border-color
Border-Attribut – Rahmenstil festlegen (border-style)
Border-Stil wird verwendet, um den Stil des Rahmens auf der Seite zu definieren:
none:没有边框即忽略所有边框的宽度(默认值)

solid:边框为单实线(最为常用的)

dashed:边框为虚线

dotted:边框为点线

double:边框为双实线
| Inhalt festlegen | Stilattribute | Gemeinsame Attributwerte |
| Top. Rand | border-top-style: Stil; border-top-width: width; border-top: width style color; border-bottom-style: style; border-bottom-width: width ; Rand-Breite: Farbe; Rand-Breite: Breite; Rand-Links-Stil: Breite; Farbe; Rand-Rechts-Stil: Breite; Rand-Rechts-Stil: Breite Stilfarbe; | |
| Stil Umfassende Einstellungen | Rahmenstil: oben [rechts, unten, links]; | keine (Standard), durchgezogene einzelne durchgezogene Linie, gestrichelte gepunktete Linie, doppelte doppelte Linie durchgezogene Linie |
| Rahmenbreite: oben [rechts, unten, links]; | Pixelwert | |
| Rahmenfarbe: oben [rechts, unten, links]; | Farbwert, #hexadezimal, RGB(r,g,b), RGB (r%, g%, b%) | |
| 值的个数 | 表达意思 |
|---|---|
| 1个值 | padding:上下左右边距 比如padding: 3px; 表示上下左右都是3像素 |
| 2个值 | padding: 上下边距 左右边距 比如 padding: 3px 5px; 表示 上下3像素 左右 5像素 |
| 3个值 | padding:上边距 左右边距 下边距 比如 padding: 3px 5px 10px; 表示 上是3像素 左右是5像素 下是10像素 |
| 4个值 | padding:上内边距 右内边距 下内边距 左内边距 比如: padding: 3px 5px 10px 15px; 表示 上3px 右是5px 下 10px 左15px 顺时针 |
大致理解顺序: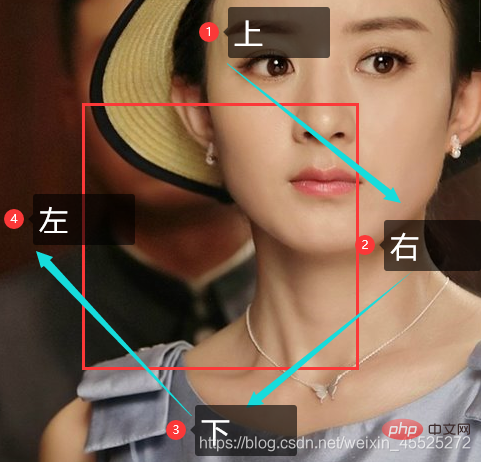
margin属性用于设置外边距。 设置外边距会在元素之间创建“空白”, 这段空白通常不能放置其他内容。
margin-top:上外边距
margin-right:右外边距
margin-bottom:下外边距
margin-left:上外边距
margin:上外边距 右外边距 下外边距 左外边
取值顺序跟内边距相同。
可以让一个盒子实现水平居中,需要满足一下两个条件:
然后就给**左右的外边距都设置为auto**,就可使块级元素水平居中。
实际工作中常用这种方式进行网页布局,示例代码如下:
.header{ width:960px; margin:0 auto;}text-align: center; /* 文字居中水平 */margin: 10px auto; /* 盒子水平居中 左右margin 改为 auto 就阔以了 */
section img {
		width: 200px;/* 插入图片更改大小 width 和 height */
		height: 210px;
		margin-top: 30px;  /* 插入图片更改位置 可以用margin 或padding  盒模型 */
		margin-left: 50px; /* 插入当图片也是一个盒子 */
	}aside {
		width: 400px;
		height: 400px;
		border: 1px solid purple;
		background: #fff url(images/sun.jpg) no-repeat;

		background-size: 200px 210px; /*  背景图片更改大小只能用 background-size */
		background-position: 30px 50px; /* 背景图片更该位置 我用 background-position */
}为了更方便地控制网页中的元素,制作网页时,可使用如下代码清除元素的默认内外边距:
* {
   padding:0;         /* 清除内边距 */
margin:0; /* 清除外边距 */}注意: 行内元素是只有左右外边距的,是没有上下外边距的。 内边距,在ie6等低版本浏览器也会有问题。
我们尽量不要给行内元素指定上下的内外边距就好了。
使用margin定义块元素的垂直外边距时,可能会出现外边距的合并。
当上下相邻的两个块元素相遇时,如果上面的元素有下外边距margin-bottom,下面的元素有上外边距margin-top,则他们之间的垂直间距不是margin-bottom与margin-top之和,而是两者中的较大者。这种现象被称为相邻块元素垂直外边距的合并(也称外边距塌陷)。
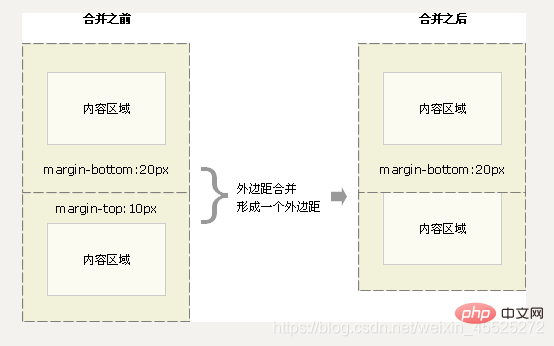
解决方案: 避免就好了。
对于两个嵌套关系的块元素,如果父元素没有上内边距及边框,则父元素的上外边距会与子元素的上外边距发生合并,合并后的外边距为两者中的较大者,即使父元素的上外边距为0,也会发生合并。
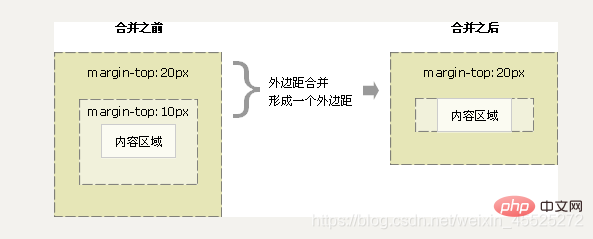
解决方案:
使用宽度属性width和高度属性height可以对盒子的大小进行控制。
width和height的属性值可以为不同单位的数值或相对于父元素的百分比%,实际工作中最常用的是像素值。
大多数浏览器,如Firefox、IE6及以上版本都采用了W3C规范,符合CSS规范的盒子模型的总宽度和总高度的计算原则是:
  /*外盒尺寸计算(元素空间尺寸)*/
  Element空间高度 = content height + padding + border + margin
  Element 空间宽度 = content width + padding + border + margin
  /*内盒尺寸计算(元素实际大小)*/
  Element Height = content height + padding + border (Height为内容高度)
  Element Width = content width + padding + border (Width为内容宽度)
注意:
1、宽度属性width和高度属性height仅适用于块级元素,对行内元素无效( img 标签和 input除外)。
2、计算盒子模型的总高度时,还应考虑上下两个盒子垂直外边距合并的情况。
3、如果一个盒子没有给定宽度/高度或者继承父亲的宽度/高度,则padding 不会影响本盒子大小。
开始学习盒子模型,同学们最大的困惑就是, 分不清内外边距的使用,什么情况下使用内边距,什么情况下使用外边距?
答案是: 其实他们大部分情况下是可以混用的。 就是说,你用内边距也可以,用外边距也可以。 你觉得哪个方便,就用哪个。
但是,总有一个最好用的吧,我们根据稳定性来分,建议如下:
按照 优先使用 宽度 (width) 其次 使用内边距(padding) 再次 外边距(margin)。
width > padding > margin
原因:
margin 会有外边距合并 还有 ie6下面margin 加倍的bug(讨厌)所以最后使用。
padding 会影响盒子大小, 需要进行加减计算(麻烦) 其次使用。
width 没有问题(嗨皮)我们经常使用宽度剩余法 高度剩余法来做。
语法格式:
box-shadow:水平阴影 垂直阴影 模糊距离 阴影尺寸 阴影颜色 内/外阴影;

p {
			width: 200px;
			height: 200px;
			border: 10px solid red;
			/* box-shadow: 5px 5px 3px 4px rgba(0, 0, 0, .4);  */
			/* box-shadow:水平位置 垂直位置 模糊距离 阴影尺寸(影子大小) 阴影颜色  内/外阴影; */
			box-shadow: 0 15px 30px  rgba(0, 0, 0, .4);
			}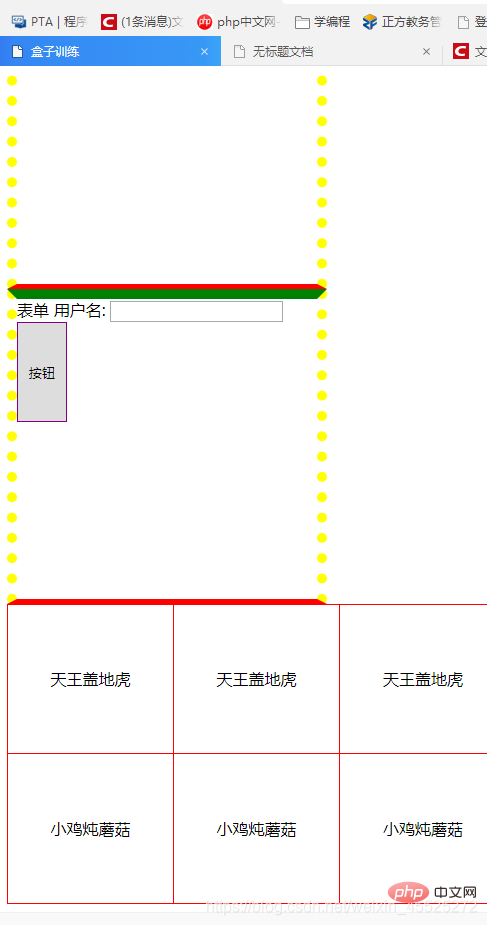
 <!DOCTYPE html><html lang="en"><head>
	<meta charset="UTF-8">
	<title>盒子训练</title>
	<style type="text/css">
		/* 1. 盒子案例 */
		p {
			width: 300px;
			height: 300px;
			border-width: 10px;
			border-color: yellow;
			border-style: solid;/*实线*/
			border-style: dashed;/*虚线*/
			border-style: dotted;/*点线*/
			/*border: 1px solid blue;*/

			border-top: 10px solid green;
			border-bottom: 5px solid red;
			border-left: : 15px solid #daaa;
			border-right: : 30px dashed yellow;
		}

		/* 2.表单边框 */
		.inputtest input
		{
			border:5px 3px 10px 26px dotted	purple	;
		}
		.inputtest button {

		width:50px;
		height: 100px;
		border: 1px solid purple;

		}

		/*  3. 表格边框 */
		table {
		width: 500px;
		height: 300px;
		border: 1px solid red;
			}
	td {
		border: 1px solid red;
		text-align: 	center;
		}
	table, td {
		border-collapse: collapse;  /*合并相邻边框*/
	}
	</style></head><body>
	<p> 盒子 </p>
	<p class="inputtest">
		表单
		用户名: <input type="text">
		<button>按钮</button>
	</p>
		<table cellpadding="0" cellspacing="0">
		<tr>
			<td>天王盖地虎</td>
			<td>天王盖地虎</td>
			<td>天王盖地虎</td>
		</tr>
		<tr>
			<td>小鸡炖蘑菇</td>
			<td>小鸡炖蘑菇</td>
			<td>小鸡炖蘑菇</td>
		</tr>
	</table></html>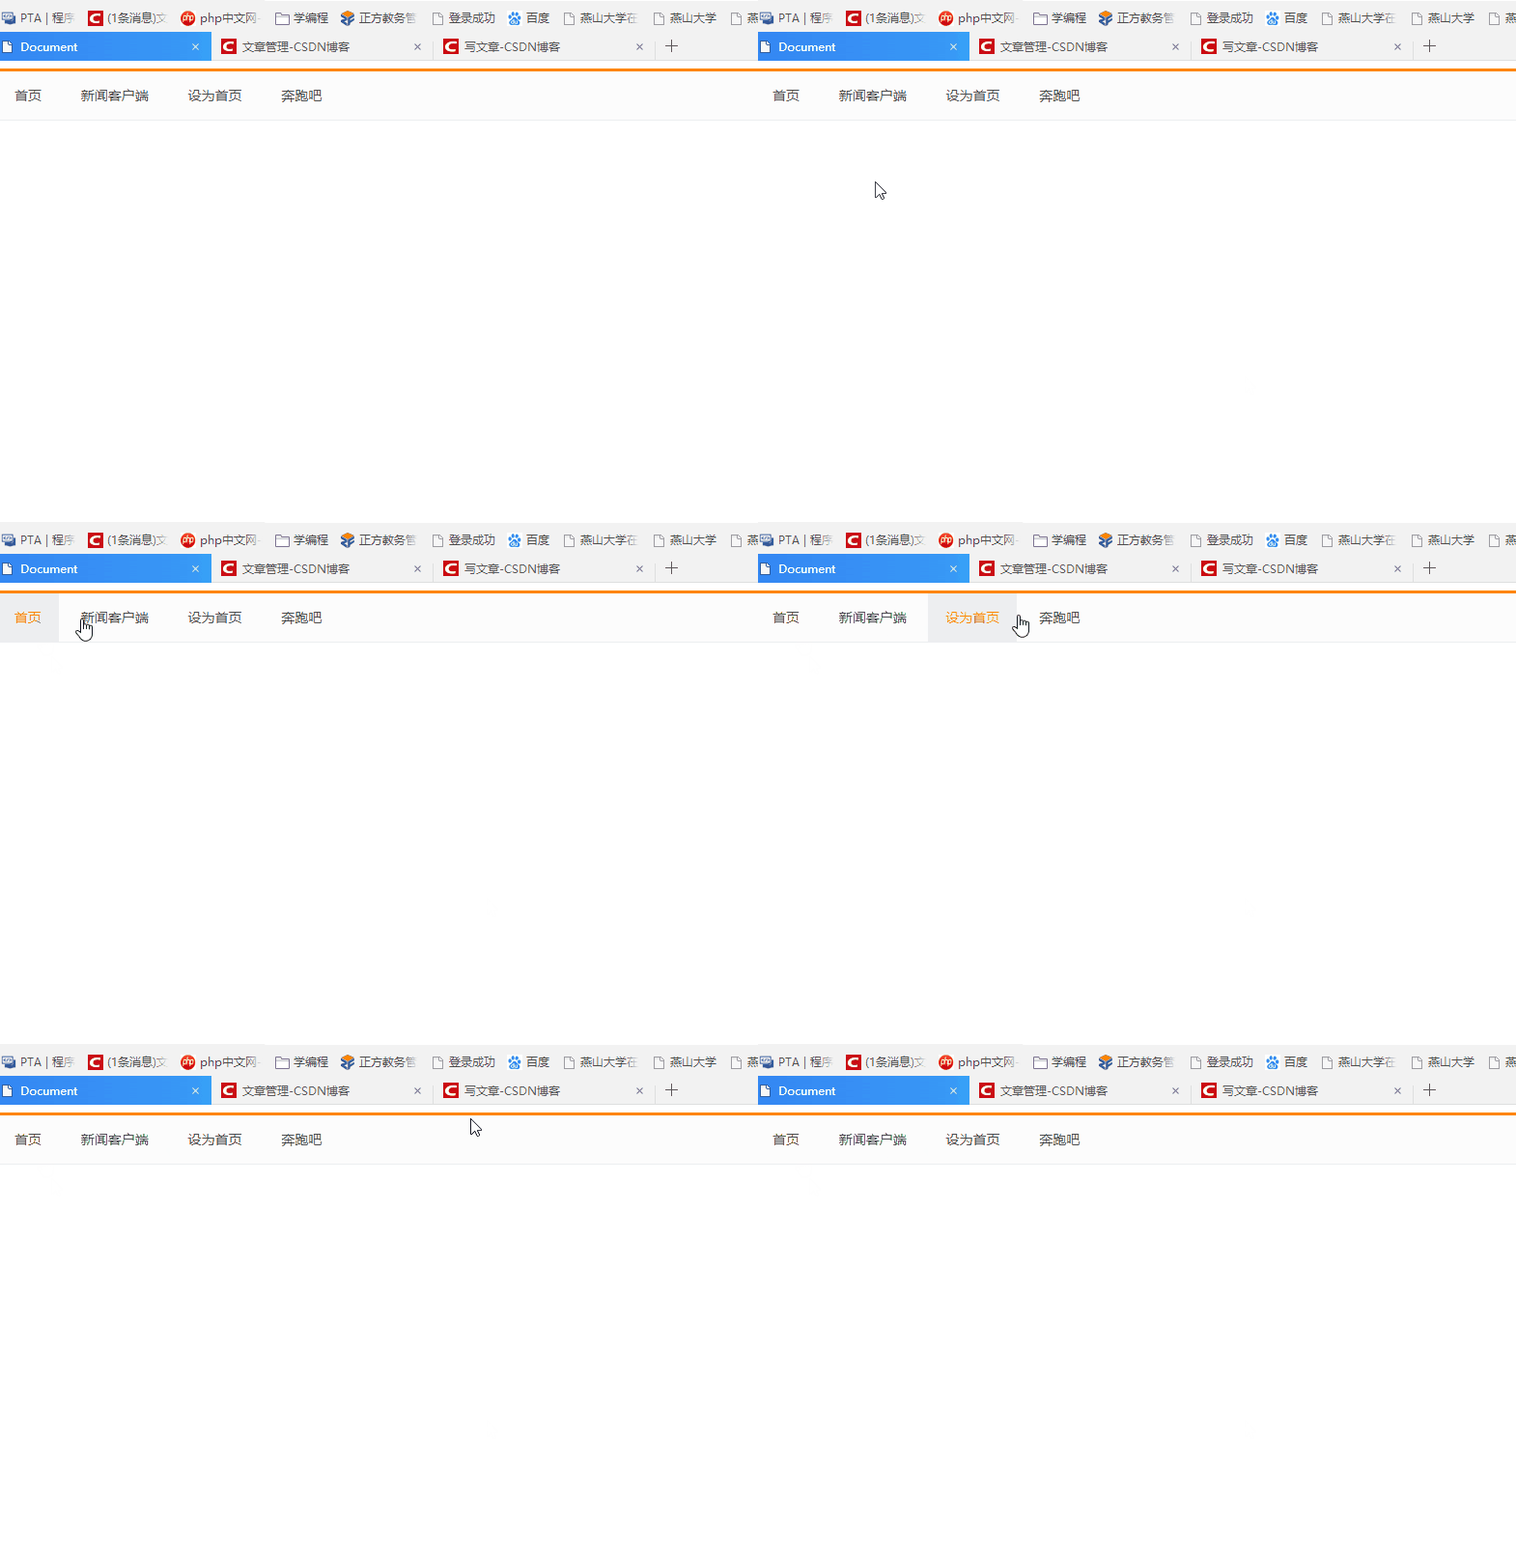
 <!DOCTYPE html><html lang="en"><head>
	<meta charset="UTF-8">
	<title>Document</title>
	<style>
	.nav {
		height: 50px;/* 高度是 50*/
		border-top: 3px solid #FF8500;  /*上边框是 3像素*/
		border-bottom: 1px solid #EDEEF0; /*下边框是 1像素*/
		background-color: #FCFCFC; /*背景颜色*/
	}
	.nav a {   /*鼠标正常时候的样子*/
		height: 50px;
		line-height: 50px;
		/*background-color: pink;*/
		display: inline-block; /*转换*/
		color: #4c4c4c;
		text-decoration: none;
		/*padding-left: 18px;
		padding-right: 18px;*/
		padding: 0 18px;
		font-size: 14px;

	}

	.nav a:hover {
		background-color: #edeef0;
		color: #ff8400;
	}


	</style></head><body>
	<p class="nav">
		<a href="#">首页</a>
		<a href="#">新闻客户端</a>
		<a href="#">设为首页</a>
		<a href="#">极限挑战</a>
	</p></body></html>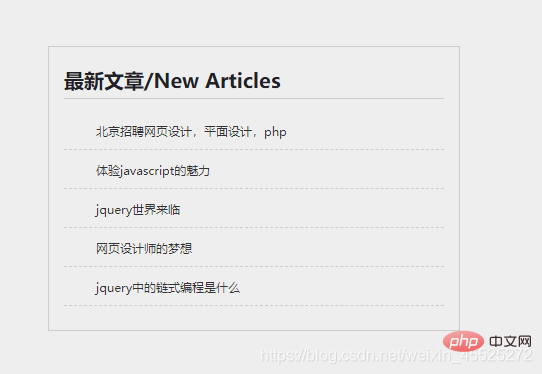
<!DOCTYPE html><html lang="en"><head>
	<meta charset="UTF-8">
	<title>Document</title>
	<style>
	/*p {
		width: 100px;
		height: 100px;
		border: 2px solid red;
		padding: 20px;
		margin: 30px;
	}*/
	* {
		margin: 0;
		padding: 0;  /*清除内外边距*/
	}
	body {
		background-color: #eee;
	}
	.article {
		width: 380px;
		height: 263px;
		border: 1px solid #ccc;
		margin: 100px;
		padding: 20px 15px 0;  /*上 20  左右  15  下  0*/
	}
	.article h4 {
		color: #202026;
		font-size: 20px;
		border-bottom: 1px solid #ccc;
		padding-bottom: 5px;
		/*margin-bottom: 12px;*/
	}
	li {
		list-style: none;   /*取消li 前面的小点*/
	}
	.article ul li {
		height: 38px;
		line-height: 38px;
		border-bottom: 1px dashed #ccc; /* 1像素的虚线边框*/
		text-indent: 2em;
	}
	.article  a  {
		font-size: 12px;
		color: #333;
		text-decoration: none;
	}
	.article a:hover {
		text-decoration: underline;  /*添加下划线*/
	}
	.article ul {
		margin-top: 12px;
	}
	</style></head><body>
  <p class="article">
  		<h4>最新文章/New Articles</h4>
  		<ul>
  			<li><a href="#">北京招聘网页设计,平面设计,php</a></li>
  			<li><a href="#">体验javascript的魅力</a></li>
  			<li><a href="#">jquery世界来临</a></li>
  			<li><a href="#">网页设计师的梦想</a></li>
  			<li><a href="#">jquery中的链式编程是什么</a></li>
  		</ul>
</p></body></html>(学习视频分享:css视频教程)
Das obige ist der detaillierte Inhalt vonWas sind die wichtigsten Punkte des Box-Modells, die Sie in CSS kennen müssen (organisiert und geteilt)?. Für weitere Informationen folgen Sie bitte anderen verwandten Artikeln auf der PHP chinesischen Website!