

Lassen Sie uns über den Lebenszyklus von Laravel sprechen

Dieser Artikel vermittelt Ihnen relevantes Wissen über laravel, das hauptsächlich Probleme im Zusammenhang mit dem Lebenszyklus von Laravel vorstellt. Der Lebenszyklus von Laravel beginnt bei publicindex.php und endet mit publicindex.php. .

【Verwandte Empfehlung: Laravel-Video-Tutorial】
Laravels Lebenszyklus A
Alles auf der Welt hat einen Lebenszyklus. Wenn wir ein Werkzeug verwenden, müssen wir dessen Funktionsprinzip verstehen Verwenden Sie es. Es wird praktisch sein, und das Gleiche gilt für die Anwendungsentwicklung. Sobald Sie die Prinzipien verstanden haben, können Sie es problemlos verwenden.
Bevor wir den Lebenszyklus von Laravel verstehen, werfen wir zunächst einen Blick auf den Lebenszyklus von PHP.
PHPs Betriebsmodi
PHPs zwei Betriebsmodi sind WEB-Modus und CLI-Modus.
Wenn wir den PHP-Befehl im Terminal eingeben, verwenden wir den CLI-Modus.
Wenn Nginx oder ein anderer Webserver als Host zur Bearbeitung einer eingehenden Anfrage verwendet wird, wird der WEB-Modus verwendet.
PHP-Lebenszyklus
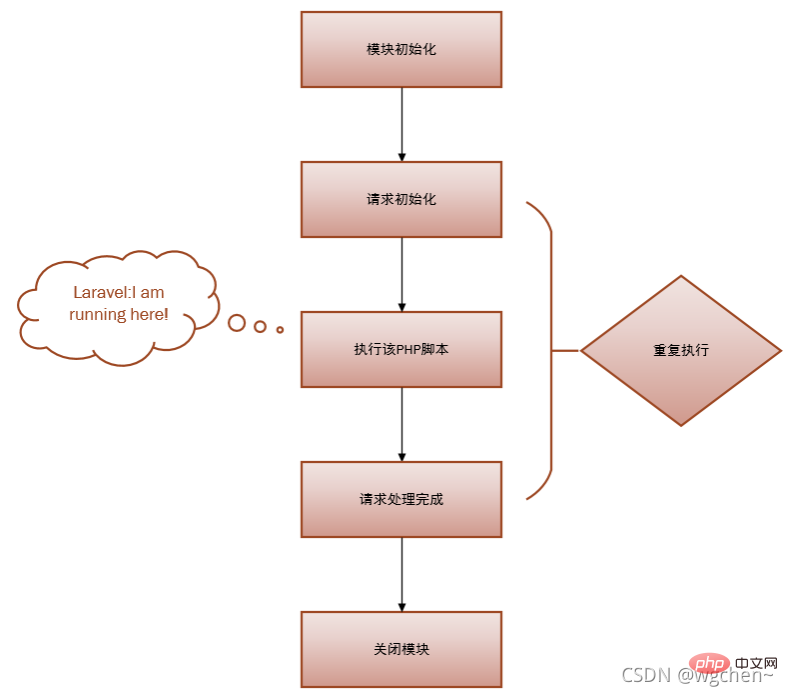
Wenn wir eine PHP-Datei anfordern, durchläuft PHP 5 Phasen des Lebenszykluswechsels, um die Anfrage abzuschließen:
1 Modulinitialisierung (MINIT), d. h. Aufruf von The Die Initialisierungsfunktion der in php.ini angegebenen Erweiterung führt Initialisierungsarbeiten durch, beispielsweise die MySQL-Erweiterung.
2 Anforderungsinitialisierung (RINIT), bei der die Symboltabelle mit Variablennamen und Variablenwertinhalten initialisiert wird, die zum Ausführen dieses Skripts erforderlich sind, z. B. die Variable $_SESSION.
3 Führen Sie das PHP-Skript aus.
4 Nachdem die Anforderungsverarbeitung abgeschlossen ist (Request Shutdown), rufen Sie nacheinander die RSHUTDOWN-Methode jedes Moduls auf und rufen Sie die unset-Funktion für jede Variable auf, z. B. die unset-Variable $_SESSION.
5 Fahren Sie das Modul herunter (Module Shutdown). Dies ist die letzte Chance für jedes Modul, Speicher freizugeben. Dies bedeutet, dass es keine nächste Anfrage gibt.
Der WEB-Modus ist dem CLI-Modus (Befehlszeilenmodus) sehr ähnlich. Der Unterschied besteht darin:
Der CLI-Modus durchläuft bei jeder Ausführung des Skripts ganze 5 Zyklen, da kein Download erfolgt Nachdem Ihr Skript ausgeführt wurde.
Der WEB-Modus verwendet möglicherweise Multithreading, um die Parallelität zu bewältigen, sodass die Lebenszyklen 1 und 5 möglicherweise nur einmal ausgeführt werden, der Lebenszyklus 2-4 jedoch wird bei der nächsten Anforderung wiederholt, wodurch der durch die Initialisierung des Systemmoduls verursachte Overhead eingespart wird.
Es ist ersichtlich, dass der PHP-Lebenszyklus sehr symmetrisch ist. Abgesehen davon geht es nur darum, herauszufinden, wo Laravel läuft. Ja, Laravel läuft nur in der dritten Stufe:
Funktion
Verstehen Sie diese, Sie können Ihren Laravel-Code optimieren und tiefer in den Singleton von Laravel einsteigen (Einzelfall).
Zumindest wissen Sie, dass die PHP-Variablen nach dem Ende jeder Anfrage nur bei einer bestimmten Anfrage deaktiviert werden.
Ihre statischen Variablen in Laravel können nicht in mehreren Anfragen verwendet werden other, da es am Ende jeder Anfrage deaktiviert wird.
Das Verständnis dieser Konzepte ist der erste und wichtigste Schritt zum Schreiben von qualitativ hochwertigem Code. Denken Sie also daran, dass PHP eine Skriptsprache ist und alle Variablen nur bei dieser Anfrage wirksam werden und bei der nächsten Anfrage zurückgesetzt werden, im Gegensatz zu statischen Java-Variablen, die globale Auswirkungen haben.
Laravels Lebenszyklus
Übersicht
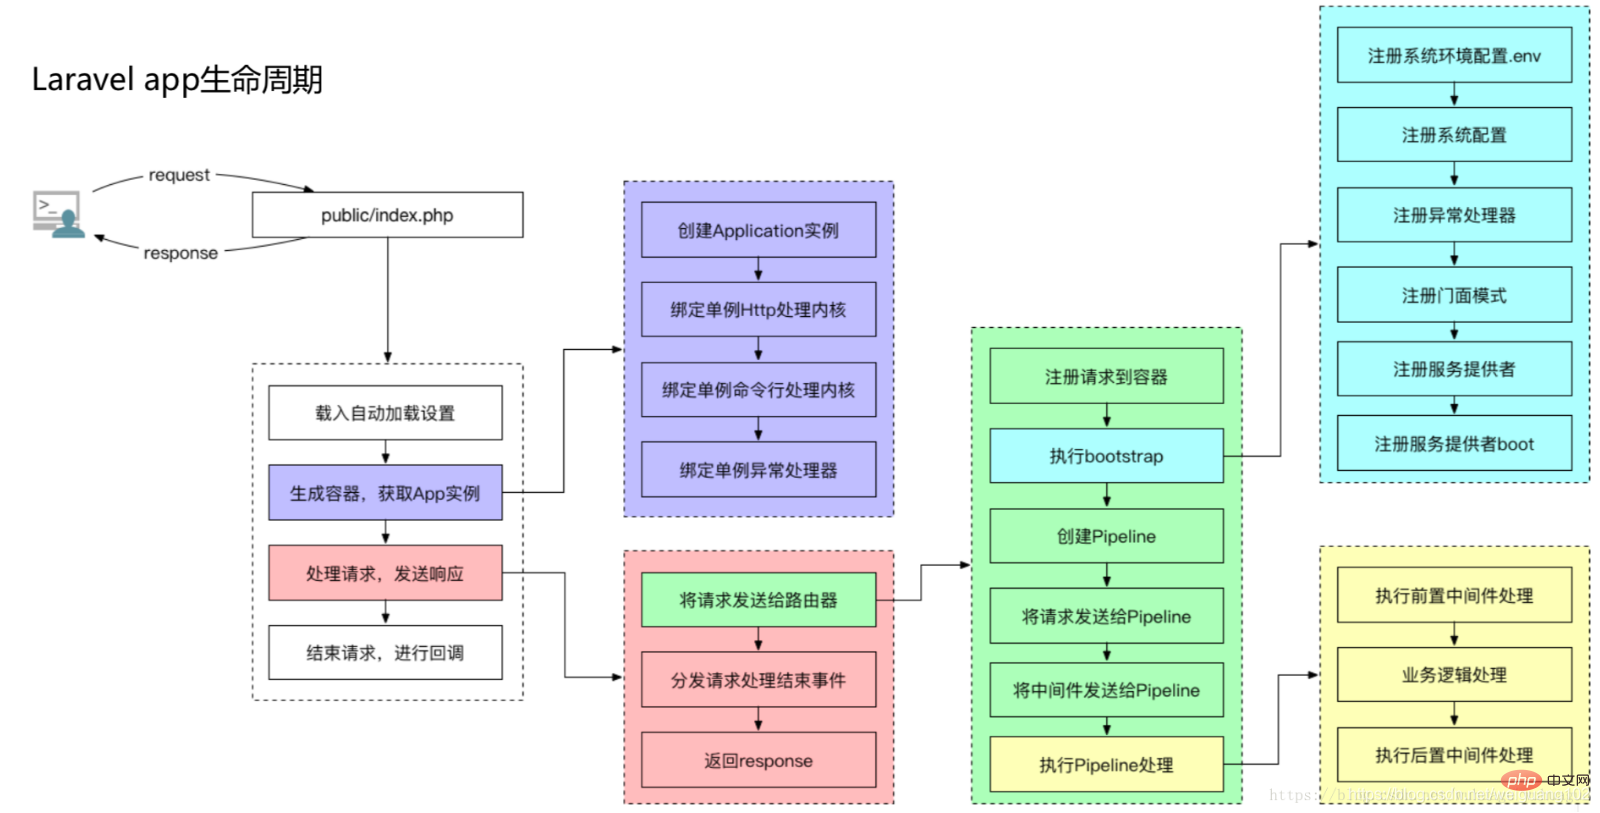
Laravels Lebenszyklus beginnt bei publicindex.php und endet bei publicindex.php.
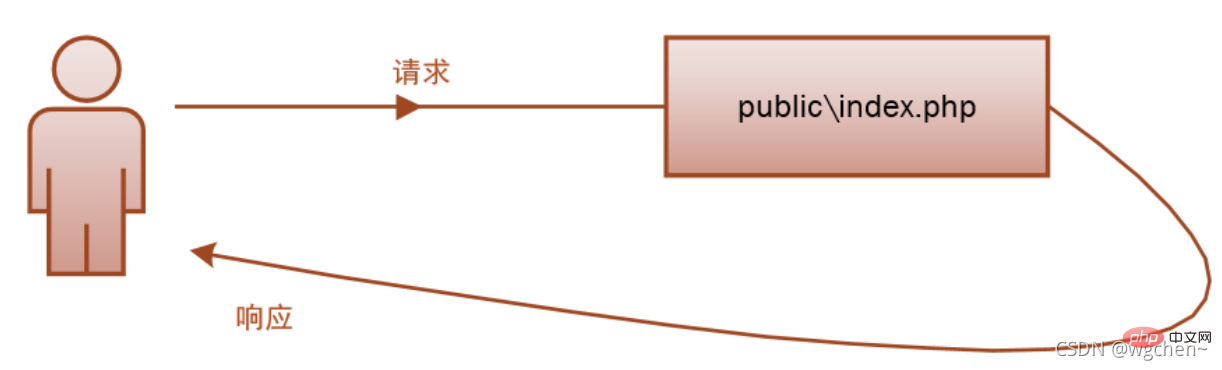
Anfrageprozess
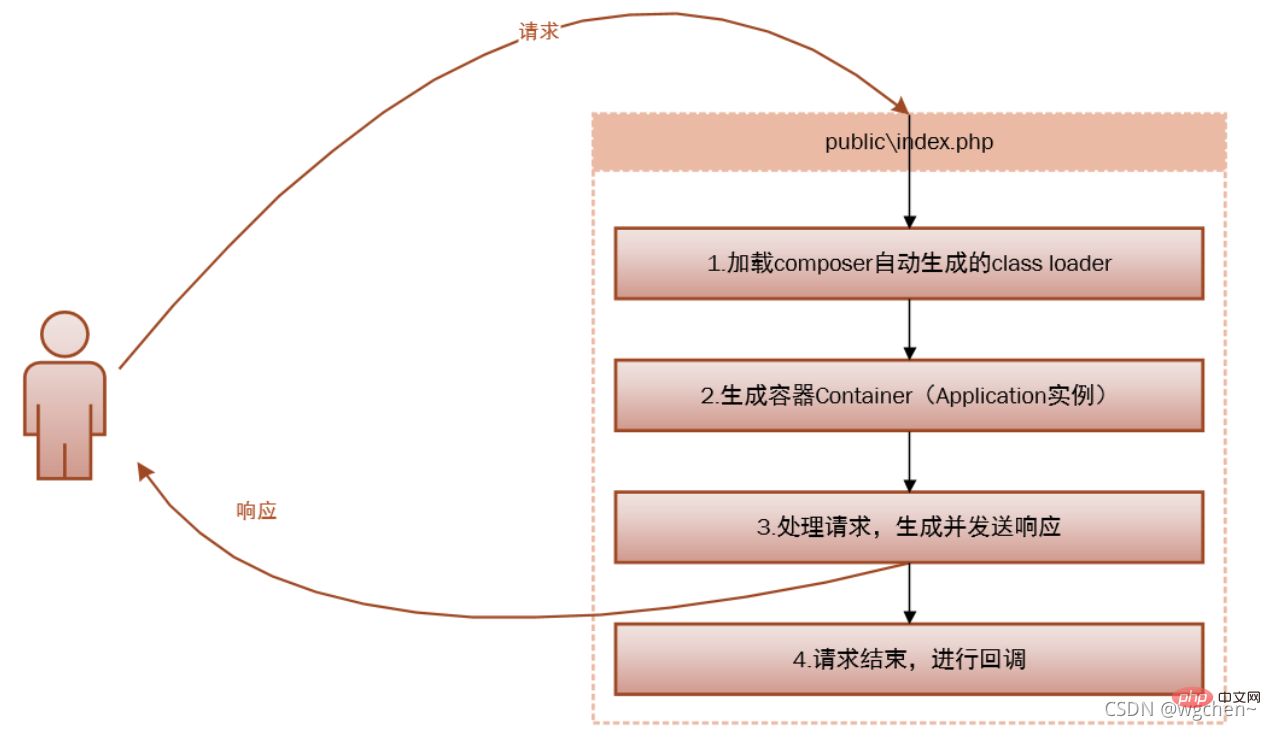
Das Folgende ist der vollständige Quellcode von publicindex.php, der genauer gesagt in vier Schritte unterteilt werden kann:
<?php define('LARAVEL_START', microtime(true)); require __DIR__.'/../vendor/autoload.php'; $app = require_once __DIR__.'/../bootstrap/app.php'; $kernel = $app->make(Illuminate\Contracts\Http\Kernel::class); $response = $kernel->handle( $request = Illuminate\Http\Request::capture() ); $response->send(); $kernel->terminate($request, $response);
Im Folgenden finden Sie eine detaillierte Erläuterung der vier Schritte : Das automatische Laden des Composers erfordert die Klasse
- 1 文件载入composer生成的自动加载设置,包括所有你 composer require的依赖。
- 2 生成容器 Container,Application实例,并向容器注册核心组件(HttpKernel,ConsoleKernel ,ExceptionHandler)(对应代码2,容器很重要,后面详细讲解)。
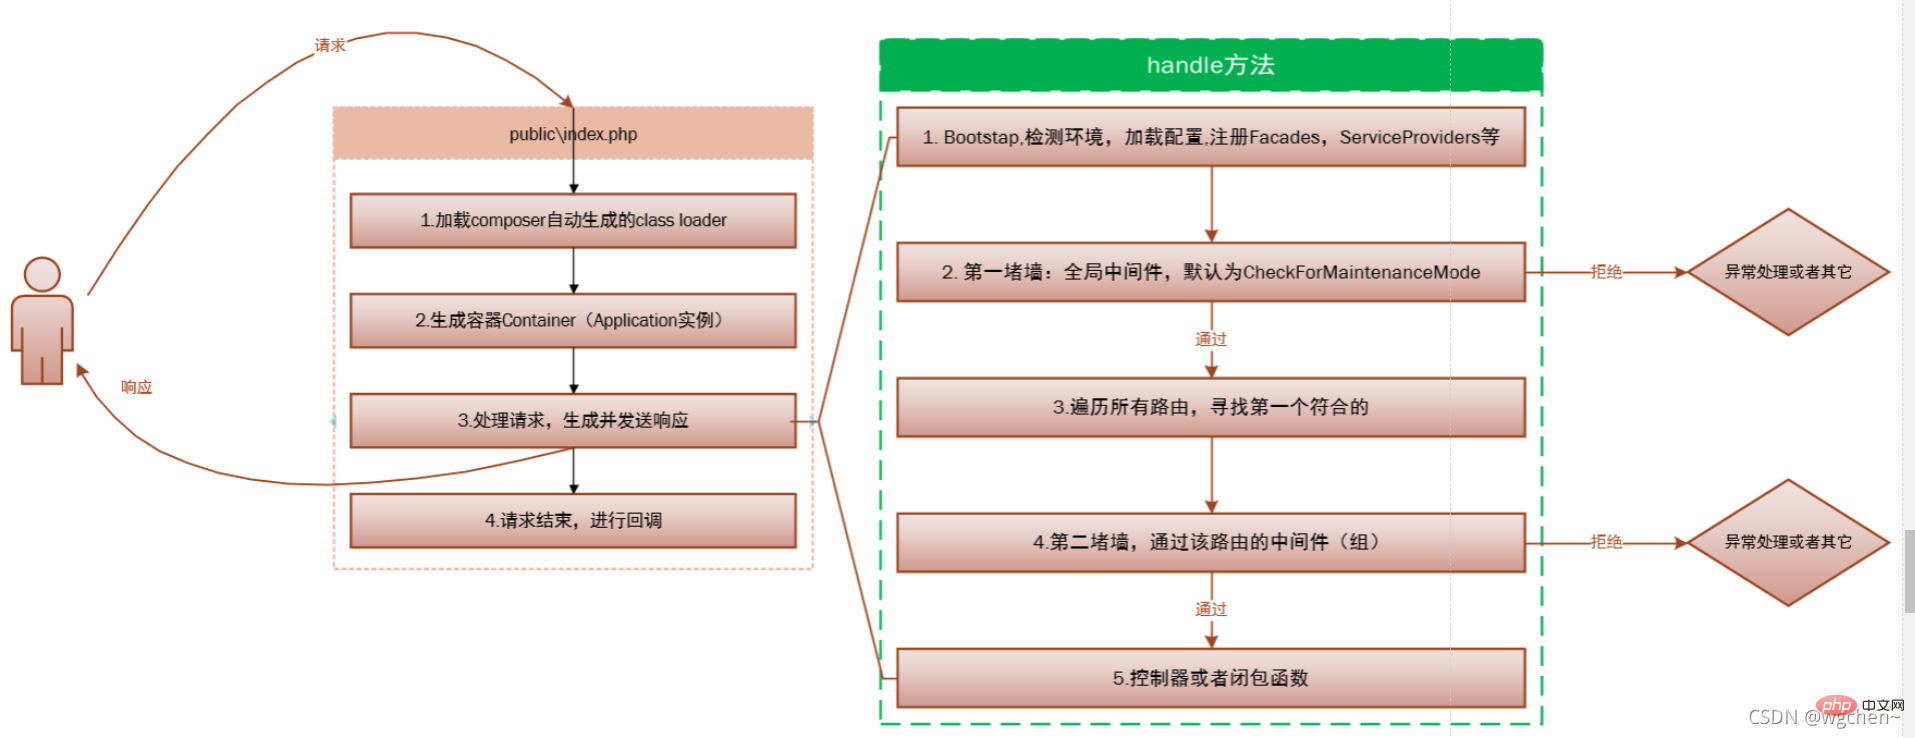
- 3 处理请求,生成并发送响应(对应代码3,毫不夸张的说,你99%的代码都运行在这个小小的handle 方法里面)。
- 4 请求结束,进行回调(对应代码4,还记得可终止中间件吗?没错,就是在这里回调的)。
Laravel 的请求步骤
第一步:注册加载composer自动生成的class loader
就是加载初始化第三方依赖。
第二步:生成容器 Container
并向容器注册核心组件,是从 bootstrap/app.php 脚本获取 Laravel 应用实例,
第三步:这一步是重点,处理请求,并生成发送响应。
请求被发送到 HTTP 内核或 Console 内核,这取决于进入应用的请求类型。
取决于是通过浏览器请求还是通过控制台请求。这里我们主要是通过浏览器请求。
HTTP 内核继承自 Illuminate\Foundation\Http\Kernel 类,该类定义了一个 bootstrappers 数组,这个数组中的类在请求被执行前运行,这些 bootstrappers 配置了错误处理、日志、检测应用环境以及其它在请求被处理前需要执行的任务。
protected $bootstrappers = [ //注册系统环境配置 (.env) 'Illuminate\Foundation\Bootstrap\DetectEnvironment', //注册系统配置(config) 'Illuminate\Foundation\Bootstrap\LoadConfiguration', //注册日志配置 'Illuminate\Foundation\Bootstrap\ConfigureLogging', //注册异常处理 'Illuminate\Foundation\Bootstrap\HandleExceptions', //注册服务容器的门面,Facade 是个提供从容器访问对象的类。 'Illuminate\Foundation\Bootstrap\RegisterFacades', //注册服务提供者 'Illuminate\Foundation\Bootstrap\RegisterProviders', //注册服务提供者 `boot` 'Illuminate\Foundation\Bootstrap\BootProviders', ];
Laravel的生命周期 B
laravel/public/index.php
/**
 * laravel的启动时间
 */
define('LARAVEL_START', microtime(true));

/**
 * 加载项目依赖。
 * 现代PHP依赖于Composer包管理器,入口文件通过引入由Composer包管理器。
 * 自动生成的类加载程序,可以轻松注册并加载所依赖的第三方组件库。
 */
require __DIR__.'/../vendor/autoload.php';

/**
 * 创建laravel应用实例。
 */
$app = require_once __DIR__.'/../bootstrap/app.php';

// 接受请求并响应
$kernel = $app->make(Illuminate\Contracts\Http\Kernel::class);

$response = $kernel->handle(
    $request = Illuminate\Http\Request::capture()
);

// 结束请求,进行回调
$response->send();

// 终止程序
$kernel->terminate($request, $response);laravel/boostrap/app.php
# 第一部分:创建应用实例
$app = new Illuminate\Foundation\Application(
    realpath(__DIR__.'/../')
);

# 第二部分:完成内核绑定
$app->singleton(
    Illuminate\Contracts\Http\Kernel::class,
    App\Http\Kernel::class
);

$app->singleton(
    Illuminate\Contracts\Console\Kernel::class,
    App\Console\Kernel::class
);

$app->singleton(
    Illuminate\Contracts\Debug\ExceptionHandler::class,
    App\Exceptions\Handler::class
);

return $app;
laravel\vendor\laravel\framework\src\Illuminate\Foundation\Http\Kernel.php
class Kernel implements KernelContract
{
    protected $bootstrappers = [
        \Illuminate\Foundation\Bootstrap\LoadEnvironmentVariables::class, // 注册系统环境配置
        \Illuminate\Foundation\Bootstrap\LoadConfiguration::class,              // 注册系统配置
        \Illuminate\Foundation\Bootstrap\HandleExceptions::class,              // 注册异常注册
        \Illuminate\Foundation\Bootstrap\RegisterFacades::class,                // 注册门面模式
        \Illuminate\Foundation\Bootstrap\RegisterProviders::class,              // 注册服务提供者
        \Illuminate\Foundation\Bootstrap\BootProviders::class,                    // 注册服务提供者boot
    ];

    // 处理请求
    public function handle($request)
    {
        try {
            $request->enableHttpMethodParameterOverride();

            $response = $this->sendRequestThroughRouter($request);
        } catch (Exception $e) {
            $this->reportException($e);

            $response = $this->renderException($request, $e);
        } catch (Throwable $e) {
            $this->reportException($e = new FatalThrowableError($e));

            $response = $this->renderException($request, $e);
        }

        $this->app['events']->dispatch(
            new Events\RequestHandled($request, $response)
        );

        return $response;
    }

    protected function sendRequestThroughRouter($request)
    {
        # 一、将$request实例注册到APP容器
        $this->app->instance('request', $request);

        # 二、清除之前的$request实例缓存
        Facade::clearResolvedInstance('request');

        # 三、启动引导程序
        $this->bootstrap();

        # 四、发送请求
        return (new Pipeline($this->app)) //创建管道
                    ->send($request)      //发送请求
                    ->through($this->app->shouldSkipMiddleware() ? [] : $this->middleware)  //通过中间件
                    ->then($this->dispatchToRouter());  //分发到路由
    }

    # 启动引导程序
    public function bootstrap()
    {
        if (! $this->app->hasBeenBootstrapped()) {
            $this->app->bootstrapWith($this->bootstrappers());
        }
    }

    # 路由分发
    protected function dispatchToRouter()
    {
        return function ($request) {
            $this->app->instance('request', $request);

            return $this->router->dispatch($request);
        };
    }

    #  终止程序
    public function terminate($request, $response)
    {
        $this->terminateMiddleware($request, $response);

        $this->app->terminate();
}Laravel 服务容器模块
简介
服务容器是一个用于管理类依赖和执行依赖注入的强大工具。是整个框架的核心;
几乎所有的服务容器绑定都是在服务提供者中完成。
框架调用分析
在框架直接生成服务容器的只有一处,在<span style="font-size: 14px;">bootstrap/app.php</span>,通过<span style="font-size: 14px;">require</span>引用会返回服务容器实例。通过<span style="font-size: 14px;">require</span>引用有两处,一处是<span style="font-size: 14px;">public/index.php</span>,服务器访问的入口;另一处是<span style="font-size: 14px;">tests/CreatesApplication.php</span>,是单元测试的入口;
如果想在项目各处中调用,可以调用<span style="font-size: 14px;">$app = Illuminate\Container\Container::getInstance()</span>或者全局帮助函数<span style="font-size: 14px;">app()</span>获取服务容器实例(也就是<span style="font-size: 14px;">Illuminate\Foundation/Application</span>实例);
<span style="font-size: 14px;">Illuminate\Foundation/Application</span>是对<span style="font-size: 14px;">Illuminate\Container\Container</span>的又一层封装;
Application初始化
那么实例化<span style="font-size: 14px;">Illuminate\Foundation/Application</span>时,做了什么呢?
第一步,设置应用的根目录,并同时注册核心目录到服务容器中;核心的目录有以下
<code><span style="font-size: 14px;">path</span>:目录<span style="font-size: 14px;">app</span>的位置<span style="font-size: 14px;">path.base</span>:项目根目录的位置<span style="font-size: 14px;">path.lang</span>:目录<span style="font-size: 14px;">resources/lang</span>的位置<span style="font-size: 14px;">path.config</span>:目录<span style="font-size: 14px;">config</span>的位置<span style="font-size: 14px;">path.public</span>:目录<span style="font-size: 14px;">public</span>的位置<span style="font-size: 14px;">path.storage</span>:目录<span style="font-size: 14px;">storage</span>的位置<span style="font-size: 14px;">path.database</span>:目录<span style="font-size: 14px;">database</span>的位置<span style="font-size: 14px;">path.resources</span>:目录<span style="font-size: 14px;">resources</span>的位置<span style="font-size: 14px;">path.bootstrap</span>:目录<span style="font-size: 14px;">bootstrap</span>的位置
第二步,将当前<span style="font-size: 14px;">IlluminateFoundation/Application</span>实例保存到<span style="font-size: 14px;">$instance</span>类变量,并同时绑定到服务容器作单例绑定,绑定名为<span style="font-size: 14px;">app</span>或<span style="font-size: 14px;">Container::class</span>;
第三步,顺序分别执行注册<span style="font-size: 14px;">IlluminateEventsEventServiceProvider</span>、<span style="font-size: 14px;">IlluminateLogLogServiceProvider</span>和<span style="font-size: 14px;">IlluminateRoutingRoutingServiceProvider</span>三个服务提供者;
注册服务提供者的顺序如下:
如果类变量
<span style="font-size: 14px;">$serviceProviders</span>已经存在该服务提供者并且不需要强制重新注册,则返回服务提供者实例<span style="font-size: 14px;">$provider</span>;未注册过当前服务提供者,则继续执行以下;
如果存在
<span style="font-size: 14px;">register</span>方法,执行服务提供者的<span style="font-size: 14px;">register</span>方法;-
将当前服务提供者
<span style="font-size: 14px;">$provider</span>实例保存到类变量<span style="font-size: 14px;">$serviceProviders</span>数组中,同时标记类变量<span style="font-size: 14px;">$loadedProviders[get_class($provider)]</span>的值为<span style="font-size: 14px;">true</span>path: Der Speicherort des Verzeichnisses🎜app🎜🎜🎜🎜 🎜🎜
🎜path.base🎜 code> 🎜: Der Speicherort des Projektstammverzeichnisses 🎜🎜🎜🎜<code>🎜path.lang🎜🎜: Der Speicherort des Verzeichnisses 🎜🎜resources/lang🎜🎜🎜🎜 li>🎜🎜🎜path.config🎜🎜: Der Speicherort des Verzeichnisses 🎜🎜config🎜🎜🎜🎜🎜🎜🎜path.public🎜🎜: Der Speicherort des Verzeichnisses 🎜🎜public🎜🎜 Der Speicherort von 🎜🎜🎜🎜🎜🎜 path.database🎜🎜: Verzeichnis 🎜🎜database🎜Der Standort von 🎜🎜🎜 🎜🎜🎜path.resources🎜🎜: Der Standort des Verzeichnisses 🎜🎜resources🎜🎜🎜🎜🎜🎜🎜path.bootstrap🎜🎜: Der Speicherort des Verzeichnisses 🎜🎜bootstrap🎜🎜🎜🎜
🎜IlluminateFoundation/ Die Anwendungsinstanz🎜🎜 wird im 🎜 gespeichert 🎜$instance🎜🎜-Klassenvariable und ist auch an den Service-Container für die Singleton-Bindung gebunden. Der Bindungsname ist 🎜🎜app🎜 🎜 oder 🎜🎜Container ::class🎜🎜;🎜🎜🎜🎜Der dritte Schritt, führen Sie die Registrierung nacheinander aus 🎜🎜IlluminateEventsEventServiceProvider🎜 code>🎜, 🎜<code>🎜IlluminateLogLogServiceProvider🎜 🎜 und 🎜🎜IlluminateRoutingRoutingServiceProvider🎜🎜drei Dienstanbieter; 🎜🎜🎜🎜Die Reihenfolge der Registrierung von Dienstanbietern ist wie folgt: 🎜🎜🎜 🎜🎜🎜Wenn die Klassenvariable 🎜 🎜$serviceProviders🎜🎜 existiert bereits und es ist keine erzwungene Neuregistrierung erforderlich, geben Sie die Dienstanbieterinstanz zurück 🎜🎜$provider🎜 🎜;🎜🎜🎜🎜🎜Wenn die Der aktuelle Dienstanbieter wurde nicht registriert. Führen Sie weiterhin Folgendes aus register🎜🎜-Methode; 🎜🎜🎜🎜🎜 speichert die aktuelle Dienstanbieter-Instanz 🎜🎜$provider🎜🎜 in einer Klassenvariablen 🎜🎜$serviceProviders🎜🎜array, markieren Sie auch die Klassenvariable 🎜<code>🎜$loadedProviders[get_class($provider)]🎜🎜Der Wert ist 🎜🎜true🎜 🎜;🎜🎜判断类变量<span style="font-size: 14px;">$booted</span>是否为<span style="font-size: 14px;">true</span>,如果是<span style="font-size: 14px;">true</span>,则执行服务提供者的<span style="font-size: 14px;">boot</span>方法;(类变量<span style="font-size: 14px;">$booted</span>应该是标志是否所有服务提供者均注册,框架是否启动)
第四步,注册核心类别名;
比如<span style="font-size: 14px;">\Illuminate\Foundation\Application::class</span>、<span style="font-size: 14px;">\Illuminate\Contracts\Container\Container::class</span>起别名为<span style="font-size: 14px;">app</span>;
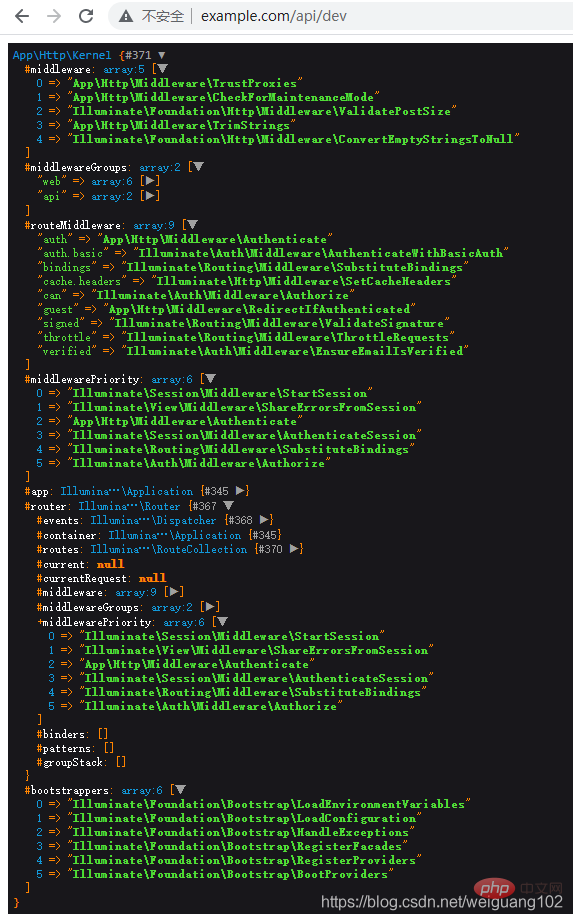
单元测试Application的bootstrap启动分析
启动代码很简洁,
Route::get('dev', 'Dev@index');

public function index()
{
     // require 初始化分析上面已经介绍了
    $app = require base_path('bootstrap/app.php');
    $kernel = $app->make('Illuminate\Contracts\Http\Kernel');

    dd($kernel);
}
构造函数主要干了一件事,注册一个<span style="font-size: 14px;">booted</span>完成后的回调函数,函数执行的内容为“注册 <span style="font-size: 14px;">Schedule</span>实例到服务提供者,同时加载用户定义的<span style="font-size: 14px;">Schedule</span>任务清单”;
<span style="font-size: 14px;">bootstrap</span>方法的执行内容如下:
加载
<span style="font-size: 14px;">Illuminate/Foundation/Console/Kernel</span>中<span style="font-size: 14px;">$bootstrappers</span>变量数组中的类,执行它们的<span style="font-size: 14px;">bootstrap</span>方法;protected $bootstrappers = [ // 加载 .env 文件 \Illuminate\Foundation\Bootstrap\LoadEnvironmentVariables::class, // 加载 config 目录下的配置文件 \Illuminate\Foundation\Bootstrap\LoadConfiguration::class, // 自定义错误报告,错误处理方法及呈现 \Illuminate\Foundation\Bootstrap\HandleExceptions::class, // 为 config/app.php 中的 aliases 数组注册类别名 \Illuminate\Foundation\Bootstrap\RegisterFacades::class, // 在服务容器中单例绑定一个 request 对象,控制台命令会用到 \Illuminate\Foundation\Bootstrap\SetRequestForConsole::class, // 注册 config\app.php 中的 providers 服务提供者 \Illuminate\Foundation\Bootstrap\RegisterProviders::class, // 项目启动,执行每个 ServiceProvider 的 boot 方法, \Illuminate\Foundation\Bootstrap\BootProviders::class, ];Nach dem Login kopieren加载延迟的服务提供者;
Http访问Application的bootstrap启动分析
启动入口文件在<span style="font-size: 14px;">public\index.php</span>
$app = require_once __DIR__.'/../bootstrap/app.php';

// 实例化 Illuminate/Foundation/Http/Kernel 对象
$kernel = $app->make(Illuminate\Contracts\Http\Kernel::class);

// 中间件处理、业务逻辑处理
$response = $kernel->handle(
    // 根据 Symfony 的 request 对象封装出 Illuminate\Http\Request
    $request = Illuminate\Http\Request::capture()
);

$response->send();

// 执行所有中间件的 terminate 方法,执行 Application 中的 terminatingCallbacks 回调函数
$kernel->terminate($request, $response);重要的类变量数组
aliases数组
维护 类与别名 的数组;键名为 类的全限定类名,键值为 数组,每一个元素都是该类的别名;
判断指定类是否有别名:
<span style="font-size: 14px;">app()->isAlias($name)</span>;
获取指定类的别名:<span style="font-size: 14px;">app()->getAlias($abstract)</span>;
abstractAliases数组
维护 类与别名 的数组;键名为 别名,键值为 类的全限定类名;
instances数组
维护 类与实例的数组;键名为 类的全限定类名,键值为该类的实例;
移除绑定类:
<span style="font-size: 14px;">app()->forgetInstance($abstract);</span>
移除所有绑定类:<span style="font-size: 14px;">app()->forgetInstances();</span>
bindings数组
通过 <span style="font-size: 14px;">bind</span> 方法实现 接口类与实现的绑定;
获取
<span style="font-size: 14px;">bindings</span>数组中的内容:<span style="font-size: 14px;">app()->getBindings()</span>
resolved数组
键名为 类的全限定类名,键值为布尔值类型(<span style="font-size: 14px;">true</span>表示已解析过,<span style="font-size: 14px;">false</span>表示未解析过);
with 数组
在<span style="font-size: 14px;">resolved</span>过程中,会有一些参数;<span style="font-size: 14px;">with</span>数组就是参数栈,开始解析时将参数入栈,结束解析时参数出栈;
contextual数组
上下文绑定数组;第一维数组键名为 场合类(比如某个<span style="font-size: 14px;">Controller</span>类的类名),第二维数组键名为 抽象类(需要实现的接口类),键值为 <span style="font-size: 14px;">Closure</span> 或 某个具体类的类名;
tags数组
维护 标签与类 的数组;键名是 标签名,键值是 对应要绑定的类的名称;
如果调用<span style="font-size: 14px;">tagged</span>方法,会将键值数组中的类都<span style="font-size: 14px;">make</span>出来,并以数组形式返回;
extenders数组
在<span style="font-size: 14px;">make</span>或<span style="font-size: 14px;">resolve</span>出对象的时候,会执行
foreach ($this->getExtenders($abstract) as $extender) { $object = $extender($object, $this);}能对解析出来的对象进行修饰;
methodBindings数组
向容器绑定方法与及实现:
<span style="font-size: 14px;">app()->bindMethod($method, $callback)</span>
判断容器内是否有指定方法的实现:<span style="font-size: 14px;">app()->hasMethodBinding($method)</span>
执行方法的实现:<span style="font-size: 14px;">app()->callMethodBinding($method, $instance)</span>或者<span style="font-size: 14px;">app()->call($method)</span>
buildStack数组
调用<span style="font-size: 14px;">build</span>方法时维护的栈,栈中存放的是当前要<span style="font-size: 14px;">new</span>的类名;
reboundCallbacks数组
当调用<span style="font-size: 14px;">rebound</span>函数时,会触发<span style="font-size: 14px;">rebound</span>中为此<span style="font-size: 14px;">$abstract</span>设置的回调函数;
注册入口:
<span style="font-size: 14px;">app()->rebinding($abstract, Closure $callback);</span>
serviceProviders数组
已在系统注册的服务提供者<span style="font-size: 14px;">ServiceProvider</span>;
数组内存放的是<span style="font-size: 14px;">loadedProviders</span>键名对应类的实例;
loadedProviders数组
系统已加载的<span style="font-size: 14px;">ServiceProvider</span>的集合;键名为<span style="font-size: 14px;">ServiceProvider</span>的全限定类名,键值为布尔值(<span style="font-size: 14px;">true</span>表示已加载,<span style="font-size: 14px;">false</span>表示未加载);
获取延迟加载对象:
<span style="font-size: 14px;">app()->getLoadedProviders()</span>;
deferredServices数组
有些服务提供者是会延迟加载的;这时候会将这些服务提供者声明的服务登录在<span style="font-size: 14px;">deferredServices</span>数组,键名为延迟加载对象名 ,键值为该延迟加载对象所在的<span style="font-size: 14px;">ServiceProvider</span>;
获取延迟加载对象:
<span style="font-size: 14px;">app()->getDeferredServices()</span>;
bootingCallbacks数组
项目启动前执行的回调函数;(项目启动是在执行<span style="font-size: 14px;">\Illuminate\Foundation\Bootstrap\BootProviders::class</span>的时候)
注册入口:
<span style="font-size: 14px;">app()->booting($callback);</span>
bootedCallbacks数组
项目启动后执行的回调函数;(项目启动是在执行<span style="font-size: 14px;">\Illuminate\Foundation\Bootstrap\BootProviders::class</span>的时候)
注册入口:
<span style="font-size: 14px;">app()->booted($callback);</span>
resolvingCallbacks数组
解析时回调函数集合;键名为 类名, 键值为 回调函数数组,每一个元素都是回调函数;
注册入口:
<span style="font-size: 14px;">app()->resolving($abstract, $callback);</span>
afterResolvingCallbacks数组
解析后回调函数集合;键名为 类名, 键值为 回调函数数组,每一个元素都是回调函数;
注册入口:
<span style="font-size: 14px;">app()->afterResolving($abstract, $callback);</span>
globalResolvingCallbacks数组
全局解析时回调函数集合;每一次<span style="font-size: 14px;">resolve</span>方法调用时都会执行的回调函数集合;
注册入口:
<span style="font-size: 14px;">app()->resolving($callback);</span>
globalAfterResolvingCallbacks数组
全局解析后回调函数集合;每一次<span style="font-size: 14px;">resolve</span>方法调用后都会执行的回调函数集合;
注册入口:
<span style="font-size: 14px;">app()->afterResolving($callback);</span>
terminatingCallbacks数组
系统在返回<span style="font-size: 14px;">response</span>之后,会执行<span style="font-size: 14px;">terminate</span>方法,来做应用结束前的扫尾处理;
这个数组就是执行<span style="font-size: 14px;">terminate</span>方法时会执行的回调函数集合;
注册入口:
<span style="font-size: 14px;">app()->terminating(Closure $callback)</span>;
常用方法的解析
bind方法
public function bind($abstract, $concrete = null, $shared = false)
第一个参数是要注册的类名或接口名,第二个参数是返回类的实例的闭包(或类的实例类名),第三个参数是否是单例;
方法内部流程:
<span style="font-size: 14px;">unset</span>掉instances和aliases数组中键值为<span style="font-size: 14px;">$abstract</span>的元素;如果
<span style="font-size: 14px;">$concrete</span>值为<span style="font-size: 14px;">null</span>,将<span style="font-size: 14px;">$abstract</span>赋值给<span style="font-size: 14px;">$concrete</span>;如果
<span style="font-size: 14px;">$concrete</span>不是<span style="font-size: 14px;">Closure</span>对象,则封装成闭包;将
<span style="font-size: 14px;">$concrete</span>和<span style="font-size: 14px;">$shared</span>通过<span style="font-size: 14px;">compact</span>,添加进bindings数组,键名为<span style="font-size: 14px;">$abstract</span>;判断
<span style="font-size: 14px;">$abstract</span>在resolved和instances数组中是否存在,如果存在,则执行第 6 步;触发
<span style="font-size: 14px;">rebound</span>回调函数;如果<span style="font-size: 14px;">reboundCallbacks</span>数组中注册以<span style="font-size: 14px;">$abstract</span>为键名的回调函数,则执行这些回调函数;
涉及数组:
<span style="font-size: 14px;">instances</span>和<span style="font-size: 14px;">aliases</span>(unset 操作)、<span style="font-size: 14px;">bindings</span>(add 操作)
singleton方法
单例绑定;
public function singleton($abstract, $concrete = null) $this->bind($abstract, $concrete, true);}
涉及数组:
<span style="font-size: 14px;">instances</span>和<span style="font-size: 14px;">aliases</span>(unset 操作)、<span style="font-size: 14px;">bindings</span>(add 操作)
bindIf方法
单例绑定;
public function bindIf($abstract, $concrete = null, $shared = false) {
    if (! $this->bound($abstract)) {
        $this->bind($abstract, $concrete, $shared);
    }
}涉及数组:
<span style="font-size: 14px;">instances</span>和<span style="font-size: 14px;">aliases</span>(unset 操作)、<span style="font-size: 14px;">bindings</span>(add 操作)
instance方法
绑定实例;
public function instance($abstract, $instance)
方法内部流程:
如果
<span style="font-size: 14px;">$abstract</span>在<span style="font-size: 14px;">aliases</span>数组中存在,则从<span style="font-size: 14px;">abstractAliases</span>中所有的值数组中移除该类;<span style="font-size: 14px;">unset</span>掉<span style="font-size: 14px;">aliases</span>数组中键名为<span style="font-size: 14px;">$abstract</span>的元素;赋值操作:
<span style="font-size: 14px;">$this->instances[$abstract] = $instance;</span>判断
<span style="font-size: 14px;">$abstract</span>在resolved和instances数组中是否存在,如果存在,则执行第 5 步;触发
<span style="font-size: 14px;">rebound</span>回调函数;如果<span style="font-size: 14px;">reboundCallbacks</span>数组中注册以<span style="font-size: 14px;">$abstract</span>为键名的回调函数,则执行这些回调函数;
涉及数组:
<span style="font-size: 14px;">instances</span>(add 操作)、<span style="font-size: 14px;">aliases</span>和<span style="font-size: 14px;">abstractAliases</span>(unset 操作)
make方法
public function make($abstract) { return $this->resolve($abstract);}alias
给类起别名;
public function alias($abstract, $alias) {
    $this->aliases[$alias] = $abstract;

    $this->abstractAliases[$abstract][] = $alias;
}涉及数组:
<span style="font-size: 14px;">aliases</span>和<span style="font-size: 14px;">abstractAliases</span>(add 操作)
laravel 的源代码生命周期
第一步 Laravel 应用的所有请求入口都是 public/index.php 文件。打开 index.php 发现代码也就几行。
下面我们来讲一下每一句代码的作用是什么?
// 定义了laravel一个请求的开始时间
define('LARAVEL_START', microtime(true));

// composer自动加载机制
require __DIR__.'/../vendor/autoload.php';

// 这句话你就可以理解laravel,在最开始引入了一个ioc容器。
$app = require_once __DIR__.'/../bootstrap/app.php';

// 打开__DIR__.'/../bootstrap/app.php';你会发现这段代码,绑定了Illuminate\Contracts\Http\Kernel::class,
// 这个你可以理解成之前我们所说的$ioc->bind();方法。
// $app->singleton(
//     Illuminate\Contracts\Http\Kernel::class,
//    App\Http\Kernel::class
// );

// 这个相当于我们创建了Kernel::class的服务提供者
$kernel = $app->make(Illuminate\Contracts\Http\Kernel::class);

// 获取一个 Request ,返回一个 Response。以把该内核想象作一个代表整个应用的大黑盒子,输入 HTTP 请求,返回 HTTP 响应。
$response = $kernel->handle(
    $request = Illuminate\Http\Request::capture()
);

// 就是把我们服务器的结果返回给浏览器。
$response->send();

// 这个就是执行我们比较耗时的请求,
$kernel->terminate($request, $response);走到这里你会发现,是不是在我们学会了 ioc,服务提供者理解起来就比较简单了。那 $middleware,服务提供者都是在哪个文件注册运行的呢?
打开 App\Http\Kernel::class 这个文件,你会发现定义了一堆需要加载的 $middleware。这个 kernel 的主要方法还是在他的父类里面 Illuminate\Foundation\Http\Kernel 中。
打开 Illuminate\Foundation\Http\Kernel,你会发现定义了启动时需要做的事呢?
protected $bootstrappers = [
    \Illuminate\Foundation\Bootstrap\LoadEnvironmentVariables::class,
    \Illuminate\Foundation\Bootstrap\LoadConfiguration::class,
    \Illuminate\Foundation\Bootstrap\HandleExceptions::class,
    \Illuminate\Foundation\Bootstrap\RegisterFacades::class,
    \Illuminate\Foundation\Bootstrap\RegisterProviders::class,
    \Illuminate\Foundation\Bootstrap\BootProviders::class,
];$bootstrappers 就定义了我们的 RegisterFacades.class,RegisterProviders.class 这两个类的意思就是要将我们在 app.config 中的 Providers,Facades 注入到我们的 Ioc 容器中。
【相关推荐:laravel视频教程】
Das obige ist der detaillierte Inhalt vonLassen Sie uns über den Lebenszyklus von Laravel sprechen. Für weitere Informationen folgen Sie bitte anderen verwandten Artikeln auf der PHP chinesischen Website!

Heiße KI -Werkzeuge

Undresser.AI Undress
KI-gestützte App zum Erstellen realistischer Aktfotos

AI Clothes Remover
Online-KI-Tool zum Entfernen von Kleidung aus Fotos.

Undress AI Tool
Ausziehbilder kostenlos

Clothoff.io
KI-Kleiderentferner

AI Hentai Generator
Erstellen Sie kostenlos Ai Hentai.

Heißer Artikel
Heiße Werkzeuge

Notepad++7.3.1
Einfach zu bedienender und kostenloser Code-Editor

SublimeText3 chinesische Version
Chinesische Version, sehr einfach zu bedienen

Senden Sie Studio 13.0.1
Leistungsstarke integrierte PHP-Entwicklungsumgebung

Dreamweaver CS6
Visuelle Webentwicklungstools

SublimeText3 Mac-Version
Codebearbeitungssoftware auf Gottesniveau (SublimeText3)
Heiße Themen
 1378
1378
 52
52

 Vergleich der neuesten Versionen von Laravel und CodeIgniter
Jun 05, 2024 pm 05:29 PM
Vergleich der neuesten Versionen von Laravel und CodeIgniter
Jun 05, 2024 pm 05:29 PM
Die neuesten Versionen von Laravel 9 und CodeIgniter 4 bieten aktualisierte Funktionen und Verbesserungen. Laravel9 übernimmt die MVC-Architektur und bietet Funktionen wie Datenbankmigration, Authentifizierung und Template-Engine. CodeIgniter4 nutzt die HMVC-Architektur, um Routing, ORM und Caching bereitzustellen. In Bezug auf die Leistung sorgen das auf Dienstanbietern basierende Designmuster von Laravel9 und das leichte Framework von CodeIgniter4 für eine hervorragende Leistung. In praktischen Anwendungen eignet sich Laravel9 für komplexe Projekte, die Flexibilität und leistungsstarke Funktionen erfordern, während CodeIgniter4 für schnelle Entwicklung und kleine Anwendungen geeignet ist.
 Wie vergleichen sich die Datenverarbeitungsfunktionen in Laravel und CodeIgniter?
Jun 01, 2024 pm 01:34 PM
Wie vergleichen sich die Datenverarbeitungsfunktionen in Laravel und CodeIgniter?
Jun 01, 2024 pm 01:34 PM
Vergleichen Sie die Datenverarbeitungsfunktionen von Laravel und CodeIgniter: ORM: Laravel verwendet EloquentORM, das eine relationale Klassen-Objekt-Zuordnung bereitstellt, während CodeIgniter ActiveRecord verwendet, um das Datenbankmodell als Unterklasse von PHP-Klassen darzustellen. Abfrage-Builder: Laravel verfügt über eine flexible verkettete Abfrage-API, während der Abfrage-Builder von CodeIgniter einfacher und Array-basiert ist. Datenvalidierung: Laravel bietet eine Validator-Klasse, die benutzerdefinierte Validierungsregeln unterstützt, während CodeIgniter über weniger integrierte Validierungsfunktionen verfügt und eine manuelle Codierung benutzerdefinierter Regeln erfordert. Praxisfall: Beispiel einer Benutzerregistrierung zeigt Lar
 Was ist einsteigerfreundlicher: Laravel oder CodeIgniter?
Jun 05, 2024 pm 07:50 PM
Was ist einsteigerfreundlicher: Laravel oder CodeIgniter?
Jun 05, 2024 pm 07:50 PM
Für Anfänger bietet CodeIgniter eine sanftere Lernkurve und weniger Funktionen, deckt aber die Grundbedürfnisse ab. Laravel bietet einen größeren Funktionsumfang, weist jedoch eine etwas steilere Lernkurve auf. In Bezug auf die Leistung schneiden sowohl Laravel als auch CodeIgniter gut ab. Laravel verfügt über eine umfangreichere Dokumentation und aktive Community-Unterstützung, während CodeIgniter einfacher und leichtgewichtiger ist und über starke Sicherheitsfunktionen verfügt. Im praktischen Fall der Erstellung einer Blogging-Anwendung vereinfacht EloquentORM von Laravel die Datenmanipulation, während CodeIgniter mehr manuelle Konfiguration erfordert.
 Laravel – Handwerkerbefehle
Aug 27, 2024 am 10:51 AM
Laravel – Handwerkerbefehle
Aug 27, 2024 am 10:51 AM
Laravel – Artisan Commands – Laravel 5.7 bietet eine neue Möglichkeit, neue Befehle zu behandeln und zu testen. Es enthält eine neue Funktion zum Testen von Handwerkerbefehlen und die Demonstration wird unten erwähnt?
 Laravel vs CodeIgniter: Welches Framework ist besser für große Projekte?
Jun 04, 2024 am 09:09 AM
Laravel vs CodeIgniter: Welches Framework ist besser für große Projekte?
Jun 04, 2024 am 09:09 AM
Bei der Auswahl eines Frameworks für große Projekte haben Laravel und CodeIgniter jeweils ihre eigenen Vorteile. Laravel ist für Anwendungen auf Unternehmensebene konzipiert und bietet modularen Aufbau, Abhängigkeitsinjektion und einen leistungsstarken Funktionsumfang. CodeIgniter ist ein leichtes Framework, das sich eher für kleine bis mittelgroße Projekte eignet und Wert auf Geschwindigkeit und Benutzerfreundlichkeit legt. Für große Projekte mit komplexen Anforderungen und einer großen Anzahl von Benutzern sind die Leistung und Skalierbarkeit von Laravel besser geeignet. Für einfache Projekte oder Situationen mit begrenzten Ressourcen sind die leichten und schnellen Entwicklungsfunktionen von CodeIgniter idealer.
 Laravel vs CodeIgniter: Welches Framework ist besser für kleine Projekte?
Jun 04, 2024 pm 05:29 PM
Laravel vs CodeIgniter: Welches Framework ist besser für kleine Projekte?
Jun 04, 2024 pm 05:29 PM
Für kleine Projekte eignet sich Laravel, für größere Projekte, die starke Funktionalität und Sicherheit erfordern. CodeIgniter eignet sich für sehr kleine Projekte, die geringes Gewicht und Benutzerfreundlichkeit erfordern.
 Welche ist die bessere Template-Engine, Laravel oder CodeIgniter?
Jun 03, 2024 am 11:30 AM
Welche ist die bessere Template-Engine, Laravel oder CodeIgniter?
Jun 03, 2024 am 11:30 AM
Vergleichen Sie Laravel's Blade und die Twig-Vorlagen-Engine von CodeIgniter und wählen Sie je nach Projektanforderungen und persönlichen Vorlieben: Blade basiert auf der MVC-Syntax, die eine gute Codeorganisation und Vorlagenvererbung fördert. Twig ist eine Bibliothek eines Drittanbieters, die flexible Syntax, leistungsstarke Filter, erweiterten Support und eine Sicherheits-Sandbox bietet.
 Laravel – Artisan-Konsole
Aug 27, 2024 am 10:51 AM
Laravel – Artisan-Konsole
Aug 27, 2024 am 10:51 AM
Laravel – Artisan Console – Das Laravel-Framework bietet drei Haupttools für die Interaktion über die Befehlszeile, nämlich Artisan, Ticker und REPL. In diesem Kapitel wird Artisan ausführlich erläutert.
