 Web-Frontend
 View.js
 Fassen Sie einige der besten Kombinationen von VueUse zusammen und teilen Sie sie. Kommen Sie und sammeln Sie sie zur Verwendung!
Fassen Sie einige der besten Kombinationen von VueUse zusammen und teilen Sie sie. Kommen Sie und sammeln Sie sie zur Verwendung!
VueUse ist ein Open-Source-Projekt von Anthony Fu, das Vue-Entwicklern eine Reihe grundlegender Composition API-Dienstprogrammfunktionen für Vue 2 und Vue 3 bietet. In diesem Artikel werden einige der besten VueUse-Kombinationen vorgestellt, die ich häufig verwende. Ich hoffe, dass er für alle hilfreich ist!

(Lernvideo-Sharing: vue-Video-Tutorial)
Vueuse bietet viele tolle Kombinationsmöglichkeiten. Aber der Umfang ist so umfangreich, dass der Versuch, sie alle zu lesen, womöglich den Sinn verfehlt. Hier sind einige nützliche Kombinationen:
onClickOutside
useFocusTrap
useHead
useStorage
useVModel
. useImage
useDark
1. onClickOutside
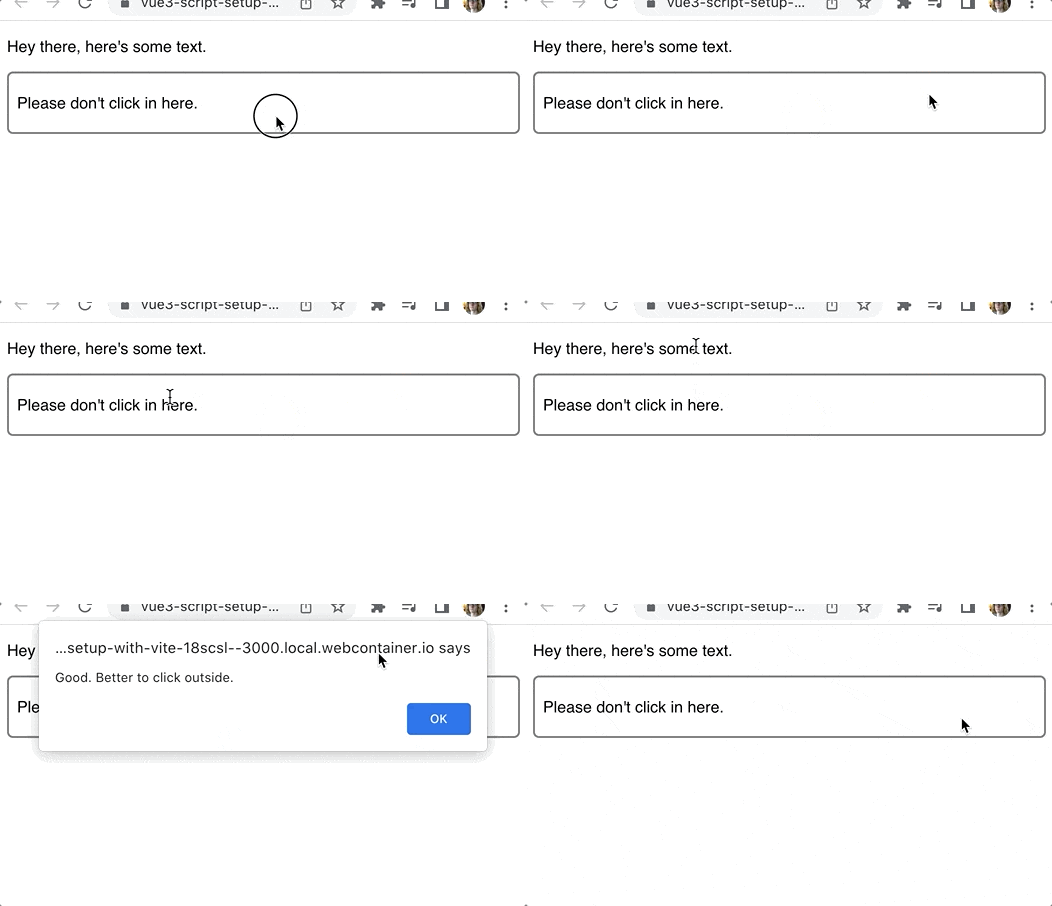
Klicks zu erkennen ist sehr einfach. Aber wie erkennt man, wenn ein Klick außerhalb eines Elements erfolgt? Das ist etwas kniffliger. Mit der onClickOutside-Komponente in VueUse ist dies jedoch ganz einfach. Der Code lautet wie folgt:
<script setup>
import { ref } from 'vue'
import { onClickOutside } from '@vueuse/core'

const container = ref(null)
onClickOutside(container, () => alert('Good. Better to click outside.'))
</script>

<template>
  <div>
    <p>Hey there, here's some text.</p>
    <div class="container" ref="container">
      <p>Please don't click in here.</p>
    </div>
  </div>
</template>Erstellen Sie einen ref für das container-Element, das Sie verfolgen möchten:container 元素创建一个 ref :
const container = ref(null);
然后我们用元素上的ref属性把它变成一个模板ref。
<div class="container" ref="container">
  <p>Please don't click in here.</p>
</div>
有了容器的ref 之后,我们把它和一个处理程序一起传递给onClickOutside组合。
onClickOutside(
  container,
  () => alert('Good. Better to click outside.')
)这种可组合对于管理窗口或下拉菜单很有用。当用户点击下拉菜单以外的地方时,你可以关闭它。
模态框也通常表现出这种行为。
事例地址:https://stackblitz.com/edit/vue3-script-setup-with-vite-18scsl?file=src%2FApp.vue
2、useFocusTrap
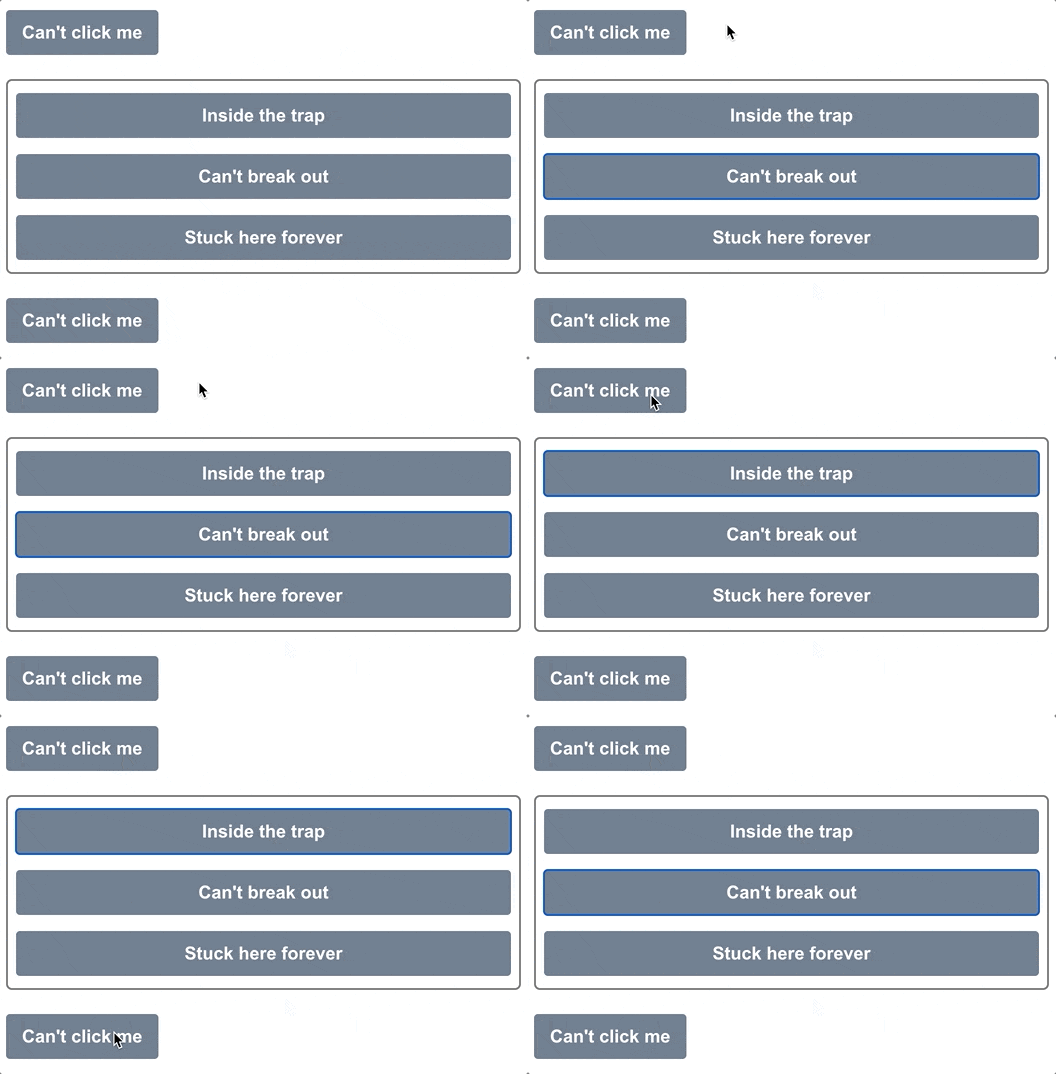
为了拥有可访问的应用程序,正确地管理焦点非常重要。
没有什么比不小心在模态后面加tab,并且无法将焦点返回到模态更糟糕的了。这就是焦点陷阱的作用。
将键盘焦点锁定在一个特定的DOM元素上,不是在整个页面中循环,而是在浏览器本身中循环,键盘焦点只在该DOM元素中循环。
下面是一个使用VueUse的useFocusTrap的例子:
<script setup>
import { ref } from 'vue'
import { useFocusTrap } from '@vueuse/integrations/useFocusTrap'

const container = ref(null)
useFocusTrap(container, { immediate: true })
</script>

<template>
  <div>
    <button tab-index="-1">Can't click me</button>
    <div class="container" ref="container">
      <button tab-index="-1">Inside the trap</button>
      <button tab-index="-1">Can't break out</button>
      <button tab-index="-1">Stuck here forever</button>
    </div>
    <button tab-index="-1">Can't click me</button>
  </div>
</template>将immediate设置为true,页面加载时,焦点将被放置在 container 元素中。然后,就不可能在该容器之外的地方做标签。
到达第三个按钮后,再次点击tab键将回到第一个按钮。
就像onClickOutside一样,我们首先为 container 设置了模板ref。
const container = ref(null)
<div class="container" ref="container">
  <button tab-index="-1">Inside the trap</button>
  <button tab-index="-1">Can't break out</button>
  <button tab-index="-1">Stuck here forever</button>
</div>
然后我们把这个模板引用传递给useFocusTrap组合。
useFocusTrap(container, { immediate: true });immediate 选项将自动把焦点设置到容器内第一个可关注的元素上。
事例地址:https://stackblitz.com/edit/vue3-script-setup-with-vite-eocc6w?file=src%2FApp.vue
3、useHead
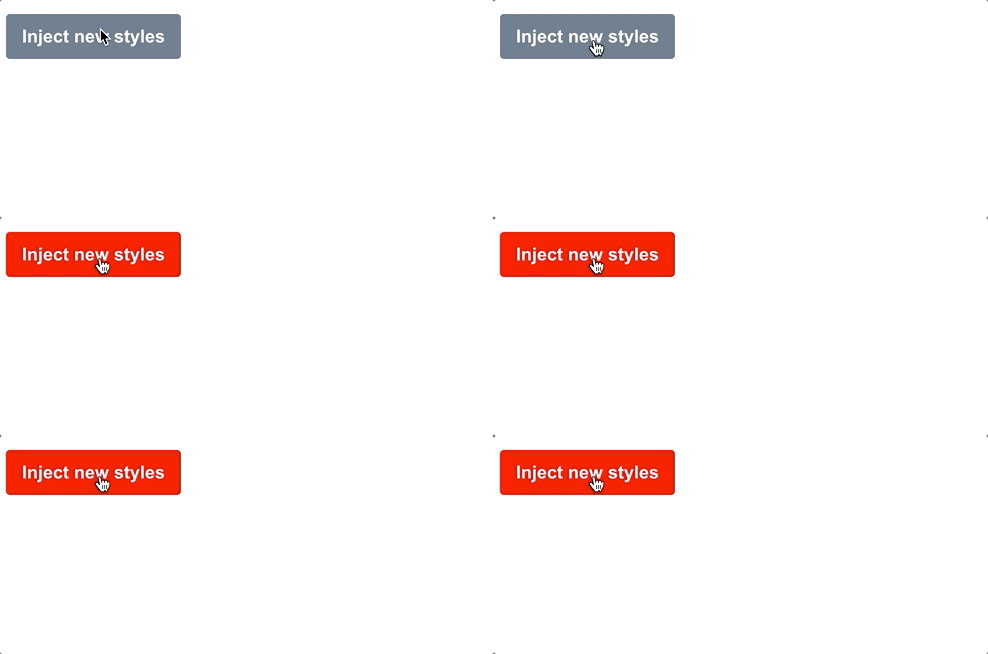
VueUse为我们提供了一种简单的方法来更新我们应用程序的 head 部分--页面 title、scripts和其他可能放在这里的的东西。
useHead 组合要求我们首先设置一个插件
import { createApp } from 'vue'
import { createHead } from '@vueuse/head'
import App from './App.vue'

const app = createApp(App)
const head = createHead()

app.use(head)
app.mount('#app')一旦我们使用了这个插件,我们就可以随心所欲地更新标题部分。在这个例子中,我们将在一个按钮上注入一些自定义样式。
<script setup>
import { ref } from 'vue'
import { useHead } from '@vueuse/head'

const styles = ref('')
useHead({
  // Inject a style tag into the head
  style: [{ children: styles }],
})

const injectStyles = () => {
  styles.value = 'button { background: red }'
}
</script>

<template>
  <div>
    <button @click="injectStyles">Inject new styles</button>
  </div>
</template>首先,我们创建一个ref来表示我们要注入的样式,默认为空:
const styles = ref('');第二,设置 useHead 将样式注入到页面中。
useHead({
  // Inject a style tag into the head
  style: [{ children: styles }],
})然后,添加注入这些样式的方法:
const injectStyles = () => {
  styles.value = 'button { background: red }'
}当然,我们并不局限于注入样式。我们可以在我们的<head>中添加任何这些内容:
title
meta tags
link tags
base tag
style tags
script tags
html attributes
body attributes
事例地址:https://stackblitz.com/edit/vue3-script-setup-with-vite-szhedp?file=src%2FApp.vue
4、useStorage
useStorage真的很酷,因为它会自动将 ref
<script setup>
import { useStorage } from '@vueuse/core'
const input = useStorage('unique-key', 'Hello, world!')
</script>

<template>
  <div>
    <input v-model="input" />
  </div>
</template>ref Attribut für das Element zu Es wird zu einer Vorlage ref. 🎜const input = useStorage('unique-key', 'Hello, world!', sessionStorage)ref des Containers haben, übergeben wir sie zusammen mit einem Handler an die onClickOutside-Komposition. 🎜export interface StorageLike {
getItem(key: string): string | null
setItem(key: string, value: string): void
removeItem(key: string): void
}🎜Beispieladresse: https://stackblitz.com/edit/vue3-script-setup-with-vite-18scsl?file=src%2FApp.vue🎜🎜2. useFocusTrap🎜🎜
 🎜🎜Um zugängliche Anwendungen zu haben, ist es wichtig, den Fokus richtig zu verwalten. 🎜🎜Es gibt nichts Schlimmeres, als versehentlich einen Tab nach einem Modal einzufügen und den Fokus nicht wieder auf das Modal richten zu können. Das ist es, was die Fokusfalle bewirkt. 🎜🎜 Sperren Sie den Tastaturfokus auf ein bestimmtes DOM-Element, anstatt durch die gesamte Seite zu blättern. Der Tastaturfokus wechselt nur durch dieses DOM-Element. 🎜🎜Hier ist ein Beispiel für die Verwendung von
 useFocusTrap von VueUse: 🎜<script setup>
import { useVModel } from '@vueuse/core'
const props = defineProps({
count: Number,
})
const emit = defineEmits(['update:count'])
const count = useVModel(props, 'count', emit)
</script>
<template>
<div>
<button @click="count = count - 1">-</button>
<button @click="count = 0">Reset to 0</button>
<button @click="count = count + 1">+</button>
</div>
</template>immediate auf true und der Fokus wird platziert, wenn die Seite geladen wird das container-Element. Dann ist es unmöglich, Etiketten außerhalb dieses Behälters zu etikettieren. 🎜🎜Sobald Sie die dritte Schaltfläche erreicht haben, klicken Sie erneut auf die Tabulatortaste, um zur ersten Schaltfläche zurückzukehren. 🎜🎜Genau wie bei onClickOutside legen wir zunächst die Vorlage ref für den container fest. 🎜const props = defineProps({
count: Number,
})const emit = defineEmits(['update:count'])
useFocusTrap. 🎜const count = useVModel(props, 'count', emit)
immediate setzt den Fokus automatisch auf das erste fokussierbare Element im Container. 🎜🎜Beispieladresse: https://stackblitz.com/edit/vue3-script-setup-with-vite-eocc6w?file=src%2FApp.vue🎜🎜3, useHead🎜🎜
 🎜🎜VueUse bietet uns eine einfache Möglichkeit, den Kopfbereich unserer Anwendung zu aktualisieren – den Seitentitel, Skripte und andere Dinge, die hier platziert werden können. Für die 🎜🎜useHead-Kombination müssen wir zunächst ein Plugin einrichten 🎜
<script setup>
import { ref } from 'vue'
import Input from './components/Input.vue'
const count = ref(50)
</script>
<template>
<div>
<Input v-model:count="count" />
{{ count }}
</div>
</template><script setup>
import { useImage } from '@vueuse/core'
// Change this to a non-existent URL to see the error state
const url = 'https://source.unsplash.com/random/400x300'
const { isLoading, error } = useImage(
{
src: url,
},
{
// Just to show the loading effect more clearly
delay: 2000,
}
)
</script>
<template>
<div>
<div v-if="isLoading" class="loading gradient"></div>
<div v-else-if="error">Couldn't load the image :(</div>
<img v-else :src="url" />
</div>
</template>ref, um den Stil darzustellen, den wir einfügen möchten. Der Standardwert ist leer: 🎜const { isLoading, error } = useImage({ src: url })useHead fest, um den Stil in den einzufügen Seite. 🎜<template> <div> <div v-if="isLoading" class="loading gradient"></div> <div v-else-if="error">Couldn't load the image :(</div> <img v-else :src="url" /> </div> </template>
<template> <UseImage src="https://source.unsplash.com/random/401x301"> <template #loading> <div class="loading gradient"></div> </template> <template #error> Oops! </template> </UseImage> </template>
<head> einfügen: 🎜🎜🎜🎜Titel🎜🎜🎜🎜Meta-Tags🎜🎜🎜🎜Link-Tags🎜🎜🎜🎜Basis-Tag🎜🎜🎜🎜Stil-Tags🎜 🎜🎜🎜Skript-Tags🎜🎜🎜🎜HTML-Attribute🎜🎜🎜🎜Körperattribute🎜🎜🎜🎜Beispieladresse: https://stackblitz.com/edit/vue3-script-setup-with-vite-szhedp ?file =src%2FApp.vue🎜🎜4. useStorage🎜🎜
useStorage ist wirklich cool, weil es ref automatisch mit localstorage synchronisiert, Beispiel Wie folgt: 🎜<script setup>
import { useStorage } from '@vueuse/core'
const input = useStorage('unique-key', 'Hello, world!')
</script>
<template>
<div>
<input v-model="input" />
</div>
</template>第一次加载时, input 显示 'Hello, world!',但最后,它会显示你最后在 input 中输入的内容,因为它被保存在localstorage中。
除了 localstorage,我们也可以指定 sessionstorage:
const input = useStorage('unique-key', 'Hello, world!', sessionStorage)当然,也可以自己实现存储系统,只要它实现了StorageLike接口。
export interface StorageLike {
  getItem(key: string): string | null
  setItem(key: string, value: string): void
  removeItem(key: string): void
}5、useVModel
v-model指令是很好的语法糖,使双向数据绑定更容易。
但useVModel更进一步,摆脱了一堆没有人真正想写的模板代码。
<script setup>
import { useVModel } from '@vueuse/core'

const props = defineProps({
  count: Number,
})
const emit = defineEmits(['update:count'])

const count = useVModel(props, 'count', emit)
</script>

<template>
  <div>
    <button @click="count = count - 1">-</button>
    <button @click="count = 0">Reset to 0</button>
    <button @click="count = count + 1">+</button>
  </div>
</template>在这个例子中,我们首先定义了要附加到v-model上的 props:
const props = defineProps({
  count: Number,
})然后我们发出一个事件,使用v-model的命名惯例update:<propName>:
const emit = defineEmits(['update:count'])
现在,我们可以使用useVModel组合来将 prop和事件绑定到一个ref。
const count = useVModel(props, 'count', emit)
每当 prop 发生变化时,这个 count 就会改变。但只要它从这个组件中被改变,它就会发出update:count事件,通过v-model指令触发更新。
我们可以像这样使用这个 Input 组件。
<script setup>
import { ref } from 'vue'
import Input from './components/Input.vue'

const count = ref(50)
</script>

<template>
  <div>
    <Input v-model:count="count" />
    {{ count }}
  </div>
</template>这里的count ref是通过v-model绑定与 Input组件内部的count ref同步的。
事例地址:https://stackblitz.com/edit/vue3-script-setup-with-vite-ut5ap8?file=src%2FApp.vue
6、useImage

随着时间的推移,web应用中的图像变得越来越漂亮。我们已经有了带有srcset的响应式图像,渐进式加载库,以及只有在图像滚动到视口时才会加载的库。
但你知道吗,我们也可以访问图像本身的加载和错误状态?
我以前主要通过监听每个HTML元素发出的onload和onerror事件来做到这一点,但VueUse给我们提供了一个更简单的方法,那就是useImage组合。
<script setup>
import { useImage } from '@vueuse/core'

// Change this to a non-existent URL to see the error state
const url = 'https://source.unsplash.com/random/400x300'
const { isLoading, error } = useImage(
  {
    src: url,
  },
  {
    // Just to show the loading effect more clearly
    delay: 2000,
  }
)
</script>

<template>
  <div>
    <div v-if="isLoading" class="loading gradient"></div>
    <div v-else-if="error">Couldn't load the image :(</div>
    <img v-else :src="url" />
  </div>
</template>第一步,通过useImage 设置图片的src:
const { isLoading, error } = useImage({ src: url })获取它返回的isLoading和error引用,以便跟踪状态。这个组合在内部使用useAsyncState,因此它返回的值与该组合的值相同。
安排好后,useImage 就会加载我们的图像并将事件处理程序附加到它上面。
我们所要做的就是在我们的模板中使用相同的URL来使用该图片。由于浏览器会重复使用任何缓存的图片,它将重复使用由useImage加载的图片。
<template>
  <div>
    <div v-if="isLoading" class="loading gradient"></div>
    <div v-else-if="error">Couldn't load the image :(</div>
    <img v-else :src="url" />
  </div>
</template>
在这里,我们设置了一个基本的加载和错误状态处理程序。当图片正在加载时,我们显示一个带有动画渐变的占位符。如果有错误,我们显示一个错误信息。否则我们可以渲染图像。
UseImage 还有其他一些很棒的特性!如果想让它成为响应式图像,那么它支持srcset和sizes属性,这些属性在幕后传递给img元素。
如果你想把所有内容都放在模板中,还有一个无渲染组件。它的工作原理与组合的相同:
<template>
    <UseImage src="https://source.unsplash.com/random/401x301">
    <template #loading>
            <div class="loading gradient"></div>
        </template>
    <template #error>
            Oops!
        </template>
  </UseImage>
</template>
事例:https://stackblitz.com/edit/vue3-script-setup-with-vite-d1jsec?file=src%2FApp.vue
7、暗黑模式 useDark
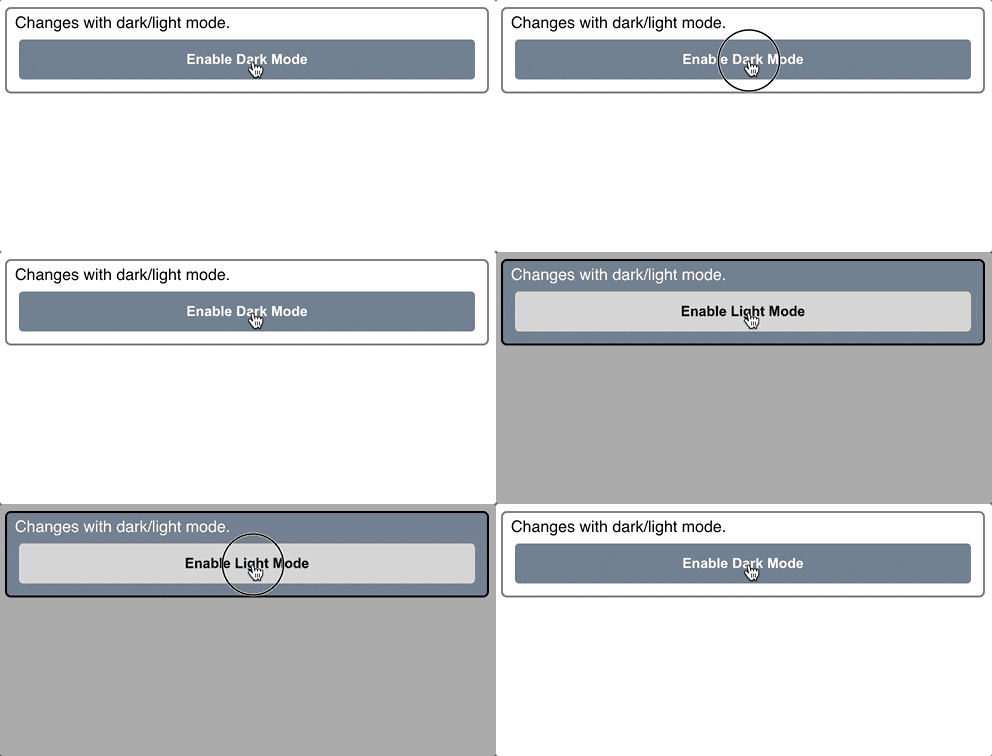
最近,每个网站和应用程序似乎都有暗黑模式。最难的部分是造型的改变。但是一旦你有了这些,来回切换就很简单了。
如果你使用的是Tailwind,你只需要在html元素中添加dark类,就可以在整个页面中启用。
<html class="dark"><!-- ... --></html>
然而,在黑暗模式和光明模式之间切换时,有几件事需要考虑。首先,我们要考虑到用户的系统设置。第二,我们要记住他们是否已经推翻了这个选择。
VueUse的useDark组合性为我们把所有这些东西都包起来。默认情况下,它查看系统设置,但任何变化都会被持久化到localStorage,所以设置会被记住。
<script setup>
import { useDark, useToggle } from '@vueuse/core'

const isDark = useDark()
const toggleDark = useToggle(isDark)
</script>

<template>
  <div class="container">
    Changes with dark/light mode.

    <button @click="toggleDark()">
            Enable {{ isDark ? 'Light' : 'Dark' }} Mode
        </button>
  </div>
</template>黑暗模式的样式:
.dark .container {
  background: slategrey;
  color: white;
  border-color: black;
}

.dark button {
  background: lightgrey;
  color: black;
}

.dark body {
  background: darkgrey;
}如果你没有使用Tailwind,你可以通过传入一个选项对象来完全定制黑暗模式的应用方式。下面是默认的Tailwind:
const isDark = useDark({
  selector: 'html',
  attribute: 'class',
  valueDark: 'dark',
  valueLight: '',
})也可以提供一个onChanged处理程序,这样你就可以编写任何你需要的Javascript。这两种方法使你可以使它与你已有的任何造型系统一起工作。
Zusammenfassung
Vueuse verfügt über eine riesige Bibliothek mit tollen Kombinationen, und wir haben hier nur einen kleinen Teil davon abgedeckt. Ich empfehle Ihnen dringend, sich etwas Zeit zu nehmen, um die Dokumentation zu erkunden und alles zu sehen, was verfügbar ist. Dies ist eine großartige Ressource, die Ihnen viel Standardcode erspart und das Rad ständig neu erfinden muss.
【Empfohlene verwandte Video-Tutorials: vuejs-Einführungs-Tutorial, Erste Schritte mit dem Web-Frontend】
Das obige ist der detaillierte Inhalt vonFassen Sie einige der besten Kombinationen von VueUse zusammen und teilen Sie sie. Kommen Sie und sammeln Sie sie zur Verwendung!. Für weitere Informationen folgen Sie bitte anderen verwandten Artikeln auf der PHP chinesischen Website!

Heiße KI -Werkzeuge

Undresser.AI Undress
KI-gestützte App zum Erstellen realistischer Aktfotos

AI Clothes Remover
Online-KI-Tool zum Entfernen von Kleidung aus Fotos.

Undress AI Tool
Ausziehbilder kostenlos

Clothoff.io
KI-Kleiderentferner

AI Hentai Generator
Erstellen Sie kostenlos Ai Hentai.

Heißer Artikel

Heiße Werkzeuge

Notepad++7.3.1
Einfach zu bedienender und kostenloser Code-Editor

SublimeText3 chinesische Version
Chinesische Version, sehr einfach zu bedienen

Senden Sie Studio 13.0.1
Leistungsstarke integrierte PHP-Entwicklungsumgebung

Dreamweaver CS6
Visuelle Webentwicklungstools

SublimeText3 Mac-Version
Codebearbeitungssoftware auf Gottesniveau (SublimeText3)

Heiße Themen
 1378
1378
 52
52
 Vue.js vs. React: projektspezifische Überlegungen
Apr 09, 2025 am 12:01 AM
Vue.js eignet sich für kleine und mittelgroße Projekte und schnelle Iterationen, während React für große und komplexe Anwendungen geeignet ist. 1) Vue.js ist einfach zu bedienen und für Situationen geeignet, in denen das Team nicht ausreicht oder die Projektskala klein ist. 2) React hat ein reichhaltigeres Ökosystem und eignet sich für Projekte mit hoher Leistung und komplexen funktionalen Bedürfnissen.
 So fügen Sie Funktionen zu Schaltflächen für Vue hinzu
Apr 08, 2025 am 08:51 AM
Sie können der VUE -Taste eine Funktion hinzufügen, indem Sie die Taste in der HTML -Vorlage an eine Methode binden. Definieren Sie die Methode und schreiben Sie die Funktionslogik in der VUE -Instanz.
 So verweisen Sie auf die JS -Datei mit Vue.js
Apr 07, 2025 pm 11:27 PM
Es gibt drei Möglichkeiten, sich auf JS -Dateien in Vue.js zu beziehen: Geben Sie den Pfad direkt mit dem & lt; Skript & gt an. Etikett;; Dynamischer Import mit dem montierten () Lebenszyklushaken; und importieren über die Vuex State Management Library.
 So verwenden Sie Watch in Vue
Apr 07, 2025 pm 11:36 PM
Mit der Watch -Option in Vue.js können Entwickler auf Änderungen in bestimmten Daten anhören. Wenn sich die Daten ändert, löst sich eine Rückruffunktion aus, um Aktualisierungsansichten oder andere Aufgaben auszuführen. Zu den Konfigurationsoptionen gehören unmittelbar, die festlegen, ob ein Rückruf sofort ausgeführt werden soll, und Deep, das feststellt, ob Änderungen an Objekten oder Arrays rekursiv anhören sollen.
 So verwenden Sie Bootstrap in Vue
Apr 07, 2025 pm 11:33 PM
Die Verwendung von Bootstrap in Vue.js ist in fünf Schritte unterteilt: Startstrap installieren. Bootstrap in main.js. Verwenden Sie die Bootstrap -Komponente direkt in der Vorlage. Optional: benutzerdefinierter Stil. Optional: Verwenden Sie Plug-Ins.
 So kehren Sie von Vue zur vorherigen Seite zurück
Apr 07, 2025 pm 11:30 PM
VUE.JS hat vier Methoden, um zur vorherigen Seite zurückzukehren: $ router.go (-1) $ router.back () verwendet & lt; Router-Link to = & quot;/& quot; Komponentenfenster.history.back () und die Methodenauswahl hängt von der Szene ab.
 Vue realisiert Festzelt-/Text -Scrolling -Effekt
Apr 07, 2025 pm 10:51 PM
Implementieren Sie Marquee/Text-Scrolling-Effekte in VUE unter Verwendung von CSS-Animationen oder Bibliotheken von Drittanbietern. In diesem Artikel wird die Verwendung von CSS -Animation vorgestellt: Bildlauftext erstellen und Text mit & lt; div & gt;. Definieren Sie CSS -Animationen und setzen Sie Überlauf: Versteckt, Breite und Animation. Definieren Sie Keyframes, setzen Sie Transformation: Translatex () am Anfang und am Ende der Animation. Passen Sie die Animationseigenschaften wie Dauer, Bildlaufgeschwindigkeit und Richtung an.
 So fragen Sie die Version von Vue
Apr 07, 2025 pm 11:24 PM
Sie können die Vue -Version mit Vue Devtools abfragen, um die Registerkarte VUE in der Konsole des Browsers anzuzeigen. Verwenden Sie NPM, um den Befehl "npm list -g vue" auszuführen. Suchen Sie das Vue -Element im Objekt "Abhängigkeiten" der Datei package.json. Führen Sie für Vue -CLI -Projekte den Befehl "Vue --version" aus. Überprüfen Sie die Versionsinformationen im & lt; Skript & gt; Tag in der HTML -Datei, die sich auf die VUE -Datei bezieht.


