 Backend-Entwicklung
 Python-Tutorial
 Schritte zum Zeichnen von Spider-Man mithilfe der Python+Turtle-Bibliothek
Schritte zum Zeichnen von Spider-Man mithilfe der Python+Turtle-Bibliothek
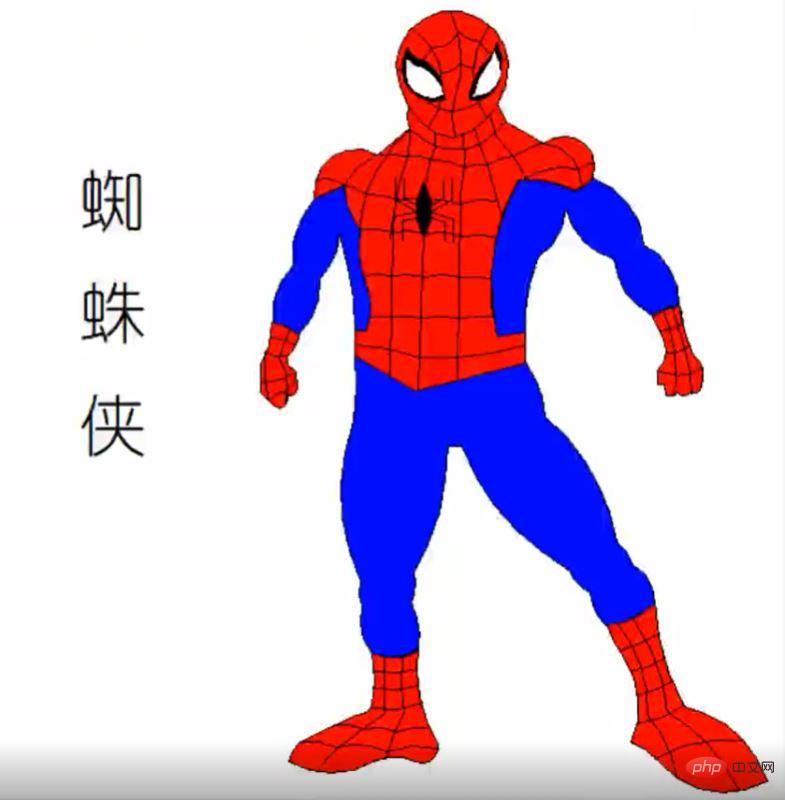
一、效果展示
在介绍代码之前,先来看下本文的实现效果。

Pinstaller(Python打包为exe文件)
之前自己把 Python 文件打包成 exe 的时候,折腾了很久,本文将详细地讲述如何快速生成在不安装 Python 的电脑上也能执行的文件
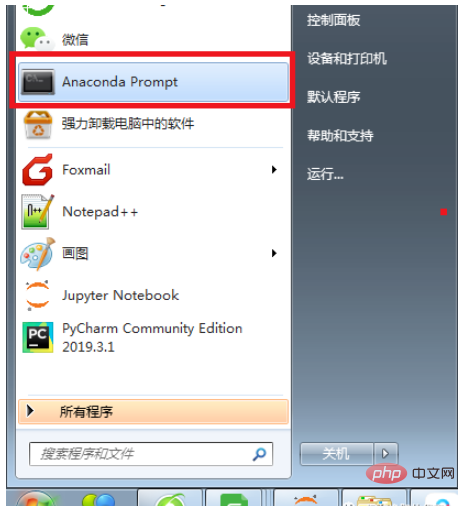
1. 在 prompt 中运行 pip install pyinstaller , 安装 pyinstaller 库

2. 在 prompt 中运行 where pyinstaller

3. 找到待打包文件存放的路径
把要打包的文件放到找到的路径
C:\Users\Administrator\Anaconda3\Scripts 中 (我的路径是这个,你就按照第二步的路径)
4. 调用 cmd 窗口
把待打包文件放在
C:\Users\Administrator\Anaconda3 \Scripts 目录下,在该文件夹中按shift+鼠标右键 , 点击 在此处打开命令窗口 调用 cmd
5. 在 cmd 中输入 pyinstaller -F 文件名
例子:打包 Python 绘制皮卡丘的视频,在cmd中输入 pyinstaller -F pkq_1.py
即可生成普通图标的exe可执行文件。
6. 生成 exe 文件
可以在路径
C:\Users\Administrator\Anaconda3\Scripts 下的 dist 文件夹中找到打包好的exe文件(即不用安装 Python 也可以运行的文件)。
这样生成的文件图标是标准固定格式,如果想生成特定特定形状的图标需要用第7点中的语句。
7. 生成自定义形状的图标,在cmd中输入:pyinstaller -i ico路径 -F xxxxx.py
例子: 打包 Python 绘制皮卡丘视频的py文件,在cmd中输入 (注: 我把ico图标和待打包文件放到一个文件夹下了, 所以直接输入了ico的名字)
pyinstaller -i pikaqiu2.ico -F pkq_1.py
生成图标是皮卡丘形状的exe文件。
二、代码详解
Python绘制蜘蛛侠的原理是:应用turtle库绘制身体的不同部位。
1.导入库
首先导入本文需要加载的库,如果你有些库还没有安装,导致运行代码时报错,可以在Anaconda Prompt中用pip方法安装。
# -*- coding: UTF-8 -*-
'''
代码用途 :画蜘蛛侠
作者     :阿黎逸阳
博客     :  https://blog.csdn.net/qq_32532663/article/details/106176609
'''
import os
import pygame
import turtle as t
本文应用到的库较少,只应用了os、pygame和turtle三个库。
os库可以设置文件读取的位置。
pygame库是为了绘制过程更有趣,在绘图过程中添加了背景音乐。
turtle库是绘图库,相当于给你一支画笔,你可以在画布上用数学逻辑控制的代码完成绘图。
2.播放音乐
接着应用pygame库播放背景音乐,本文的音乐是《Sunflower》。
os.chdir(r'F:\公众号\56.蜘蛛侠')
#播放音乐
print('播放音乐')
pygame.mixer.init()
pygame.mixer.music.load("Cope - Sunflower (Original Version).mp3")
pygame.mixer.music.set_volume(0.5)
pygame.mixer.music.play(1, 10)这一部分的代码和整体代码是剥离的,可以选泽在最开始放上该代码,也可以直接删除。
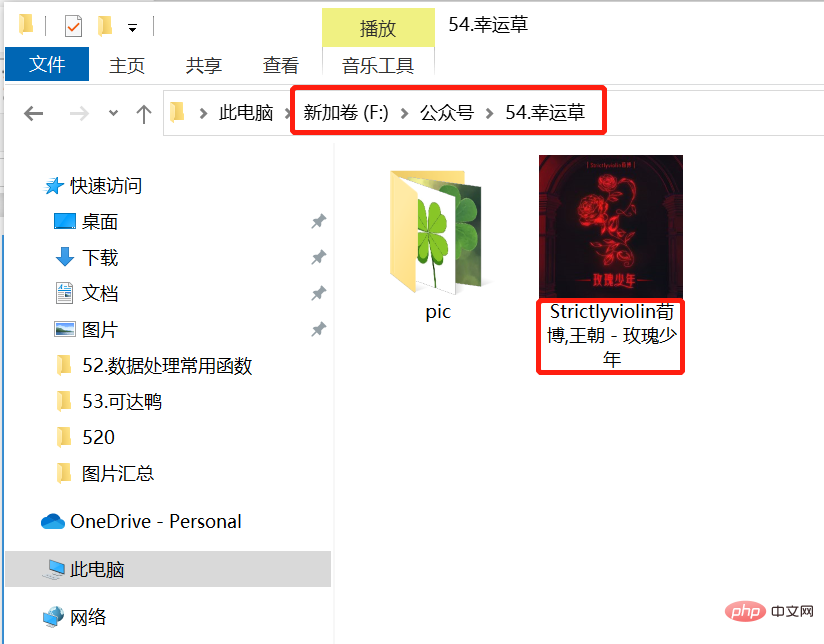
如果选择播放音乐,需要在代码music.load函数中把你想放音乐的电脑本地存放地址填进去。
有部分朋友对这一块有疑问,填充格式可参考如下图片:

3.定义画蜘蛛侠上半身的函数
然后设置画板的大小,并定义绘制蜘蛛侠上半身的函数。
t.title('阿黎逸阳的代码公众号')
t.speed(10)
#t.screensize(1000, 800)
t.setup(startx=0, starty = 0, width=800, height = 600)
def up_body():
    #画头
    t.penup()
    t.goto(60, 200)
    t.pendown()
    t.pensize(1)
    t.color('black', 'red')
    t.begin_fill()
    t.setheading(60)
    t.circle(60, 30)
    t.left(4)
    t.circle(40, 173)
    t.left(4)
    t.circle(60, 30)
    #画脖子
    t.setheading(260)
    t.circle(30, 29)
    #画肩膀
    t.setheading(220)
    t.forward(30)
    #画手上肌肉
    t.setheading(150)
    t.circle(30, 130)
    #画胸部的内部线
    t.setheading(30)
    t.circle(-100, 13)
    t.setheading(270)
    t.circle(50, 40)
    t.setheading(255)
    t.circle(55, 40)
    t.circle(-40, 50)
    #画腰部的外横线
    t.setheading(0)
    t.forward(-7)
    t.setheading(270)
    t.forward(18)
    #画腰线
    t.setheading(-30)
    t.forward(50)
    t.setheading(15)
    t.forward(80)
    t.setheading(90)
    t.forward(22)
    #重复的地方
    #画衣服内轮廓
    t.setheading(190)
    t.forward(20)
    t.setheading(103)
    t.circle(-160, 41)
    #画手内轮廓
    t.setheading(5)
    t.circle(-80, 30)
    t.setheading(20)
    t.circle(30, 30)
    #重复的地方
    #手臂上肌肉
    t.setheading(70)
    t.circle(22, 150)
    t.setheading(150)
    t.forward(30)
    t.setheading(120)
    t.forward(15)
t.end_fill()关键代码详解:
t.pensize(width):设置画笔的尺寸。
t.color(color):设置画笔的颜色。
t.penup():抬起画笔,一般用于另起一个地方绘图使用。
t.goto(x,y):画笔去到某个位置,参数为(x,y),对应去到的横坐标和纵坐标。
t.pendown():放下画笔,一般和penup组合使用。
t.left(degree):画笔向左转多少度,括号里表示度数。
t.right(degree):画笔向右转多少度,括号里表示度数。
t.circle(radius,extent,steps):radius指半径,若为正,半径在小乌龟左侧radius远的地方,若为负,半径在小乌龟右侧radius远的地方;extent指弧度;steps指阶数。
画外轮廓的关键是:通过调节circle函数中的半径和弧度来调节曲线的弧度,从而使得蜘蛛侠的轮廓比较流畅。
4.定义画左手和右手的函数
接着定义画左手和右手的函数。
def left_hand():
    #画左手臂
    #画胸部的内部线
    t.penup()
    t.goto(-69, 134)
    t.color('black', 'blue')
    t.pendown()
    t.begin_fill()
    t.setheading(30)
    t.circle(-100, 13)
    t.setheading(270)
    t.circle(50, 40)
    t.setheading(255)
    t.circle(55, 40)
    t.circle(-40, 50)
    #画腰部的外横线
    t.setheading(0)
    t.forward(-8)
    t.setheading(90)
    t.circle(220, 18)
    t.setheading(-90)
    t.circle(-40, 50)
    t.setheading(-85)
    t.circle(-50, 50)
    t.setheading(135)
    t.circle(30, 40)
    t.setheading(95)
    t.circle(-50, 50)
    t.setheading(98)
    t.circle(-60, 51)
    t.end_fill()
def right_hand():
    #画右手臂
    #画衣服内轮廓
    t.penup()
    t.goto(80, 39)
    t.color('black', 'blue')
    t.pendown()
    t.begin_fill()
    t.setheading(190)
    t.forward(20)
    t.setheading(103)
    t.circle(-160, 41)
    #画手内轮廓
    t.setheading(5)
    t.circle(-80, 30)
    t.setheading(20)
    t.circle(30, 30)
    t.setheading(-20)
    t.circle(-55, 65)
    t.setheading(-30)
    t.circle(-50, 60)
    t.setheading(180)
    t.circle(30, 40)
    t.setheading(154)
    t.circle(-48, 60)
    t.setheading(164)
    t.circle(-50, 60)
    t.setheading(-90)
    t.circle(-40, 60)
    t.left(40)
    t.circle(150, 23)
    t.end_fill()
def left_wrist():
    #画左手腕
    t.penup()
    t.goto(-81, 37)
    t.color('black', 'red')
    t.pendown()
    t.begin_fill()
    t.setheading(135)
    t.circle(30, 40)
    t.setheading(-90)
    t.circle(-60, 30)
    t.setheading(-90)
    t.forward(20)
    t.setheading(-45)
    t.forward(12)
    t.circle(6, 180)
    t.setheading(-50)
    t.circle(5, 160)
    t.setheading(95)
    t.forward(10)
    t.setheading(135)
    t.forward(8)
    t.setheading(95)
    t.forward(6)
    t.setheading(35)
    t.circle(30, 10)
    t.left(10)
    t.circle(30, 27)
    t.end_fill()
    #画手腕上的线
    #横线
    #第一条横线
    t.penup()
    t.goto(-84, 30)
    t.color('black')
    t.pendown()
    t.setheading(145)
    t.circle(30, 36)
    #第二条横线
    t.penup()
    t.goto(-90, 22)
    t.color('black')
    t.pendown()
    t.setheading(185)
    t.circle(-30, 31)
    #第三条横线
    t.penup()
    t.goto(-83, 10)
    t.color('black')
    t.pendown()
    t.setheading(210)
    t.circle(-50, 31)
    #第四条横线
    t.penup()
    t.goto(-102, -10)
    t.color('black')
    t.pendown()
    t.setheading(50)
    t.circle(-20, 41)
    t.setheading(55)
    t.circle(-90, 8)
    #第一条竖线
    t.penup()
    t.goto(-105, 24)
    t.color('black')
    t.pendown()
    t.setheading(-95)
    t.circle(100, 20)
    #第二条竖线
    t.penup()
    t.goto(-87, 42)
    t.color('black')
    t.pendown()
    t.setheading(-110)
    t.forward(22)
    t.setheading(-63)
    t.circle(-50, 40)
def right_wrist():
    #画右手腕
    t.penup()
    t.goto(189, 57)
    t.color('black', 'red')
    t.pendown()
    t.begin_fill()
    t.setheading(180)
    t.circle(30, 40)
    t.setheading(-55)
    t.circle(-100, 10)
    t.circle(-20, 70)
    t.setheading(-90)
    t.forward(10)
    t.setheading(-0)
    t.forward(5)
    t.setheading(-85)
    t.forward(8)
    t.setheading(-20)
    t.circle(8, 60)
    t.setheading(-35)
    t.circle(8, 70)
    t.setheading(-15)
    t.circle(6, 70)
    t.setheading(60)
    t.circle(20, 80)
    t.setheading(115)
    t.circle(-100, 20)
    t.end_fill()
    #画第一条横线
    t.goto(191, 45)
    t.color('black')
    t.pendown()
    t.setheading(215)
    t.circle(-30, 34)
    #画第二条横线
    t.penup()
    t.goto(197, 29)
    t.color('black')
    t.pendown()
    t.setheading(215)
    t.circle(-30, 37)
    #画第三条横线
    t.penup()
    t.goto(174, 11)
    t.color('black')
    t.pendown()
    t.setheading(-0)
    t.circle(-30, 27)
    t.setheading(20)
    t.circle(-20, 27)
    t.setheading(40)
    t.circle(-30, 23)
    #画第一条竖线
    t.penup()
    t.goto(178, 55)
    t.color('black')
    t.pendown()
    t.setheading(-70)
    t.circle(-200, 9)
    t.setheading(-82)
    t.circle(-100, 18)
    #画第二条竖线
    t.penup()
    t.goto(185, 55)
    t.color('black')
    t.pendown()
    t.setheading(-70)
    t.circle(-200, 8)
    t.setheading(-68)
t.circle(-80, 25)5.定义画蜘蛛的函数
接着定义画蜘蛛的函数。
def spider():
    #画蜘蛛
    t.penup()
    t.goto(8, 146)
    t.color('black')
    t.pendown()
    t.begin_fill()
    t.setheading(-120)
    t.circle(40, 60)
    t.setheading(60)
    t.circle(40,60)
    t.end_fill()
    #画蜘蛛的脚
    #右边的脚1
    t.penup()
    t.goto(13, 129)
    t.color('black')
    t.pendown()
    t.setheading(30)
    t.forward(10)
    t.setheading(90)
    t.forward(15)
    #右边的脚2
    t.penup()
    t.goto(14, 125)
    t.color('black')
    t.pendown()
    t.setheading(30)
    t.forward(16)
    t.setheading(90)
    t.forward(17)
    #右边的脚3
    t.penup()
    t.goto(14, 124)
    t.color('black')
    t.pendown()
    t.setheading(-20)
    t.forward(16)
    t.setheading(-90)
    t.forward(17)
    #右边的脚4
    t.penup()
    t.goto(14, 120)
    t.color('black')
    t.pendown()
    t.setheading(-20)
    t.forward(10)
    t.setheading(-90)
    t.forward(15)
    #画蜘蛛的脚
    #左边的脚1
    t.penup()
    t.goto(3, 129)
    t.color('black')
    t.pendown()
    t.setheading(150)
    t.forward(10)
    t.setheading(90)
    t.forward(15)
    #右边的脚2
    t.penup()
    t.goto(2, 125)
    t.color('black')
    t.pendown()
    t.setheading(150)
    t.forward(16)
    t.setheading(90)
    t.forward(17)
    #右边的脚3
    t.penup()
    t.goto(2, 124)
    t.color('black')
    t.pendown()
    t.setheading(-170)
    t.forward(16)
    t.setheading(-99)
    t.forward(17)
    #右边的脚4
    t.penup()
    t.goto(3, 120)
    t.color('black')
    t.pendown()
    t.setheading(-170)
    t.forward(10)
    t.setheading(-90)
t.forward(15)6.调用函数绘制图形
最后调用函数绘制图形。
print('绘制上半身外轮廓')
up_body()
print('绘制右手')
right_hand()
print('绘制左手')
left_hand()
print('绘制左拳头')
left_wrist()
print('绘制右拳头')
right_wrist()
print('绘制蜘蛛')
spider()
Das obige ist der detaillierte Inhalt vonSchritte zum Zeichnen von Spider-Man mithilfe der Python+Turtle-Bibliothek. Für weitere Informationen folgen Sie bitte anderen verwandten Artikeln auf der PHP chinesischen Website!

Heiße KI -Werkzeuge

Undresser.AI Undress
KI-gestützte App zum Erstellen realistischer Aktfotos

AI Clothes Remover
Online-KI-Tool zum Entfernen von Kleidung aus Fotos.

Undress AI Tool
Ausziehbilder kostenlos

Clothoff.io
KI-Kleiderentferner

AI Hentai Generator
Erstellen Sie kostenlos Ai Hentai.

Heißer Artikel

Heiße Werkzeuge

Notepad++7.3.1
Einfach zu bedienender und kostenloser Code-Editor

SublimeText3 chinesische Version
Chinesische Version, sehr einfach zu bedienen

Senden Sie Studio 13.0.1
Leistungsstarke integrierte PHP-Entwicklungsumgebung

Dreamweaver CS6
Visuelle Webentwicklungstools

SublimeText3 Mac-Version
Codebearbeitungssoftware auf Gottesniveau (SublimeText3)

Heiße Themen
 1384
1384
 52
52
 PHP und Python: Code Beispiele und Vergleich
Apr 15, 2025 am 12:07 AM
PHP und Python haben ihre eigenen Vor- und Nachteile, und die Wahl hängt von den Projektbedürfnissen und persönlichen Vorlieben ab. 1.PHP eignet sich für eine schnelle Entwicklung und Wartung großer Webanwendungen. 2. Python dominiert das Gebiet der Datenwissenschaft und des maschinellen Lernens.
 Python gegen JavaScript: Community, Bibliotheken und Ressourcen
Apr 15, 2025 am 12:16 AM
Python und JavaScript haben ihre eigenen Vor- und Nachteile in Bezug auf Gemeinschaft, Bibliotheken und Ressourcen. 1) Die Python-Community ist freundlich und für Anfänger geeignet, aber die Front-End-Entwicklungsressourcen sind nicht so reich wie JavaScript. 2) Python ist leistungsstark in Bibliotheken für Datenwissenschaft und maschinelles Lernen, während JavaScript in Bibliotheken und Front-End-Entwicklungsbibliotheken und Frameworks besser ist. 3) Beide haben reichhaltige Lernressourcen, aber Python eignet sich zum Beginn der offiziellen Dokumente, während JavaScript mit Mdnwebdocs besser ist. Die Wahl sollte auf Projektbedürfnissen und persönlichen Interessen beruhen.
 Detaillierte Erklärung des Docker -Prinzips
Apr 14, 2025 pm 11:57 PM
Docker verwendet Linux -Kernel -Funktionen, um eine effiziente und isolierte Anwendungsumgebung zu bieten. Sein Arbeitsprinzip lautet wie folgt: 1. Der Spiegel wird als schreibgeschützte Vorlage verwendet, die alles enthält, was Sie für die Ausführung der Anwendung benötigen. 2. Das Union File System (UnionFS) stapelt mehrere Dateisysteme, speichert nur die Unterschiede, speichert Platz und beschleunigt. 3. Der Daemon verwaltet die Spiegel und Container, und der Kunde verwendet sie für die Interaktion. 4. Namespaces und CGroups implementieren Container -Isolation und Ressourcenbeschränkungen; 5. Mehrere Netzwerkmodi unterstützen die Containerverbindung. Nur wenn Sie diese Kernkonzepte verstehen, können Sie Docker besser nutzen.
 So wählen Sie die Pytorch -Version auf CentOS aus
Apr 14, 2025 pm 06:51 PM
Bei der Installation von PyTorch am CentOS -System müssen Sie die entsprechende Version sorgfältig auswählen und die folgenden Schlüsselfaktoren berücksichtigen: 1. Kompatibilität der Systemumgebung: Betriebssystem: Es wird empfohlen, CentOS7 oder höher zu verwenden. CUDA und CUDNN: Pytorch -Version und CUDA -Version sind eng miteinander verbunden. Beispielsweise erfordert Pytorch1.9.0 CUDA11.1, während Pytorch2.0.1 CUDA11.3 erfordert. Die Cudnn -Version muss auch mit der CUDA -Version übereinstimmen. Bestimmen Sie vor der Auswahl der Pytorch -Version unbedingt, dass kompatible CUDA- und CUDNN -Versionen installiert wurden. Python -Version: Pytorch Official Branch
 So führen Sie Programme in der terminalen VSCODE aus
Apr 15, 2025 pm 06:42 PM
Im VS -Code können Sie das Programm im Terminal in den folgenden Schritten ausführen: Erstellen Sie den Code und öffnen Sie das integrierte Terminal, um sicherzustellen, dass das Codeverzeichnis mit dem Terminal Working -Verzeichnis übereinstimmt. Wählen Sie den Befehl aus, den Befehl ausführen, gemäß der Programmiersprache (z. B. Pythons Python your_file_name.py), um zu überprüfen, ob er erfolgreich ausgeführt wird, und Fehler auflösen. Verwenden Sie den Debugger, um die Debugging -Effizienz zu verbessern.
 Python: Automatisierung, Skript- und Aufgabenverwaltung
Apr 16, 2025 am 12:14 AM
Python zeichnet sich in Automatisierung, Skript und Aufgabenverwaltung aus. 1) Automatisierung: Die Sicherungssicherung wird durch Standardbibliotheken wie OS und Shutil realisiert. 2) Skriptschreiben: Verwenden Sie die PSUTIL -Bibliothek, um die Systemressourcen zu überwachen. 3) Aufgabenverwaltung: Verwenden Sie die Zeitplanbibliothek, um Aufgaben zu planen. Die Benutzerfreundlichkeit von Python und die Unterstützung der reichhaltigen Bibliothek machen es zum bevorzugten Werkzeug in diesen Bereichen.
 Ist die VSCODE -Erweiterung bösartig?
Apr 15, 2025 pm 07:57 PM
VS -Code -Erweiterungen stellen böswillige Risiken dar, wie das Verstecken von böswilligem Code, das Ausbeutetieren von Schwachstellen und das Masturbieren als legitime Erweiterungen. Zu den Methoden zur Identifizierung böswilliger Erweiterungen gehören: Überprüfung von Verlegern, Lesen von Kommentaren, Überprüfung von Code und Installation mit Vorsicht. Zu den Sicherheitsmaßnahmen gehören auch: Sicherheitsbewusstsein, gute Gewohnheiten, regelmäßige Updates und Antivirensoftware.
 So installieren Sie Nginx in CentOS
Apr 14, 2025 pm 08:06 PM
Die Installation von CentOS-Installationen erfordert die folgenden Schritte: Installieren von Abhängigkeiten wie Entwicklungstools, PCRE-Devel und OpenSSL-Devel. Laden Sie das Nginx -Quellcode -Paket herunter, entpacken Sie es, kompilieren Sie es und installieren Sie es und geben Sie den Installationspfad als/usr/local/nginx an. Erstellen Sie NGINX -Benutzer und Benutzergruppen und setzen Sie Berechtigungen. Ändern Sie die Konfigurationsdatei nginx.conf und konfigurieren Sie den Hörport und den Domänennamen/die IP -Adresse. Starten Sie den Nginx -Dienst. Häufige Fehler müssen beachtet werden, z. B. Abhängigkeitsprobleme, Portkonflikte und Konfigurationsdateifehler. Die Leistungsoptimierung muss entsprechend der spezifischen Situation angepasst werden, z. B. das Einschalten des Cache und die Anpassung der Anzahl der Arbeitsprozesse.


