 Betrieb und Instandhaltung
 Nginx
Nginx
 So aktivieren Sie die Multi-Site-Unterstützung und die Konfiguration der Nginx-Rewrite-Regeln in WordPress
So aktivieren Sie die Multi-Site-Unterstützung und die Konfiguration der Nginx-Rewrite-Regeln in WordPress
在wordpress3.0及以上版本可以直接使用多站点,它可以:
1、只安装一个wordpress程序即可创建多个wordpress站点,可以是子域名也可以是子目录。
2、可以有独立的博客后台,独立的博客地址。
3、管理员可设置开放哪些主题给站点使用。
4、管理员可配置插件给每个站点使用。
5、多个站点之间共用“用户数据库表”,也就是表 wp_usermeta 和 wp_users,其他的为独立数据库表。
wordpress多站点的配置方法:
1、首先,备份网站的数据库,以防出现意外时恢复(一般可忽略)。
2、打开wordpress的根目录下的wp-config.php文件,在
require_once(abspath . 'wp-settings.php');
前面加上以下代码:
define('wp_allow_multisite',true);
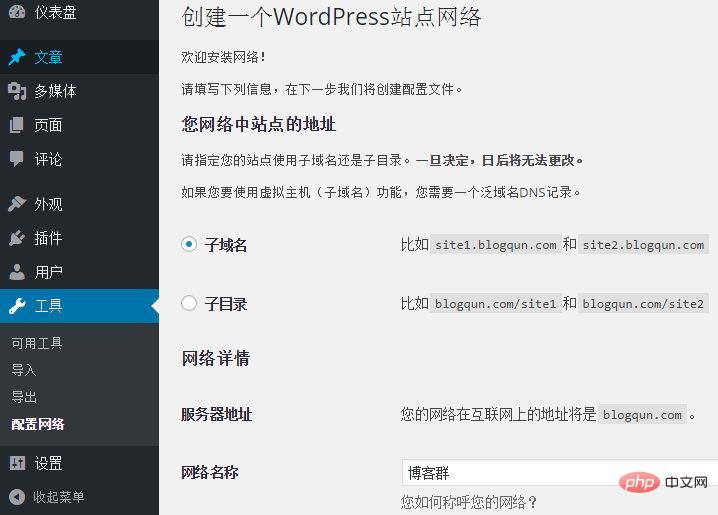
3、进入wordpress后台,”工具”-> 点击”配置网络”
ps:如果您要使用二级域名的形式,可以到“设置”->“常规”里面,把站点地址(url)的www.去掉。

4、点击安装后,按照提示做好相关的配置
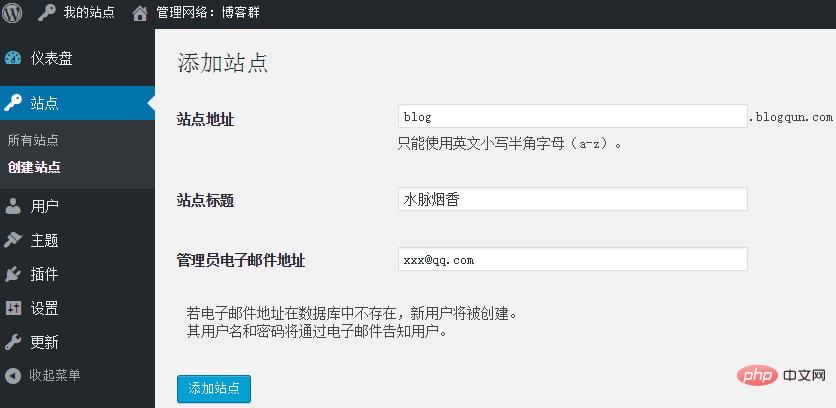
5、配置好,再次进入后台,在头部将出现“我的站点”->“管理网络”的选项菜单,接下来您可以管理或者创建站点,也可以开启主题或者插件给其他站点使用。

6、如果要给站点绑定其他域名,可以安装 wordpress mu domain mapping 插件。
nginx多站点rewrite(重写)规则
wordpress多站点模式可以被应用在多种方式上。其中最常用的是在”子目录”模式或者”二级域名”模式上。
nginx提供了两种特殊的指令:”x-accel-redirect”和”map”,使用这两个指令可以使得wordpress多站点的网络服务实现伪静态功能。
wordpress多站点使用子目录重写规则:
配置中jb51.net修改为自己的站点域名。
map $uri $blogname{
 ~^(?p<blogpath>/[^/]+/)files/(.*) $blogpath ;
}

map $blogname $blogid{
 default -999;

 #ref: http://wordpress.org/extend/plugins/nginx-helper/
 #include /var/www/wordpress/wp-content/plugins/nginx-helper/map.conf ;
}

server {
 server_name jb51.net ;

 root /var/www/jb51.net/htdocs;
 index index.php;

 #多站点配置
 location ~ ^(/[^/]+/)?files/(.+) {
 try_files /wp-content/blogs.dir/$blogid/files/$2 /wp-includes/ms-files.php?file=$2 ;
 access_log off; log_not_found off; expires max;
 }

 #avoid php readfile()
 location ^~ /blogs.dir {
 internal;
 alias /var/www/jb51.net/htdocs/wp-content/blogs.dir ;
 access_log off; log_not_found off; expires max;
 }

 if (!-e $request_filename) {
 rewrite /wp-admin$ $scheme://$host$uri/ permanent;
 rewrite ^(/[^/]+)?(/wp-.*) $2 last;
 rewrite ^(/[^/]+)?(/.*\.php) $2 last;
 }

 location / {
 try_files $uri $uri/ /index.php?$args ;
 }

 location ~ \.php$ {
 try_files $uri =404;
 include fastcgi_params;
 fastcgi_pass php;
 }

 #此处可以继续添加伪静态规则
}wordpress多站二级域名重写规则:
配置中jb51.net修改为自己的站点域名。
map $http_host $blogid {
 default  -999;

 #ref: http://wordpress.org/extend/plugins/nginx-helper/
 #include /var/www/wordpress/wp-content/plugins/nginx-helper/map.conf ;

}

server {
 server_name jb51.net *.jb51.net ;

 root /var/www/jb51.net/htdocs;
 index index.php;

 location / {
 try_files $uri $uri/ /index.php?$args ;
 }

 location ~ \.php$ {
 try_files $uri =404;
 include fastcgi_params;
 fastcgi_pass php;
 }

 #wpmu files
  location ~ ^/files/(.*)$ {
    try_files /wp-content/blogs.dir/$blogid/$uri /wp-includes/ms-files.php?file=$1 ;
    access_log off; log_not_found off;  expires max;
  }

 #wpmu x-sendfile to avoid php readfile()
 location ^~ /blogs.dir {
 internal;
 alias /var/www/jb51.net/htdocs/wp-content/blogs.dir;
 access_log off; log_not_found off; expires max;
 }

 #此处可以继续添加伪静态规则
}备注
“map”部分可以应用于小站点。大站点的多站点应用可以使用 nginx-helper wordpress插件 。
如果想进一步优化wordpress的性能可以使用nginx的fastcgi_cache,当使用fastcgi_cache配置需要在编译nginx时加上ngx_cache_purge模块以及使用wordpress的缓存插件等等
Das obige ist der detaillierte Inhalt vonSo aktivieren Sie die Multi-Site-Unterstützung und die Konfiguration der Nginx-Rewrite-Regeln in WordPress. Für weitere Informationen folgen Sie bitte anderen verwandten Artikeln auf der PHP chinesischen Website!

Heiße KI -Werkzeuge

Undresser.AI Undress
KI-gestützte App zum Erstellen realistischer Aktfotos

AI Clothes Remover
Online-KI-Tool zum Entfernen von Kleidung aus Fotos.

Undress AI Tool
Ausziehbilder kostenlos

Clothoff.io
KI-Kleiderentferner

Video Face Swap
Tauschen Sie Gesichter in jedem Video mühelos mit unserem völlig kostenlosen KI-Gesichtstausch-Tool aus!

Heißer Artikel

Heiße Werkzeuge

Notepad++7.3.1
Einfach zu bedienender und kostenloser Code-Editor

SublimeText3 chinesische Version
Chinesische Version, sehr einfach zu bedienen

Senden Sie Studio 13.0.1
Leistungsstarke integrierte PHP-Entwicklungsumgebung

Dreamweaver CS6
Visuelle Webentwicklungstools

SublimeText3 Mac-Version
Codebearbeitungssoftware auf Gottesniveau (SublimeText3)

Heiße Themen
 So stellen Sie die WordPress -Artikelliste an
Apr 20, 2025 am 10:48 AM
Es gibt vier Möglichkeiten, die WordPress -Artikelliste anzupassen: Verwenden Sie Themenoptionen, verwenden Plugins (z. B. die Bestellung von Post -Typen, WP -Postliste, Boxy -Sachen), Code (Einstellungen in der Datei functions.php hinzufügen) oder die WordPress -Datenbank direkt ändern.
 Was sind die Plugins für WordPress blockieren IP?
Apr 20, 2025 am 08:27 AM
WordPress IP -Blocking -Plugin -Auswahl ist entscheidend. Die folgenden Typen können berücksichtigt werden: basierend auf .htaccess: effizienter, aber komplexer Betrieb; Datenbankbetrieb: Flexible, aber geringe Effizienz; Firewall: hohe Sicherheitsleistung, aber komplexe Konfiguration; Selbstgeschrieben: höchste Kontrolle, erfordert aber mehr technisches Niveau.
 Wie man einen Kopfball eines WordPress schreibt
Apr 20, 2025 pm 12:09 PM
Die Schritte zum Erstellen eines benutzerdefinierten Headers in WordPress sind wie folgt: Bearbeiten Sie die Themendatei "Header.php". Fügen Sie Ihren Website -Namen und Ihre Beschreibung hinzu. Erstellen Sie ein Navigationsmenü. Fügen Sie eine Suchleiste hinzu. Speichern Sie Änderungen und sehen Sie sich Ihren benutzerdefinierten Header an.
 WordPress -Website -Konto Anmeldung
Apr 20, 2025 am 09:06 AM
So melden Sie sich bei einem WordPress-Website-Konto an: Besuchen Sie die Anmeldeseite: Geben Sie die Website von URL Plus "/wp-login.php" ein. Geben Sie Ihren Benutzernamen und Ihr Passwort ein. Klicken Sie auf "Login". Überprüfung der Überprüfung zweistufiger Verifizierung (optional). Nachdem Sie sich erfolgreich angemeldet haben, sehen Sie das Dashboard der Website.
 Was tun, wenn ein Fehler in WordPress vorhanden ist
Apr 20, 2025 am 11:57 AM
WordPress-Fehlerlösungshandbuch: 500 Interner Serverfehler: Deaktivieren Sie das Plug-In oder überprüfen Sie das Serverfehlerprotokoll. 404 Seite nicht gefunden: Permalink überprüfen und sicherstellen, dass der Seitenlink korrekt ist. Weißer Todesbildschirm: Erhöhen Sie das Server -PHP -Speichergrenze. Datenbankverbindungsfehler: Überprüfen Sie den Datenbankserverstatus und die WordPress -Konfiguration. Weitere Tipps: Aktivieren Sie den Debug -Modus, überprüfen Sie Fehlerprotokolle und suchen Sie Unterstützung. Fehler verhindern: Aktualisieren Sie regelmäßig WordPress, installieren Sie nur die erforderlichen Plugins, sichern Sie regelmäßig Ihre Website und optimieren Sie die Leistung der Website.
 So ändern Sie das Kopfbild des WordPress -Themas
Apr 20, 2025 am 10:00 AM
Eine Schritt-für-Schritt-Anleitung zum Ersetzen eines Headerbildes von WordPress: Melden Sie sich beim WordPress-Dashboard an und navigieren Sie zum Aussehen & GT; Thema. Wählen Sie das Thema aus, das Sie bearbeiten möchten, und klicken Sie auf Anpassen. Öffnen Sie das Panel der Themenoptionen und suchen Sie nach den Optionen für die Website -Header- oder Header -Bild -Bildung. Klicken Sie auf die Schaltfläche Bild und laden Sie ein neues Kopfbild hoch. Erstellen Sie das Bild und klicken Sie auf Speichern und Ernte. Klicken Sie auf die Schaltfläche Speichern und veröffentlichen, um die Änderungen zu aktualisieren.
 So zeigen Sie WordPress -Kommentare an
Apr 20, 2025 pm 12:06 PM
Aktivieren Sie Kommentare in der WordPress -Website: 1. Melden Sie sich im Administratorbereich an, wenden Sie sich zu "Einstellungen" - "Diskussionen" und überprüfen Sie "Kommentare zulassen". 2. Wählen Sie einen Ort aus, um Kommentare anzuzeigen. 3.. Anpassen Kommentare; V. 5. verwenden & lt;? Php commenter_template (); ? & gt; Tags zum Anzeigen von Kommentaren; 6. Verschachtelte Kommentare aktivieren; 7. Kommentarform einstellen; 8. Verwenden Sie Plugins und Verifizierungscodes, um Spam -Kommentare zu verhindern. 9. Ermutigen Sie Benutzer, Gravatar Avatar zu verwenden; 10. Erstellen Sie Kommentare, auf die Sie sich beziehen können
 So stornieren Sie das Bearbeitungsdatum von WordPress
Apr 20, 2025 am 10:54 AM
WordPress-Bearbeitungsdaten können auf drei Arten storniert werden: 1. Installieren Sie das Postdatum-Deaktivierungs-Plug-In; 2. Fügen Sie den Code in die Datei functions.php hinzu; 3. Bearbeiten Sie die post_modified -Spalte manuell in der Tabelle WP_POSTS.


