So stellen Sie die SpringBoot-Anwendung auf K8S bereit
May 14, 2023 pm 05:22 PMBild auf Docker Hub übertragen
Bevor wir unser eigenes Image-Warehouse erstellt haben, haben wir dieses Mal die Methode geändert und das Bild auf
Docker Hubhochgeladen Geh rein.Docker Hub中去。
-
首先我们得注册个
Docker Hub的账号,Docker Hub地址:https://hub.docker.com/
部署应用使用之前的
mall-tiny-fabric项目,先修改pom.xml文件,主要是增加Docker Hub的认证信息和修改下镜像前缀,具体内容如下;
<configuration> <!-- Docker 远程管理地址--> <dockerHost>http://192.168.5.94:2375</dockerHost> <!-- 增加认证信息--> <authConfig> <push> <!--Docker Hub 客户名--> <username>macrodocker</username> <!--Docker Hub 密码--> <password>xxx</password> </push> </authConfig> <images> <image> <!--修改镜像前缀为Docker Hub 客户名--> <name>macrodocker/${project.name}:${project.version}</name> </image> </images> </configuration>修改完成后使用
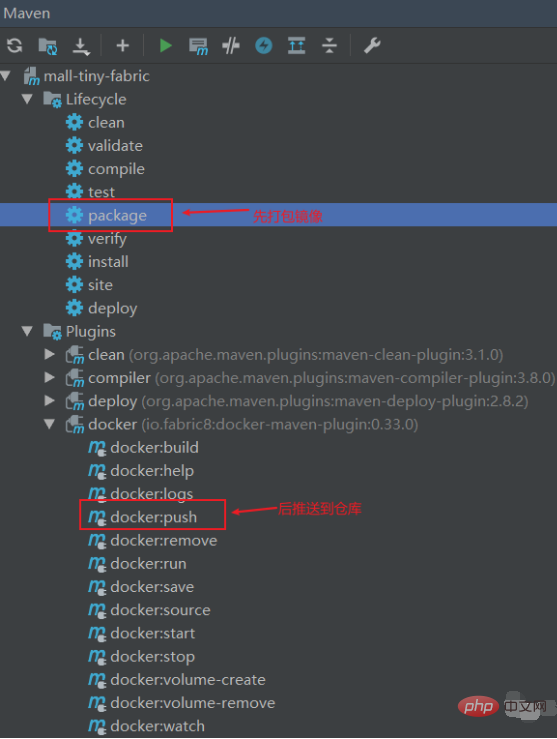
package命令先把镜像打包到Linux服务器,再使用docker:push命令把镜像推送到Docker Hub中去:
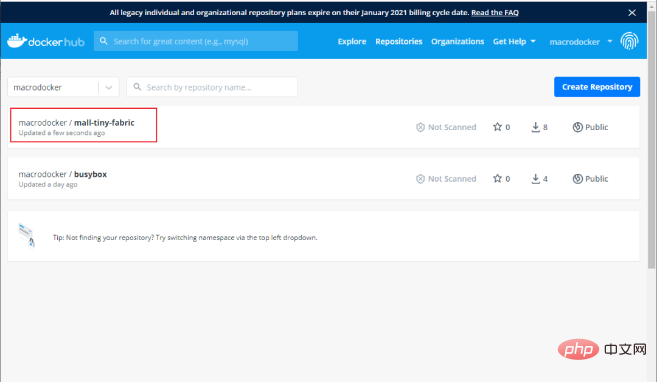
推送成功以后即可以在
Docker Hub中看到镜像了。
应用部署
接下来我们将把应用部署到K8S上去,包含
SpringBoot应用的部署和MySQL的部署。
部署MySQL
首先增加配置文件
mysql-deployment.yaml用于创立Deployment,具体说明参考注释就可;
apiVersion: apps/v1kind: Deploymentmetadata: # 指定Deployment的名称 name: mysql-deployment # 指定Deployment的标签 labels: app: mysqlspec: # 指定创立的Pod副本数量 replicas: 1 # 定义如何查找要管理的Pod selector: # 管理标签app为mysql的Pod matchLabels: app: mysql # 指定创立Pod的模板 template: metadata: # 给Pod打上app:mysql标签 labels: app: mysql # Pod的模板规约 spec: containers: - name: mysql # 指定容器镜像 image: mysql:5.7 # 指定开放的端口 ports: - containerPort: 3306 # 设置环境变量 env: - name: MYSQL_ROOT_PASSWORD value: root # 使用存储卷 volumeMounts: # 将存储卷挂载到容器内部路径 - mountPath: /var/log/mysql name: log-volume - mountPath: /var/lib/mysql name: data-volume - mountPath: /etc/mysql name: conf-volume # 定义存储卷 volumes: - name: log-volume # hostPath类型存储卷在宿主机上的路径 hostPath: path: /home/docker/mydata/mysql/log # 当目录不存在时创立 type: DirectoryOrCreate - name: data-volume hostPath: path: /home/docker/mydata/mysql/data type: DirectoryOrCreate - name: conf-volume hostPath: path: /home/docker/mydata/mysql/conf type: DirectoryOrCreate
通过应用配置文件来创立
Deployment;通过应用配置文件来创立Deployment;
kubectl apply -f mysql-deployment.yaml
运行成功后查询
Deployment,发现mysql-deployment已经就绪;
[macro@linux-local k8s]$ kubectl get deploymentsNAME READY UP-TO-DATE AVAILABLE AGEmysql-deployment 1/1 1 1 38snginx-volume-deployment 2/2 2 2 6d5h
想要其余
Pod可以通过服务名称访问MySQL,需要创立Service,增加配置文件mysql-service.yaml用于创立Service;
apiVersion: v1kind: Servicemetadata: # 定义服务名称,其余Pod可以通过服务名称作为域名进行访问 name: mysql-servicespec: # 指定服务类型,通过Node上的静态端口暴露服务 type: NodePort # 管理标签app为mysql的Pod selector: app: mysql ports: - name: http protocol: TCP port: 3306 targetPort: 3306 # Node上的静态端口 nodePort: 30306
通过应用配置文件来创立
Service;
kubectl apply -f mysql-service.yaml
运行成功后查询
Service,发现mysql-service已经暴露在Node的30306端口上了;
[macro@linux-local k8s]$ kubectl get servicesNAME TYPE CLUSTER-IP EXTERNAL-IP PORT(S) AGEkubernetes ClusterIP 10.96.0.1 <none> 443/TCP 7d23hmysql-service NodePort 10.107.189.51 <none> 3306:30306/TCP 7snginx-service NodePort 10.101.171.181 <none> 80:30080/TCP 6d2h
部署完成后需要新建
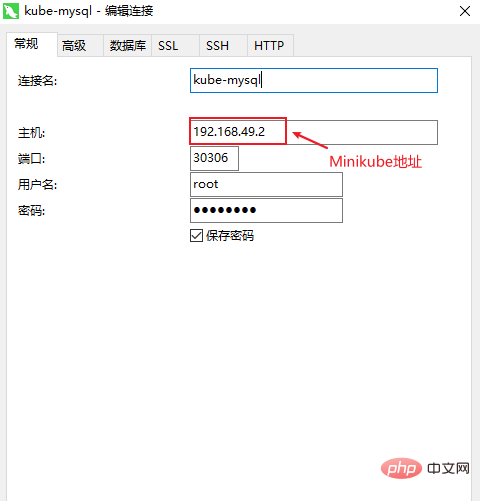
mall数据库,并导入相关表,表地址: macrozheng/mall-learning/blob/master/document/sql/mall.sql这里有个比较简单的方法来导入数据库,通过
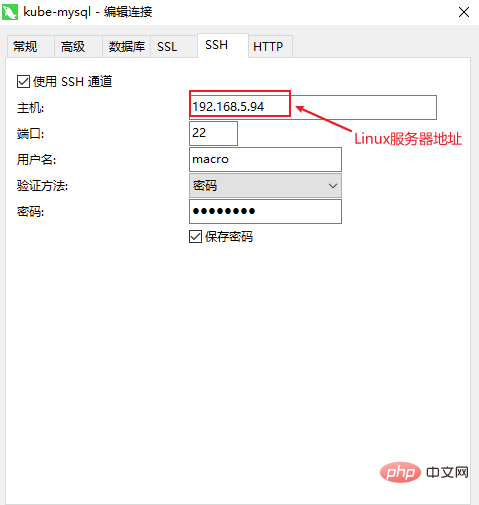
Navicat创立连接,先配置一个SSH通道;
之后我们即可以像在
Linux服务器上访问数据库一样访问Minikube中的数据库了,直接增加Minikube中数据库IP和端口就可。
部署SpringBoot应用
首先增加配置文件
mall-tiny-fabric-deployment.yaml用于创立Deployment,这里我们可以通过环境变量来覆盖SpringBoot中的默认配置;
apiVersion: apps/v1kind: Deploymentmetadata: name: mall-tiny-fabric-deployment labels: app: mall-tiny-fabricspec: replicas: 1 selector: matchLabels: app: mall-tiny-fabric template: metadata: labels: app: mall-tiny-fabric spec: containers: - name: mall-tiny-fabric # 指定Docker Hub中的镜像地址 image: macrodocker/mall-tiny-fabric:0.0.1-SNAPSHOT ports: - containerPort: 8080 env: # 指定数据库连接地址 - name: spring.datasource.url value: jdbc:mysql://mysql-service:3306/mall?useUnicode=true&characterEncoding=utf-8&serverTimezone=Asia/Shanghai # 指定日志文件路径 - name: logging.path value: /var/logs volumeMounts: - mountPath: /var/logs name: log-volume volumes: - name: log-volume hostPath: path: /home/docker/mydata/app/mall-tiny-fabric/logs type: DirectoryOrCreate
通过应用配置文件来创立
Deployment;
kubectl apply -f mall-tiny-fabric-deployment.yaml
我们可以通过
kubectl logs命令来查看应用的启动日志;
[macro@linux-local k8s]$ kubectl get podsNAME READY STATUS RESTARTS AGEmall-tiny-fabric-deployment-8684857dff-pnz2t 1/1 Running 0 47smysql-deployment-5dccc96ccf-sfxvg 1/1 Running 0 25mnginx-volume-deployment-6f6c89976d-nv2rn 1/1 Running 4 6d6hnginx-volume-deployment-6f6c89976d-tmhc5 1/1 Running 4 6d5h[macro@linux-local k8s]$ kubectl logs -f mall-tiny-fabric-deployment-8684857dff-pnz2t
假如想要从外部访问
SpringBoot应用,需要创立Service,增加配置文件mall-tiny-fabric-service.yaml用于创立Service;
apiVersion: v1kind: Servicemetadata: name: mall-tiny-fabric-servicespec: type: NodePort selector: app: mall-tiny-fabric ports: - name: http protocol: TCP port: 8080 targetPort: 8080 # Node上的静态端口 nodePort: 30180
通过应用配置文件来创立
Service;
kubectl apply -f mall-tiny-fabric-service.yaml
此时服务已经暴露到了
Node的30180端口上了;
[macro@linux-local k8s]$ kubectl get servicesNAME TYPE CLUSTER-IP EXTERNAL-IP PORT(S) AGEkubernetes ClusterIP 10.96.0.1 <none> 443/TCP 7d23hmall-tiny-fabric-service NodePort 10.100.112.84 <none> 8080:30180/TCP 5smysql-service NodePort 10.107.189.51 <none> 3306:30306/TCP 13mnginx-service NodePort 10.101.171.181 <none> 80:30080/TCP 6d2h
在
Linux服务器上,我们可以通过curl命令来访问下项目的Swagger页面,不过只能查看到返回的一串HTML- Zuerst müssen wir ein
Docker Hub-Konto registrieren,Docker Hub< /code>Adresse: https://hub.docker.com/</li></ul><img src="/static/imghw/default1.png" data-src="https://img.php.cn/upload/article/000/465/014/168405613028442.png" class="lazy" alt="So stellen Sie SpringBoot-Anwendungen auf K8S bereit" /><p ><strong><br/></strong></p><li>#🎜🎜#<Code vor der Bereitstellung der Anwendung >mall -tiny-fabric-Projekt: Ändern Sie zunächst die Dateipom.xml, hauptsächlich um die Authentifizierungsinformationen vonDocker Hubhinzuzufügen und das Bildpräfix zu ändern sind wie folgt ;#🎜🎜##🎜🎜##🎜🎜#curl $(minikube ip):30180/swagger-ui.html
Nach dem Login kopieren- #🎜🎜#Nachdem die Änderung abgeschlossen ist, verwenden Sie das
Paket</ code>-Befehl, um das Image zuerst zu packen. Gehen Sie zum <code>Linux-Server und verwenden Sie dendocker:push-Befehl, um das Image anDocker Hubzu senden: < img alt="So stellen Sie die SpringBoot-Anwendung auf K8S bereit" />#🎜🎜##🎜🎜#< li>#🎜🎜#Push erfolgreich Sie können das Bild jetzt imDocker Hubsehen. #🎜🎜##🎜🎜 # #🎜🎜#
Anwendungsbereitstellung#🎜🎜##🎜🎜##🎜🎜#Als nächstes werden wir die Anwendung auf K8S bereitstellen, einschließlich der
SpringBoot-Anwendungsbereitstellung und Bereitstellung vonMySQL. #🎜🎜##🎜🎜##🎜🎜#MySQL bereitstellen#🎜🎜##🎜🎜#- #🎜🎜#Fügen Sie zuerst die Konfigurationsdatei hinzu < code>mysql-deployment.yaml wird zum Erstellen von
Deploymentverwendet. Spezifische Anweisungen finden Sie in den Kommentaren =" list- paddingleft-2" > - #🎜🎜# Erstellen Sie eine
Bereitstellungmithilfe von Konfigurationsdateien; erstellen Sie eineBereitstellungmithilfe von Konfigurationsdateien; 🎜# #🎜🎜#server { listen 80; server_name mall-tiny.macrozheng.com; #修改域名 location / { proxy_set_header Host $host:$server_port; proxy_pass http://192.168.49.2:30180; #修改为代理商服务地址 index index.html index.htm; } error_page 500 502 503 504 /50x.html; location = /50x.html { root /usr/share/nginx/html; }}Nach dem Login kopierenNach dem Login kopieren- #🎜🎜# Fragen Sie nach erfolgreichem Vorgang
Deploymentab und finden Siemysql-deployment</ code> ist fertig ;#🎜🎜##🎜🎜##🎜🎜#<div class="code" style="position:relative; padding:0px; margin:0px;"><div class="code" style="position:relative; padding:0px; margin:0px;"><pre class='brush:php;toolbar:false;'>192.168.5.94 mall-tiny.macrozheng.com</pre><div class="contentsignin">Nach dem Login kopieren</div></div><div class="contentsignin">Nach dem Login kopieren</div></div><ul class=" list-paddingleft-2" ><li>#🎜🎜# Will den Rest des <code>PodUm über den DienstnamenMySQLerreichbar zu sein, müssen SieServiceerstellen und die Konfigurationsdateimysql-service.yamlhinzufügen, umzu erstellen Service; #🎜🎜# #🎜🎜##🎜🎜#rrreee- #🎜🎜#Erstellen Sie
Servicedurch Anwenden der Konfiguration files; #🎜🎜##🎜🎜 ##🎜🎜#rrreee- #🎜🎜# Nach erfolgreicher Ausführung fragen Sie
Serviceab und finden dasmysql-servicewurde auf dem Port 30306 des Knotens verfügbar gemacht; #🎜🎜##🎜🎜##🎜🎜#rrreee- #🎜🎜# Bereitstellung abgeschlossen. Anschließend müssen Sie eine neue
mall-Datenbank erstellen und die relevanten Tabellen importieren. Die Tabellenadresse lautet: Macrozheng/mall-learning/blob/master/document/sql /mall.sql#🎜🎜##🎜🎜# - # 🎜🎜#Hier ist eine relativ einfache Methode, um die Datenbank über
Navicatzu importieren und zuerst einen SSH-Kanal zu konfigurieren img src="https://img.php.cn/upload/article /000/465/014/168405613019188.png" alt="So stellen Sie SpringBoot-Anwendungen auf K8S bereit" />#🎜🎜##🎜🎜#< li>#🎜🎜#Danach können wir wie inLinuxauf die Datenbank inMinikubezugreifen, genau wie Sie auf die Datenbank auf dem Server zugreifen und direkt inMinikubeportieren. #🎜🎜##🎜🎜# #🎜🎜##🎜🎜##🎜🎜##🎜🎜##🎜🎜#SpringBoot-Anwendung bereitstellen #🎜🎜##🎜🎜#
- #🎜🎜 # Fügen Sie zunächst die Konfigurationsdatei
mall-tiny-fabric-deployment.yamlhinzu, umDeploymentzu erstellen. Hier können wirSpringBootüberschreiben Konfiguration von ;#🎜🎜##🎜🎜##🎜🎜#rrreee- #🎜🎜#Wir können die Anwendung über die
kubectl-Protokolle</code anzeigen > Befehl Startprotokoll; #🎜🎜##🎜🎜##🎜🎜#rrreee<ul class=" list-paddingleft-2" ><li>#🎜🎜#Wenn Sie auf den <code>SpringBoot</code zugreifen möchten > Anwendung von außen, Sie müssen <code>Serviceerstellen und die Konfigurationsdateimall-tiny-fabric-service.yamlhinzufügen, umServicezu erstellen; 🎜🎜##🎜🎜 ##🎜🎜#rrreee- #🎜🎜#Erstellen Sie
Dienstdurch Anwenden der Konfigurationsdatei #🎜🎜## 🎜🎜##🎜 🎜#rrreee- #🎜🎜#Zu diesem Zeitpunkt wurde der Dienst dem 30180-Port des
Knotensausgesetzt; 🎜##🎜🎜# #🎜🎜#rrreee- #🎜🎜#Auf dem
Linux-Server können wir über dencurl-Befehl Laden Sie dieSwagger-Seite des Projekts herunter, Sie können jedoch nur die zurückgegebene Zeichenfolge vonHTML-Codes anzeigen. #🎜🎜##🎜🎜##🎜🎜#rrreee#🎜🎜##🎜🎜#Externe Zugriffsanwendung#🎜🎜##🎜🎜#因为使用
Minikube安装的K8S Node处于Linux服务器的内网环境,无法直接从外部访问,所以我们需要安装一个Nginx反向代理商下才能访问。首先我们需要安装
Nginx,安装完成后增加一个
Nginx的配置文件,这里我的配置路径为/mydata/nginx/conf/conf.d/,用于将mall-tiny.macrozheng.com域名的访问代理商到K8S中的SpringBoot应用中去,proxy_pass为上面curl使用的路径;
server { listen 80; server_name mall-tiny.macrozheng.com; #修改域名 location / { proxy_set_header Host $host:$server_port; proxy_pass http://192.168.49.2:30180; #修改为代理商服务地址 index index.html index.htm; } error_page 500 502 503 504 /50x.html; location = /50x.html { root /usr/share/nginx/html; }}Nach dem Login kopierenNach dem Login kopieren重启
Nginx服务,再修改访问Linux服务器的本机host文件,增加如下记录;
192.168.5.94 mall-tiny.macrozheng.com
Nach dem Login kopierenNach dem Login kopieren之后就可直接在本机上访问K8S上的
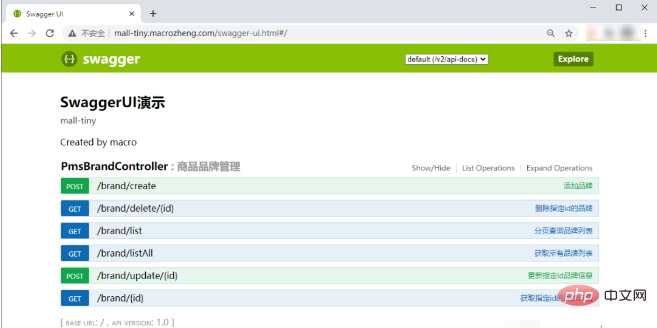
SpringBoot应用了,访问地址:http://mall-tiny.macrozheng.com/swagger-ui.html
Das obige ist der detaillierte Inhalt vonSo stellen Sie die SpringBoot-Anwendung auf K8S bereit. Für weitere Informationen folgen Sie bitte anderen verwandten Artikeln auf der PHP chinesischen Website!
- #🎜🎜#Auf dem
- #🎜🎜#Zu diesem Zeitpunkt wurde der Dienst dem 30180-Port des
- #🎜🎜#Erstellen Sie
- #🎜🎜#Wir können die Anwendung über die
- #🎜🎜 # Fügen Sie zunächst die Konfigurationsdatei
- #🎜🎜# Bereitstellung abgeschlossen. Anschließend müssen Sie eine neue
- #🎜🎜# Nach erfolgreicher Ausführung fragen Sie
- #🎜🎜#Erstellen Sie
- #🎜🎜# Fragen Sie nach erfolgreichem Vorgang
- #🎜🎜#Fügen Sie zuerst die Konfigurationsdatei hinzu < code>mysql-deployment.yaml wird zum Erstellen von
- #🎜🎜#Nachdem die Änderung abgeschlossen ist, verwenden Sie das
- Zuerst müssen wir ein

Heißer Artikel

Hot-Tools-Tags

Heißer Artikel

Heiße Artikel -Tags

Notepad++7.3.1
Einfach zu bedienender und kostenloser Code-Editor

SublimeText3 chinesische Version
Chinesische Version, sehr einfach zu bedienen

Senden Sie Studio 13.0.1
Leistungsstarke integrierte PHP-Entwicklungsumgebung

Dreamweaver CS6
Visuelle Webentwicklungstools

SublimeText3 Mac-Version
Codebearbeitungssoftware auf Gottesniveau (SublimeText3)

Heiße Themen
 Wie Springboot Jasypt integriert, um die Verschlüsselung von Konfigurationsdateien zu implementieren
Jun 01, 2023 am 08:55 AM
Wie Springboot Jasypt integriert, um die Verschlüsselung von Konfigurationsdateien zu implementieren
 So implementieren Sie verteilte Sperren mit Redis in SpringBoot
Jun 03, 2023 am 08:16 AM
So implementieren Sie verteilte Sperren mit Redis in SpringBoot
 Wie SpringBoot Redisson integriert, um eine Verzögerungswarteschlange zu implementieren
May 30, 2023 pm 02:40 PM
Wie SpringBoot Redisson integriert, um eine Verzögerungswarteschlange zu implementieren
 Vergleich und Differenzanalyse zwischen SpringBoot und SpringMVC
Dec 29, 2023 am 11:02 AM
Vergleich und Differenzanalyse zwischen SpringBoot und SpringMVC
 So lösen Sie das Problem, dass Springboot nach dem Einlesen in ein JAR-Paket nicht auf die Datei zugreifen kann
Jun 03, 2023 pm 04:38 PM
So lösen Sie das Problem, dass Springboot nach dem Einlesen in ein JAR-Paket nicht auf die Datei zugreifen kann
 Wie SpringBoot Redis anpasst, um die Cache-Serialisierung zu implementieren
Jun 03, 2023 am 11:32 AM
Wie SpringBoot Redis anpasst, um die Cache-Serialisierung zu implementieren
 So erhalten Sie den Wert in application.yml in Springboot
Jun 03, 2023 pm 06:43 PM
So erhalten Sie den Wert in application.yml in Springboot
 So implementieren Sie Springboot+Mybatis-plus, ohne SQL-Anweisungen zum Hinzufügen mehrerer Tabellen zu verwenden
Jun 02, 2023 am 11:07 AM
So implementieren Sie Springboot+Mybatis-plus, ohne SQL-Anweisungen zum Hinzufügen mehrerer Tabellen zu verwenden


