
# Numpy的基本使用
'''
Numpy提供了两种基本的对象:ndarray存储单一数据类型的多维数组;
                       ufunc是能够对数组进行处理的函数
1-导入函数
import numpy as np
2-数组创建
2-1 array   可将列表或元组转化为ndarray数组
2-2 arange 在给定区间内创建等差数组,格式:
            arange(start=None, stop=None, step=None,dtype=None)
            【step表示步长间隔】
2-3 linspace 在给定区间内创建间隔相等的数组,格式:
             linspace(start, stop, num=50, endpoint=True)
             【间隔相等的num个数据,其num默认值是50】
2-4 logspace 在给定区间内生成等比数组,格式:
             logspace(start, stop, num=50, endpoint=True, base=10.0)
             【默认生成区间[10start(次方), 10stop()次方]上的num个数据的等比数组】
以及 ones、zeros、empty和ones_like等系列函数的运用:
'''# numpy.array # array()函数,括号内可以是列表、元组、数组、迭代对象、生成器 import numpy as np print(np.array([6, 6, 6])) # 列表 print(np.array((8, 8, 8))) # 元组 print(np.array(np.array([9, 9, 9]))) # 数组 print(np.array(range(10))) # 迭代对象 / 整型 print(np.array([i**2 for i in range(10)])) # 生成器 # 创建10以内的奇数的数组: print(np.array([i for i in range(1, 10, 2)])) print(np.array([i for i in range(10) if i % 2 != 0])) # 创建10以内的偶数的数组: print(np.array([i for i in range(0, 10, 2)])) print(np.array([i for i in range(10) if i % 2 == 0])) # 列表中元素类型不相同 print(np.array([5, 2, '0'])) # ['5' '2' '0'] # 浮点型 print(np.array([3, 4, 5.2])) # 二维数组:【嵌套序列(列表、元组均可)】 print(np.array([[6, 7, 8], ('lxw', 'cw', 'wl')])) print(np.array([[6, 7, 8], ('lxw', 'cw', 'wl')]).ndim) # ndim(维度): 2 # 嵌套数量不一致:【强制转化为一维,推荐不用】 print(np.array([[6, 7, 8], ('lxw', 'cw', 'wl', 'npy')], dtype=object)) print(np.array([[6, 7, 8], ('lxw', 'cw', 'wl', 'npy')], dtype=object).ndim) # ndim(维度):1 print(np.array([[6, 7, 8], ('lxw', 'cw', 'wl', 'npy')], dtype=object).shape) # 运行结果:(2,) print(np.array([[6, 7, 8], [9, 9, 6, 9]], dtype=object)) print(np.array([[6, 7, 8], [9, 9, 6, 9]], dtype=object).ndim) # ndim(维度):1 print(np.array([[6, 7, 8], [9, 9, 6, 9]], dtype=object).shape) # 运行结果:(2,) -> 代表两行一列
# numpy.empty
'''
numpy.empty 方法用来创建一个指定形状(shape)、数据类型(dtype)且未初始化的数组
numpy.empty(shape, dtype = float, order = 'C')
参数说明:
参数	描述
shape	数组形状
dtype	数据类型,可选
order	有"C"和"F"两个选项,分别代表,行优先和列优先,在计算机内存中的存储元素的顺序

'''
import numpy as np
lxw = np.empty([3, 4], dtype=int)
print(lxw)  # 注意:数组元素为随机值,因为它们未初始化
# numpy.zeros
'''
创建指定大小的数组,数组元素以 0 来填充:
numpy.zeros(shape, dtype = float, order = 'C')
参数说明:
order :	'C' 用于 C 的行数组,或者 'F' 用于 FORTRAN 的列数组
'''
import numpy as np
lxw = np.zeros(6)                   # 默认为浮点数
print(lxw)
lxw2 = np.zeros((6, ), dtype=int)   # 设置类型为整数
print(lxw2)
# 自定义类型
lxw3 = np.zeros((2, 2), dtype=[('lxw', 'i2'), ('lxw2', 'i4')])
print(lxw3)
# numpy.ones
'''创建指定形状的数组,数组元素以 1 来填充:
numpy.ones(shape, dtype = None, order = 'C')
'''
import numpy as np
lxw4 = np.ones(8)   # 默认浮点数
print(lxw4)
lxw5 = np.ones([2, 2], dtype=int)
print(lxw5)
# numpy.asarray
'''
numpy.asarray 类似 numpy.array,但 numpy.asarray 参数只有三个,比 numpy.array 少两个。
numpy.asarray(a, dtype = None, order = None)
参数说明:
参数	描述
a	任意形式的输入参数,可以是,列表, 列表的元组, 元组, 元组的元组, 元组的列表,多维数组

'''
# 将列表转换为 ndarray:
import numpy as np
x = [5, 2, 0]
lxw6 = np.asarray(x)
print(lxw6)
# 将元组转换为 ndarray
import numpy as np
x2 = (1, 3, 1, 4)
lxw7 = np.asarray(x2)
print(lxw7)
# 设置了 dtype 参数
import numpy as np
x4 = [6, 6, 9]
lxw9 = np.asarray(x4, dtype=float)
print(lxw9)
# numpy.frombuffer
'''
numpy.frombuffer 用于实现动态数组;接受 buffer 输入参数,以流的形式读入转化成 ndarray 对象。
格式如下:
numpy.frombuffer(buffer, dtype = float, count = -1, offset = 0)
注:buffer 是字符串的时候,Python3 默认 str 是 Unicode 类型,所以要转成 bytestring 在原 str 前加上 b。
参数说明:
参数	描述
buffer	可以是任意对象,会以流的形式读入。
dtype	返回数组的数据类型,可选
count	读取的数据数量,默认为-1,读取所有数据。
offset	读取的起始位置,默认为0

'''
import numpy as np
s = b'lxw_pro'
lxw10 = np.frombuffer(s, dtype='S1')
print(lxw10)
# numpy.fromiter
'''
numpy.fromiter 方法从可迭代对象中建立 ndarray 对象,返回一维数组。
numpy.fromiter(iterable, dtype, count=-1)
'''
import numpy as np
lst = range(6)
it = iter(lst)
lxw11 = np.fromiter(it, dtype=float)
print(lxw11)
# numpy.arange
'''
numpy 包中的使用 arange 函数创建数值范围并返回 ndarray 对象,函数格式如下:
numpy.arange(start, stop, step, dtype)
根据 start 与 stop 指定的范围以及 step 设定的步长,生成一个 ndarray。
参数说明:
参数	描述
start	起始值,默认为0
stop	终止值(不包含)
step	步长,默认为1
dtype	返回ndarray的数据类型,如果没有提供,则会使用输入数据的类型

'''
# 生成0和5的数组
import numpy as np
a = np.arange(6)
print(a)
# 设置返回类型位 float
import numpy as np
a2 = np.arange(6, dtype=float)
print(a2)
# 设置了起始值、终止值及步长
import numpy as np
a3 = np.arange(20, 52, 5)
print(a3)
# numpy.linspace
'''
numpy.linspace 函数用于创建一个一维数组,数组是一个等差数列构成的,格式如下:
np.linspace(start, stop, num=50, endpoint=True, retstep=False, dtype=None)
参数说明:

参数	描述
start	序列的起始值
stop	序列的终止值,如果endpoint为true,该值包含于数列中
num	要生成的等步长的样本数量,默认为50
endpoint	该值为 true 时,数列中包含stop值,反之不包含,默认是True。
retstep	如果为 True 时,生成的数组中会显示间距,反之不显示。
dtype	ndarray 的数据类型

'''
# 类似等差数列
import numpy as np
a4 = np.linspace(1, 10, 5)
print(a4)
# 设置元素全部是1的等差数列
import numpy as np
a5 = np.linspace(1, 1, 10)
print(a5)
# 将 endpoint 设为 false,不包含终止值
import numpy as np
a6 = np.linspace(8, 22, 4, endpoint=False)
print(a6)
# 注:将 endpoint 设为 true,则会包含 22
a6 = np.linspace(8, 22, 4, endpoint=True)
print(a6)
# 设置间距
import numpy as np
a7 = np.linspace(5, 10, 5).reshape([5, 1])
print(a7)
# numpy.logspace
'''
numpy.logspace 函数用于创建一个于等比数列。格式如下:
np.logspace(start, stop, num=50, endpoint=True, base=10.0, dtype=None)
base 参数意思是取对数的时候 log 的下标。
参数	描述
start	序列的起始值为:base ** start
stop	序列的终止值为:base ** stop。如果endpoint为true,该值包含于数列中
num	要生成的等步长的样本数量,默认为50
endpoint	该值为 true 时,数列中中包含stop值,反之不包含,默认是True。
base	对数 log 的底数。
dtype	ndarray 的数据类型

'''
import numpy as np
a8 = np.logspace(1, 2, num=10)      # 默认底数是 10
print(a8)
# 将对数的底数设置为 2
import numpy as np
a9 = np.logspace(0, 8, 9, base=2)
print(a9)
# 综合运用
import numpy as np
ltw = np.array([3, 3, 4, 4])    # 生成整型数组
ltw2 = ltw.astype(float)        # 转为浮点数
ltw3 = np.array([5, 2, 1], dtype=float) # 浮点数
print(ltw)
print(ltw2)
print(ltw3)
# 比较类型
print(ltw.dtype, ltw2.dtype, ltw3.dtype)
aa = np.array([
    [2, 5, 8],
    [9, 6, 2]
])
print(aa)
bb = np.arange(2, 9)
print(bb)   # 运行结果为:[2 3 4 5 6 7 8]
cc = np.linspace(2, 5, 4)
print(cc)   # 运行结果为:[2. 3. 4. 5.]
dd = np.logspace(1, 4, 4, base=2)   # base控制的是几次方
print(dd) # 运行结果为:[ 2. 4. 8. 16.]# 综合运用【ones、zeros、empty、ones_like】 import numpy as np a = np.ones(6, dtype=int) print(a) # 运行结果为:[1 1 1 1 1 1] b = np.ones((6,), dtype=int) print(b) # 运行结果为:[1 1 1 1 1 1] c = np.ones((3, 1)) print(c) # 输出3行一列的数组 # 运行结果为: # [[1.] # [1.] # [1.]] d = np.zeros(4) print(d) # 运行结果为:[0. 0. 0. 0.] e = np.empty(3) print(e) # 生成3个元素的空数组行向量 # 运行结果为:[1. 1. 1.] f = np.eye(3) print(f) # 生成3阶单位阵 # 运行结果为: # [[1. 0. 0.] # [0. 1. 0.] # [0. 0. 1.]] g = np.eye(3, k=1) print(g) # 生成第k对角线的元素为1,其他元素为0的3阶方阵 # 运行结果为: # [[0. 1. 0.] # [0. 0. 1.] # [0. 0. 0.]] h = np.zeros_like(b) print(h) # 生成与a同维数的全0数组 # 运行结果为:[0 0 0 0 0 0]
# NumPy 切片和索引
'''
ndarray对象的内容可以通过索引或切片来访问和修改,与 Python 中 list 的切片操作一样。

ndarray 数组可以基于 0 - n 的下标进行索引,
切片对象可以通过内置的 slice 函数,并设置 start, stop 及 step 参数进行,从原数组中切割出一个新数组

'''
import numpy as np
# 通过 arange() 函数创建 ndarray 对象
a = np.arange(10)
lxw = slice(2, 9, 3)    # 索引从2到9,间隔为3

print(a[lxw])       # [2 5 8]

# 通过切片操作
a = np.arange(10)
lxw2 = a[2:9:3]         # 这里的切片操作和Python中list的操作是一样的
print(lxw2)         # [2 5 8]
# 比如:
import numpy as np
lxw3 = np.arange(10)
print(lxw3[6])      # 6
print(lxw3[6:])     # [6 7 8 9]
print(lxw3[2:7])    # [2 3 4 5 6]
# 多维数组同样适用上述索引提取方法
import numpy as np
lxw4 = np.array([
    [6, 6, 6],
    [5, 2, 0],
    [5, 8, 9]
])
print(lxw4)
print(lxw4[1:])
# 切片还可以包括省略号 …,来使选择元组的长度与数组的维度相同。
# 如果在行位置使用省略号,它将返回包含行中元素的 ndarray
import numpy as np
lxw5 = np.array([
    [1, 2, 9],
    [2, 5, 4],
    [3, 4, 8]
])
print(lxw5[1, ...])     # [2 5 4]   第二行元素
print(lxw5[..., 2])     # [9 4 8]   第三列元素
print(lxw5[1:, ...])    # 第二行及剩下元素
print(lxw5[..., 1:]) # 第二列及剩下元素Numpy Das array数组与Python基础数据结构列表(list)的区别 in ist:
Die Elemente in der Liste können unterschiedliche Datentypen haben. Das Array-Array ermöglicht nur das Speichern desselben Datentyps.
NumPy bietet mehr Indizierungsmethoden als gewöhnliche Python-Sequenzen.
Zusätzlich zur zuvor gezeigten Indizierung mit Ganzzahlen und Slices können Arrays durch
Integer Array Index Boolean Index Fancy Index
# 1-整数数组索引
import numpy as np
b = np.array([
    [6, 2, 9],
    [4, 3, 9],
    [5, 2, 3]
])
lxw6 = b[
    [0, 1, 2], [1, 2, 1]
]
print(lxw6)     # 输出 [2 9 2]
# 获取四个角元素
import numpy as np
aq = np.array([
    [1, 2, 3, 4],
    [2, 3, 4, 5],
    [3, 4, 5, 6],
    [4, 5, 6, 7]
])
print(aq)
hj = np.array([[0, 0], [3, 3]])
lj = np.array([[0, 3], [0, 3]])
yq = aq[hj, lj]
print(yq)
print()
# 可借助切片 : 或 … 与索引数组组合:
import numpy as np

jz = np.array([
    [3, 5, 9],
    [5, 2, 6],
    [2, 9, 8]
])
jz1 = jz[:2, :2]
print(jz1)
jz2 = jz[:2, [0, 1]]
print(jz2)
jz3 = jz[..., 1:]
print(jz3)# 布尔索引
# 布尔索引可通过布尔运算(如:比较运算符)来获取符合指定条件的元素的数组
# 获取大于5的元素:
import numpy as np
br = np.array([
[6, 7, 8],
[5, 2, 1],
[6, 6, 9],
[2, 4, 5]
])
print(br)
print(br[br > 5]) # 输出 [6 7 8 6 6 9]
# 使用 ~(取补运算符)来过滤 NaN:
import numpy as np
bu = np.array([5, np.nan, 2, 0, np.nan, np.nan, 5, 8])
print(bu[~np.isnan(bu)]) # 输出 [5. 2. 0. 5. 8.]
# 从数组中过滤掉非复数元素:
import numpy as np
lv = np.array([2+2.9j, 4, 9, 2+8.2j, 8])
print(lv[np.iscomplex(lv)]) # 输出 [2.+2.9j 2.+8.2j]# 花式索引【利用整数数组进行索引】 # 花式索引根据索引数组的值作为目标数组的某个轴的下标来取值。 # 对于使用一维整型数组作为索引,如果目标是一维数组,那么索引的结果就是对应下标的行, # 如果目标是二维数组,那么就是对应位置的元素。 # 注:花式索引跟切片不一样,它总是将数据复制到新数组中。 # 1.传入顺序索引数组 import numpy as np sx = np.arange(32).reshape(8, 4) print(sx[[5, 2, 1, 6]]) # 2.传入倒序索引数组 import numpy as np dx = np.arange(32).reshape(8, 4) print(dx[[-5, -2, -1, -6]]) # 3.传入多个索引数组(要使用np.ix_) import numpy as np dg = np.arange(32).reshape(8, 4) print(dg[np.ix_([2, 3, 5, 1], [3, 2, 0, 1])])
Drei praktische Methoden:
Bedingte Klammern
Verwenden Sie die np.logical_and-Methode
Verwenden Sie die np.all-Methode
import numpy as np
sy = np.array([
    [3, 5, 6],
    [2, 6, 2],
    [5, 2, 0],
    [3, 3, 4]
])
# 原数组
print(sy)
# 1-
print(sy[(sy > 3) & (sy < 6)])  # 条件记得加小括号
# 2-
print(sy[np.logical_and(sy > 3, sy < 6)])
# 3-
print(sy[np.all([sy > 3, sy < 6], axis=0)])Der relevante Code lautet wie folgt:
import numpy as np
x = np.arange(16).reshape(4, 4)
print(x)    # 生成4行4列的数组
x2 = x[2][1]
print(x2)   # 输出 9
x3 = x[2, 1]
print(x3)   # 输出 9
x4 = x[1:2, 2:4]
print(x4)   # 输出 [[6 7]]
xx = np.array([0, 1, 2, 1])
print(x[xx == 1])   # 输出x的第2、4行元素
# Pandas学习(续)
# Pandas库是在Numpy库基础上开发的一种数据分析工具
'''
Pandas主要提供了三种数据结构:
1-Series: 带标签的一维数组
2-DataFrame: 带标签且大小可变得二维表格结构
3-Panel: 带标签且大小可变得三维数组

'''
# 生成二维数组
# 生成服从标准正态分布的24*4随机数矩阵,并保存为DataFrame数据结构。
import pandas as pd
import numpy as np
dates = pd.date_range(start='20220622', end='20220707', freq='D')
print(dates)
Das laufende Ergebnis lautet wie folgt:

lxw1 = pd.DataFrame(np.random.randn(16, 4), index=dates, columns=list('ABCD'))
lxw2 = pd.DataFrame(np.random.randn(16, 4))
print(lxw1)
print(lxw2)
Das laufende Ergebnis lautet wie folgt:
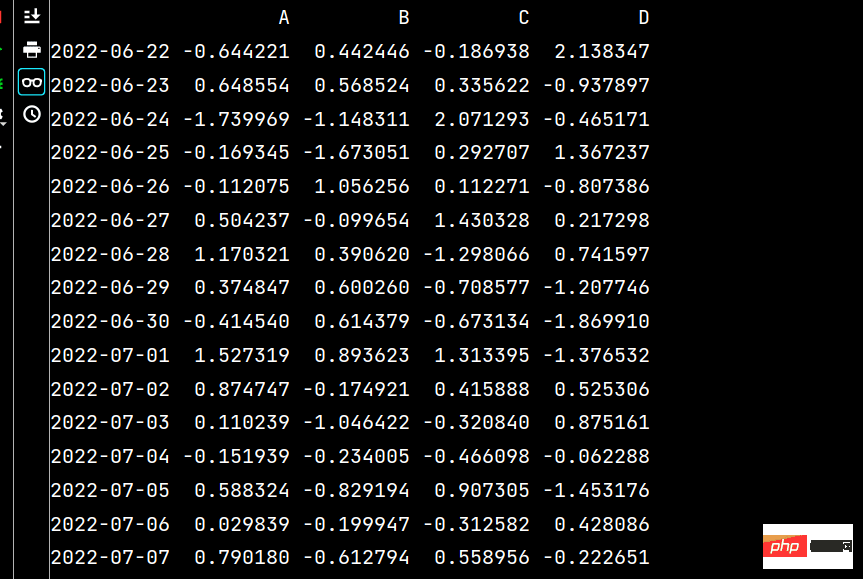 🏜
🏜
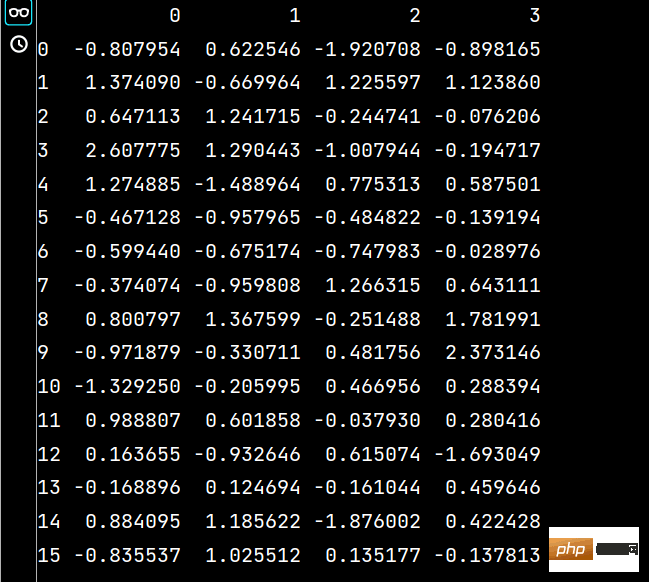
# 将lxw1的数据写入excel文件
lxw1.to_excel('假期培训时间.xlsx')
lxw1.to_excel("时间任意.xlsx", index=False)     # 不包含行索引
# 将lxw2的数据写入csv文件
lxw2.to_csv('假期培训时间.csv')
lxw2.to_csv("时间随意.csv", index=False)                     # 不包含行索引
# 创建文件对象
f = pd.ExcelWriter('培训时间(格式).xlsx')
# 把lxw1写入Excel文件
lxw1.to_excel(f, "Shell1")
# 把lxw2写入Excel文件
lxw2.to_excel(f, "Sheet2")
f.save()2 Einige vorläufige Datenverarbeitungen
3 Datenauswahl und -manipulation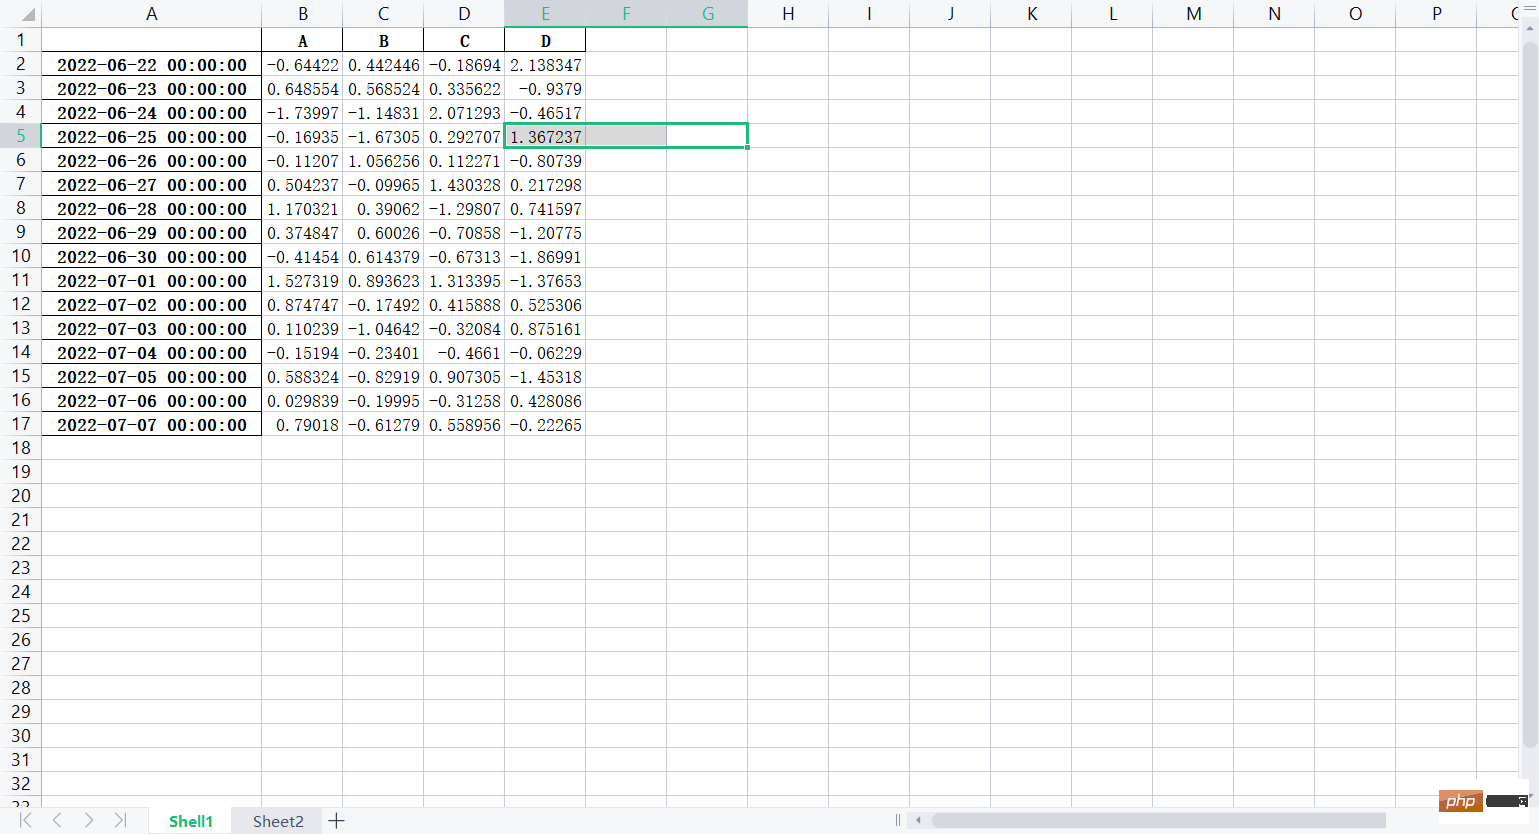
# 从文件中读入数据:
import pandas as pd
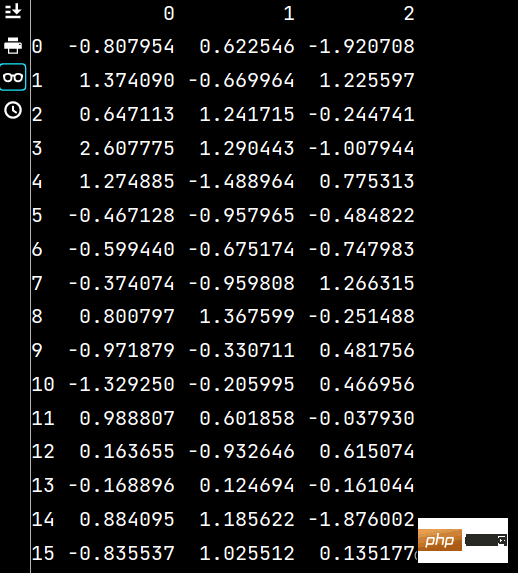
lxw3 = pd.read_csv("假期培训时间.csv", usecols=range(1, 4))
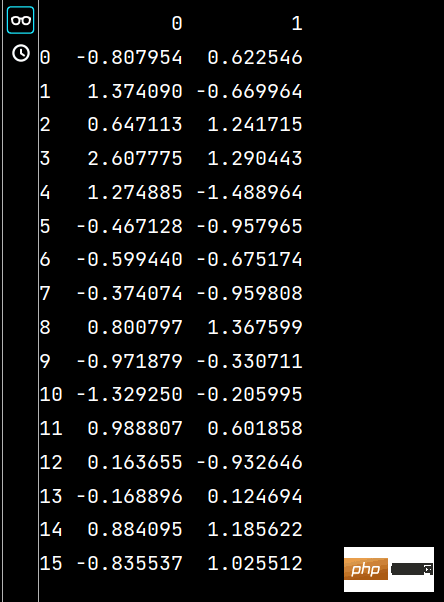
print(lxw3) 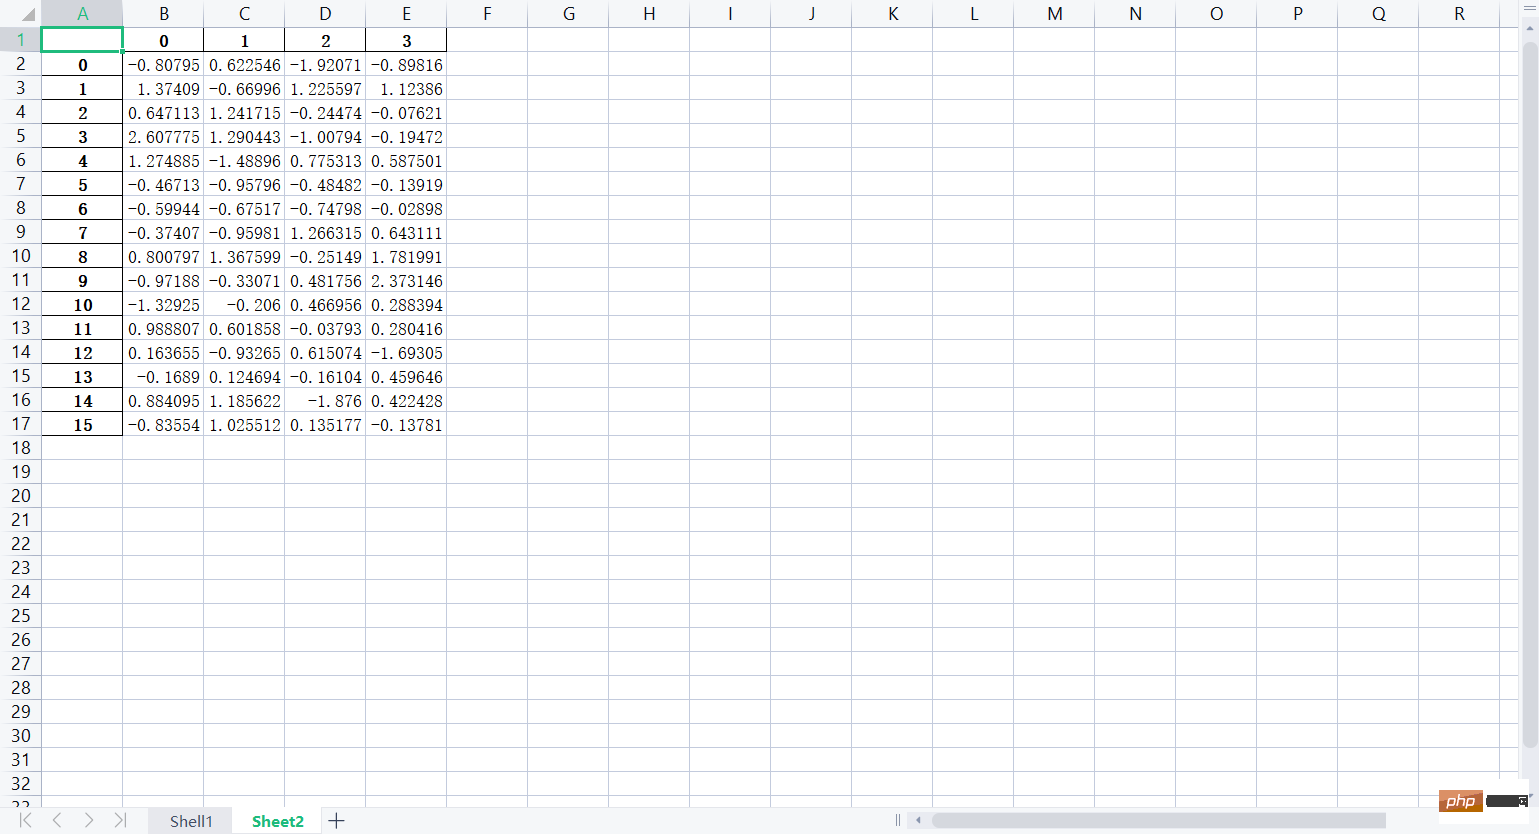
lxw4 = pd.read_excel("培训时间(格式).xlsx", "Sheet2", usecols=range(1, 3))
print(lxw4)# 数据的一些预处理
# DataFrame数据的拆分、合并和分组计算:
import pandas as pd
import numpy as np
lxw5 = pd.DataFrame(np.random.randint(1, 6, (10, 4)), columns=list('ABCD'))
print(lxw5)
lxww = lxw5[:5]     # 获取前五行数据
print(lxww)
lxwy = lxw5[5:]     # 获取第六行以后的数据
print(lxwy)
Das obige ist der detaillierte Inhalt vonPython-Mathematikmodellierung Numpy- und Pandas-Anwendungsbeispielanalyse. Für weitere Informationen folgen Sie bitte anderen verwandten Artikeln auf der PHP chinesischen Website!


