 Web-Frontend
 View.js
 Was ist der Unterschied zwischen der Ausführungsreihenfolge des Lebenszyklus in vue2 und vue3?
Was ist der Unterschied zwischen der Ausführungsreihenfolge des Lebenszyklus in vue2 und vue3?
Der Unterschied in der Ausführungsreihenfolge der Lebenszyklen in vue2 und vue3
Vergleich der Lebenszyklen
Die Ausführungsreihenfolge in vue2
beforeCreate=>created=> ;beforeMount =><code>mounted=>beforeUpdate=>updated=>beforeDestroy=> <code>zerstörtbeforeCreate=>created=>beforeMount=>mounted=>beforeUpdate=>updated=>beforeDestroy=>destroyedvue3中执行顺序
setup=>onBeforeMount=>onMounted=>onBeforeUpdate=>onUpdated=>onBeforeUnmount=>onUnmounted
对应关系
vue2->vue3
beforeCreate->setupcreated->setupbeforeMount->onBeforeMountmounted->onMountedbeforeUpdate->onBeforeUpdateupdated->onUpdatedbeforeDestroy->onBeforeUnmountdestroyed->onUnmounted
其中 vue3中的setup相当于vue2中beforeCreate 与created 但是的执行在beforeCreate 与created之前,所以setup无法使用 data 和 methods 中的数据和方法,即无法操作this,setup中的this等于 undefined,又因为setup中创建的变量与方法最后都要通过return返回出去,所以setup中的程序只能是同步的,而不能是异步,除非return 后面只接受一个异步对象,对象返回setup内定义的变量与方法,然后父组件使用Suspense标签包裹异步组件;
vue3中 如果要使用vue2的beforeDestroy与destroyed需要把名称分别改为beforeUnmount,unmounted
如果vue3中同时使用了vue2的写法,vue3的写法会优先执行;
简单例子说明
父组件App.vue
1 2 3 4 5 6 |
|
1 2 3 4 5 6 7 8 9 10 11 12 13 14 15 16 17 |
|
1 2 3 4 5 6 |
|
子组件child.vue
1 2 3 4 5 6 7 8 9 10 11 12 13 14 15 16 17 18 19 20 21 22 23 24 25 26 27 28 29 30 31 32 33 34 35 36 37 38 39 40 41 42 43 44 45 46 47 48 49 50 51 52 53 54 55 56 57 58 59 60 61 62 63 64 65 66 67 68 69 70 71 72 73 74 75 |
|
运行起来的显示效果
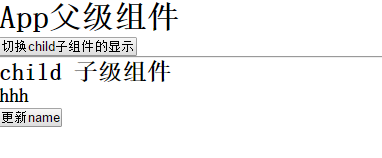
进入页面 按f12 打开调试 刷新页面
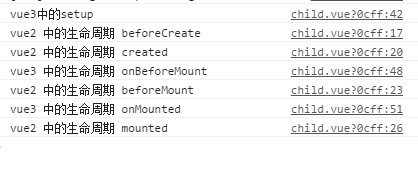
可以看出vue3中
setup执行在beforeCreate与created前面;onBeforeMount执行在beforeMount前面;onMounted执行在mounted前面;
点击 更新name

可以看出vue3中
onBeforeUpdate执行在beforeUpdate前面;onUpdated执行在updated前面;点击 切换child子组件的显示
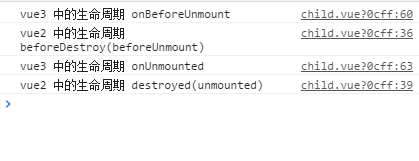
可以看出vue3中
onBeforeUnmount执行在beforeDestroy前面;onUnmounted
setup=>onBeforeMount=>onMounted< /code>=>< code>onBeforeUpdate=>onUpdated=>onBeforeUnmount=> vue2->vue3
< code>beforeCreate->setupcreated->setup< /code></li><li><p></p><code>beforeMount< /code> -> <code>onBeforeMountmontiert->onMountedbeforeUpdate>onBeforeUpdate
aktualisiert -> onUpdated< code>beforeDestroy -> >onBeforeUnmount
destroyed->onUnmount- Das Setup in vue3 entspricht beforeCreate und wurde in vue2 erstellt, aber die Ausführung erfolgt vorher VorherErstellen und erstellen, damit das Setup die Daten und Methoden in Daten und Methoden nicht verwenden kann, das heißt, es kann diese nicht bedienen, dies ist im Setup gleich undefiniert, und weil die im Setup erstellten Variablen und Methoden schließlich sein müssen Wird über die Rückgabe zurückgegeben, sodass das Programm im Setup nur synchron und nicht asynchron sein kann, es sei denn, die Rückgabe akzeptiert nur ein asynchrones Objekt. Das Objekt gibt die im Setup definierten Variablen und Methoden zurück, und dann wird die übergeordnete Komponente mit dem Suspense-Tag umschlossen . Asynchrone Komponente;Wenn Sie beforeDestroy und destroy von vue2 in vue3 verwenden möchten, müssen Sie die Namen in beforeUnmount bzw. unmounten ändern.
- Wenn vue2 auch in vue3 verwendet wird, wird vue3 zuerst ausgeführt;Einfaches Beispiel zur Veranschaulichung: Übergeordnete Komponente App.vue,
1
2
3
4
5
6
7
8
9
10
11
12
13
14
15
16
17
18
19
20
21
22
23
24
25
26
27
28
29
30
31
32
33
34
35
36
37
38
39
40
41
42
43
44
45
46
47
48
49
50
51
52
53
54
55
56
57
58
59
60
61
62
63
64
65
66
67
68
69
70
71
72
73
74
75
76
77
<!DOCTYPE html><html lang="en"><head><meta charset="UTF-8"><meta name="viewport"content="width=device-width, initial-scale=1.0"><meta http-equiv="X-UA-Compatible"content="ie=edge"><title>vue生命周期学习</title><script src="https://cdn.bootcss.com/vue/2.4.2/vue.js"></script></head><body><div id="app"><h2 id="message">{{message}}</h2></div></body><script>varvm =newVue({el: '#app',data: {message: 'Vue的生命周期'},beforeCreate:function() {console.group('------beforeCreate创建前状态------');console.log("%c%s","color:red","el : "+ this.$el);//undefinedconsole.log("%c%s","color:red","data : "+ this.$data);//undefinedconsole.log("%c%s","color:red","message: "+ this.message)},created:function() {console.group('------created创建完毕状态------');console.log("%c%s","color:red","el : "+ this.$el);//undefinedconsole.log("%c%s","color:red","data : "+ this.$data);//已被初始化console.log("%c%s","color:red","message: "+ this.message);//已被初始化},beforeMount:function() {console.group('------beforeMount挂载前状态------');console.log("%c%s","color:red","el : "+ (this.$el));//已被初始化console.log(this.$el);console.log("%c%s","color:red","data : "+ this.$data);//已被初始化console.log("%c%s","color:red","message: "+ this.message);//已被初始化},mounted:function() {console.group('------mounted 挂载结束状态------');console.log("%c%s","color:red","el : "+ this.$el);//已被初始化console.log(this.$el);console.log("%c%s","color:red","data : "+ this.$data);//已被初始化console.log("%c%s","color:red","message: "+ this.message);//已被初始化},beforeUpdate:function() {console.group('beforeUpdate 更新前状态===============》');console.log("%c%s","color:red","el : "+ this.$el.innerHTML);console.log(this.$el);console.log("%c%s","color:red","data : "+ this.$data);console.log("%c%s","color:red","message: "+ this.message);},updated:function() {console.group('updated 更新完成状态===============》');console.log("%c%s","color:red","el : "+ this.$el.innerHTML);console.log(this.$el);console.log("%c%s","color:red","data : "+ this.$data);console.log("%c%s","color:red","message: "+ this.message);},beforeDestroy:function() {console.group('beforeDestroy 销毁前状态===============》');console.log("%c%s","color:red","el : "+ this.$el);console.log(this.$el);console.log("%c%s","color:red","data : "+ this.$data);console.log("%c%s","color:red","message: "+ this.message);},destroyed:function() {console.group('destroyed 销毁完成状态===============》');console.log("%c%s","color:red","el : "+ this.$el);console.log(this.$el);console.log("%c%s","color:red","data : "+ this.$data);console.log("%c%s","color:red","message: "+ this.message)}})</script></html>Nach dem Login kopierenrrreee, untergeordnete Komponente, child.vue 164/168424443537483. png" alt="Was ist der Unterschied zwischen der Ausführungsreihenfolge des Lebenszyklus in vue2 und vue3" />🎜🎜Geben Sie die Seite ein und drücken Sie f12, um die Debugging-Aktualisierungsseite zu öffnen🎜🎜1
2
3
4
5
6
7
<template><divclass="father"><component-Aclass="son_A"></component-A><component-Bclass="son_B"></component-B></div></template>// script部分同上代码,不多写了。Nach dem Login kopierenNach dem Login kopieren 🎜🎜🎜Das können Sie in vue3 sehen 🎜🎜🎜🎜🎜
setupWird vor beforeCreate ausgeführt und erstellt; 🎜🎜🎜🎜onBeforeMountwird vor beforeMount ausgeführt; 🎜🎜🎜🎜onMounted</code > vor montiert ausgeführt; 🎜🎜🎜🎜Klicken Sie, um den Namen zu aktualisieren🎜🎜 <img src="/static/imghw/default1.png" data-src="https://img.php.cn/upload/article/000/000/164/168424443570520.png" class="lazy" alt="Was ist der Unterschied zwischen der Ausführungsreihenfolge des Lebenszyklus in vue2 und vue3" />🎜🎜🎜 Es ist ersichtlich, dass in vue3 🎜🎜🎜🎜🎜<code>onBeforeUpdatevor beforeUpdate ausgeführt wird; 🎜🎜🎜 🎜onUpdatedwird vor „aktualisiert“ ausgeführt. 🎜🎜🎜🎜Klicken Sie, um die Anzeige der untergeordneten Unterkomponente zu wechseln 🎜🎜🎜🎜 🎜🎜🎜Es ist ersichtlich, dass in vue3 🎜🎜🎜🎜🎜
onBeforeUnmountwird vor dem Zerstören ausgeführt. 🎜🎜🎜🎜 Die Vue-Instanz durchläuft eine Reihe von Initialisierungsprozessen (den Prozess von der Erstellung bis zur Zerstörung der Vue-Instanz). Dieser Prozess ist der Lebenszyklus von Vue. 🎜🎜Vue bietet Entwicklern eine Reihe von Rückruffunktionen, die uns das Hinzufügen benutzerdefinierter Logik erleichtern. Der Lebenszyklus von Vue reicht von der Erstellung bis zur Zerstörung und der Aktualisierung wichtiger Knotendaten. 🎜🎜🎜🎜Erstellungsphase vorErstellen, erstellt🎜🎜🎜🎜Mount-Rendering-Seitenphase vorMount, gemountet🎜🎜🎜🎜Update-Phase vorUpdate, aktualisiert🎜🎜🎜🎜Deinstallationsphase vorDestory, zerstört🎜🎜🎜🎜1, Lebenszyklus einer Single Seite Sequenz 🎜🎜 Präsentieren Sie eine Codewelle, um die Ausführungssequenz jeder Cycle-Hook-Funktion zu sehen: 🎜rrreee🎜🎜 (1) Erstellungsphase: Ereignisse initialisieren und Daten beobachten 🎜🎜🎜🎜🎜new Vue({}) Erstellen Sie ein leeres Instanzobjekt , es gibt nur Lebenszyklusfunktionen und einige Standardereignisse für dieses Objekt🎜🎜🎜🎜In beforeCreate werden weder $el noch Daten initialisiert🎜🎜🎜🎜created wird ausgeführt, die Initialisierung der Daten ist abgeschlossen und die Vorlage wird in Rendering konvertiert Funktion (Rendern) können Sie einen virtuellen Knotenbaum (im Speicher) erhalten, indem Sie die Renderfunktion ausführen🎜 如果有模板文件,则编译成渲染函数;如果没有,则使用外部 HTML 作为模板进行渲染。综合排名优先级:render函数选项 > template选项 > outer HTML.
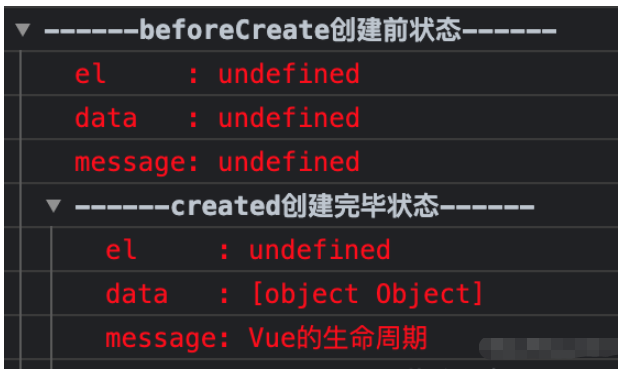
(2)挂载阶段
为vue实例添加$el成员,替换挂载的DOM成员
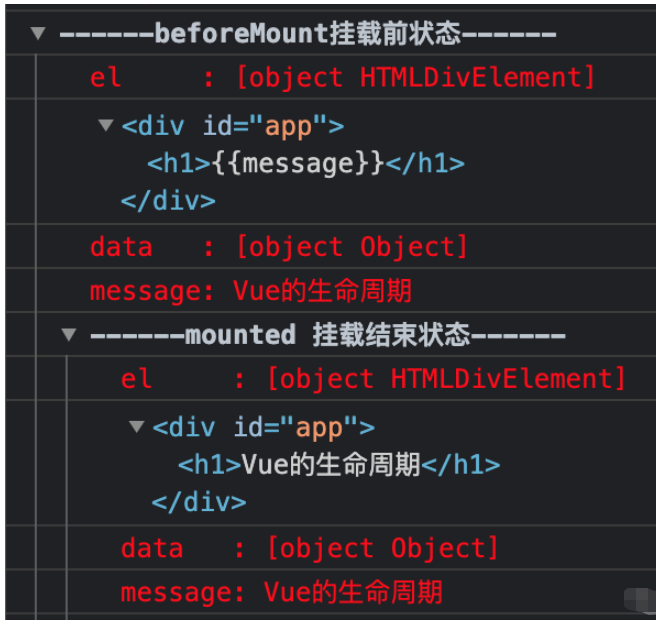
其中在beforeMount时,初始化el和data,但el和data,但el和data,但el还是使用{{message}}进行占位
mounted执行时,将message的值进行渲染
(3)更新阶段:触发对应组件的重新渲染
data 被改变时触发生命周期函数 beforeUpdate 执行,data是最新的,页面还未更新(旧的页面)
根据最新的 data 重新渲染虚拟 DOM,并挂载到页面上,完成 Model 到 View 的更新
updated 执行,此时 data 和页面都是最新的

(4)销毁阶段
beforeDestroy钩子函数在实例销毁之前调用。在这一步,实例仍然完全可用。
destroyed钩子函数在Vue 实例销毁后调用。一旦调用,Vue 实例所绑定的所有内容都将被解绑,包括事件监听器,同时所有子实例都将被销毁。
2、父子、兄弟组件的生命周期顺序
1 2 3 4 5 6 7 |
|
主要可以从以下几种情况分析:
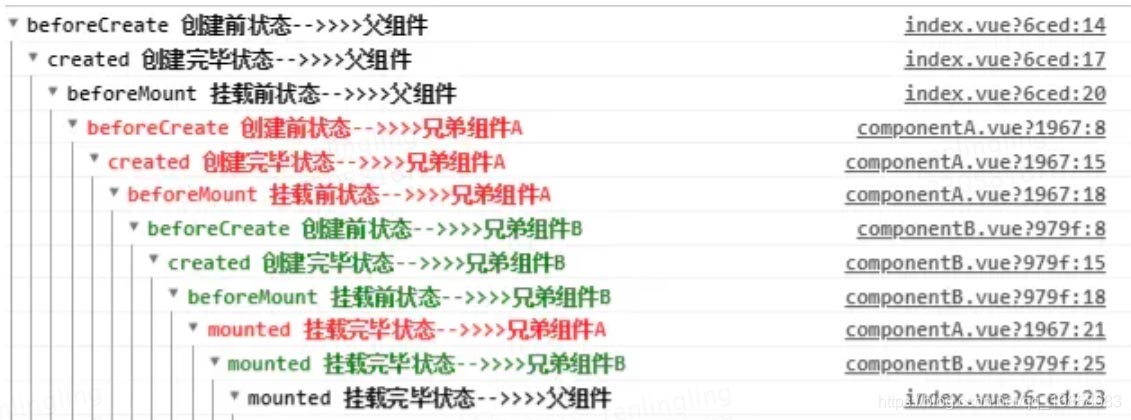
(1)创建过程:
父beforeCreate->父created->父beforeMount->子beforeCreate->子created->子beforeMount->子mounted->父mounted
(2)组件的内部更新:
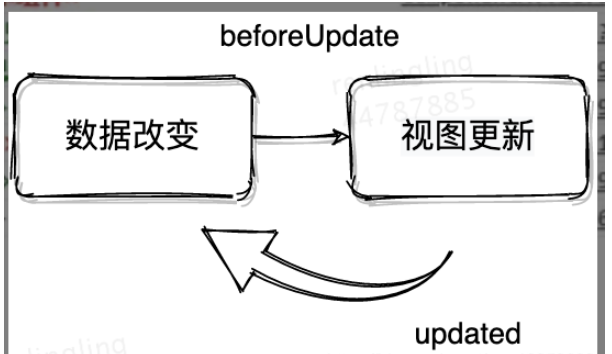
子组件的内部更新过程是:子beforeUpdate->子updated
同理父组件的内部更新过程也是:父beforeUpdate->父updated
(3)组件之间的更新:
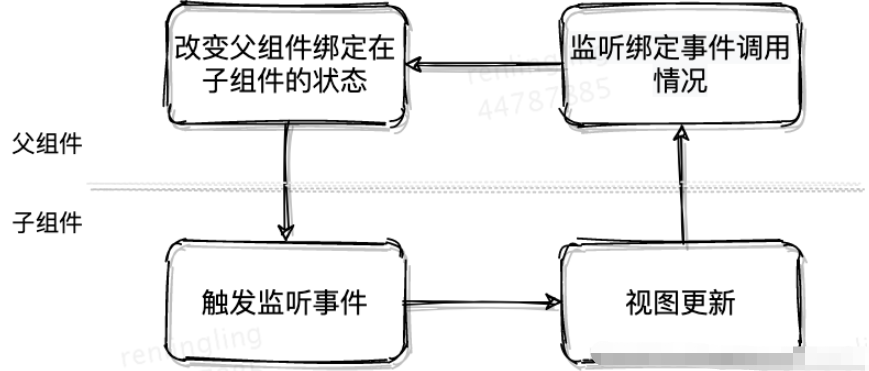
当子组件使用emit修改父组件状态时,刚好这个状态又绑定在子组件的props上,更新过程是:父beforeUpdate->子beforeUpdate->子updated->父updated
(4)父子组件销毁:
父组件被销毁时子组件也同时被销毁,销毁的钩子过程是:父beforeDestroy->子beforeDestroy->子destroyed->父destroyed

父子组件完整的生命周期图如下所示:
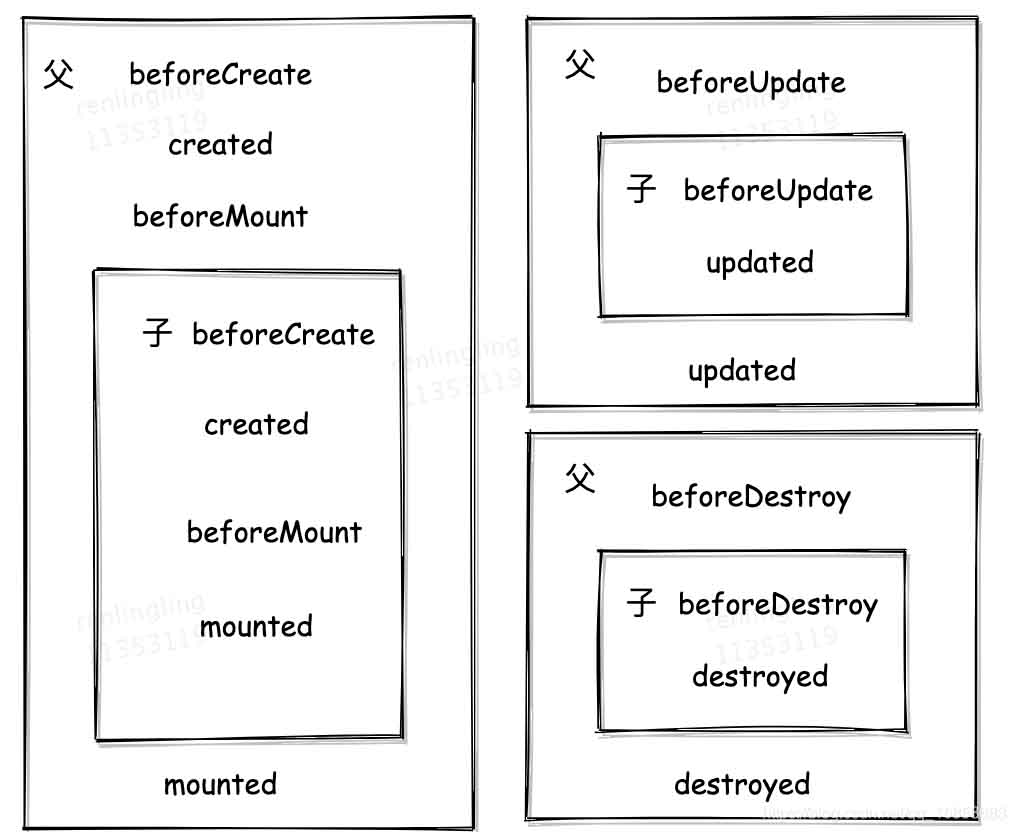
从上图可以看出,在父兄子组件挂载前,各组件的实例已经初始化完成。
子组件挂载完成后,父组件还未挂载。因此,在父组件的mounted钩子中获取API数据时,子组件的mounted钩子无法获取到该数据。
仔细看看父子组件生命周期钩子的执行顺序,会发现created这个钩子是按照从外内顺序执行,所以回显场景的解决方案是:在created中发起请求获取数据,依次在子组件的created中会接收到这个数据。
无论嵌套多少层,Vue父子组件的生命周期钩子执行顺序都是从外到内再从内到外。
3、不同页面跳转时各页面生命周期的执行顺序
跳转不同页面和part2是相同的原理,从第一个页面(index)跳转到下一个页面(secondIndex)时,回先初始化secondIndex,之后在执行index页面的销毁阶段,最后secondIndex挂载完成.
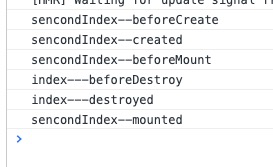
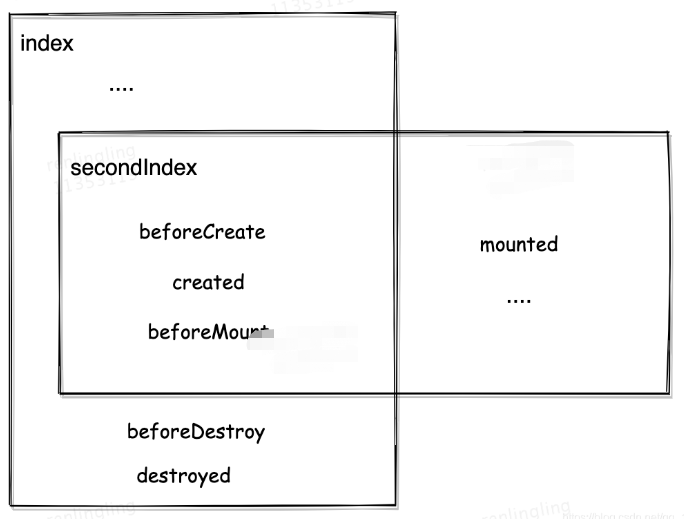
Das obige ist der detaillierte Inhalt vonWas ist der Unterschied zwischen der Ausführungsreihenfolge des Lebenszyklus in vue2 und vue3?. Für weitere Informationen folgen Sie bitte anderen verwandten Artikeln auf der PHP chinesischen Website!

Heiße KI -Werkzeuge

Undresser.AI Undress
KI-gestützte App zum Erstellen realistischer Aktfotos

AI Clothes Remover
Online-KI-Tool zum Entfernen von Kleidung aus Fotos.

Undress AI Tool
Ausziehbilder kostenlos

Clothoff.io
KI-Kleiderentferner

Video Face Swap
Tauschen Sie Gesichter in jedem Video mühelos mit unserem völlig kostenlosen KI-Gesichtstausch-Tool aus!

Heißer Artikel

Heiße Werkzeuge

Notepad++7.3.1
Einfach zu bedienender und kostenloser Code-Editor

SublimeText3 chinesische Version
Chinesische Version, sehr einfach zu bedienen

Senden Sie Studio 13.0.1
Leistungsstarke integrierte PHP-Entwicklungsumgebung

Dreamweaver CS6
Visuelle Webentwicklungstools

SublimeText3 Mac-Version
Codebearbeitungssoftware auf Gottesniveau (SublimeText3)

Heiße Themen
 So verwenden Sie tinymce im Vue3-Projekt
May 19, 2023 pm 08:40 PM
tinymce ist ein voll funktionsfähiges Rich-Text-Editor-Plug-in, aber die Einführung von tinymce in Vue ist nicht so reibungslos wie bei anderen Vue-Rich-Text-Plug-ins. Tinymce selbst ist nicht für Vue geeignet, und @tinymce/tinymce-vue muss eingeführt werden. und Es handelt sich um ein ausländisches Rich-Text-Plug-in, das die chinesische Version nicht bestanden hat. Sie müssen das Übersetzungspaket von der offiziellen Website herunterladen (möglicherweise müssen Sie die Firewall umgehen). 1. Installieren Sie die zugehörigen Abhängigkeiten npminstalltinymce-Snpminstall@tinymce/tinymce-vue-S2. 3. Führen Sie den Skin und das chinesische Paket ein. Erstellen Sie einen neuen Tinymce-Ordner im öffentlichen Ordner des Projekts und laden Sie ihn herunter
 vue3+vite: So beheben Sie den Fehler bei der Verwendung von require zum dynamischen Importieren von Bildern in src
May 21, 2023 pm 03:16 PM
vue3+vite:src verwendet „require“, um Bilder dynamisch zu importieren, und vue3+vite importiert dynamisch mehrere Bilder. Wenn Sie „requireisnotdefined“ verwenden, wird eine Fehlermeldung angezeigt like vue2 like imgUrl:require(' .../assets/test.png') wird importiert, da Typescript Require nicht unterstützt, daher wird Import verwendet. So lösen Sie das Problem: Verwenden Sieawaitimport
 So aktualisieren Sie einen Teilinhalt der Seite in Vue3
May 26, 2023 pm 05:31 PM
Um eine teilweise Aktualisierung der Seite zu erreichen, müssen wir nur das erneute Rendern der lokalen Komponente (dom) implementieren. In Vue lässt sich dieser Effekt am einfachsten mit der v-if-Direktive erzielen. In Vue2 können wir zusätzlich zur Verwendung der v-if-Anweisung zum erneuten Rendern des lokalen Doms auch eine neue leere Komponente erstellen. Wenn wir die lokale Seite aktualisieren müssen, springen wir zu dieser leeren Komponentenseite und springen dann wieder hinein der beforeRouteEnter-Schutz in der leeren Komponente. Wie in der Abbildung unten gezeigt, wie man in Vue3.X auf die Schaltfläche „Aktualisieren“ klickt, um das DOM im roten Feld neu zu laden und den entsprechenden Ladestatus anzuzeigen. Da der Guard in der Komponente in der scriptsetup-Syntax in Vue3.X nur o hat
 Wie Vue3 Markdown analysiert und Code-Hervorhebung implementiert
May 20, 2023 pm 04:16 PM
Um das Blog-Frontend mit Vue zu implementieren, müssen Sie die Markdown-Analyse implementieren. Wenn Code vorhanden ist, müssen Sie die Code-Hervorhebung implementieren. Es gibt viele Markdown-Parsing-Bibliotheken für Vue, wie z. B. markdown-it, vue-markdown-loader, markiert, vue-markdown usw. Diese Bibliotheken sind alle sehr ähnlich. Hier wird Markiert verwendet, und highlights.js wird als Code-Hervorhebungsbibliothek verwendet. Die spezifischen Implementierungsschritte lauten wie folgt: 1. Installieren Sie abhängige Bibliotheken. Öffnen Sie das Befehlsfenster unter dem Vue-Projekt und geben Sie den folgenden Befehl ein: npminstallmarked-save//marked, um Markdown in htmlnpmins zu konvertieren
 So verwenden Sie vue3+ts+axios+pinia, um eine sinnlose Aktualisierung zu erreichen
May 25, 2023 pm 03:37 PM
vue3+ts+axios+pinia realisiert sinnlose Aktualisierung 1. Laden Sie zuerst aiXos und pinianpmipinia im Projekt herunter--savenpminstallaxios--save2. AxiosResponse}from"axios";importaxiosfrom'axios';import{ElMess
 So verwenden Sie wiederverwendbare Vue3-Komponenten
May 20, 2023 pm 07:25 PM
Vorwort Ob Vue oder React: Wenn wir auf mehrere wiederholte Codes stoßen, werden wir darüber nachdenken, wie wir diese Codes wiederverwenden können, anstatt eine Datei mit einer Reihe redundanter Codes zu füllen. Tatsächlich können sowohl Vue als auch React eine Wiederverwendung durch Extrahieren von Komponenten erreichen. Wenn Sie jedoch auf einige kleine Codefragmente stoßen und keine andere Datei extrahieren möchten, kann React im Vergleich dazu verwendet werden Deklarieren Sie das entsprechende Widget in der Datei , oder implementieren Sie es über die Renderfunktion, wie zum Beispiel: constDemo:FC=({msg})=>{returndemomsgis{msg}}constApp:FC=()=>{return(
 So wählen Sie einen Avatar aus und schneiden ihn in Vue3 zu
May 29, 2023 am 10:22 AM
Der letzte Effekt besteht darin, die VueCropper-Komponente „garnaddvue-cropper@next“ zu installieren. Wenn es sich um Vue3 handelt oder Sie andere Methoden als Referenz verwenden möchten, besuchen Sie bitte die offizielle npm-Adresse. Es ist auch sehr einfach, es in einer Komponente zu referenzieren und zu verwenden. Sie müssen nur die entsprechende Komponente und ihre Stildatei einführen. Ich verweise hier nicht global, sondern nur auf import{userInfoByRequest}from'../js/api ' in meiner Komponentendatei. import{VueCropper}from'vue-cropper&
 So lösen Sie das Problem, dass die Zugriffsseite leer angezeigt wird, nachdem das vue3-Projekt gepackt und auf dem Server veröffentlicht wurde
May 17, 2023 am 08:19 AM
Nachdem das vue3-Projekt gepackt und auf dem Server veröffentlicht wurde, wird auf der Zugriffsseite eine leere 1 angezeigt. Der publicPath in der Datei vue.config.js wird wie folgt verarbeitet: const{defineConfig}=require('@vue/cli-service') module.exports=defineConfig({publicPath :process.env.NODE_ENV==='produktion'?'./':'/&


