 Betrieb und Instandhaltung
 Nginx
Nginx
 So verbieten Sie bestimmten IPs und ausländischen IPs den Zugriff auf die Website basierend auf Nginx
So verbieten Sie bestimmten IPs und ausländischen IPs den Zugriff auf die Website basierend auf Nginx
Verwenden Sie Nginx, um den Zugriff bestimmter IPs und ausländischer IPs auf meine Website zu verhindern.
Es gibt viele Möglichkeiten, diese Funktion zu implementieren. Jetzt werde ich das auf Nginx basierende Modul ngx_http_geoip2 vorstellen, um den Zugriff ausländischer IPs auf die Website zu verhindern.
①Geoip2-Erweiterungsabhängigkeiten installieren:
[root@fxkj ~]# yum install libmaxminddb-devel -y
②Laden Sie das ngx_http_geoip2_module-Modul herunter:
[root@fxkj tmp]#  git clone https://github.com/leev/ngx_http_geoip2_module.git
[ro tmp]#
③Extrahieren Sie das Modul in den angegebenen Pfad
Ich entpacke es in das /usr/local-Verzeichnis:
[root@fxkj tmp]# mv ngx_http_geoip2_module/ /usr/local/
[root@fxkj local]# ll ngx_http_geoip2_module/
total 60
-rw-r--r-- 1 root root  1199 Aug 13 17:20 config
-rw-r--r-- 1 root root  1311 Aug 13 17:20 LICENSE
-rw-r--r-- 1 root root 23525 Aug 13 17:20 ngx_http_geoip2_module.c
-rw-r--r-- 1 root root 21029 Aug 13 17:20 ngx_stream_geoip2_module.c
-rw-r--r-- 1 root root  3640 Aug 13 17:20 README.md
④Installieren Sie das. nginx Modul
Zuallererst Down-Umgebung, meine Nginx-Version ist 1.16. Ich habe online überprüft, dass für die Installation des ngx_http_geoip2-Moduls mindestens Version 1.18 und höher erforderlich ist. Daher habe ich für diese Installation ein Upgrade von nginx1.18 durchgeführt und das ngx_http_geoip2-Modul hinzugefügt.
Nginx 1.18-Version herunterladen:
[root@fxkj ~]# yum install libmaxminddb-devel -y
Entpacken Sie das Nginx1.18-Paket, aktualisieren Sie auf Nginx1.18 und fügen Sie das Modul ngx_http_geoip2 hinzu.
Hinweis:
Um Nginx zu aktualisieren und Module hinzuzufügen, müssen Sie nur den Make-Vorgang kompilieren und dann ausführen. Wenn Sie make install ausführen, ersetzt die neue Version von Nginx das Online-Nginx vollständig.
Vor dem Kompilieren müssen Sie überprüfen, welche Module derzeit in Nginx installiert sind.
[root@fxkj tmp]# /usr/local/nginx/sbin/nginx -V
nginx version: nginx/1.16.0
built by gcc 4.8.5 20150623 (Red Hat 4.8.5-39) (GCC)
built with OpenSSL 1.0.2k-fips 26 Jan 2017
TLS SNI support enabled
configure arguments: –with-http_stub_status_module –prefix=/usr/local/nginx –user=nginx –group=nginx –with-http_ssl_module –with-stream
Kompilieren und installieren:
[root@fxkj tmp]# tar -xf nginx-1.18.0.tar.gz
[root@fxkj tmp]# cd nginx-1.18.0/
[root@fxkj nginx-1.18.0]# ./configure --with-http_stub_status_module \
 --prefix=/usr/local/nginx \
 --user=nginx --group=nginx --with-http_ssl_module --with-stream \
 --add-module=/usr/local/ngx_http_geoip2_module
[root@fxkj nginx-1.18.0]# make
[root@fxkj nginx-1.18.0]# cp /usr/loca/nginx/sbin/nginx /usr/loca/nginx/sbin/nginx1.16    #备份
[root@fxkj nginx-1.18.0]# cp objs/nginx /usr/local/nginx/sbin/    #用新的去覆盖旧的
[root@fxkj nginx-1.18.0]# pkill nginx     #杀死nginx
[root@fxkj nginx-1.18.0]# /usr/local/nginx/sbin/nginx    #再次启动Nginx
Überprüfen Sie die Nginx-Version und die installierten Module:
[root@fxkj nginx-1.18.0]# /usr/local/nginx/sbin/nginx -V
nginx version: nginx/1.18.0
built by gcc 4.8.5 20150623 (Red Hat 4.8.5-39) (GCC)
built with OpenSSL 1.0.2k-fips 26 Jan 2017
TLS SNI support enabled
configure arguments: –with-http_stub_status_module –prefix=/usr/local/nginx –user=nginx –group=nginx –with-http_ssl_module –with-stream –add-module=/usr/local/ngx_http_geoip2_module
⑤Laden Sie die neueste IP-Adressdatenbankdatei herunter
Nach erfolgreicher Installation des Moduls müssen Sie auch die Datenbank in Nginx angeben und installieren Laufzeitbibliothek Zwei sind standardmäßig installiert und befinden sich im Verzeichnis /usr/share/GeoIP/, eine verfügt nur über IPv4 und die andere umfasst IPv4 und IPv6.
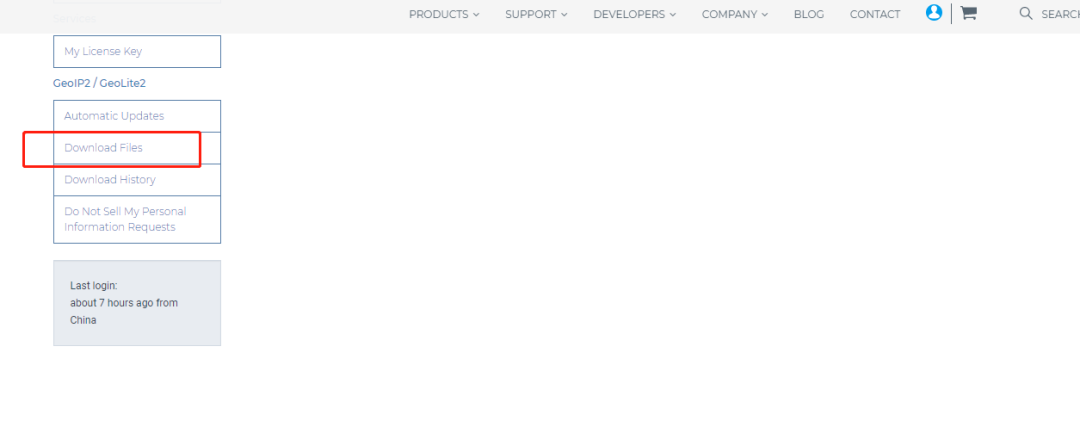
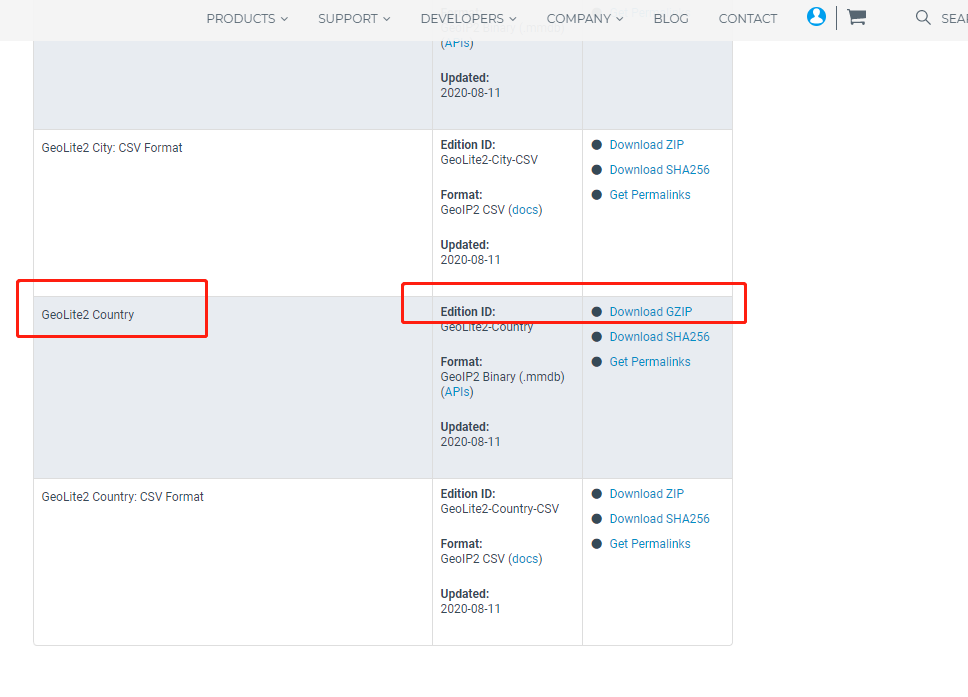
Betreten Sie die Website www.maxmind.com, registrieren Sie ein Konto und laden Sie die neuesten Bibliotheksdateien herunter. Klicken Sie links auf Dateien herunterladen, überspringen Sie die Schritte zur Kontoerstellung. Wählen Sie das GeoLite2-Land aus und klicken Sie auf GZIP herunterladen, um Folgendes herunterzuladen:

Nach /usr/share/GeoIP/ hochladen und entpacken:
[root@fxkj local]# cd /usr/share/GeoIP/
[root@fxkj GeoIP]# ll
total 69612
lrwxrwxrwx. 1 root root       17 Mar  7  2019 GeoIP.dat -> GeoIP-initial.dat
-rw-r--r--. 1 root root  1242574 Oct 30  2018 GeoIP-initial.dat
lrwxrwxrwx. 1 root root       19 Mar  7  2019 GeoIPv6.dat -> GeoIPv6-initial.dat
-rw-r--r--. 1 root root  2322773 Oct 30  2018 GeoIPv6-initial.dat
-rw-r--r--  1 root root  3981623 Aug 12 02:37 GeoLite2-Country.mmdb
⑥Konfiguration Nginx-Konfiguration file
[root@fxkj ~]# cp /usr/local/nginx/conf/nginx.conf /usr/local/nginx/conf/nginx.conf-bak
[root@fxkj ~]# vim /usr/local/nginx/conf/nginx.conf
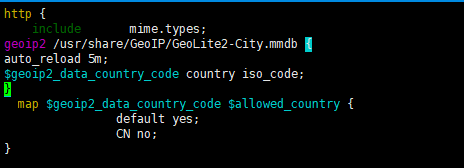
geoip2 /usr/share/GeoIP/GeoLite2-City.mmdb {
auto_reload 5m;
$geoip2_data_country_code country iso_code;
}
  map $geoip2_data_country_code $allowed_country {
                default yes;
                CN no;
} Überprüfen Sie nach der Änderung die Konfigurationsdatei und laden Sie Nginx neu:
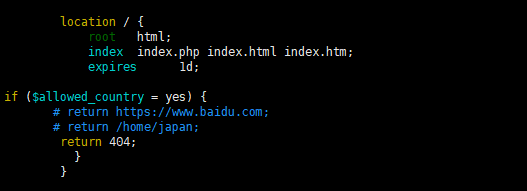
 if ($allowed_country = yes) {
# return https://www.baidu.com;
# return /home/japan;
return 404;
} Verwenden Sie den Server des ausländischen Knotens, um Greifen Sie auf die Website zu, hier kommt meine IP aus Südkorea:

[root@fxkj ~]# /usr/local/nginx/sbin/nginx -t
nginx: the configuration file /usr/local/nginx/conf/nginx.conf syntax is ok
nginx: configuration file /usr/local/nginx/conf/nginx.conf test is successful
[roo@fxkj ~]# /usr/local/nginx/sbin/nginx -s reload

Das obige ist der detaillierte Inhalt vonSo verbieten Sie bestimmten IPs und ausländischen IPs den Zugriff auf die Website basierend auf Nginx. Für weitere Informationen folgen Sie bitte anderen verwandten Artikeln auf der PHP chinesischen Website!

Heiße KI -Werkzeuge

Undresser.AI Undress
KI-gestützte App zum Erstellen realistischer Aktfotos

AI Clothes Remover
Online-KI-Tool zum Entfernen von Kleidung aus Fotos.

Undress AI Tool
Ausziehbilder kostenlos

Clothoff.io
KI-Kleiderentferner

AI Hentai Generator
Erstellen Sie kostenlos Ai Hentai.

Heißer Artikel

Heiße Werkzeuge

Notepad++7.3.1
Einfach zu bedienender und kostenloser Code-Editor

SublimeText3 chinesische Version
Chinesische Version, sehr einfach zu bedienen

Senden Sie Studio 13.0.1
Leistungsstarke integrierte PHP-Entwicklungsumgebung

Dreamweaver CS6
Visuelle Webentwicklungstools

SublimeText3 Mac-Version
Codebearbeitungssoftware auf Gottesniveau (SublimeText3)

Heiße Themen
 1371
1371
 52
52
 So erlauben Sie den externen Netzwerkzugriff auf den Tomcat-Server
Apr 21, 2024 am 07:22 AM
Um dem Tomcat-Server den Zugriff auf das externe Netzwerk zu ermöglichen, müssen Sie Folgendes tun: Ändern Sie die Tomcat-Konfigurationsdatei, um externe Verbindungen zuzulassen. Fügen Sie eine Firewallregel hinzu, um den Zugriff auf den Tomcat-Server-Port zu ermöglichen. Erstellen Sie einen DNS-Eintrag, der den Domänennamen auf die öffentliche IP des Tomcat-Servers verweist. Optional: Verwenden Sie einen Reverse-Proxy, um Sicherheit und Leistung zu verbessern. Optional: Richten Sie HTTPS für mehr Sicherheit ein.
 So führen Sie thinkphp aus
Apr 09, 2024 pm 05:39 PM
Schritte zum lokalen Ausführen von ThinkPHP Framework: Laden Sie ThinkPHP Framework herunter und entpacken Sie es in ein lokales Verzeichnis. Erstellen Sie einen virtuellen Host (optional), der auf das ThinkPHP-Stammverzeichnis verweist. Konfigurieren Sie Datenbankverbindungsparameter. Starten Sie den Webserver. Initialisieren Sie die ThinkPHP-Anwendung. Greifen Sie auf die URL der ThinkPHP-Anwendung zu und führen Sie sie aus.
 Willkommen bei Nginx! Wie kann ich es lösen?
Apr 17, 2024 am 05:12 AM
Um den Fehler „Willkommen bei Nginx!“ zu beheben, müssen Sie die Konfiguration des virtuellen Hosts überprüfen, den virtuellen Host aktivieren, Nginx neu laden. Wenn die Konfigurationsdatei des virtuellen Hosts nicht gefunden werden kann, erstellen Sie eine Standardseite und laden Sie Nginx neu. Anschließend wird die Fehlermeldung angezeigt verschwindet und die Website wird normal angezeigt.
 So kommunizieren Sie zwischen Docker-Containern
Apr 07, 2024 pm 06:24 PM
In der Docker-Umgebung gibt es fünf Methoden für die Containerkommunikation: freigegebenes Netzwerk, Docker Compose, Netzwerk-Proxy, freigegebenes Volume und Nachrichtenwarteschlange. Wählen Sie abhängig von Ihren Isolations- und Sicherheitsanforderungen die am besten geeignete Kommunikationsmethode, z. B. die Nutzung von Docker Compose zur Vereinfachung von Verbindungen oder die Verwendung eines Netzwerk-Proxys zur Erhöhung der Isolation.
 So stellen Sie das NodeJS-Projekt auf dem Server bereit
Apr 21, 2024 am 04:40 AM
Serverbereitstellungsschritte für ein Node.js-Projekt: Bereiten Sie die Bereitstellungsumgebung vor: Erhalten Sie Serverzugriff, installieren Sie Node.js, richten Sie ein Git-Repository ein. Erstellen Sie die Anwendung: Verwenden Sie npm run build, um bereitstellbaren Code und Abhängigkeiten zu generieren. Code auf den Server hochladen: über Git oder File Transfer Protocol. Abhängigkeiten installieren: Stellen Sie eine SSH-Verbindung zum Server her und installieren Sie Anwendungsabhängigkeiten mit npm install. Starten Sie die Anwendung: Verwenden Sie einen Befehl wie node index.js, um die Anwendung zu starten, oder verwenden Sie einen Prozessmanager wie pm2. Konfigurieren Sie einen Reverse-Proxy (optional): Verwenden Sie einen Reverse-Proxy wie Nginx oder Apache, um den Datenverkehr an Ihre Anwendung weiterzuleiten
 So generieren Sie eine URL aus einer HTML-Datei
Apr 21, 2024 pm 12:57 PM
Für die Konvertierung einer HTML-Datei in eine URL ist ein Webserver erforderlich. Dazu sind die folgenden Schritte erforderlich: Besorgen Sie sich einen Webserver. Richten Sie einen Webserver ein. Laden Sie eine HTML-Datei hoch. Erstellen Sie einen Domainnamen. Leiten Sie die Anfrage weiter.
 Was sind die häufigsten Anweisungen in einer Docker-Datei?
Apr 07, 2024 pm 07:21 PM
Die am häufigsten verwendeten Anweisungen in Dockerfile sind: FROM: Neues Image erstellen oder neues Image ableiten RUN: Befehle ausführen (Software installieren, System konfigurieren) COPY: Lokale Dateien in das Image kopieren ADD: Ähnlich wie COPY kann es automatisch dekomprimiert werden tar-Archive oder URL-Dateien abrufen CMD: Geben Sie den Befehl an, wenn der Container gestartet wird. EXPOSE: Deklarieren Sie den Container-Überwachungsport (aber nicht öffentlich). ENV: Legen Sie die Umgebungsvariable fest. VOLUME: Mounten Sie das Hostverzeichnis oder das anonyme Volume. WORKDIR: Legen Sie das Arbeitsverzeichnis im fest Container ENTRYPOINT: Geben Sie an, was beim Start des Containers ausgeführt werden soll. Ausführbare Datei (ähnlich wie CMD, kann aber nicht überschrieben werden)
 Kann von außen auf Nodejs zugegriffen werden?
Apr 21, 2024 am 04:43 AM
Ja, auf Node.js kann von außen zugegriffen werden. Sie können die folgenden Methoden verwenden: Verwenden Sie Cloud Functions, um die Funktion bereitzustellen und öffentlich zugänglich zu machen. Verwenden Sie das Express-Framework, um Routen zu erstellen und Endpunkte zu definieren. Verwenden Sie Nginx, um Proxy-Anfragen an Node.js-Anwendungen umzukehren. Verwenden Sie Docker-Container, um Node.js-Anwendungen auszuführen und sie über Port-Mapping verfügbar zu machen.


