So nutzen Sie die Funktionen von Python folium
1. Rendering
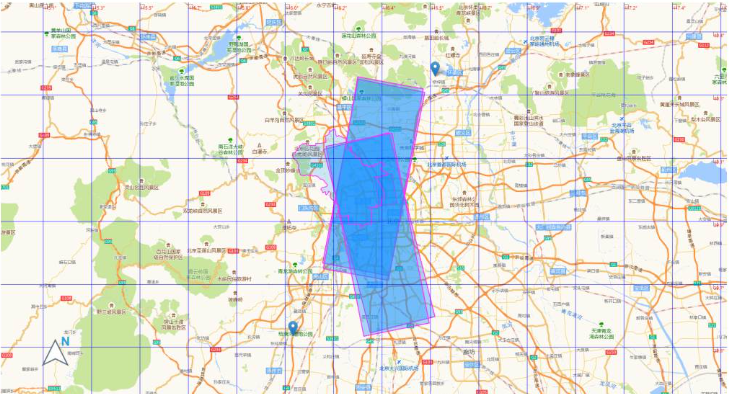
2. Ebenenkontrolle
Der Folium-Beamte stellt uns auch einige klarere Methoden zur Verfügung. Genau wie die Ebenensteuerung. Der offizielle Methodenname lautet FeatureGroup, und die Importmethode stammt von folium import FeatureGroup oder folium.FeatureGroup(). Ich gehe hier nicht näher auf die konkreten Prinzipien ein, sondern schaue mir hauptsächlich die Beispiele an:
import folium
def map2png(map_data,out_file='pdf.png'):
# 1.直接构造,默认底图
mo = folium.Map(location=[0, 0])
# 2.图层1-高德底图+数据
fg = folium.FeatureGroup()
# 2.1 高德地图
fg.add_child(folium.TileLayer(
tiles='http://webrd02.is.autonavi.com/appmaptile?lang=zh_cn&size=1&scale=1&style=8&x={x}&y={y}&z={z}',
attr="© <a href=http://ditu.amap.com/>高德地图</a>",
min_zoom=0,
max_zoom=19,
control=True,
zoom_control=False,
show=True))
# 2.2添加一个点
fg.add_child(folium.Marker(
location=[45.3311, -121.7113],
popup="Timberline Lodge",
icon=folium.Icon(color="green")))
# 2.3添加一个线形
fg.add_child(folium.PolyLine(
locations=[[38.68,115.67],
[38.85,115.48],
[38.65,115.37],
[38.68,115.67]],
color='green', weight=2, opacity=1))
# 2.4添加一个面
fg.add_child(folium.Polygon(
locations=[[38.68,115.67],
[38.85,115.48],
[38.65,115.37],
[38.68,115.67]],
color='green', weight=2,
fill=True,fill_color = 'red'))
# 2.5将我们的图层加入map
mo.add_child(fg)
# 3.图层2-重点数据+最上层
fg2 = folium.FeatureGroup()
fg2.add_child(folium.Polygon(
locations=[[38.68,115.67],
[38.85,115.48],
[38.65,115.37],
[38.68,115.67]],
color='green', weight=2,
fill=True,fill_color = 'red'))
mo.add_child(fg2)
# 4.将图层fg2显示在最上层,keep_in_front的参数必须是FeatureGroup或TileLayer对象
mo.keep_in_front(fg2)
# 5.根据范围缩放地图
mo.fit_bounds([[38.68,115.67],
[38.85,115.48],
[38.65,115.37],
[38.68,115.67]])
root = mo.get_root()
html = root.render() # 这个拿到的就是一个html的内容
# mo.save('text.html')3. Nordpfeil
Die Nordpfeilfunktion ist für die Karte nicht unbedingt notwendig, aber es ist immer gut, sie hinzuzufügen. Durch die Verwendung von FloatImage kann diese Funktion erreicht werden, obwohl der relevante Inhalt in der offiziellen Dokumentation und Quellcode-Analyse nicht erwähnt wird. Die offizielle Dokumentation enthält viele Plug-Ins. Das am weitesten verbreitete Plug-In ist die HeatMap-Methode namens Heatmap.
Die FloatImage-Methode implementiert die Platzierung eines Bildes auf dem Bildschirm und die Angabe der Größe des Bildes und der Position auf dem Bildschirm. Die Parameter sind Ganzzahlen (die FloatImage-Methode implementiert die prozentuale Konvertierung). Basierend auf dem zweiten Code haben wir das Bild in der unteren linken Ecke hinzugefügt.
fg.add_child(FloatImage(os.path.join(base, 'map_png', 'image', 'compass.png'), left=5, bottom=10, width=5))
4. JS und CSS zu Folium hinzufügen
folium bietet offiziell keine relevanten Methoden zum Hinzufügen von JS und CSS. Sie sollten auf der Grundlage der Interpretation des Quellcodes extrahiert werden . Fügen Sie js und css hinzu, um relevante Anweisungen zu erhalten.
Aus dem Quellcode ist ersichtlich, dass die Kartenfunktion in Folium über Jinjia2 implementiert wird, um HTML für Daten und Karten zu laden.
Es gibt drei Hauptmethoden zum Hinzufügen von Daten und Karten, die im Quellcode verwendet werden. Diese Methoden weisen Mängel auf (können nur vorne hinzugefügt werden). Wenn sie keine Operationen an Kartenobjekten beinhalten, können diese drei Methoden die Anforderungen erfüllen.
1.header fügt js und css hinzu
    init_script = """
        var mapsPlaceholder = [];
        L.Map.addInitHook(function () {mapsPlaceholder.push(this);});
    """
    # 加在header最上边
    mo.get_root().header.add_child(folium.Element(init_script))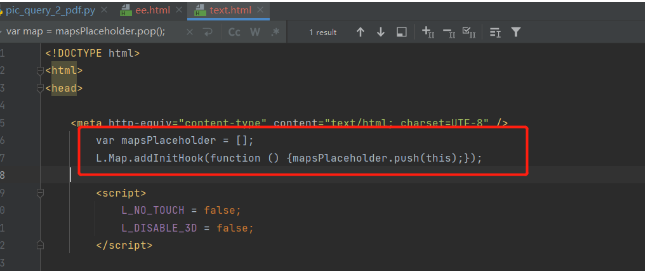
2.body fügt js und css hinzu
    init_script = """
        var mapsPlaceholder = [];
        L.Map.addInitHook(function () {mapsPlaceholder.push(this);});
    """
    # 加在body中
    mo.get_root().html.add_child(folium.Element(init_script))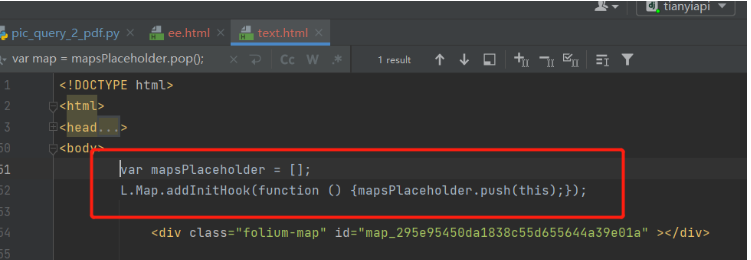
3.script fügt js und css hinzu
    init_script = """
        var mapsPlaceholder = [];
        L.Map.addInitHook(function () {mapsPlaceholder.push(this);});
    """
    # 加在script中
    mo.get_root().script.add_child(folium.Element(init_script))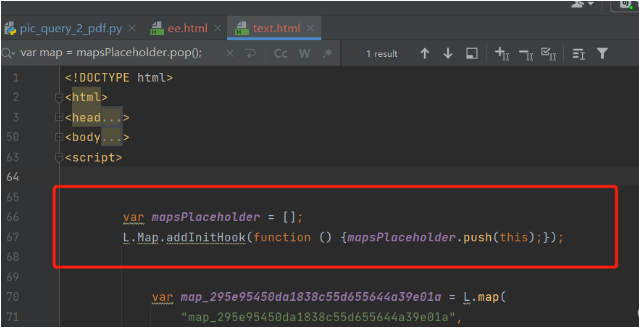
5. Längengrad und Breitengradgitterlinien
In einem Schritt wird die Methode zum Hinzufügen von js und css an verschiedenen Stellen der HTML-Datei implementiert. Wenn es sich um die Operation des Kartenobjekts handelt, kann es zu unbefriedigenden Situationen kommen, z. B. beim Hinzufügen von Längen- und Breitengradlinien. Es ist schwierig, die Funktion der Breiten- und Längengrade zu implementieren. Die Hauptschwierigkeiten sind:
1 Es gibt keine offiziellen entsprechenden Methoden und Plugins (derzeit keine).
2 Bibliothek, die auf Leadlet.js angewiesen ist, um Breiten- und Längengrade zu implementieren (im Internet wurde nur ein verwandter Artikel gefunden). direkte Back-End-Implementierungsmethode.
4. Die Front-End-Implementierungsmethode besteht darin, die Karte direkt zu erstellen. Hier ist das Kartenerstellungsobjekt nicht verfügbar (das Kartenobjekt wird zufällig generiert).
Wie bestimmt man die Gitterlinien für Breiten- und Längengrade?
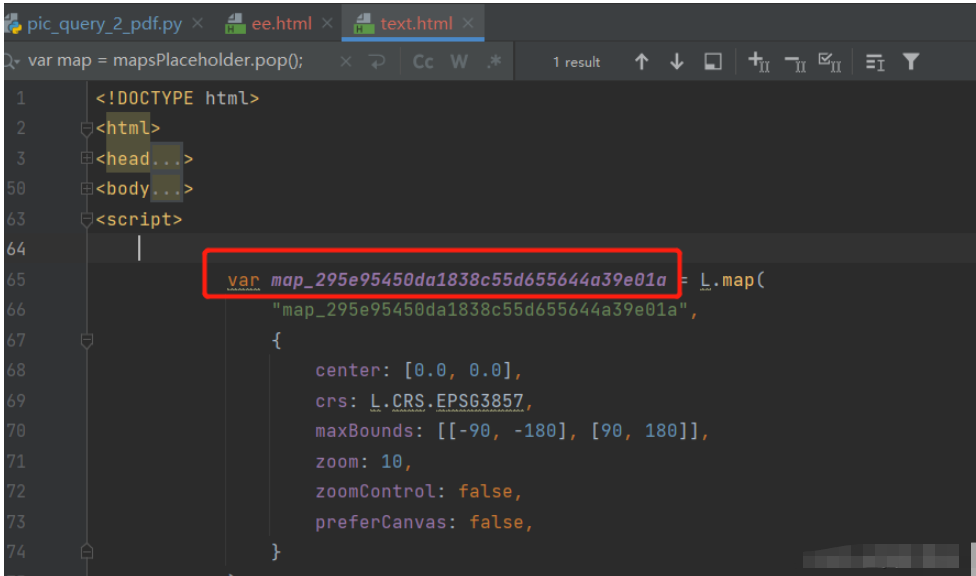
Wir müssen das Objekt beim Erstellen des Kartenobjekts speichern, dann das Kartenobjekt abrufen und die Gitterlinien entsprechend der Zoomstufe implementieren. Eine wichtige Aufgabe besteht darin, sicherzustellen, dass der JavaScript-Code vor und nach der Erstellung des Kartenobjekts ordnungsgemäß in die HTML-Seite eingebettet wird.
Unter anderem wurde das Speichern des Objekts in vier Schritten beim Erstellen des Kartenobjekts implementiert. Durch das Studium des Folium-Quellcodes wurde die Methode zum Hinzufügen von js umgeschrieben, um js nach der Erstellung des Kartenobjekts hinzuzufügen.
 1.html-Seite zum Implementieren des Breiten- und Längengradgitters
<!DOCTYPE html>
<html lang="en">
<head>
<meta charset="UTF-8" />
<meta http-equiv="X-UA-Compatible" content="IE=edge" />
<meta name="viewport" content="width=device-width, initial-scale=1.0" />
<link
rel="stylesheet"
href="https://unpkg.com/leaflet@1.7.1/dist/leaflet.css" rel="external nofollow"
/>
<script src="https://unpkg.com/leaflet@1.7.1/dist/leaflet.js"></script>
<title>leaflet-经纬网格</title>
<style>
html,
body {
width: 100%;
height: 100%;
padding: 0;
margin: 0;
}
.leaflet-div-icon {
background: none;
border: none;
}
</style>
</head>
<body>
<div id="map" ></div>
<script>
let map = L.map("map", { renderer: L.canvas({ padding: 0.5 }) }).setView(
[25.127879288597576, 118.37905883789064],
4
);
// 添加背景图层
L.tileLayer("https://{s}.tile.openstreetmap.org/{z}/{x}/{y}.png", {
attribution:
'© <a href="https://www.openstreetmap.org/copyright" rel="external nofollow" >OpenStreetMap</a> contributors',
}).addTo(map);
// 创建图层
let lonLatGridLineLayer = L.featureGroup().addTo(map);
// 经纬网格生成方法
let addLonLatLine = () => {
let zoom = map.getZoom();
let bounds = map.getBounds();
let north = bounds.getNorth();
let east = bounds.getEast();
// 经纬度间隔
let d = 90 / Math.pow(2, zoom - 1);
// 经线网格
for (let index = -180; index <= 360; index += d) {
// 判断当前视野内
if (bounds.contains([north, index])) {
// 绘制经线
let lonLine = L.polyline(
[
[-90, index],
[90, index],
],
{ weight: 1, color: "blue" }
);
lonLatGridLineLayer.addLayer(lonLine);
// 标注
let text = index.toFixed(1) + "°";
// 动态计算小数位数
if (zoom > 10) {
text = index.toFixed((zoom - 8) / 2) + "°";
}
let divIcon = L.divIcon({
html: `<div >${text}</div>`,
iconAnchor: [0, -5],
});
let textMarker = L.marker([north, index], { icon: divIcon });
lonLatGridLineLayer.addLayer(textMarker);
}
}
if(d>90)d=90;
// 纬线网格
for (let index = -90; index <= 90; index += d) {
if (bounds.contains([index, east])) {
let lonLine = L.polyline(
[
[index, -180],
[index, 360],
],
{ weight: 1, color: "blue" }
);
lonLatGridLineLayer.addLayer(lonLine);
// 标注
let text = index.toFixed(1) + "°";
if (zoom > 10) {
text = index.toFixed((zoom - 8) / 2) + "°";
}
let divIcon = L.divIcon({
html: `<div >${text}</div>`,
iconAnchor: [(text.length + 1) * 6, 0],
});
let textMarker = L.marker([index, east], { icon: divIcon });
lonLatGridLineLayer.addLayer(textMarker);
}
}
};
addLonLatLine();
map.on("zoomend move", () => {
lonLatGridLineLayer.clearLayers();
addLonLatLine();
});
</script>
</body>
</html>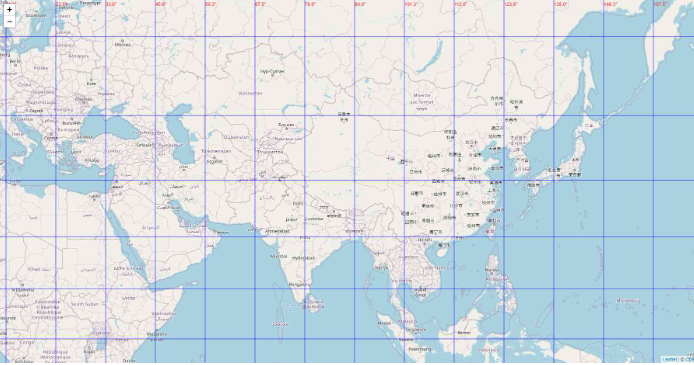 2. Passen Sie die Gitterlinienklasse an
Durch die Klassenvererbungsbeziehung des Quellcodes habe ich die MacroElement-Klasse geerbt.
from branca.element import MacroElement,
from jinja2 import Template
from folium.vector_layers import path_options
class Jwwg(MacroElement):
"""自定义经纬线网格"""
_template = Template("""
{% macro script(this, kwargs) %}
var map = mapsPlaceholder.pop();
// 创建图层
let lonLatGridLineLayer = L.featureGroup().addTo(map);
// 经纬网格生成方法
let addLonLatLine = () => {
let zoom = map.getZoom();
let bounds = map.getBounds();
let north = bounds.getNorth();
let east = bounds.getEast();
// 经纬度间隔
let d = 90 / Math.pow(2, zoom - 1);
// 经线网格
for (let index = -180; index <= 360; index += d) {
// 判断当前视野内
if (bounds.contains([north, index])) {
// 绘制经线
let lonLine = L.polyline(
[
[-90, index],
[90, index],
],
{weight: 1, color: "blue"}
);
lonLatGridLineLayer.addLayer(lonLine);
// 标注
let text = index.toFixed(1) + "°";
// 动态计算小数位数
if (zoom > 10) {
text = index.toFixed((zoom - 8) / 2) + "°";
}
let divIcon = L.divIcon({
html: `<div >${text}</div>`,
iconAnchor: [0, -5],
});
let textMarker = L.marker([north, index], {icon: divIcon});
lonLatGridLineLayer.addLayer(textMarker);
}
}
if (d > 90) d = 90;
// 纬线网格
for (let index = -90; index <= 90; index += d) {
if (bounds.contains([index, east])) {
let lonLine = L.polyline(
[
[index, -180],
[index, 360],
],
{weight: 1, color: "blue"}
);
lonLatGridLineLayer.addLayer(lonLine);
// 标注
let text = index.toFixed(1) + "°";
if (zoom > 10) {
text = index.toFixed((zoom - 8) / 2) + "°";
}
let divIcon = L.divIcon({
html: `<div >${text}</div>`,
iconAnchor: [(text.length + 1) * 6, 0],
});
let textMarker = L.marker([index, east], {icon: divIcon});
lonLatGridLineLayer.addLayer(textMarker);
}
}
};
addLonLatLine();
map.on("zoomend move", () => {
lonLatGridLineLayer.clearLayers();
addLonLatLine();
});
{% endmacro %}
""")
def __init__(self, **kwargs):
super(Jwwg, self).__init__()
self._name = 'Jwwg'
self.options = path_options(line=True, **kwargs)3. Rasterlinien implementieren
import folium
def map2png(map_data,out_file='pdf.png'):
# 1.直接构造,默认底图
mo = folium.Map(location=[0, 0])
# 2.图层1-高德底图+数据
fg = folium.FeatureGroup()
# 2.1 高德地图
fg.add_child(folium.TileLayer(
tiles='http://webrd02.is.autonavi.com/appmaptile?lang=zh_cn&size=1&scale=1&style=8&x={x}&y={y}&z={z}',
attr="© <a href=http://ditu.amap.com/>高德地图</a>",
min_zoom=0,
max_zoom=19,
control=True,
zoom_control=False,
show=True))
# 2.2添加一个点
fg.add_child(folium.Marker(
location=[45.3311, -121.7113],
popup="Timberline Lodge",
icon=folium.Icon(color="green")))
# 2.3添加一个线形
fg.add_child(folium.PolyLine(
locations=[[38.68,115.67],
[38.85,115.48],
[38.65,115.37],
[38.68,115.67]],
color='green', weight=2, opacity=1))
# 2.4添加一个面
fg.add_child(folium.Polygon(
locations=[[38.68,115.67],
[38.85,115.48],
[38.65,115.37],
[38.68,115.67]],
color='green', weight=2,
fill=True,fill_color = 'red'))
# 2.5将我们的图层加入map
mo.add_child(fg)
# 5.根据范围缩放地图
mo.fit_bounds([[38.68,115.67],
[38.85,115.48],
[38.65,115.37],
[38.68,115.67]])
# 网格线
init_script = """
var mapsPlaceholder = [];
L.Map.addInitHook(function () {mapsPlaceholder.push(this);});
"""
mo.get_root().script.add_child(folium.Element(init_script))
Jwwg().add_to(mo)
root = mo.get_root()
html = root.render() # 这个拿到的就是一个html的内容
# mo.save('text.html')Das obige ist der detaillierte Inhalt vonSo nutzen Sie die Funktionen von Python folium. Für weitere Informationen folgen Sie bitte anderen verwandten Artikeln auf der PHP chinesischen Website!

Heiße KI -Werkzeuge

Undresser.AI Undress
KI-gestützte App zum Erstellen realistischer Aktfotos

AI Clothes Remover
Online-KI-Tool zum Entfernen von Kleidung aus Fotos.

Undress AI Tool
Ausziehbilder kostenlos

Clothoff.io
KI-Kleiderentferner

AI Hentai Generator
Erstellen Sie kostenlos Ai Hentai.

Heißer Artikel

Heiße Werkzeuge

Notepad++7.3.1
Einfach zu bedienender und kostenloser Code-Editor

SublimeText3 chinesische Version
Chinesische Version, sehr einfach zu bedienen

Senden Sie Studio 13.0.1
Leistungsstarke integrierte PHP-Entwicklungsumgebung

Dreamweaver CS6
Visuelle Webentwicklungstools

SublimeText3 Mac-Version
Codebearbeitungssoftware auf Gottesniveau (SublimeText3)

Heiße Themen
 1377
1377
 52
52
 Muss MySQL bezahlen?
Apr 08, 2025 pm 05:36 PM
MySQL hat eine kostenlose Community -Version und eine kostenpflichtige Enterprise -Version. Die Community -Version kann kostenlos verwendet und geändert werden, die Unterstützung ist jedoch begrenzt und für Anwendungen mit geringen Stabilitätsanforderungen und starken technischen Funktionen geeignet. Die Enterprise Edition bietet umfassende kommerzielle Unterstützung für Anwendungen, die eine stabile, zuverlässige Hochleistungsdatenbank erfordern und bereit sind, Unterstützung zu bezahlen. Zu den Faktoren, die bei der Auswahl einer Version berücksichtigt werden, gehören Kritikalität, Budgetierung und technische Fähigkeiten von Anwendungen. Es gibt keine perfekte Option, nur die am besten geeignete Option, und Sie müssen die spezifische Situation sorgfältig auswählen.
 So verwenden Sie MySQL nach der Installation
Apr 08, 2025 am 11:48 AM
Der Artikel führt den Betrieb der MySQL -Datenbank vor. Zunächst müssen Sie einen MySQL -Client wie MySQLworkBench oder Befehlszeilen -Client installieren. 1. Verwenden Sie den Befehl mySQL-uroot-P, um eine Verbindung zum Server herzustellen und sich mit dem Stammkonto-Passwort anzumelden. 2. Verwenden Sie die Erstellung von Createdatabase, um eine Datenbank zu erstellen, und verwenden Sie eine Datenbank aus. 3.. Verwenden Sie CreateTable, um eine Tabelle zu erstellen, Felder und Datentypen zu definieren. 4. Verwenden Sie InsertInto, um Daten einzulegen, Daten abzufragen, Daten nach Aktualisierung zu aktualisieren und Daten nach Löschen zu löschen. Nur indem Sie diese Schritte beherrschen, lernen, mit gemeinsamen Problemen umzugehen und die Datenbankleistung zu optimieren, können Sie MySQL effizient verwenden.
 MySQL kann nach dem Herunterladen nicht installiert werden
Apr 08, 2025 am 11:24 AM
Die Hauptgründe für den Fehler bei MySQL -Installationsfehlern sind: 1. Erlaubnisprobleme, Sie müssen als Administrator ausgeführt oder den Sudo -Befehl verwenden. 2. Die Abhängigkeiten fehlen, und Sie müssen relevante Entwicklungspakete installieren. 3. Portkonflikte müssen Sie das Programm schließen, das Port 3306 einnimmt, oder die Konfigurationsdatei ändern. 4. Das Installationspaket ist beschädigt. Sie müssen die Integrität herunterladen und überprüfen. 5. Die Umgebungsvariable ist falsch konfiguriert und die Umgebungsvariablen müssen korrekt entsprechend dem Betriebssystem konfiguriert werden. Lösen Sie diese Probleme und überprüfen Sie jeden Schritt sorgfältig, um MySQL erfolgreich zu installieren.
 Die MySQL -Download -Datei ist beschädigt und kann nicht installiert werden. Reparaturlösung
Apr 08, 2025 am 11:21 AM
Die MySQL -Download -Datei ist beschädigt. Was soll ich tun? Wenn Sie MySQL herunterladen, können Sie die Korruption der Datei begegnen. Es ist heutzutage wirklich nicht einfach! In diesem Artikel wird darüber gesprochen, wie dieses Problem gelöst werden kann, damit jeder Umwege vermeiden kann. Nach dem Lesen können Sie nicht nur das beschädigte MySQL -Installationspaket reparieren, sondern auch ein tieferes Verständnis des Download- und Installationsprozesses haben, um zu vermeiden, dass Sie in Zukunft stecken bleiben. Lassen Sie uns zunächst darüber sprechen, warum das Herunterladen von Dateien beschädigt wird. Dafür gibt es viele Gründe. Netzwerkprobleme sind der Schuldige. Unterbrechung des Download -Prozesses und der Instabilität im Netzwerk kann zu einer Korruption von Dateien führen. Es gibt auch das Problem mit der Download -Quelle selbst. Die Serverdatei selbst ist gebrochen und natürlich auch unterbrochen, wenn Sie sie herunterladen. Darüber hinaus kann das übermäßige "leidenschaftliche" Scannen einer Antiviren -Software auch zu einer Beschädigung von Dateien führen. Diagnoseproblem: Stellen Sie fest, ob die Datei wirklich beschädigt ist
 Braucht MySQL das Internet?
Apr 08, 2025 pm 02:18 PM
MySQL kann ohne Netzwerkverbindungen für die grundlegende Datenspeicherung und -verwaltung ausgeführt werden. Für die Interaktion mit anderen Systemen, Remotezugriff oder Verwendung erweiterte Funktionen wie Replikation und Clustering ist jedoch eine Netzwerkverbindung erforderlich. Darüber hinaus sind Sicherheitsmaßnahmen (wie Firewalls), Leistungsoptimierung (Wählen Sie die richtige Netzwerkverbindung) und die Datensicherung für die Verbindung zum Internet von entscheidender Bedeutung.
 Wie optimieren Sie die MySQL-Leistung für Hochlastanwendungen?
Apr 08, 2025 pm 06:03 PM
Die MySQL-Datenbankleistung Optimierungshandbuch In ressourcenintensiven Anwendungen spielt die MySQL-Datenbank eine entscheidende Rolle und ist für die Verwaltung massiver Transaktionen verantwortlich. Mit der Erweiterung der Anwendung werden jedoch die Datenbankleistung Engpässe häufig zu einer Einschränkung. In diesem Artikel werden eine Reihe effektiver Strategien zur Leistungsoptimierung von MySQL -Leistung untersucht, um sicherzustellen, dass Ihre Anwendung unter hohen Lasten effizient und reaktionsschnell bleibt. Wir werden tatsächliche Fälle kombinieren, um eingehende Schlüsseltechnologien wie Indexierung, Abfrageoptimierung, Datenbankdesign und Caching zu erklären. 1. Das Design der Datenbankarchitektur und die optimierte Datenbankarchitektur sind der Eckpfeiler der MySQL -Leistungsoptimierung. Hier sind einige Kernprinzipien: Die Auswahl des richtigen Datentyps und die Auswahl des kleinsten Datentyps, der den Anforderungen entspricht, kann nicht nur Speicherplatz speichern, sondern auch die Datenverarbeitungsgeschwindigkeit verbessern.
 Lösungen für den Dienst, der nach der MySQL -Installation nicht gestartet werden kann
Apr 08, 2025 am 11:18 AM
MySQL hat sich geweigert, anzufangen? Nicht in Panik, lass es uns ausprobieren! Viele Freunde stellten fest, dass der Service nach der Installation von MySQL nicht begonnen werden konnte, und sie waren so ängstlich! Mach dir keine Sorgen, dieser Artikel wird dich dazu bringen, ruhig damit umzugehen und den Mastermind dahinter herauszufinden! Nachdem Sie es gelesen haben, können Sie dieses Problem nicht nur lösen, sondern auch Ihr Verständnis von MySQL -Diensten und Ihren Ideen zur Fehlerbehebungsproblemen verbessern und zu einem leistungsstärkeren Datenbankadministrator werden! Der MySQL -Dienst startete nicht und es gibt viele Gründe, von einfachen Konfigurationsfehlern bis hin zu komplexen Systemproblemen. Beginnen wir mit den häufigsten Aspekten. Grundkenntnisse: Eine kurze Beschreibung des Service -Startup -Prozesses MySQL Service Startup. Einfach ausgedrückt, lädt das Betriebssystem MySQL-bezogene Dateien und startet dann den MySQL-Daemon. Dies beinhaltet die Konfiguration
 So optimieren Sie die Datenbankleistung nach der MySQL -Installation
Apr 08, 2025 am 11:36 AM
Die MySQL -Leistungsoptimierung muss von drei Aspekten beginnen: Installationskonfiguration, Indexierung und Abfrageoptimierung, Überwachung und Abstimmung. 1. Nach der Installation müssen Sie die my.cnf -Datei entsprechend der Serverkonfiguration anpassen, z. 2. Erstellen Sie einen geeigneten Index, um übermäßige Indizes zu vermeiden und Abfrageanweisungen zu optimieren, z. B. den Befehl Erklärung zur Analyse des Ausführungsplans; 3. Verwenden Sie das eigene Überwachungstool von MySQL (ShowProcessList, Showstatus), um die Datenbankgesundheit zu überwachen und die Datenbank regelmäßig zu sichern und zu organisieren. Nur durch kontinuierliche Optimierung dieser Schritte kann die Leistung der MySQL -Datenbank verbessert werden.


